After purchasing a computer or installing a new hard drive, as a rule, you will only have 1 partition on it. We’ll talk about this today: how to divide a hard drive into 2 or more partitions. This example will be given on Windows 7 OS through the operating system, without installing additional software.
How many sections should there be:
For Windows 7 to work correctly, 1 partition “drive C” is enough. The system is installed on it and it doesn’t need anything else because... it has all the necessary folders. But, from the point of view of convenience and personal safety, it is recommended to have at least 2 partitions: drive “C” and drive “D”. Why 2? It's simple! It is advisable to leave drive C only for windows and programs, and use drive D for games, music, movies, photos, etc. Thus, in the event of a failure and reinstallation of Windows, all important information will not be affected.
How to split drive C into multiple drives
In order to partition the disk, open: Start Menu, Control Panel. Next we will have to work with the “System and Security” tab.

That's it, we've come to the right place and you should see a window like this:

To see which partitions are already installed, open Disk Management. The operating system is usually located on the C drive, so you need to be careful when working with it.
To split drive “C” into partitions, right-click on it and select “Shrink Volume”.

In the new window that opens, enter the desired size of the new partition:

Now click “create”. In the window that opens, enter what volume you want.
In the new window, on the unallocated area, right-click and select “create simple volume” as below:

Ready. You can start working, but it is advisable to restart your computer.
Program for partitioning HDD into partitions
Personally, I prefer to do without third-party programs; if it is possible to do it using Windows, I do so. I have already written above how to partition a HDD without a program, now let’s look at an alternative method using third-party software.
For example, I took the simplest, free and very convenient program “disk manager free”

I uploaded it to Yandex disk, you can download for free— https://yadi.sk/d/c0A22sBs3ReiFh
Installation and use are as simple as doors. To partition a disk, you need to do everything the same as in the example above without programs. As you can see, it is of no use, in my opinion, and it is better to do everything as in the example above, without downloading anything.
You bought a new computer and discovered that the hard drive is not divided into volumes. Next, we will look at how to create logical drives yourself, how to divide the hard drive into partitions when installing Windows, which are then displayed in the Computer Explorer window.
If the list of disks only contains the item Unallocated space, this means there is not a single partition on the hard drive. To partition your hard drive, click the corresponding button in the field that appears Size enter the volume capacity in megabytes and select Apply.
How to partition a hard drive. The process of creating a new partition
In order to partition a hard drive, a system partition is first created, therefore, a dialog box will open on the screen in which the system will ask you to create a partition. And so, we need to create two sections in unallocated space:
1. Select the disk and press Disk setup.

3. Here you are not asked to create a partition on this disk. The figure below shows that by default the entire volume of our hard drive is displayed. And we need to make two disks: Local disk "C" and Local disk "D"

4. In order to create Disk C, enter in the Size window: as much as you need. In my case it will be 50 GB or 51200 MB - click Apply. After Windows will offer to create an additional partition in which it will store system files, click OK.
5. The following figure shows that windows has created a hidden partition to store system files. This section will not be displayed on your computer in any way. And section 2 (Main) is the section that we just created. Next you need to create another partition for Local Disk "D" .

6. Highlight Unallocated disk space 0 and follow the link Create.

7. Windows will offer the remaining free space to create a partition, which is what we need. Click Apply to create Local Disk "D"

8. Now we have divided the hard drive into two parts, now we can continue
Creating, deleting and formatting computer disk partitions is only part of the possibilities hard drive management applications. Today, they make it possible to securely perform operations that previously required data deletion or other mind-boggling combinations.
Many of the tasks performed through the Partition Manager can, in theory, be accomplished using Windows' built-in Disk Management tool. However, it is not as intuitive as the programs discussed here.
A good disk management application consists of several modules. They are used to create, delete and format partitions. Apart from these functions, they also have functions for copying and moving partitions, creating images and backups.
Additional modules support system migration, merging and splitting partitions. Supports various partition schemes, dynamic disks, RAID configurations, various file systems and boot records.
Attention! Whenever you work with hard drive partitions, you need to plan everything carefully, back up your data, and make sure you select the correct hard drive or partition before pressing Enter.
Attention! All operations carried out on partitions are fraught with risks. The editors recommend extreme caution and are not responsible for possible loss of data or other damage incurred by readers.
EaseUS Partition Master Disk Management
One of the most popular programs for managing hard drive partitions in Windows. Ensures the allocation of new partitions without data loss.
Benefits of EaseUS Partition Master
- Easy conversion of partition type, primary to logical and vice versa
- Recovers deleted or non-existent partitions
- Supported hard drive capacity up to 8 TB
Flaws
- Inability to transfer data from HDD to SSD in the free version
License: freeware
Price: free
AOMEI Partition Assistant Disk Management
Also popular. Creates, divides, connects, copies hard drive partitions, changing their size, while saving files. System transfer is possible.
Benefits of AOMEI Partition Assistant
- Convenient wizards for every operation
- Supports all the most popular file systems
- Displays accurate information about supported media
- Allows you to create a bootable CD with the application
License: freeware
Price: free
Disk Management in GParted
A tool for managing computer hard drive partitions. Distributed as an ISO file. Install it on a flash drive or burn it to a CD and start your computer from it.

Benefits of GParted
- Does not require installation and does not take up disk space
- Attractive free offer for companies
- Wide range of partition management capabilities for almost any file system
Flaws
- Mastery takes time
- Only available via Live CD
License: freeware
Price: free
MiniTool Partition Wizard
Performs all operations with hard disk partitions and also hides it. Copying the contents of the disk and changing the file system.
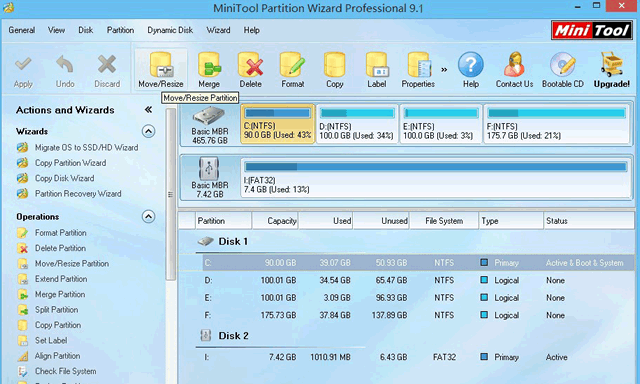
Advantages of MiniTool Partition Wizard
- Lots of tools, including disk cleaning and checking
- Convenient visual wizard for each operation
- Allows you to convert NTFS to FAT32 without formatting, change the disk type from MBR to GPT
License: freeware
Price: free
Active@ Partition Manager
Performs operations on disk partitions. Formats the flash drive in FAT32 and NTFS. Fixes MBR disks. Converts MBR to GPT and vice versa.
Benefits of Active@ Partition Manager
- Disk Imaging Tool
- Convenient wizard for creating and changing partitions
- Built-in boot sector editor, allows you to manually make changes
- Shows S.M.A.R.T data. for hard drives
Flaws
- English only
License: freeware
Price: free
Partitioning a hard drive using Windows 7
 Partitioning the C:\ drive in Win7
When purchasing a new computer or laptop with the Windows 7 operating system preinstalled, many users are faced with the problem of dividing the hard drive into several partitions.
Partitioning the hard drive into several partitions is important both from the point of view of ease of use of the system interface and the ability to save data after reinstalling or restoring the operating system.

Main partition C:\
As you know, when you reinstall the operating system, all data located on the C:\ drive is lost, while the data on the remaining partitions of the hard drive remains intact. All important files can be easily used even after the system is restored.
Partitioning a hard drive is also convenient because programs and applications are installed on the system partition C:\. If the C:\ drive is the only one, then when you add all kinds of files and folders to it, confusion arises between system files and regular folders added by the user. In this case, it is easy to get confused in the files and inadvertently delete some important system file. Therefore, partitioning the hard drive is necessary.
In order to split a hard drive in Windows 7 into several partitions (logical drives), many use specialized programs, like Partition Magic and the like. Using such programs, you can split a disk into several partitions. But Windows 7 provides the ability to split it using system utilities. In this case, the need for third-party programs completely disappears.
To partition a hard drive in Windows 7, you need to go to the computer control panel.
You can do this in two ways:

It is clear that the first method is simpler.
In the “Disk Management” tab you can view all the information on our HDD and its partitions. In addition to the main C:\ partition, there is a possibility of finding a hidden recovery partition.

Main partition C:\ and hidden recovery partition
The recovery partition is used to store information to restore the operating system in the event of a serious failure when the system does not boot. It is not indicated by a letter. It is worth noting that the amount of memory occupied by recovery files can reach several gigabytes (usually about 15GB). Also, in addition to it, there is a section on the disk System Reserved , volume 100 megabytes. These sections are official, since they are not used by the user in any way and serve for the normal functioning of the operating system.
So, let's turn our attention to the C:\ drive, which is to be divided into sections - additional logical drives.
In order to split it, right-click on the conventional image of the disk. In the drop-down menu, select “ Shrink Volume…”.

Item "Compress volume..."

After the request is completed, a window will appear in which the compression parameters will be indicated. If the disk has not been partitioned before, then by default the utility will offer to split it approximately in half. If the HDD initially had a memory capacity of, for example, 1.8 Terabytes, then after division two sections are formed with a capacity of approximately 900 Gigabytes each.
The window that appears indicates the size of the C:\ volume before compression (in megabytes) and the size of the compressed space. The size of the compressed space is the amount of memory of the new partition that will be created. The total size after compression is the size of the C:\ volume after compression. It will be slightly larger than the newly created one. As already mentioned, the system will offer to divide the available memory approximately in half.

If you have the desire and confidence in your abilities, you can indicate your numbers and divide the disk according to your needs. In any case, it will be possible to carry out the reverse procedure - volume expansion and return everything to its previous state.
After familiarizing yourself with the separation parameters, click the “Compress” button. After a short process, another partition with the inscription “Unallocated” will appear on the HDD.

The item "Create a simple volume..."

The “Create a Simple Volume Wizard” will launch. Click “Next”. The “Specify volume size” window will appear – click “Next” again. In the next window, select the letter of the new volume in the “ Assign a drive letter" You can choose any letter you like.

Assigning a letter for the new partition
Confirm your choice and specify the file system in a new window. In point " Format this volume as follows:” specify the file system NTFS , leave the cluster size at default. Put a tick in the checkbox “ Quick formatting” and click “Next”. A window will appear with all the specified parameters. If everything is correct, then click the “Done” button.

If you are not satisfied with the default parameters set by the system, then, of course, you can set your own. But in most cases this is not required.
After a few seconds, the new HDD partition will be formatted, a letter will be assigned to it, and the inscription “Good (Logical drive)” will appear in the symbol field. Now the C:\ drive will be divided into two.

New HDD partition - New volume (E:)
If desired, you can change the name of the new section, and instead of “ New volume”, give another. You can do this in several ways:
1 .In the computer control panel in the disk management window, select the one whose name we want to change. Right-click and select " Properties". In the name field, enter a new name and confirm by clicking OK.
If you have a solid-state drive (SSD) installed in your system instead of an HDD, then the separation technique is similar.
Today we’ll look at how to partition a disk in Windows 10 without resorting to third-party software, because virtually all users of the new operating system have this need.
No matter what supporters of specialized programs say, if the operating system has the appropriate functionality, there is no point in using them. Therefore, we will take a closer look at how to partition a hard drive using the Windows 10 integrated storage tool.
What is important, we will work from under the operating system itself, without even resorting to using the installation drive with the Tens distribution kit.
What is it for?
First of all, dividing the drive into volumes is necessary if you purchase a new device, it does not matter whether it is a laptop, a computer or a larger hard drive. This is done for several reasons, the main ones being ease of use and safety.
Imagine what will happen to a 500-1000 GB hard drive if you format it during the reinstallation of the operating system in order to get rid of all the files of the old OS. Installing a new system on top of an old one makes little more sense than simply updating it from Windows itself: all the garbage will remain, which will soon affect the performance of the computer.
And it’s more convenient to store different types of data on different volumes (games on one, video collection on another). The operating system with software must be located on the first logical disk due to the nature of the HDD.
Running a utility to change disk layout
Working with partitions begins by launching the Disk Management program, which has remained virtually unchanged since its introduction into the Windows 7 operating system. The tool is launched in several ways.
Control Panel
1. Open the Control Panel via Start, Win→X (by holding down the appropriate key combination) or a shortcut in a convenient place.
2. Change the visualization style of window icons to “Small icons”.
3. Call the “Administration” applet.

4. Launch the last utility in the list “Computer Management”.

5. Expand the “Storage Devices” section in the left vertical menu.
6. Click on the “Disk Management” item.

Command interpreter
The second, and more effective, method to call the tool for partitioning the hard drive into volumes is to use the capabilities of the Run window.
1. Call up a dialog to quickly execute system commands and open resources using the Win+R key combination.
2. Enter the command “diskmgmt.msc”.
3. Launch it using the “Enter” key.

As a result, the same window will open as in the previous version, but without unnecessary interface elements.
How to use the built-in disk manager
The application window displays a list of all detected digital information storage devices, including those operating using flash memory technology (solid-state drives and flash drives).
The first in the list are the partitions reserved by the operating system, where the files necessary to reset the operating system to its original state and its boot loader are stored. These volumes of 100-350 (sometimes more) megabytes in size should not be touched in any way.

1. In the main frame or panel below, select the hard drive or its volume that needs to be divided into the nth number of partitions.
The main thing is that there is a sufficient amount of free space on it, which is at least slightly larger than the size of the partition/partitions being created. And if the system volume is divided, at least 10 GB of free space should be left on it. You will need it to store temporary files and install missing software.
2. Call the context menu of the selected object and select “Compress volume...”.
This operation will allow you to “cut off” the specified number of gigabytes from the partition and form a new partition or several in this place, but their total size will not exceed the amount of data allocated for this.
3. In the parametric window that opens, set the volume of compressible space.
This is exactly how many megabytes will be freed (turned into unallocated area) in order to subsequently mark it up in the desired way.
After specifying all the information, click “Compress” and wait. Depending on the size (and the degree of damage to the hard drive - this factor primarily affects the speed), you will have to wait from ten seconds to a couple of minutes until the application completes the task of reassigning free clusters of the unallocated area.

Upon completion of the operations, an unallocated space of the specified volume will appear on the diagram; this area is distinguished by the presence of a black stripe at the top.
4. Through the context menu of this space, call the command “Create a simple volume...”.

By default, its size will be equal to the unused space, which is important for forming one volume in this area. If you need to create several partitions, enter the size of the first one in megabytes (taking into account that 1 gigabyte equals 1024 megabytes, not 1000).
5. In the Create Simple Volumes Wizard, select the file system. Set the cluster size and label.

It is better to choose NTFS as the file system. Even with many shortcomings, it is the best solution from Microsoft. Cluster size: if small files will be stored on the disk, it makes sense to set it to 2096 KB or less in order to optimally use the space, and for storing video collections and images it is better to use a larger cluster size. Nothing depends on the volume label, and it can be easily changed through Explorer at any time.

As a result, the file system of the new partition will be formed and a new volume will appear on the hard drive. When creating several partitions with an unallocated area, you will have to do the same as in steps 4-6.
Volume breakdown during Windows 10 installation
If your computer does not yet have an operating system, you can also crash your hard drive while installing it. The difference between this option is the impossibility of dividing the drive into logical volumes without formatting, and this method is not suitable for hard drives with important information.
1. Boot from the installation distribution using the Boot Menu.
2. We get to the stage of selecting a disk for installing “ten”, choosing the “Custom” option.

3. Remove unnecessary volumes to make them an unallocated area.
4. As before, select this space and create sections of the specified sizes in it.


