Apple phones are famous for their cameras.
It is not surprising that their owners constantly take thousands of photographs. It is physically impossible to store them all on the device, so you have to copy them to your computer’s hard drive.
Due to the nature of Apple products, this procedure is not so obvious. This material will provide instructions on how to transfer photos from iPhone to computer. The features of copying photos on OS X, Windows and using the iPhoto program will also be covered.
How to Transfer Photos from iPhone to Mac
The operating systems iOS and OS X are highly integrated. However, the connected device does not appear as a physical storage medium. For those who do not want to use the iPhoto service, the opportunity will come to the rescue "Image Capture".
This utility is built into OS X and allows you to move photos and other images from your phone, both to a specific directory and to the required application. Find using search SpotLight. To do this, just start typing the name in the search bar.
The program will show all the photos and actions available on the device. It is possible to configure automatic actions when the device is connected (copying to the hard drive and deleting originals, for example). Otherwise, this is actually a regular folder with which you can do all the same actions.
How to transfer photos from iPhone to computer Windows 8, 7 and XP
Installs freely on a Windows computer iTunes. However, you can copy photos without synchronization, because this OS is able to recognize the phone as a physical medium.
We connect the device to the computer using our USB cable. The system will offer a quick method automatically.
In the startup menu, just select "Import images and videos". The illustration shows actions from the iPad; transferring pictures from the iPhone is no different.
In my opinion, it’s easier to open the device after detection as soon as you see a Windows Explorer window that will offer you a number of actions that you can do. For this we choose "Open device to view files".
However, the message may not appear or the user may automatically close it.
In this case, you can use Windows Explorer. First you need to open "Computer» and double-click on the icon of the connected device.
In addition, when the computer “sees” your iPhone, then in the “My Computer” section, in the left column under the list of your displayed hard drives, your device will be displayed by the name that you assigned to the iPhone when setting up in iTunes. It will appear as a media device, with its inherent camera icon. If for some reason you did not open the device in the step above, you can do it now by clicking on it.
This will open access to the built-in data storage (Internal storage).
It will contain the root directory of the DCIM device and then to a folder specific to each name (for me it is “860OKMZO”, in which the images will be stored.
You can treat these files just like any other. Copy to disk, send by email, or delete.
How to Transfer Photos from iPhone to Computer Using iTunes
iTunes itself does not allow you to work with photos. Usually, for such purposes, they use the programs built into OS X - iPhoto. The program opens automatically after connecting to the PC. You can also open it using the dock panel. In the main window, just select the photos you need to import and click "Import selected."
You can import one or all photos at once. After the transfer, the program will offer to save or delete photos from the device.
Deleting original images will free up space on your device and speed up backup creation. All photos in iPhoto are sorted by date added, albums, and devices.
How to transfer photos from iPhone to computer via Wi-Fi
Along with a wired connection, photo transfer can also be done wirelessly. The process of transferring photos using Wi-Fi is not fundamentally different from other methods. That is, the same thing happens. Just before starting the transfer you will need to synchronize via Wi-Fi. This is done as follows.
First you need to connect your device using a cable and open iTunes. On the left side of the window, in the block "Devices" You must select an iPhone or iPad to sync. In the tab "Review" in the block "Options» you will need to put a checkbox opposite "Sync. devices via Wi-Fi."
Now the gadget will automatically synchronize when it is on the same network with a computer on which iTunes is installed. From your phone, synchronization can be started through the device settings. To do this in the menu "Basic" you will need to select an item "Sync with iTunes over Wi-Fi".
Data synchronization will occur automatically if certain conditions are met:
- The computer and iPhone are connected to the same Internet network
- iPhone is turned on and the battery is charged or connected to a charger
- iTunes launched on PC
The presence of synchronization is indicated by an icon in the phone tray.
The device now appears as connected. Consequently, all actions on it can be performed in the same way as when connecting using a regular cable - twisted pair.
Note! If you have any problems with the connection, then you should first restart the computer and then the device itself. If no progress is detected, then the reason may even lie in the router itself. To do this you will need to reboot it.
How to transfer photos from iPhone to computer via e-mail
If your iPhone has email configured, you can send photos via email and then transfer them to your computer.
Open the application "Photo", which is located on the home screen of your iPhone.
Taking photographs is one of the main tasks of a smartphone, along with making calls and sending messages. Therefore, novice users are very often interested in issues related to the camera and photographs. For example, users often ask how to copy photos from iPhone to computer. We will devote this article to this very issue. Here you can learn how to copy photos from iPhone to Windows and Mac OS X computer.
How to copy photos from iPhone to Windows computer
If you are using a computer with a Windows operating system (for example, Windows 7, Windows 8 or Windows 10), then you can say that you are in luck. Because the process of copying photos in this case will be quite simple. And now we will analyze this whole process in as much detail as possible.
Firstly, to copy photos from iPhone to a computer running Windows operating system, you need to connect your iPhone to the computer using a cable. To do this, take the cable you use for charging and plug it into your computer and your iPhone. After this, the Windows operating system will recognize your iPhone as a storage device and display it in the “My Computer” window (where all your drives are located). It looks something like the screenshot below.
Now you need to open the iPhone that appeared in the “My Computer” window. After this, you will see a drive called “Internal Storage”. We also open this disk.


And then open the “100APPLE” folder.

That's it, you've reached the photo folder on your iPhone. Now you can copy photos from iPhone to computer by simply dragging and dropping with the mouse.
How to copy photos from iPhone to MAC
If you use a computer running Mac OS X (for example, you have a MacBook or iMac), then the process of copying photos from your iPhone to your computer will be a little more complicated. In this case, you will have to use a program called Image Capture.
As a rule, the Image Capture program launches itself after connecting an iPhone or other device with which it can work. But, if automatic launch does not work, then you can launch this program manually. The easiest way to do this is to use Spotlight search. To do this, click on the search icon in the upper right corner of the screen and enter “Image capture” in the search box that appears. After which the system will offer to launch this application.

So, in order to copy photos from an iPhone to a computer running Mac OS X, connect your iPhone to the computer using a cable. This should open the Image Capture program. If this does not happen, then open it manually, as described above.

After opening Image Capture, look at the left side menu of this program. Here you can see a list of all devices that are currently connected to your computer. Select with your mouse the device from which you want to copy photos.

The next step is to select the location where you want to copy photos from your iPhone. To do this, open the drop-down list at the bottom of the “Image Capture” window and select one of the proposed options there. For example, you can copy photos to your Pictures folder or simply to your computer desktop.
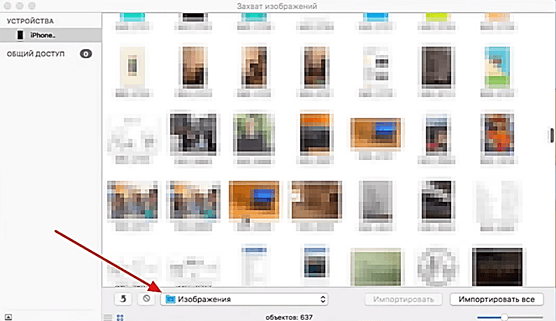
At this point, the setup is complete and you can proceed directly to copying photos. If you want to copy all the photos from your iPhone to your computer at once, then just click on the “Import all” button. If you want to copy only part of the photos, then select the desired photos with the mouse and click on the “Import” button.

By the way, if the photos are not in a row, you can select them with the mouse by holding down the CTRL key on the keyboard. This will copy them all in one go.
In addition, the Image Capture program allows you to use drag and drop. So you can simply select the photos you need and drag them using Drag&Drop into the desired folder.
If you are the proud owner of a fashionable iPhone phone, then most likely you want to know how to transfer photos from your iPhone to your computer or laptop. For users who take a lot of photographs, it is extremely important to transfer photos from this phone to your PC or laptop from time to time.
Video tutorial: Transfer photos from iPhone to computer
First thing connect iPhone to computer using a standard USB cable. Insert one end into your smartphone and the other into a free USB port on your computer.

After a few seconds, Windows will automatically install the driver needed for operation and detect our iPhone.
1 way to transfer photos from iPhone to computer
Open the Computer section and find the phone icon. Usually the icon has the iPhone name, which was set in the settings.

To transfer all photos from your iPhone to your computer, you need to right-click on the smartphone icon and select Importing images and videos.


There it is important to configure the folder into which the photos will be uploaded. There is no need to touch anything else there. Click OK and Next.


In the next window, you can uncheck those photos that do not need to be transferred to your computer. Now click Import.

The photos will be saved in the folder we selected. When the operation is completed, it will automatically open.
2nd way to transfer photos from iPhone to computer
You can upload photos without importing by selecting only a few of them. For this No need right-click on the phone icon, or simply double-click to open the folders and find the photos you need.
You need to select the photo, right-click and select Copy.

Now open the folder into which we want to send the photo and call up the context menu and select Insert.

After you have double-checked and made sure that the photos were successfully saved to your computer, you can delete them from your phone. This is, of course, optional!
These are standard ways to transfer photos from an iPhone to a computer or laptop. But besides this, you can also use third-party programs.
3 way. Transfer photos from iPhone to computer using iTools
There is a wonderful Chinese-made program called iTools. It can perform various functions, including using it to transfer photos from iPhone to computer. I downloaded iTools on this forum. Among the unofficial assemblies there is a Russian-language Portable version that does not require installation.


Launch the program and connect the iPhone to the computer.

In iTools, go to the Photo section and the Photo tab too. Here we can view photos by double-clicking them, and also save them to our computer. Check the boxes for the photos you need and click the Export button.

Now specify a location on your computer where you can save the photos.

Pay attention to the adjacent Albums tab. By switching to it, we can download entire albums with photos from our iPhone.

The functionality of the iTools program does not end there. Using it, you can not only transfer photos from your iPhone to your computer, but also here you can install and uninstall programs, upload music and videos, make a backup copy of your device, download firmware, and the like!
If you use other schemes to transfer photos to your computer, then tell us about them in the comments.
That's all, I wish you good luck!
Apple products are deservedly considered one of the best and are popular among people around the world. Modern smartphones are capable of not only making calls, but also recording videos and taking pictures, so you should know how to transfer photos from your iPhone to your computer. Due to the nature of this company's devices, this is not easy to do.
How to transfer photos from iPhone to computer via USB cable
The vast majority of people use the Windows operating system on their PC. The iPhone has maximum compatibility only with Apple products, but it can also be synchronized with other operating systems relatively easily. Instructions on how to transfer photos from iPhone to computer:
- Find the USB cable in the phone box.
- Connect the device to the PC using a cable. In some cases, it is possible to immediately start viewing the smartphone through Windows Explorer. From the list, select the “Open device” option.
- In modern versions of Windows, by default there are drivers for the iPhone and the device should appear in the list of hard drives inside if you open “My Computer”. It will be identified as a media device and have a camera icon. You just need to click on the icon with the mouse and you can copy the contents.
- The internal storage will open in front of you. The images are saved in a folder called "DCIM". It contains another folder with a unique name from a set of letters and numbers. This is where the photographs are located.
- Next, simply select the pictures you want to transfer and drag them into a pre-created folder.
How to move photos from iPhone to Mac
With “native” devices, the situation is much simpler and there are more ways to download the necessary files. Below are the main ways to transfer photos from an iPhone to a computer running Mac OS. Each of them allows you to download pictures from your smartphone to your laptop. Some of them don't even require you to connect the device directly to your PC. You can upload files using:
- USB cable;
- special programs;
- Email.
Using a USB cable
This method of transferring photos from an iPhone to a computer is practically no different from the similar option of importing pictures for Windows OS. For copying, PCs and Macs come with the iPhoto app pre-installed. You just need to connect the device via a cord to the device. The algorithm of actions is as follows:
- First you need to connect your phone to your PC via cable.
- When the connection is established, the laptop should “see” the smartphone and automatically open the application. If this does not happen, then you can find it yourself in the “Programs” section.
- A window will immediately open in front of you with a list of all the photos on your iPhone. All you have to do is select the photos you need and dump them into any directory on your hard drive.

Using Image capture
Sometimes people use another program instead of the standard iPhoto - Image capture. This is another option for transferring photos from iPhone to computer. Instructions for using this application:
- You still need to connect your smartphone via a USB cord.
- Find an application called "Image Capture" in your Applications folder.
- The program will immediately ask you to specify the directory into which it will copy the photo. You can specify any location on the hard drive.
- Click on the "Download All" button. This will help you transfer all the pictures from your device to your computer at once. This will take some time.
- If desired, the user can set it in the settings so that after the transfer all images from the phone are deleted.
How to transfer photos to your computer via iTunes
iTunes is a multimedia station for Apple devices. This is another way to transfer photos from iPhone to computer. The program opens up the opportunity to upload and upload not only photos, but also videos. You can download the software from the company’s official website; it is distributed free of charge by iTunes. Before using the program, you need to configure it:
- Connect your smartphone via USB cable to your PC.
- Next, you need to open the program in “Media Library” mode.
- There should be a "Device" button in the right corner. Select your phone.
- You may need to synchronize your device.
- After these steps, you will have full access to the contents of your iPhone. You can copy, delete, transfer any files, change the name of the gadget.
- In the future, these steps will not have to be repeated.

How to send photos from iPhone to computer using email
This method of how to transfer images from iPhone does not require a direct connection to a computer, but Internet access is required. The principle is based on the fact that you send pictures by mail, and then you can download them from there to any PC. This procedure is performed as follows:
- Launch the Photos app on your phone. Located on the desktop of the smartphone.
- Mark the photos you want to transfer. Click on “Albums”, then “Shared and Photos” (located at the bottom of the window) to display your photos.
- In the right corner, click on the “Select” button. You can select several pictures at once for sending. It is possible to send up to 5 photos to one email.
- Click "Share" to open the sharing settings. You should click on the “Mail” inscription.
- A new window will appear with the pictures you previously selected. This will not happen if you mark more than 5 files.
- Write the recipient's address and click "Send".
- Go to the letter on your PC and copy the sent files from it.
This method is not very convenient due to the limitation of the number of images that can be transferred. If you took more than 15-20 shots per evening, you will have to send at least 3-4 letters. However, this is the fastest option to transfer fresh images to friends without being at a PC. You can also use a Wi-Fi connection, but this requires you to be near your laptop.
The user does not have to think when he wants to transfer certain files from the computer to the smartphone and back - he simply takes a cable, connects the device to the PC, which sees it as a flash drive and resets everything necessary. But the developers have created a real headache for users of the iOS platform; the fact is that file exchange between a computer and Apple devices can only be carried out through a special iTunes program.
Many users, just hearing the word “iTunes,” wrinkle their nose in displeasure, however, as they say, the devil is not as scary as he is painted. In this article, we’ll tell you how to transfer photos from your computer to your iPhone via iTunes, and you can see that this program looks scary only at first glance. However, if you don’t want to work with iTunes on principle, in this material you will find several workarounds that will allow you to transfer photos to your Apple device without going through this program.
How to transfer photos from your computer to iPhone via iTunes?
Install iTunes and log into the program
In order to start working with iTunes, the program, of course, needs to be downloaded and installed on your PC. In addition, to enter the program, you need to register a unique Apple ID.
We have already written about how to download and install iTunes, as well as how to create an Apple ID in the article “” and in it you can find detailed instructions on how to complete the above tasks. Don't be scared! There is nothing complicated about them; all procedures will take no more than 15 minutes.
Preparing a folder for photos
So, you have downloaded, installed and signed in to iTunes, now you need to create a special folder on your computer - in this folder you need to place all the photos that you want to transfer to the iPhone.
Important! When you want to upload new photos to your iPhone, you will need to transfer them to the same folder. Otherwise, if you decide to drop a photo from another folder and select it, the photo from the previous folder, and the folder itself from the iPhone will simply disappear.
Posting photos
Once the folder is created, perform the following steps:
1. Connect the iPhone via cable to the computer.
2. Wait 10-15 seconds for iTunes to detect your smartphone (if you have a weak PC, the procedure may take longer).
3. Click on the phone icon and select the “Photo” tab in the sidebar that appears.
4. Put a tick in the “Synchronize” box, click the “Images” button, and in the drop-down menu select the “Select folder” item.

You can only transfer photos from your computer to your iPhone via iTines one by one!
5. In the “Select the location of the folder with photos” window, specify the path to the folder prepared for transfer and click the “Select folder” button.

Please note that after selecting a folder, its name and the number of photos in it will automatically be displayed in the “Copy photos from:” column, and the “Selected folders” window will become inactive.
6. Now click the “Apply” button, synchronization will start, wait until it completes.

Look - we made a mistake, which we explained earlier - we selected a new folder for synchronization and iTunes warns us that photos from the old folder will be deleted. However, this is not important to us, so we will click “Delete and Sync.” If you don’t want to lose your old photos, click “Cancel” and put the new photos in the folder with which you previously synchronized.

7. Well, all that’s left is to check if the photos have been transferred. To do this, take your iPhone and open the “Photos” application, a new folder should appear in it.

How to transfer photos from your computer to your iPhone without going through iTunes?
Method 1 – Cloud storage
There are a lot of cloud storage options today, but, of course, the most logical thing would be to use Apple’s “native” cloud – iCloud. How to transfer photos to iPhone using it? Follow these instructions:
1. Log into iCloud via your computer using your unique Apple ID - www.icloud.com.
2. Open the iCloud.Drive section, click on the folder icon with a plus sign, name the folder that appears as you wish, for example, “photos”.


3. Double-click on the created folder and drag any photos from your computer into it.

4. Wait until the photos are uploaded to the folder, take your iPhone and go to the iCloudDrive application - it is installed on your iPhone by default.
5. You should see the folder created, and once you open it, you can download and save photos to your iPhone, they will appear in the “Camera Roll” folder.

Unfortunately, iCloud has one significant drawback: it has very little free space, so we will also provide instructions on how to transfer photos to an iPhone from a PC via an alternative “cloud” - Dropbox:
1. Go to the official Dropbox website - www.dropbox.com, register on it - after registration, the program will automatically download to your PC, all you have to do is double-click on the downloaded file with the left mouse button and the automatic installation will start.


2. Now go to the mailbox specified during registration, follow the address confirmation link, it will automatically take you to your Dropbox account.

3. Click on the folder with a plus sign, a new folder will be created, name it, for example, again “photo”.

4. Click on the folder once and drag the necessary photos into it - by the way, they will automatically appear in the Dropbox folder that appeared on your computer after installing the program - do not delete them from there!


5. Install Dropbox on your iPhone via the AppStore, go to the program in the “Files” section, here you will find the dropped photos.
6. Click on the photo, click on the button with the up arrow, then “Save”, the photo will be in the “Camera Roll” folder.

Method 2 – Social networks, email
If you have no desire to understand the work of cloud storage, as well as the work of iTunes, we offer you a method from the series “everything ingenious is simple.” You can use a social network or mail:
1. Send the photo from your computer to your email or via messages on a social network.
3. That's it!
How to transfer photos from iPhone to computer?
Surprisingly, when it is necessary to carry out the reverse procedure - transferring a photo from an iPhone to a PC, and not vice versa, users are in for a pleasant surprise. This is the only procedure for exchanging files between a PC and Apple devices that does not require the participation of iTunes or other complex programs. You need:
1. Connect your iPhone to your PC via cable, go to the “Computer” section, and you will see your iPhone there.

2. Double-click on the phone icon with the left mouse button, then perform the same action in the two subsequent windows and you will find yourself in a window where there will be a bunch of folders.


3. Open any of the folders and in it you will see the photos you took on your iPhone - all you have to do is drag them to your computer in the usual way.
Results
Well, we looked at how to transfer photos from a computer to an iPhone via iTunes and figured out how to bypass this program. We hope that each of you has found the optimal convenient way to perform this procedure!


