Most mobile phones and tablets with the Android operating system sold on our market already have Russification built into the firmware. Even in Chinese smartphones from second-tier companies, their manufacturers are trying to localize the interface of the system and installed programs, including into Russian. Unfortunately, in practice there are still cases when a phone or tablet from a little-known company ordered from China comes with firmware in which the Chinese language is installed, and in the best case it can be changed to English or one of the most common Western European languages. For some users who are fluent in foreign languages, this may not seem like a problem. But we think that most buyers would like to install their native language on their device and enjoy all its advantages.
Today we will tell you, dear readers, how to translate your Android into Russian. If you are one of the owners of the above-mentioned mobile or tablet with an unfriendly interface, this article is written for you.
How to check the presence of Russian language in the operating system
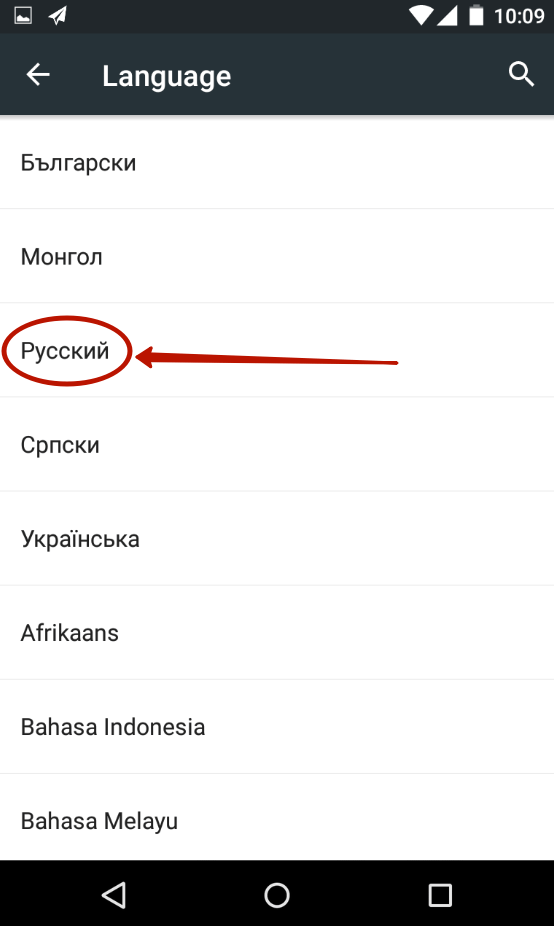
We assume, dear user, that since you are reading this article, you have already checked the settings of your Android device and made sure that the Russian language is not in the selection list. But if you still forgot to do this, check the availability of the Russian-language OS interface right now. Go to the "Settings" menu item on your phone or tablet and then select "Language & keyboard". In the menu that opens, select the first item “Select language” and check the list of available languages to see if Russian is there. If it is missing from the system, it’s time to install it, correcting this annoying flaw.
Russification of Android keyboards only
Some users are ready to come to terms with the fact that the firmware of their device or the interface of some programs does not have Russian localization, but they need at least Russification of the on-screen keyboard. After all, typing texts, communicating on social networks, sending messages, etc. Latin letters are at least unreadable for those who will receive these messages. For such users, the solution may be to simply install a keyboard with Russian language support on the system. There are a huge variety of similar keyboards for Android, because, in fact, a keyboard is a regular program that you can download and install on your phone or tablet.
On Google Play Market, you can always find something suitable for the search query “keyboard”. One of the popular ones is SwiftKey Keyboard, which has support for Russian and Ukrainian languages. But you can choose any other keyboard to your liking, experiment. Installing applications from the Google Play market is described in detail on our portal in.
After installing the new keyboard, all you have to do is follow the path “Settings” ->
"Language & keyboard" and check the box next to the keyboard that we just installed. If necessary, you can click on the name of this keyboard and make the desired program settings in the list of parameters that appears. Now you can type texts in any applications in Russian.
How to Russify Android (for Android up to version 4.2)
Many users are unlikely to be fully satisfied with the conditional Russification given in the sections above, and they will want their Android phone or tablet to communicate with them entirely in Russian. This can be done, and now we will tell you how to completely translate Android into Russian if your phone or tablet has an old version of the operating system.
The most popular application for localizing Android firmware is MoreLocale 2, available for download on Google Play.
Download the program from there or install it on your mobile device in any way. Next, in order to install the Russian language in your system, you need to perform the following sequence of actions:
Launch MoreLocale 2 and select the green "Custom locale" item in the program window;

In the window that appears after this, you need to click the “ISO” button located next to the “Language” menu item and select the “Russian” language there;
After this, click the “ISO” button located opposite the next menu item “Country”, and select “Russian Federation” from the list of countries;

Press the "Set" button to confirm your choice;
You can enjoy full localization, your phone or tablet has learned to speak Russian.
Please note: if the applications installed on the operating system do not initially have Russian language, MoreLocale 2 will not be able to Russify them. Perhaps in this case your operating system will not be completely Russified. But it's better than nothing, isn't it?
In addition, when using the method given above, it is necessary to take into account the following: due to the changed rules for making changes to the OS configuration, This method will not work on firmwareAndroid version 4.2.x and older. How to transfer devices with new versions of Android, read on.
How to Russify Android 4.2 and higher
Complete Russification of the entire Android operating system version 4.2.x and higher is associated with some difficulties, but there are no difficulties that a true Android system enthusiast cannot overcome, right?
To begin with, let's say that on Google Play there is a program Set Locale & Language, which allows you to set the system language, even if it is not in the firmware. The developers claim that it can localize even Android versions 4.2.x and older.

However, many users complain that the Set Locale & Language program does not always work stably, and localization settings may disappear after restarting the application. Only one recommendation can help here: try, try, and hope that you are lucky and your device is localized reliably.
But if the previous method turned out to be useless for you, now we will teach you another method on how to translate the system language of your phone or tablet into Russian. This method was originally invented for HTC smartphones, but for other phones or tablets it also works great in many cases.
To Russify new versions of the Android OS, we will need to download the adb program and install it on our computer. In addition, in this case it is also necessary to install the More Locale 2 application, which was already discussed above. Also install drivers for your smartphone or tablet on your PC. To Russify your Android device, follow the instructions below:
1. Enable the "USB debugging" mode on your device (Program menu -> "Settings" -> "Developer options" -> "USB debugging"). If the "Developer options" item is not available in the menu on your device, you need to find the "About phone" item in the "Settings" menu and click on the name of the device model or firmware version ten times in a row. "Developer options" will appear in the settings menu;
2. The ADB program must be unpacked on the computer to the root of the C: drive (the path to the executable file should be: C:\adb\adb.exe);
3. Connect your Android device to your computer;
4. Launch the command line application on your PC by running cmd.exe;
5. Enter the command cd c:\adb to go to the folder C:\adb\;
6. To search for your smartphone, enter the commandadb devices;
7. The program should display your device ID below under the line " List of devices attached ";
8. Enter team
adb shell pm grant jp.co.c_lis.ccl.morelocale android.permission.CHANGE_CONFIGURATION
9. Make sure, What V window appeared answer programs
lo cale android.permission.CHANGE_CONFIGURATION;
10. If we made an error in the command syntax, the system will display a message with help from the pm command. In this case, you need to carefully repeat the command again.
11. Disconnect your Android device from your computer and launch MoreLocale 2.
12. Repeat the sequence of actions for Russifying the firmware using MoreLocale 2, indicated in the previous section.
If your phone or tablet is not found by the ADB program, and you see the word “offline” next to its identifier, this means that your version of ADB is outdated for this model. Download the Android SDK and install it on your computer. In the /platform-tools/ folder you will find the latest version of ADB.
Please note that this localization method (like the method for Adroid before 4.2.x) works at the software level, and not at the operating system level. That's why if you do, your localization will fly off, and to get the Russian language after resetting the settings, you will have to do everything all over again.
As you can see, it is not always easy to localize new mobile devices with the latest Android firmware. The only good news is that even little-known Chinese mobile phone developers are already paying attention to the market of Russian-speaking users, and phone or tablet models that do not have Russian localization are becoming less and less common. For most modern devices, it is usually possible to find, if not official, then at least custom (custom) firmware, in which the Russian language will be built-in. We hope your new mobile phone on Android OS will be exactly like this!
The Android operating system has become very widespread. Its virtual freeness gave the Chinese a free hand. Even the smallest companies from this country have started producing smartphones. They often focus on the low cost of their creations. Of course, these manufacturers try to sell their goods not only in their native China, but also outside the country, using one or another online store. And sometimes the buyer faces one problem - the device he received has an interface made in English or Chinese. In this article we will show that Russification of Chinese Android is not difficult.
It should be noted that by default Google implements support for several dozen languages into its operating system. There is also a Russian among them. A smartphone manufacturer can get rid of certain languages - for example, to reduce the amount of memory that the operating system will occupy. But practice shows that recently large and not very large companies have stopped touching language packs.
It is also impossible not to note the fact that when you first start the smartphone, it should prompt you to select a language. This applies to almost all versions of Android. If he doesn’t offer you to do this, then someone has already launched the device before you. But this is not scary, since you can install the Russian language on Android almost blindly. To do this, do the following:
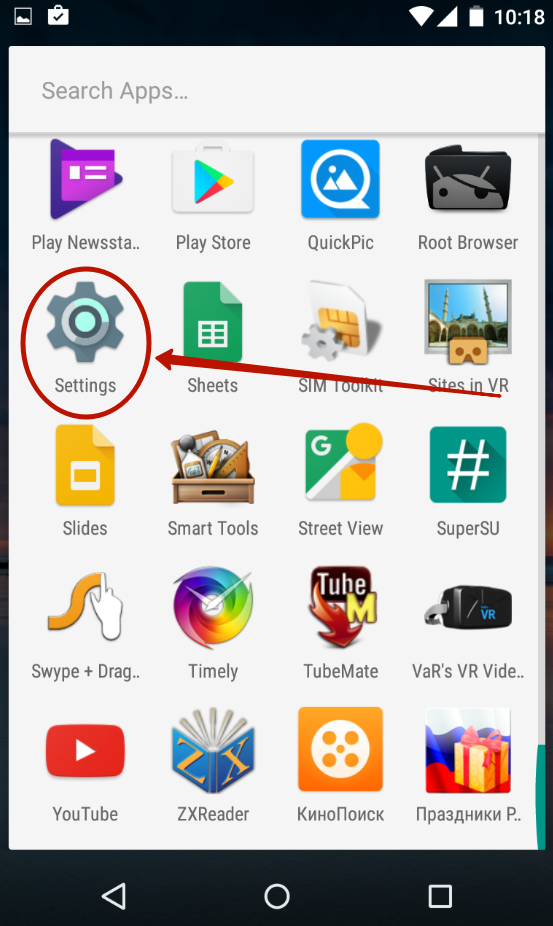
Step 1. Go to " Settings" If you use hieroglyphs instead of English, then focus on the appearance of the icon, which should look like a gear. In the latest versions of the operating system, it can be found not only in the menu, but also in the notification panel, if you pull it out completely.

Step 2. Proceed to the section " Language & Input" Usually next to its name there is a simple image of the globe.

Step 3. Click on the item " Language" It's at the very top.

Step 4. You will be offered a list of languages built into the operating system. Select from the options " Russian».
On more modern smartphones, the procedure will be slightly different. As a rule, the desired parameter is hidden in advanced settings, in other submenus, or simply does not have any identifying marks. It is especially problematic in such a situation to change the system language not from English, but from Chinese (relevant if you ordered a smartphone from Aliexpress). If this is your case, then try the following:
Step 1. Go to settings (usually this is a gear icon) and type in the search bar "yuyan" or copy the hieroglyphs «语言» .

Step 2. Now find the hieroglyphs in the list «语言» . Please note that different submenus are displayed during the search. Therefore, select the line that also ends with hieroglyphs «语言» (or just switch between each line in turn). If you did everything correctly, the language selection menu will open. All you have to do here is find the one you need. In our case it is "Russian". After this, the system language will be changed.

If the smartphone is in English, then you can change the language in a similar way. Just type it into the search instead of hieroglyphs "language", and then set the desired parameter.
That's all! However, as we said above, the Russian language may not be on the list if the manufacturer decides to ignore it. Then you need a special program for Russification.
Using the MoreLocale 2 cracker
There are not as many localizers on Google Play as we would like. One of them is MoreLocale 2. The application is free and compatible with a huge number of devices. In fact, it contains all those language packs that are present in the Android operating system by default, before the influence of the Chinese manufacturer on it.
First you need to install this program. After this, do the following:
Step 1. Activate the section. Our recent article already wrote about how to do this. In the case of the English version of the operating system, you first need to go to “ Settings».

Step 3. Here tap about 7-10 times on the item “ Build Number" This will enable access rights for developers, which will be indicated by a pop-up notification " You are now a developer».

Step 4. Press the " Back" Proceed to the newly appeared section “ Developer Options».

Step 5. Here you need to activate the checkbox next to the item “ USB Debugging", thereby enabling USB debugging mode..

Step 6. Now you will need the archive with the ADB executive file. Download and unzip it to the root of the C drive of your computer.
Please note that the versions for Windows XP and subsequent versions of this operating system are different!

Step 7 Connect your device to your computer using a USB cable. Next, launch the command prompt. To do this, open the menu “ Start" and enter in the search field " adb” (without quotes) by left-clicking on the displayed result.

Step 8 Type the following into the command line: cd c:ADB. Click Enter.
Step 9 Enter the command " adb devices", then press Enter. This will show you the code name of the device connected to your computer. If the system cannot detect the smartphone, then something has gone wrong - it is quite possible that you are using a low-quality cable.

Step 10 Enter the following commands in order:
- pm list packages morelocale
- pm grant jp.c.c_lis.ccl.morelocale android.permission.CHANGE_CONFIGURATION
Note: The command line does not support the copy function. In this regard, you will have to enter all the text manually.
Step 11 Disconnect your smartphone from your computer and open the program MoreLocale 2.

Step 12 Find in the list of languages " Russian" Click on this item.

The system will be automatically localized. Your actions are now complete!
Russification of the keyboard
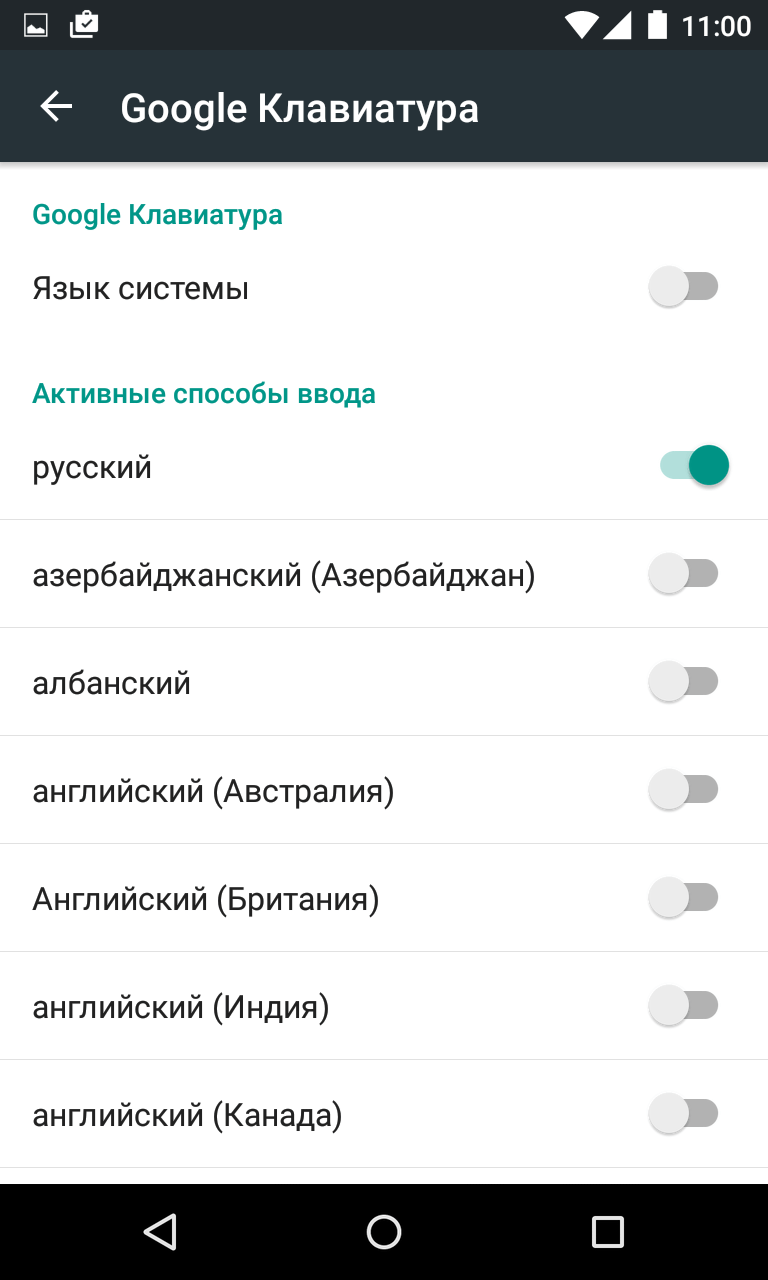
Interestingly, after changing the system language, absolutely nothing will change in the virtual keyboard. If English and Chinese were previously offered there, they will remain the same after Android localization. Fortunately, setting the Russian language for the keyboard is much easier than for the system itself. Especially after Google made its keyboard a separate application, allowing it to be downloaded from the online store.
Step 1. Download the program Google Keyboard .

Step 2. Now follow to " Settings" and visit the item " Language and input».

Step 3. Here click on the item " Google Keyboard».

Step 4. Click on the item " Languages».

Step 5. Check the languages you need. Or activate the item “ System language"if Android is already Russified.
That's it, the Russification of the keyboard is complete! Of course, in exactly the same way you can enable the Russian language on any other virtual keyboard, if it supports it (some of them only have a Latin layout).
Go to the following path “Menu – Settings – Language & keyboard”. Click on the topmost item “Language” and select Russian (Russia) from the list of languages that appears. If the Russian language is not on this list, then you need to Russify your Android phone or tablet. “But how to Russify Android?” - you ask. We'll talk more about this in the next step.

Step 2. Complete Russification of the Android device
By complete Russification we mean the following: Russian keyboard and Russian interface of the Android system itself. If you only need to Russify the keyboard, then proceed to step 3.
Instructions for those with Android version 4.1.X and lower
For this procedure, we will use the crack “MoreLocale 2” (Download from our server or from the Play Store - 255 KB). Download this application from the links given earlier and launch it. A window will appear on the communicator screen as in the first screenshot, click on the green inscription “Custom Lacale”, a window will appear as in the second screenshot - in this window, first click on the button with the inscription ISO opposite “Language” and select “Russian” there, then opposite “ Country" and select "Russian Federation" from the list. Confirm your choice by clicking on the “Set” button. All! Now your smartphone or tablet is completely in Russian.


Russification of Android version 4.2 and higher
Since the Android operating system version 4.2 Jelly Bean and later have protection for configuration changes, simply installing the program is not enough and you need to work a little with the ADB console application, which is installed on the computer and is used for debugging communicators and tablets.
First of all, install the MoreLocale 2 program on your device, links to which are above. Next, you need to install ADB on your computer (Download - 467 KB, updated 04/23/2014) and drivers for HTC phones (Download - 15 MB). Attention: if we have a different phone, then install the driver for your phone! Download ADB and unpack it to the “C:” drive so that it looks like this: C:\adb\adb.exe (i.e. 4 files should be in the adb folder). We simply download and install the driver. Next, on the phone, go to “Menu - Settings - For Developers - Debugging via USB” (“Menu - Settings - Developer options - USB debugging”) and put a tick there. If there is no section “for developers” (this happens on Android version 4.2.2 and higher), then go to “Menu - Settings - About the device (or About the phone)” and click on Build number 10 times. A message should appear indicating that the "For Developers" section is open. Enable USB debugging. Now we connect the phone to the computer. We launch the command line (if you have Windows 7, then click start and enter “cmd” in the search field, then press the Enter button), write the following commands in the command line:
- cd c:\adb- go to the folder with ADB.
- adb devices- we are looking for connected devices, there should be 1 line below the line “List of devices attached” - this is your communicator.
- adb shell pm grant jp.co.c_lis.ccl.morelocale android.permission.CHANGE_CONFIGURATION- we give the MoreLocale2 program the right to change the configuration of the smartphone.

That's it, now we disconnect the smartphone from the computer and launch the Local program and do everything as for devices on Android version 4.1.x and lower.
Step 3. Russification of the keyboard
In order for the keyboard of your device to be in Russian, just install any Russian keyboard from the Play Store, go to “Menu - Settings - Language and Keyboard”, and there, in the “Keyboard and input methods” item, select the keyboard installed from the Market.
The ease of use of a phone or tablet largely depends on the availability of Russian localization. The phone may have a different language, and then it is very difficult to use it. You can change the language using standard settings, and if there is no Russian, try adding it using a special application.
The Russian language is pre-installed in most certified devices. Here you simply need to activate it. However, how to find the necessary items if it is, for example, Chinese or Korean. Trying to translate the inscriptions in this case is useless. Fortunately, most modern gadgets have graphical prompts for menu items that will help you find the settings you need.
Let's find out how to change the language on your Android phone or tablet. You need to follow these steps:

In most cases, such settings allow you to change the language to Russian.
In many Chinese phones, you won’t even find Russian in the language settings. It simply isn’t there, and then you won’t be able to change the language. Installing the Russian language on a phone running Android is not a big problem. MoreLocale 2 will help you add Russian.

This is a special application that can Russify almost any device. You can download it from the official Google Play app store or on another website. You must first install the program on your phone. After this, follow these steps:

This app can add a language to virtually any Android device up to version 4.2. Changing the language occurs in a few seconds, but on some devices Russification will be only partial.
We install Russian language on Android version 4.2.X and higher
If you have a smartphone with a modern version of the OS, then you should use a different application. Set Locale & Language will help you change, or to be more precise, completely add the required language to the firmware, even if it was not there initially. Despite such capabilities, users note that the application is unstable, so its actions do not provide a complete guarantee.
To change the language, you need to complete the following steps:

The main advantages of this software are that it is completely free, and also has more than 200 languages in its database.
Installing Russian using a computer
If none of these methods help, try making the settings using your computer and the ADB program. It serves as an addition to MoreLocale 2. If you were unable to change the language using MoreLocale 2, then this option is for you. You must first install the drivers for your tablet or phone, and then enable USB debugging mode.
To install Russian using ADB, follow the following instructions.
There are times when when you buy a gadget, the menu is in English, and sometimes in Chinese. It’s simply inconvenient to manage it, because you don’t know the location of all the elements or menu items. And what to do in cases where the language settings differ from the “standard” ones, and navigation through the menu requires complete Russification of the device. What to do? Incomprehensible menu and incomprehensible language. Don't panic! Here we will talk about how to add the Russian language from third-party localizers or from the menu of the device itself, and add the Russian keyboard layout.
Turn on Russian language from the Android menu
In order to install the Russian language on your smartphone, in most cases you need to follow several steps. To reach the right place in the settings, we have attached screenshots in Chinese and English.
Open “Settings” – “Input Language” (Settings - Language & Input)
Then select the item"Language"
We find “Russian” language in the list and select it as the system language.
Installation of the Russifier.
- In smartphones whose settings do not allow for the installation of the Russian language, you can set the language using the MoreLocale 2 utility. This utility can be downloaded from the Google Play application.
- After installing MoreLocale 2, go to the Settings - About menu and get access rights for developers.
- Go to the Build Number menu item, where the firmware version is indicated.
- Next, slide until the words You are now a developer appear. It means "You are now a developer."
- Then select it and set the slider to the “On” position for the USB (Android) Debugging item.
- to drive C.
- Next we need a computer with Windows OS. We connect our smartphone to it, launch the command line on the PC (in the search, write CMD and run as admin) and enter the command: cd c:\adb (go to the directory with the downloaded file).
The system would have to detect the smartphone; to check this, enter the command in the line: adb devices and press Enter.
After which the code name of the smartphone should appear in the command line, if the system has identified it.
- pm list packages morelocale
- pm grant jp.co.c_lis.ccl.morelocale android.permission.CHANGE_CONFIGURATION
After them, the line screen should look like this:
Disconnect the device from the computer and launch the previously downloaded MoreLocale 2 application.
Select “Russian” language in the list that appears. Russification is completed, the system will automatically be translated into Russian.
Installing a Russian keyboard
In order to install a Russian keyboard, you must first download the corresponding application on Google Play.
- Download the Google Keyboard application.
- Go to “Settings” - “Language and input”. Select “Google Keyboard” from the list.
- In the “Language” menu, use the switches to mark the required languages.


