Want to protect the data on your Windows 10 computer by blocking or disabling USB drives on your PC? In this guide, we'll look at five easy ways to enable or disable USB drives in Windows 10.
Blocking USB drives in Windows 10 can be done in different ways. You can use the Registry, BIOS, or third-party utilities to enable or disable USB drives in Windows 10.
Below are five ways to enable or disable USB drives in Windows 10.
Method 1 of 5
Enable or disable USB drives in Windows 10 using the registry
If you're comfortable making changes to the Windows registry, you can enable or disable USB drives in Windows 10 by manually editing the registry. Here's how to do it.
Step 1: Open Registry Editor
Step 2: Continue to the next section:
HKEY_LOCAL_MACHINE\SYSTEM\CurrentControlSet\Services\USBSTOR
Step 3: Now on the right side double click on the option "Start" and change its value to 4 to disable USB drives on your Windows 10 PC. Change the Start value to 3 to enable USB drives and storage devices on your PC.
Method 2 of 5
Enable or disable USB ports through Device Manager
Did you know that you can disable all USB ports using Device Manager? By disabling USB ports, you prevent users from using USB ports to connect USB drives to your computer.
When you disable USB ports, the USBs on your PC will not work and hence no one will be able to connect USB drives. You will need to re-enable the USB ports to connect devices via USB. Here's how to enable or disable USB ports using Device Manager.
Step 1: Right click on the button "Start" on the taskbar and select .

Step 2: Expand USB controllers. Right-click on all the entries one by one, and click "Disable device". Click "Yes" when you see a confirmation dialog.
Method 3 of 5
Use USB Drive Disabler to enable or disable USB drives
If you don't want to edit the registry manually, you can use a free tool called USB Drive Disabler to quickly enable or disable USB storage devices on your PC. Simply download USB Disabler, launch it, and then select Enable USB Drives or Disable USB Drives to enable or disable USB drives on your PC.
Method 4 of 5
Disable or enable USB ports in BIOS
Some manufacturers offer an option in the BIOS/UEFI to disable or enable USB ports. Boot into BIOS/UEFI and check if there is an option to disable or enable USB ports. Check your PC's user manual to see if there is an option to enable or disable USB ports in the BIOS/UEFI.
Method 5 out of 5
Enabling or disabling USB storage devices USB Guard
Nomesoft USB Guard is another free utility for blocking USB drives on computers running Windows 10 and earlier versions of Windows. You must use this program as an administrator to enable or disable USB storage devices.
Write protection for USB drives can be useful as an additional security option.
Share this article with your friends
The reasons for problems due to which USB ports on a laptop do not work can be completely different - from hardware failure to “lost” motherboard drivers or the controllers themselves.
However, usually the user can cope with most problems on his own, without turning to specialists - if he knows how to do it.
If there are a lot of USB ports on the laptop (for example, 3 or 4), the problem may not be so critical, and its solution can be postponed.
But if there are only 2 connectors or there is a constant need to use connected devices - flash drives, and even printers - the issue should be resolved as soon as possible.
Moreover, some methods will take no more than a few minutes.
First Troubleshooting Steps
A message that appears on the screen about the USB ports stopping working or the laptop not responding to a drive installed in the corresponding slot may indicate.
Sometimes you can solve them with a simple reboot - there is a small chance that the fix will happen automatically.
Increase the likelihood of the positive effect of a reboot, which actually sometimes helps, You can do it in a not quite usual way:
1 Completely disconnect the laptop from the power supply (if it was, for example, charging);
2 Remove the battery and leave the laptop in this state for about 5 minutes;
3 Insert the battery back and turn on the device.
If no messages about non-working ports appear on the screen, but the flash drive is still not readable or a peripheral device cannot be connected to the laptop, it is possible that the problem lies with this equipment.
The assumption is tested by connecting gadgets to other ports of the laptop - or to another computer.
Other USB devices
Another problematic situation with USB ports arises when a large number of external devices are simultaneously connected to the laptop.
For example, a user has already connected three gadgets to four ports ( , and ), and then tries to install a flash drive as well.
Sometimes such a drive simply will not be detected by the system - and turning off 1-2 peripheral devices allows you to check the assumption.

Simultaneously connect a large number of USB devices and adapters to the laptop.
Most often, this situation occurs not when connecting peripherals directly to the laptop, but when using a “hub” (USB hub that increases the number of connections).
You can solve the problem by reducing the number of connected devices - or even better, by removing the hub and connecting all gadgets directly.
Incorrect BIOS configuration
You can find a list of ways to solve problems with USB ports.
Sometimes using this interface it is possible to enable self-disabling controllers on the motherboard.
To activate, you need to perform several steps:
- Reboot the system while simultaneously pressing the function keys to enter the BIOS (for some laptops this is F1 or F2, for others - Del or Esc).
- Select the Advanced or Integrated Peripherals section.
- Go to the USB Configuration menu item and change the parameter value in the USB Controller section (there may be several of them with different names) to Enabled.

BIOS interface settings.
After a reboot, the hardware configuration on the laptop will change, and USB ports that were not previously recognized by the system may appear to be working.
System settings
A laptop running on battery power can automatically turn off some controllers to save energy - especially if it approaches critical values.
In this situation, first of all, you should connect the laptop to the network, and then change the power settings, by following these steps:
1 Open Device Manager.
2 Select the branch indicating serial bus controllers.
3 Find and open the USB root hub subkey.
4 Double-click the properties of the hub and go to the power settings.
If the problem was incorrect power consumption settings that caused the laptop to automatically turn off the ports, there will be a check mark here to allow the hub to turn off power.
By removing it, you can restore the functionality of the ports.
The steps are repeated for each hub if there are several of them on the laptop.

Prohibits the system from turning off USB ports to save energy.
Driver problem
The problem may be - and in most cases it is - in problems with USB drivers.
You can find the problem by going to Device Manager(via computer properties or by typing in mmc devmgmt.msc).
It is possible that one of the ports is marked in the list with a special icon - a yellow triangle with an exclamation point, indicating that the equipment is not working properly.
You can try the problem solve in one of 2 ways:
- Try updating the drivers (preferably an Internet connection) in the properties of the USB controller.
- Remove the device marked with a yellow triangle from Dispatcher And restart laptop.
When using the second option, the system rebooted will try to install new software for discovered “new” equipment. Sometimes this will restore port operation.
For the first option, you may need to find out the ID number by which the corresponding driver is searched on the Internet - this identifier is located in the device properties on the details tab.

Determining USB port ID.
The problem, which is the motherboard drivers not working properly (this usually happens with outdated laptops released several years ago), is solved by downloading and installing the appropriate software.
To do this, the laptop user first needs to find out - for example, use the AIDA64 application, which is paid, but works without entering a key confirming payment for a certain trial period.
The name of the device will help you identify and msinfo32 command, entered in the “Run” form (called by the Win + R keys).

Determining the name of the motherboard.
You can try to find drivers for the corresponding board on the website of its manufacturer - or on the resource of the company that developed the chipset.
You should know: If you don’t have the time and experience to find and update drivers, you can use the utility. After installation on the laptop, it will independently check and update all the necessary software. The disadvantage of using this method is that if you do not choose to manually configure updates, the application will automatically replace drivers for almost every part and even update some programs - this usually takes several hours.

A utility for searching and updating control programs and other applications.
Incorrect operation of the operating system
Replacing this part returns the port (or several connectors at once) to its normal state.
In order to encounter such problems as rarely as possible, the user should not connect a large number of USB devices to the laptop - especially using special splitters (“hubs”).
It is also worth enabling automatic installation of updates in the appropriate section of Windows - this usually allows the system to independently resolve problems with drivers.
If the USB ports on your PC are not working, and Windows settings and driver updates do not help, the controller may have been disabled in the BIOS. In this case, you will need to go to the configuration menu and turn everything back on.
There are many different versions BIOS with its own interfaces and subtleties of operation. Also, a more modern complex can work on your computer - UEFI, which supports a full GUI interface. This article discusses the distributions that are most often installed on motherboards.
Entering BIOS settings
To start changing the configuration, you need to go to the corresponding menu. It can be opened when the personal computer is turned on - before Windows starts loading from the hard drive.
Turn on your PC. In case it is already running: reboot. Wait for the speaker to beep: a short, single beep indicates that all internal components necessary for the computer to function have been detected.
Now you need to click hotkey to call the configuration. This must be done before changing the screen. If you don't have time and Windows starts loading, reboot. The keys depend on the model of the installed motherboard and the BIOS firmware version. You can find it in the user manual that came with the motherboard, on the manufacturer’s official website, or view on your PC screen when loading it:

If you don't know the board model, it's okay. Just try pressing the following keys: Tab, Delete, Esc, F1, F2, F8, F10, F11, F12. One of them will definitely do.
You don't have to try just 1 option at a time. You can quickly press all the buttons from the list without any problems. One of them will come up and launch the BIOS settings, and the rest will be ignored.
Entering the BIOS/UEFI settings of the latest PCs
Many modern computers boot up so quickly that you won't be able to access the keystrokes when you turn them on. This is also true for laptops. Therefore, the latest versions of Windows OS have acquired a new launch feature. Let's show it using Windows 8.1 as an example.


Your computer or laptop will reboot into setup mode. After restarting your PC, you will also be able to select option to run from a USB drive or DVD.
Menu navigation
Almost all BIOS versions do not have a graphical interface. This means that you will have to work only using the keyboard, like in the Windows console. Navigation is carried out using the up-down and right-left arrows. To open any section, use the Enter key to go back - “Escape”. A small reminder of the keys used is always shown on the screen.

Firmware complex UEFI installed on the most expensive and powerful motherboards. It supports more drivers and can use a mouse. Its interface will be familiar to users of Windows and other modern operating systems.

Each version has its own interface and sets of options. Even the names of the same parameters may differ. The following article describes several popular BIOS releases.
AMI BIOS
A very common option that can be found on many modern computers. The main menu is divided into 2 parts: a list of categories and various actions, such as exit or save. You will be working on the left side.

You need to go to the section called “ Integrated Peripherals" There is no Russian version of the interface, so all commands are only in English. Use the Down arrow to highlight this item and press Enter.
Here you need to enable ( Enabled) 4 options:
- USB EHCI controller– main controller. If the motherboard has version 3.0 ports, this item will be divided into 2 parts: “Controller” and “Controller 2.0”;
- USB Keyboard Support– keyboard support;
- USB Mouse Support– mouse support;
- – work with external data storage: flash drives, disk drives, smartphones and digital cameras.

In some older versions there are only 2 points " USB controller" And " Legacy USB storage support».
When you're done with the settings, press the F10 key to save your changes and restart your computer.
Phoenix AwardBIOS
Another popular version that can often be found on modern laptops. It does not have a main page like AMI, but is equipped with convenient thematic bookmarks at the top. You can move between sections using the left and right arrows, and between items using the up and down arrows.

Go to the section " Advanced» using the Right arrow. In it, find the category “ USB configuration" All items in this section must be moved to the position “ Enabled" In some versions the category " USB configuration" may be located in the " tab Peripherals" and not in "Advanced".
To exit the menu, press F10 and confirm exit.

AMI BIOS for Asus
Version of AMI used on Asus laptops. Externally it is very similar to Phoenix - a similar bookmarks bar. Settings USB are in the section " Advanced" Go there, enable all options and exit using the F10 button.
UEFI
Contrary to popular belief, UEFI is not part of the BIOS. It can rather be called a more advanced, but less popular competitor. There are a large number of different versions, each with their own interfaces. However, here the controls are similar to the usual Windows, so you can easily find the options you need.

Windows Settings
If at the BIOS level all ports and controllers are enabled, but the USB ports still do not work, there may be a problem in the settings of your Windows system.
First, just try disconnect and reconnect the device. This will check if the drivers are correct. If there's something wrong with them, Windows will try to reinstall them.
If nothing happens when you reconnect, try turn on the controller in the Windows registry. To do this you need to do the following:

Video: how to configure any BIOS to boot from a USB flash drive
Hi all! Today we will look at several questions on the topic of how to connect USB to a computer. First, we will learn how to connect any devices to a PC or laptop. And secondly, I’ll tell you how you can connect additional USB ports to your computer if you don’t have enough of them for all your devices. So, let's go!
How to connect a USB cable to a computer?
A USB port is by far the most common type of connecting devices to a computer or laptop. There are three types of connectors: 1.0, 2.0 and 3.0. If the first one can now be found only on the oldest computers, then the second and third ones are used today. At their core, they differ in data transfer speed. And in appearance, what is more important for us now is color. USB 2.0 has a black connector and plug, USB 3.0 has a blue color. You can read more about the specifications and differences between standards.
Before connecting the USB cable to the computer, look at the plug of your gadget - if the blue connector is connected to the black port, the device will not use all its speed characteristics to the maximum. If you plug the black plug into the blue one, then absolutely nothing will happen - the USB 3.0 port will simply operate at the speed that is maximum for 2.0.

So, look at the back panel of your computer, find a USB port of the same color as the plug, and connect it.

After this, the device will either be detected by itself in the system, if it is a keyboard, mouse, webcam, or some other simple and common device for which Windows already has a driver. Or to work you will need to install the software that comes with the device on CD.
How to connect additional USB ports to a computer?
Any modern motherboard already has built-in USB ports - both 2.0 and 3.0. However, we usually connect so many different peripherals that there may simply not be enough of them, for example, to connect a flash drive or external drive and transfer fresh photos to it.

Connecting a USB stick to the rear panel
What to do? There are two ways. The first, preferable one, is to buy a separate bracket with USB ports and insert it into the additional slots available on the rear panel of the case - the same ones where we attach a video or sound card, a wireless adapter, and other components that are connected directly to the board. It looks like this:

In order to accomplish this task, the motherboard must support the connection of additional USB ports. This can be determined by the presence of connectors on the motherboard labeled USB or USB 3.
Connectors for USB 3.0 are large, have many contacts and are designed to connect two ports at once in one plug.


USB 2.0 is smaller and each of them can be connected to 2 ports separately.

Accordingly, we look at the presence of such connectors on the motherboard, buy the corresponding brackets, fix them in the back of the case and connect them to our connectors.
Connecting a unit with USB ports instead of a flop
Another variation of this method of increasing the number of ports is a special unit with USB, which is inserted into the front of the case instead of the old floppy disk 3.5
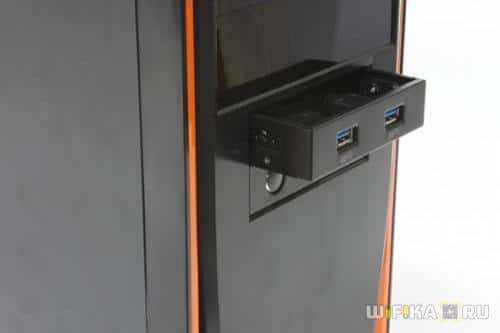
There are many options for designing such a block. For example, combined for connecting USB 2.0 and 3.0

And in the following example, USB 2.0 ports are combined with connectors for connecting a microphone and headphones

Connecting such a block occurs in exactly the same way as the bracket described above - to the corresponding connectors on the motherboard.
External USB hub
Finally, another option for increasing the number of ports is to buy an external USB hub. However, there are a number of disadvantages, because of which I would not connect any serious equipment through it, but would only use it for flash drives or, as a last resort, a mouse.

Since this is a hub, all the load from its several ports goes to one single computer to which it is connected. Due to this overload, certain devices may periodically fall off, which is not good. If you connect a hard drive to a USB hub, the electricity supplied through it may not be enough to operate it. Therefore, we reserve this method only for light fast food - flash drives.


