The article will be a useful guide for any owner of a weak laptop or computer running on the "Seven" who wants to optimize the operation of Windows 7. Today we will look at what can be disabled in this operating system in order to increase its performance without adversely affecting the functioning.
What is system optimization
There is no clear definition of the term. In most cases, it hides a set of user measures and actions aimed at disabling and removing unused components of the operating system, as well as changing its configuration in order to improve the efficiency of the latter. That is, an optimized Windows 7 will consume less hardware resources and perform its tasks with greater efficiency than a non-tuned operating system.
One of the most important factors in reducing the performance of Win 7 is the presence of a large number of items in the list that are automatically launched after the OS starts. Services that can be disabled in the Seven to speed up its operation. This article describes in detail. You can speed up Windows 7 a little more. How - read here. We will consider the remaining ways to optimize the operating system for normal operation on an old PC and to run games on it.
Setting up the system disk
The system partition must have at least several gigabytes of free space. Even if it is quite enough, the folders for storing temporary files are probably full of garbage. No matter how much we optimize the operating system, without proper hard drive maintenance, most efforts will go down the drain.
How to improve HDD performance? First of all, let's clear it of temporary files. To do this, we perform the algorithm below.
- Call “Explorer” using Win + E.
- Open the “Properties” of the system volume through its context menu.
- Click “Cleaning...” and wait for the cleaning program to search for unnecessary files and evaluate the freed up space.
- We confirm our intentions.
- We wait until all operations are completed.
- Switch to the “Service” tab.
- Click on the “Run defragmentation...” button.
- Enter the command “msconfig” into the text line and execute it.
- Click on the “Advanced options” button to start the system.
- Next to the “Number of processors” option, check the box and indicate the maximum available number.
- After that, save the settings.
- In the “System Configuration” window, click “OK”.
- Uncheck unnecessary boxes and click “Install”.
- We launch the Windows 7 accelerator directly from the installer window.
- Click “Registry” and start the process of searching for unnecessary keys
- Activate the “Fix selected…” button and click “Yes” to create a backup copy of the deleted entries.
- We are correcting the noted problems.
- We agree to back up the entire system database and wait for the operation to complete.
Instead of a full backup, you can simply create a restore point if the corresponding feature is enabled.
Before defragmenting, you can perform a full scan of the registry for problems and compare the results of the application with the success of CCleaner
- Click on the “Compression...” tab.
- Close all applications and click “Analysis”.
- We do not touch anything until the computer is rebooted.
Attention! During optimization, processes on a laptop or computer may not respond for a long time or freeze until the device is rebooted.
After the restart, if everything went well, the operating system will load noticeably faster, but that’s not all.
Record caching policy
Full optimization of Windows 7 cannot happen without activating the hard drive record caching option. It allows you to speed up work with files and is not enabled by default in all builds of Windows 7.
- Open the “Task Manager”, for example, by executing the command “devmgmt.msc” in the command interpreter window.
- We expand the “Disk devices” branch, where we open the “Properties” of our drive.
- Go to the “Politics” tab.
- If it is not active, check the box indicated in the screenshot and save the settings.
Disable remote file compression
The function allows you to calculate the difference between two files (for example, an earlier and a more recent copy of a document) in order to reduce the amount of information transferred when copying or replacing. This option can be disabled, because such a function is very rarely in demand.
- Call “Control Panel”.
- In it, click “Uninstall programs” or “Programs and Features”, depending on the method of visualizing objects.
- Click on the link “Turn Windows components on/off”.
We wait until everything loads. The process may take a couple of minutes or a little more.
- Uncheck the box next to the “Remote differential compression” option.
We are not in a hurry to save the new settings, since here you can remove several more unnecessary components, for example, “Windows Search”, “TFTP Client”, “Indexing Service”, if you do not use them. If necessary, any of the elements is returned in the same way.
- Afterwards we save the new settings.
Improving performance by disabling visual effects
Aero, window animation, visual effects when windows and menus appear consume a lot of resources, although they have no practical value. Except that the interface elements look beautiful and are animated. If the computer’s graphics adapter is very outdated, and it doesn’t have much RAM (~2 GB), you can sacrifice the beauty and animation of interface elements in order to improve the performance of the system without hesitation. 

- Call “Properties” of “My Computer”.
Power management
Lastly, optimize the power supply of Windows 7. By default, the system uses balanced mode - the golden mean between power consumption and PC efficiency. Changing your power plan can improve your computer's performance. However, for laptops it is not recommended to touch it, because the device developer has already selected the optimal power settings for the system, including when the laptop is operating autonomously.
- In the drop-down list, select “High Performance” and save the optimal power settings for the system.
As a result, we will get a faster computer than it was before the setup. For even greater acceleration, you can use an SSD as a system volume or add a stick of RAM, but that’s a different story.
Despite regularly updating versions of operating systems and improving their quality and reliability, as well as the speed of information processing in software, there still comes a certain moment when it happens.
Of course, the resource of normal operation of the system as a whole can be extended if you take into account all kinds of rules for operating the OS, however, the constantly accumulating minor errors, minor failures of various programs associated with system files will one day lead to a failure of the OS.
To maintain stable operation, the system has special built-in utilities, but their functionality is limited and resource-intensive, so they are not always suitable for deep scanning, analysis and cleaning of the OS. In this case, it is worth using special programs, external utilities with local action.
Today there are a great many such programs, many of which are practically ineffective, but from the entire arsenal for each OS, time-tested utilities are still distinguished that can restore system functions and significantly increase the life of the OS.
Using Windows 7 as an example, in this article we will consider two fairly well-known programs that meet all optimization requirements:
- CCleaner;
- Auslogics BoostSpeed.
Both programs can be downloaded for free from the Internet on the official website.
About utility utilities for OS optimization
For general information, deviating slightly from the topic, let us once again remember the location of utility utilities for optimizing the OS. The main ones are:
- Disk Defragmenter;
To use disk defragmentation or disk cleanup, perform the following steps: open the Start menu - All Programs - Accessories - System Tools (we find these utilities in the general list).


To check the local disk for errors, do the following: Start menu - Computer - right-click on the required disk - in the menu that appears, select “Properties” - Tools - Run check. By the way, here you can also use defragmentation of this disk.


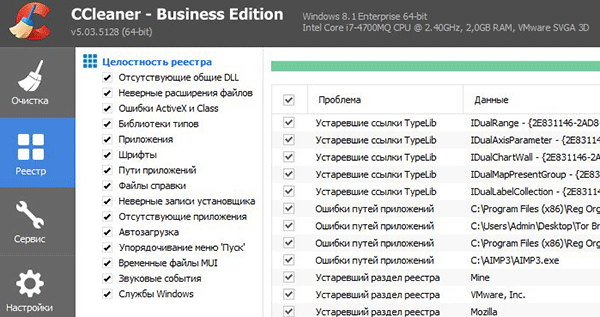
CCleaner program for optimizing and cleaning the system
Before downloading this software, you need to determine the bit depth of the operating system:

Start menu - Computer - right-click on the white field of the screen - Properties.

Now you need to find a program of any version, but in accordance with the bitness of Windows 7.

After downloading the product, install it by default on the system drive C by selecting the desired language in the menu item. To save traffic, especially when using a wireless Internet connection, it is recommended to uncheck the following items before installation:
- Automatically check for CCleaner updates;
- scanning cookies.

Considering that when optimizing Windows, the network is not involved and all maintenance processes take place exclusively within the OS itself, even a far from new version of the program will have an effect on solving the problem, since all the necessary functionality of the utility is already included in the general version package.

So, the program is installed, after which you should immediately restart the computer manually through the Start menu, even if the installation manager did not ask the user to do so. Speaking of rebooting, you need to constantly use it after installing any of the programs. To ensure normal operation of the OS, users should take this as a rule.
Having opened the shortcut on the desktop, we find a fairly simple interface with 4 buttons on the left edge of the screen. Moreover, not only the program version is indicated at the top, but also general information on the operating system and the main parameters of the computer.

Now you need to click on the “Settings” button on the left, select “Tracking” and uncheck all the boxes.

Here, going up the list, open the “Settings” column and disable automatic CCleaner updates.

Next, click the “Service” button and go to the “Startup” section. In this window, you can freely disable and delete those processes that are connected automatically every time the system starts. Naturally, each of them takes away part of the resources, a certain amount of memory. Here you can disable them using the corresponding buttons opposite: Enable; Switch off; Delete. This also applies to browser settings (connecting extensions and their updates, as well as updates to the browser itself, if it has not been previously disabled through the control panel).

The necessary program settings have been made, and now to work with the utility, in fact, only two functions are needed:
- Cleaning;
Having selected the “Cleaning” mode, we find next to it a list of files that will be scanned and, if necessary, deleted automatically. It is recommended not to remove existing checkboxes or add new ones; the necessary categories are already selected in the program by default.

Find the “Analysis” button at the bottom and click it. As soon as the analysis is completed and information about the files to be deleted appears, click on the “Cleaning” button and confirm the action with the “Ok” button. After cleaning the files, a report will appear on the screen.

Let's move on to the "Register" function. There is also a list of events and services that the utility is ready to optimize. Then click on the “Search for problems” button and wait for the process to complete.
If no problems are found in the end, you can close the program; optimization using the CCleaner utility is completed.

If a list of problems appears on the screen, click on the “Fix” button. Next - “Correct marked”, wait for the registry cleaning to complete and also exit the program.
Description of the Auslogics utility BoostSpeed to optimize your computer's performance
In one of the guides on the topic "" the Auslogics BoostSpeed program was briefly described. Now let's look at this product in general terms in more detail.
After successfully installing the software on your PC, open the program. At the top of the screen there are standard general control buttons:
- File;
- Settings;
- Reference.
Below, as in the CCleaner example, the Windows version and general PC settings are indicated. There are 4 main sections that you will have to work with:
- System check;
- Advisor;
- Resources;
- Tools.

In this case, there is no point in describing in detail each sub-item in the program, so we will only touch on the necessary ones, specifically for optimizing the OS.

So, first of all, open the first section - “System Check” and in the left column we find information on files and programs submitted for scanning. Click the “Check” button and wait for the process to complete.

Having received a report on the problems found, we eliminate them by clicking “Fix noted”. Once the problems are fixed, information in the form of a report will also appear on the screen.

Go to the “Advisor” section. It should be noted that this section is unlikely to be visited frequently in the future, since the Advisor only allows one-time disabling or setting up of some system services.

If the check has already been carried out previously, we will see the notification “No problems have been found on your system at the moment.”
If, when scanning the Advisor, a list of certain services appears, then you need to sequentially disable each of the presented ones by clicking the corresponding buttons under each of them. Thus, we will significantly speed up the system boot and increase the speed of any operation on this PC as a whole.
The next section “Resources” is extremely informative, where the operation of the system and its main blocks in real time is presented in the form of graphs.

Open the “Tools” section. Here are 9 functions shown, of which only a few are the most necessary for stable operation of the system:
- Disk maintenance;
- Registry maintenance;
- System settings;
- Speeding up the Internet.

Under each function there are interactive buttons highlighted in blue. In general, the program interface is also quite simple and convenient. For example, in the first item “Disk Maintenance” you need to go through three steps in sequence:
- Cleaning;
- Defragmentation;
- Finding errors.
We go into each of them and follow the instructions, and if at the end of any stage a utility request appears to reboot the system, then you should immediately perform it. Then re-enter the program and continue optimization from where you left off.
Registry Maintenance:
- Cleaning;
- Defragmentation.
System settings:
- Options;
- Service optimization.
In this function, in the parameters, you can disable all kinds of graphic visualization effects, optimizing the PC system with parameters below standard (for example, built-in video card (VGA), insufficient processor frequency, etc.)

In “Service Optimization” you can improve system performance by disabling some services, a list of which will be displayed immediately after selecting the appropriate PC profile.

And the last optimization feature is “Internet Speedup”. After the automatic check, the system’s operation will also be adjusted according to the criteria for setting up work on the Internet. There is no need to resort to manual optimization of Internet speedup; in the “Internet Speedup” section, the result of automatic configuration is quite effective.

Good afternoon.
To prevent Windows from slowing down and to minimize the number of errors, it needs to be optimized from time to time, cleaned of junk files, and corrected incorrect entries in the registry. There are, of course, built-in utilities for these purposes in Windows, but their effectiveness leaves much to be desired.
Therefore, in this article I would like to consider the best programs for optimizing and cleaning Windows 7 (8, 10*). By regularly running these utilities and optimizing Windows, your computer will run faster.
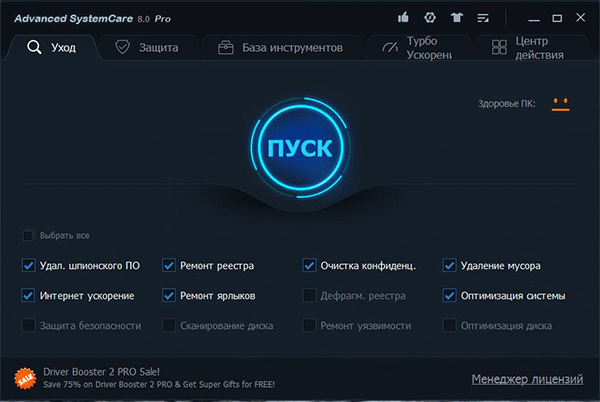
1) Auslogics BoostSpeed

The main window of the program.
One of the best programs for optimizing Windows. Moreover, what is immediately captivating about it is its simplicity; even when you first launch the program, it will immediately prompt you to scan the Windows OS and correct errors in the system. In addition, the program has been completely translated into Russian.
BoostSpeed scans the system in several directions at once:
For registry errors (over time, a large number of incorrect entries may accumulate in the registry. For example, you installed a program, then uninstalled it, but the entries in the registry remained. When a large number of such entries accumulate, Windows will begin to slow down);
To useless files (various temporary files that are used by programs during installation and configuration);
To incorrect labels;
For fragmented files (article about).
Also included in the BootSpeed complex are several more interesting utilities: for cleaning the registry, freeing up space on your hard drive, setting up the Internet, monitoring software, etc.

2) TuneUp Utilities

This is not even just a program, but a whole range of utilities and programs for PC maintenance: optimizing Windows, cleaning it, troubleshooting problems and errors, setting up various functions. Still, the program scores high in various tests for a reason.
What TuneUp Utilities can do:
- clean disks of various “garbage”: temporary files, program caches, incorrect shortcuts, etc.;
- optimize the system registry from erroneous and incorrect entries;
- will help you configure and manage Windows startup (and startup greatly affects the speed of Windows startup and loading);
- delete confidential and personal files so that not a single program or “hacker” can restore them;
- change the appearance of Windows beyond recognition;
- optimize RAM and much more...
In general, for those who are not satisfied with BootSpeed in some way, TuneUp Utilities is recommended as an analogue and a good alternative. In any case, at least one program of this kind must be launched regularly when actively working in Windows.
Cleaning the registry in CCleaner.
A very small utility with great capabilities! While running, CCleaner finds and deletes most temporary files on your computer. Temporary files include: Cookies, website history, files in the recycle bin, etc. You can also optimize and clean the system registry of old DLLs and non-existent paths (remaining after installing and uninstalling various applications).
By regularly running CCleaner you will not only free up space on your hard drive, but also make working on your PC more comfortable and faster. Despite the fact that in some tests the program loses to the first two, it enjoys the trust of thousands of users around the world.
4) Reg Organizer

One of the best registry maintenance programs. Despite the fact that many Windows optimization packages have built-in registry cleaners, they cannot compare with this program...
Reg Organizer works in all popular Windows today: XP, Vista, 7, 8. It allows you to remove all incorrect information from the registry, remove the “tails” of programs that have not been on the PC for a long time, compress the registry, thereby increasing the speed of work.
5)Advanced SystemCare Pro
A very, very good program for optimizing and cleaning Windows. By the way, it works in all popular versions: Windows Xp, 7, 8, Vista (32/64 bits). The program has a pretty good arsenal:
Detecting and removing spyware from your computer;
- “repair” of the registry: cleaning, error correction, etc., compression.
Clearing confidential information;
Removing junk and temporary files;
Automatic setting of settings for maximum Internet connection speed;
Correction of shortcuts, removal of non-existent ones;
Disk and system registry defragmentation;
Set automatic settings to optimize Windows and much more.
6) Revo Uninstaller

This relatively small utility will help you remove all unwanted programs from your computer. Moreover, it can do this in several ways: first, try to remove it automatically through the installer of the program itself; if that doesn’t work, there is a built-in forced mode in which Revo Uninstaller will automatically remove all the “tails” of the program from the system.
Peculiarities:
- Easy and correct uninstallation of applications (without “tails”);
- Ability to view all applications that are installed on Windows;
- New “Hunter” mode - will help you uninstall all, even secretive, applications;
- Support for the “Drag&Drop” method;
- View and manage Windows startup;
- Removing temporary and junk files from the system;
- Clearing history in Internet Explorer, Firefox, Opera and Netscape browsers;
- And much more…
Options for bundled utilities for full Windows maintenance:
1) Maximum
BootSpeed (for cleaning and optimizing Windows, speeding up PC boot, etc.), Reg Organizer (for complete optimization of the registry), Revo Uninstaller (for “correctly” uninstalling applications so that there are no “tails” left in the system and it is not constantly needed clean).
2) Optimal
TuneUp Utilities + Revo Uninstaller (optimization and acceleration of Windows + “correct” removal of programs and applications from the system).
3) Minimum
Advanced SystemCare Pro or BootSpeed or TuneUp Utilities (for cleaning and optimizing Windows from time to time, when unstable operation occurs, brakes, etc.).
That's all for today. Good and fast Windows to everyone...
Many programs start automatically when you turn on your computer, causing your system to take longer to boot. In addition, these programs take up extra RAM and are not always needed by you.
To edit the list of programs for startup, you need to click the “Start” button and type the msconfig command in the search bar. In the Startup tab, programs that start when you turn on the computer are checked. All that remains is to uncheck unnecessary programs.
Be careful not to disable autoloading of utilities and antivirus products.
3. Disable autoloading of unnecessary fonts

When you turn on your computer, Windows downloads a selection of over 200 different fonts. You can disable unnecessary ones like this: “Start” - Control Panel - Design and Personalization - Fonts. Open the context menu with the right key and on the unnecessary font and select “Hide”.
Comic Sans only , only hardcore!
4. Delete temporary files

In the process of work, many temporary files are created daily on the hard drive, which somehow imperceptibly become permanent. They also greatly reduce the overall speed of your computer.
Regularly cleaning your computer will speed up the loading of the operating system and programs, and will also free up space on your hard drive.
To do this, just open My Computer - the partition with the operating system (usually Drive C:\) - the Windows folder - the Temp folder, and then delete all files and empty the Recycle Bin.
5. Disk Cleanup

To optimize Windows, Microsoft developers have provided a built-in disk cleanup utility. It searches for and deletes junk files, such as temporary Internet files, distributions of installed programs, various error reports, and others.
Go to the Start menu - All Programs - Accessories - System Tools - Disk Cleanup.
6. Disk defragmentation

After deleting unnecessary programs and files, start defragmenting the disk, i.e. regrouping files on your hard drive for maximum PC optimization.
Defragmentation can be done using Windows tools, or you can use special programs - this is a topic for a separate article.
The standard procedure will look like this - in Explorer, select the partition to defragment (for example, drive D:\) and right-click on it, in the menu that appears, open Properties and in the Tools tab, click “Defragment.”
7. Install SSD

A solid-state drive will help speed up the loading of the operating system and programs, the self-installation of which in a laptop we discussed in. If you don’t have enough money for a 500 GB SSD, it makes sense to purchase a disk at least to install the operating system - it will simply fly on the new SSD.
8. Install HDD
There are many video guides on HDD installation on YouTube. Here's one of them
If your budget does not allow you to spend money on expensive SSD drives, you should not give up more traditional components. Installing an additional HDD will significantly improve PC performance.
So, if the hard drive is more than 85% occupied, the computer will work many times slower. In addition, installing an additional hard drive on your desktop PC yourself is even easier than an SSD.
9. Installing additional RAM

RAM is used to process running programs. The more information you need to process, the more RAM you will need.
If there is not enough memory, the system begins to use hard disk resources, which leads to a critical slowdown of the computer and freezing of Windows.
Adding or replacing RAM sticks is not difficult. For a regular computer with a set of standard office programs, 4 GB of RAM is enough, and for a gaming PC you can think about 16 GB or higher.
10. Cleaning

Dust is computer enemy No. 2 (everyone knows that enemy No. 1 is). It prevents normal ventilation, which can cause PC components to overheat, slowing down the system. Extreme overheating of components can lead to their complete failure.
Turn off your computer at least half an hour before you start cleaning. Do not clean in synthetic clothing - friction may result in a static charge that can damage components. To remove static, touch the unpainted part of the central heating radiator.
Turn on the vacuum cleaner at low power and carefully remove dust from all parts of the PC. Particular attention should be paid to the power supply, processor cooler and video card, where most of the dust accumulates.
Even though Windows 7 is much more responsive than its predecessor, Vista, its default settings are far from optimal. However, when speeding up the work of the “seven”, it is necessary to take into account that some changes made to its settings lead to a deterioration in the functionality and appearance of the system. Your task is to choose a configuration that will provide you with the optimal balance between performance, functionality and appearance. Next, we will look at several ways to speed up the operation of a number of Windows 7 systems, as well as a number of its utilities.
Windows 7: system boot optimization
It is known that the greatest irritation for the user is the long loading of the operating system. Despite the fact that the "seven" is optimized by the developers in such a way that it loads 10-20 seconds faster than Vista, users always strive to make it even faster. Multi-core processors allow you to speed up system loading even more, for which you need to perform a number of settings. Open the msconfig utility by typing its name in the Start menu bar. In the window that opens, we need the Download tab, where we need to click on the Advanced options button.
 Check the box next to Number of processors and select the maximum number of your cores from the drop-down menu. After you click OK to save the settings, reboot the system, and you will see how much faster Windows 7 boot has become. To speed up the system boot, you should also take into account that its speed directly depends on the number of processes and applications launched at startup Windows. Therefore, opening the msconfig utility again, let's go to its other Startup tab.
  Many Windows applications are added to the system startup without the user noticing. When there are too many such programs, downloading begins to slow down significantly. Therefore, carefully analyze the list of applications presented in the startup tab and uncheck all programs that you do not need. Ideally, you should leave a checkmark next to the name of your antivirus only. In the same way, you can speed up the loading of Windows by disabling all unnecessary services that slow down not only startup, but also operation. We will look at disabling them below.
 Optimizing services in Windows 7
Throughout the Windows OS family there are many services designed to interact with internal hardware, drivers and some system options. Many third-party programs also add their own services to the system. Working in the background, many services significantly reduce system performance without improving its functionality at all. Moreover, a number of Windows 7 services are detrimental to the overall security of the system. Such services, first of all, include the default Remote Registry, which allows an attacker to make any changes to the system. There are two ways to open the service management utility: go to Control Panel - Administrative Tools - Services or enter services.msc in the Start menu bar. After launching this application, a window will open in front of you with a list of all services.
  To disable a particular service, you need to left-click on it, after which a window will open.
  Click the Stop button to stop the service and change the startup type to Disabled to prevent it from being enabled again the next time you start the system. After that, click Apply and OK, the service will no longer interfere with your computer. When working with the list of services, you should be especially careful, since disabling the desired process can lead to a partial loss of system functionality: certain equipment or applications may stop working. If you have made changes to the properties of several dozen services at the same time, it will not be easy to find the right service required for a particular program to run. Below we provide a list of services that can be disabled on almost any computer, be it a single machine or part of a local network.
 - The remote registry allows remote users to make changes to the system registry. For security reasons, this service should be disabled.
- Offline Files is responsible for implementing the Offline Files API. Not needed by the vast majority of users. Turn it off.
- The Tablet PC Input Service is required for pen and similar input devices to work on tablets. Turn it off.
- The Windows Error Logging Service is responsible for logging system errors. If, when problems arise with your PC, you are in the habit of analyzing log entries to identify the causes of errors, leave the service startup type set to Auto. If you are almost never interested in what is recorded in the system log, you can disable the service.
- IPsec key modules for key exchange... - provides IKE key management and authenticated IP functionality. Turn it off.
- Client for tracking changed connections. The service tracks connections between files located within the NTFS system. Once disabled, your computer will run faster.
- Windows Search is necessary to index files on your computer to enable search functionality. If you do not use the system's built-in search, you can disable the service.
- Parental Control. This service was introduced into Windows 7 from the Vista version and is needed only for compatibility with it. Turn it off.
- IPSec Policy Agent. Almost never used on a home PC. Turn it off.
- KtmRm for distributed transaction coordinator. If you read the description of the service, it becomes clear that it is not recommended to start it unless you are sure that you need it. Turn it off.
- IP Ancillary Service. Not used on a home computer. Turn it off.
- Print Manager. If you do not use the printer, disable this service. If you print documents occasionally, try setting the startup to Manual. If printing does not work in this case, change the startup type to Auto. Whether your printer will work or not with the Manual startup type depends only on its drivers.
- A secondary login is required to run processes as a different user. Disabled for security reasons.
- Fax machine. We disable it if you do not send or receive faxes.
- Windows Defender protects against spyware. You can disable it if you plan to install an alternative security system on your system.
- Windows Firewall. Can be disabled if you have installed a third-party firewall on your system.
- Smart Card Removal Policy. If you don't use smart cards, you don't need the service.
- Microsoft iSCSI Initiator Service. If you do not use iSCSI devices, you can set the service startup type to Manual.
- SSDP discovery is required for devices that use the SSDP protocol. Can be disabled.
- Adaptive brightness control is only necessary for PC owners with a built-in light sensor to automatically adjust monitor brightness.
- A computer browser is required to discover working machines on the local network. A single computer does not need the service. Turn it off.
- Server. The service is required only for computers used for file or printer sharing. Turn it off.
- Bluetooth support service. Disable if you don't have Bluetooth.
Reducing shutdown time: Windows 7 optimization
The system shutdown time can also be reduced, but this can only be done using a somewhat barbaric method - reducing the time that is given to the process to complete running programs. If the system does not have time to complete their work, they will be stopped forcibly. Open the registry again and find the HKEY_LOCAL_MACHINE -> System -> CurrentControlSet -> Control branch there. Find the WaitToKillServiceTimeout parameter there and change its value from 12000 to 2000.
ReadyBoost function
Windows 7 has an option to use flash drives in addition to RAM for data caching. This allows you to speed up data read and write operations and also increases system performance. To use the ReadyBoost option, you must have USB drives or flash cards connected to the PC using a card reader. Insert the drive into the USB port of your computer and in the Autorun window, select Speed up the system using Windows ReadyBoost. Specify the space limit available for use. To save the settings, click the Apply and OK buttons. After this, the ReadyBoost.sfcache file will be created on the USB drive. Under no circumstances remove the flash drive from the computer!
 Optimizing your hard drive in Windows 7
This function is valid in the Windows family of systems, starting with version XP, it is also available in the “seven”, however, if in XP this option was enabled by default, in Windows you must enable it yourself. Right-click on the My Computer icon and open Device Manager. Find Disk devices in the list, right-click on the HDD name and select Properties. A window will appear where we need the Policy tab. Check the box next to “Disable buffer clearing...”. Here in the Device Manager we find the IDE ATA/ATAPI controllers branch in the list, where in the properties of all ATA channels in the Additional parameters tab, check the box next to the Enable DMA item.
Speed up copying and moving files
One of the new options in Windows 7 is remote differential compression, which is designed to calculate the differences between two objects, which reduces the amount of data transferred, but requires more calculation time. You can disable this option in the Windows Components utility. Find the Programs and Features icon in Control Panel and open Turn Windows features on or off from the list on the left. Next to the item Remote differential compression, uncheck the box.
Disabling driver signature verification
This setting will significantly reduce the time required to install drivers. Use the Start menu to find the gpedit.msc utility. Then, in User Configuration, go to Administrative Templates -> System -> Driver Installation. Click Digital signature of device drivers and in the window that opens, select Disable, click Apply and OK.
Speed up thumbnail viewing
To increase the speed of viewing thumbnails, make the necessary settings in the registry. Open the HKEY_CURRENT_USER -> Control Panel -> Mouse branch. Change the MouseHoverTime setting to 100 or lower.
Speed up the Start menu
When you open the Start menu, the system spends some time identifying and highlighting recently installed programs. If you do not need this option, you can disable it, reducing the time it takes to open the menu. Right-click on the Start button and select Properties from the menu that appears. In the Menu tab, click the Configure button. In the window that appears with a list of settings, uncheck the “Highlight recently installed programs” item.
  There is a short pause before the Start menu opens, which can be reduced by changing the corresponding registry setting. To do this, first launch the registry by entering the word regedit in the Start menu bar and pressing Enter.
  In the registry editor that opens, find the HKEY_CURRENT_USER -> Control Panel -> Desktop key and change the value of the MenuShowDelay key from 400 to 50. After this, the pause when opening the menu will be noticeably shortened.

Disable unnecessary visual effects
If your computer has a not very powerful graphics card or uses a graphics solution built into the motherboard for graphics, Aero visual effects may cause a noticeable performance hit. Owners of inexpensive laptops, primarily intended for office work, face this problem especially often. In the Control Panel, click on the System icon and in the window that opens, select Advanced system settings. A window will appear in front of you where you should go to the Advanced tab. Click the Settings button under Performance. A window will open with a list of special effects, many of which significantly affect system performance.
  You have to configure the system to ensure the optimal balance between appearance and performance. On weaker computers, you can disable all effects by selecting “Ensure the best performance.” By making the “Special Effects” item active, you can independently choose which effects you need. Most users prefer not to disable the “Smooth out irregularities in screen fonts” option.


