A disadvantage of the camera is the lack of a port for a memory card: it is installed on the motherboard, which requires partial disassembly of the device.
Ready-made sets of video surveillance systems
Several cameras will definitely be required to monitor a large area or ensure the security of a complex building.
A smart choice for solving this problem is the AliExpress video surveillance system. On the trading platform it is easy to find an offer with the required number of cameras, with or without a DVR.
H.VIEW 104AM+10X5AMC4
The system includes 4 analog cameras and a hybrid video recorder, to which you can connect digital monitoring devices.

The equipment set is designed for universal use, inside and outside the building, and offers many possibilities.
Characteristics:
- powerful IR illumination of cameras (24 diodes);
- hybrid video recorder;
- 720p class cameras;
- built-in motion detectors;
- protection from moisture;
- simple mechanics of copying a video archive, saving it to external media or memory cards;
- built-in access control system via the Internet, from a local network;
- convenient shell for working with cameras.
The cameras are designed for wall mounting; the system as a whole is characterized by quick deployment and easy configuration.
Specialized software is offered for accessing broadcasts via the Internet or local network.
ZOSI 8KN/8KM-106B4-00
An excellent purchase option for those who initially expect to expand their video surveillance capabilities.

The equipment set offers:
- 4 AHD 720p analog cameras, 1/4 Aptima CMOS sensor;
- built-in IR illumination;
- hybrid DVR, with support for disks up to 6 TB, three ports for connecting external media;
- built-in motion detectors and warning system;
- convenient software for remote access via smartphone, PC;
- access control system;
- The temperature range of the cameras is from -10 to 55 degrees Celsius.
A special feature of the system is the possibility of easy expansion. The hybrid DVR can work with all types of cameras, analog and digital. The set includes 4 monitoring devices, and there are 8 recorder ports available.
Techage Plug and Play 4CH Wireless NVR Kit P2P 720P HD
This system will not force you to fuss with laying cables. The connection between the cameras and the DVR is wireless.

Characteristics:
- cameras with 1 MP optical sensor, CCTV 720p standard;
- water protection class IЗ66;
- built-in motion detectors, alert system with sending email messages;
- powerful IR illumination (30 diodes) for night photography;
- specialized software for remote viewing of broadcasts;
- easy setup and installation;
- 4 port hybrid DVR;
- the ability to order a built-in 1 GB disk;
- access control system from a local network or the Internet.
A special feature of this set of equipment is not only its ease of deployment (external antennas of the fixation devices and the video recorder guarantee a stable channel over a long distance), but also its impressive durability.
Thus, the cameras are designed for operation at temperatures from -20 to 55 degrees and are characterized by a service life of 5 years.
Conclusion
To find something, you need to start looking. This saying fully applies to cameras and video surveillance systems presented on the Aliexpress trading platform.
There is literally anything here. You can even find devices with an unexpected set of functional features.
But the main thing is that all the products presented are of good quality, reasonable price and technological excellence.
Therefore, if you want to solve video surveillance problems with minimal investment, you should pay attention to Aliexpress’s offers.
Video: Video surveillance from Aliexpress for 7300 rubles. Expert opinion
A camera that looks just like the real thing - even the red LED blinks (can be turned off). In some cases, this will be quite sufficient.
The best-selling 720p IP camera. It has a rotating mechanism in two planes and a good viewing angle. Can be mounted to the ceiling and has a night mode.


Rugged Full HD camera powered by batteries. Can be installed both indoors and outdoors. Perfectly attaches to ceilings and walls. Connect to the camera via Wi-Fi from a mobile application.

Outdoor IP camera in a sealed aluminum case with moisture protection according to IP66 standard. Thanks to infrared LEDs, it clearly films in complete darkness at a distance of 30 m. Resolution - 720p. Can be mounted on a wall or ceiling.

Budget-friendly outdoor camera with night mode and motion sensor with email notifications. Video can be recorded on a card or broadcast over the Internet.
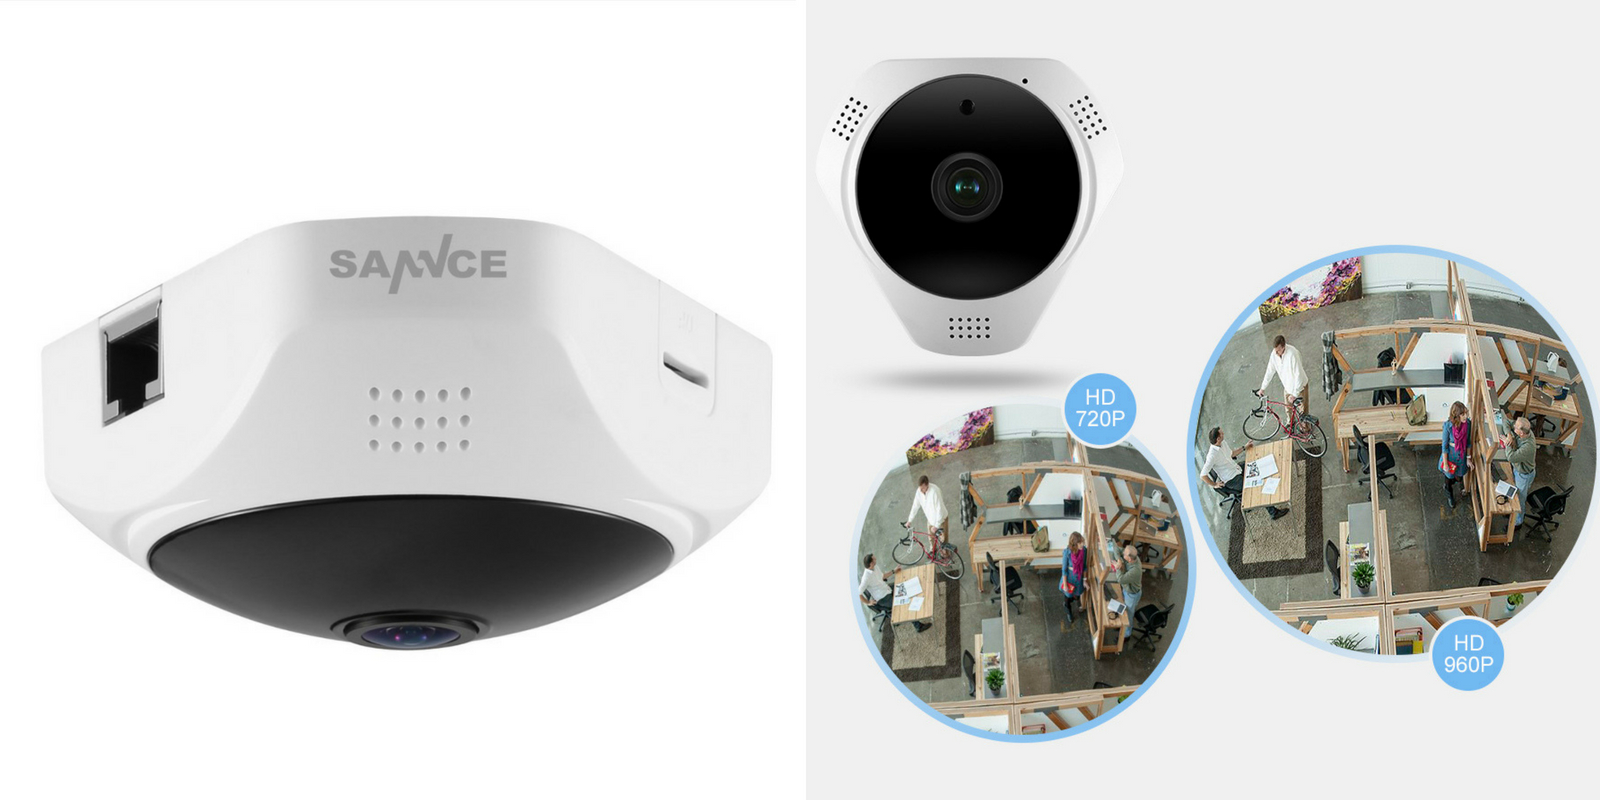
A camera with a panoramic lens for installation on the ceiling, which captures a 360-degree image of the entire room. There is two-way audio communication, a motion sensor, notifications, and a night mode. Picture resolution - 960r.
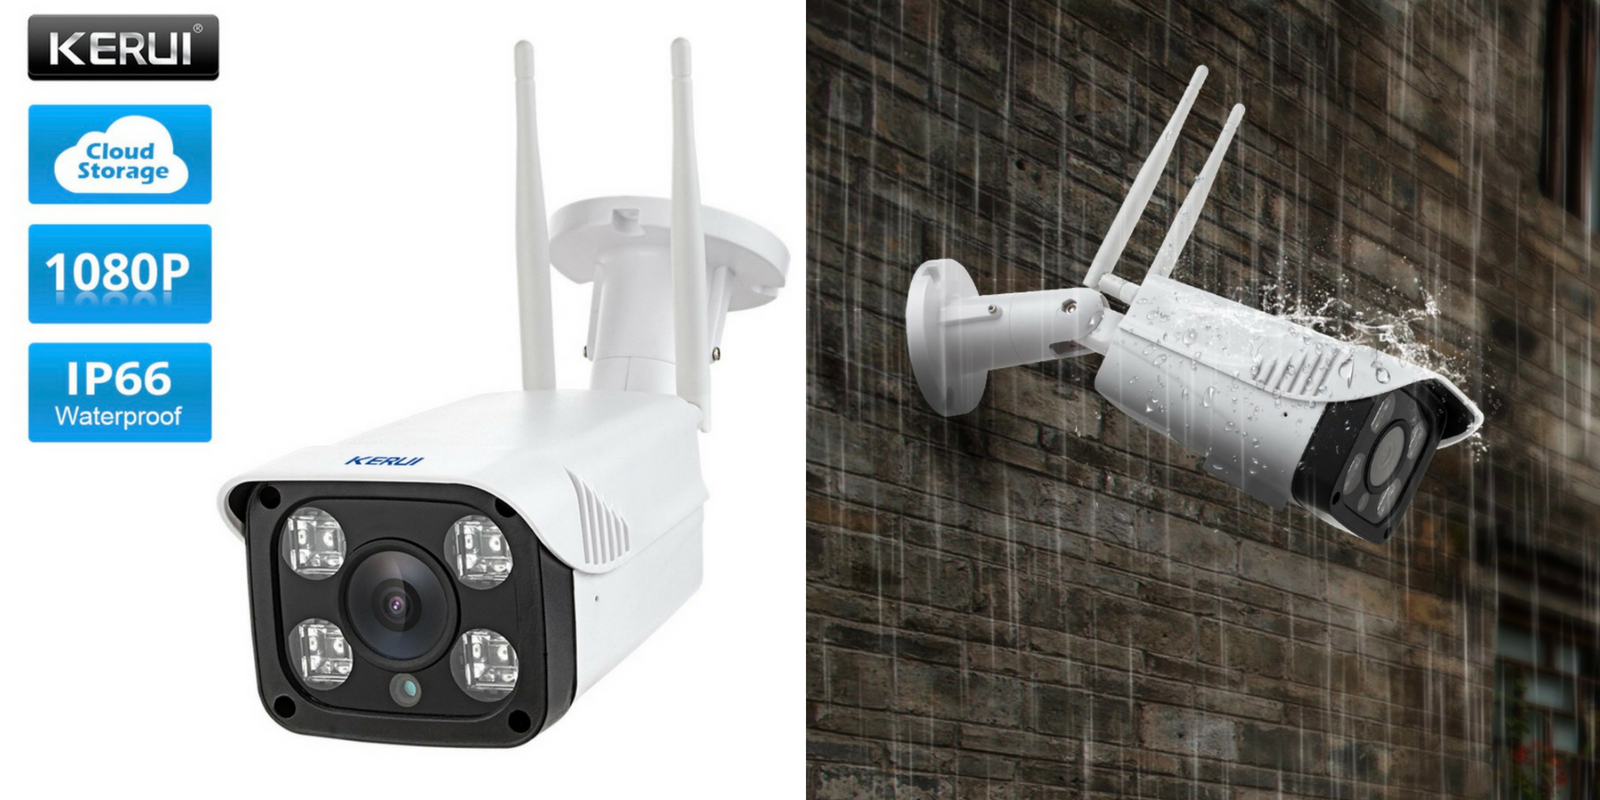
A secure camera with a waterproof housing and the ability to be installed outdoors. Connects to the network via Wi-Fi or cable. Has a motion sensor that supports integration with a security alarm. Picture resolution - 1080p.
10. Hiseeu FH2A

Another good budget camera with a Wi-Fi module and control from a smartphone. Supports SD cards up to 64 GB. There is a night mode, pan and tilt, and a motion sensor.
The life hacker may receive a commission from the purchase of products featured in the publication.
When creating their own security system at home or office, many people purchase a Chinese IP camera. This choice is connected with the high quality of the equipment, the ease of management and, of course, the price. Before you can start using your device, you need to configure it. This task will not be difficult even for a non-IP equipment specialist.
Choosing a camera from China
The user is always interested in what opportunities a budget camera from the Celestial Empire can provide him with? In the price range of up to $100, you can find high-quality digital equipment equipped with infrared illumination and a PTZ function, which, using a small motor, can remotely rotate the camera while monitoring dynamic events. An example of quality equipment in this price range would be any desktop camera in the $80-$100 price range. Among the additional advantages:
- LAN function;
- built-in microphone and speakers;
- Possibility of memory card support.
Camera setup
The structure of a desktop camera is very simple - stand, housing, antenna. The power supply of many Chinese devices is designed for the American type of power supply, so you will additionally have to purchase an adapter that allows you to connect different standards. On the back of the stand you can see inputs designed for various types of network equipment.
 To connect the camera to a computer and further configure it, you will need to find its IP address. It will need to be changed, since the standards of the camera and home local networks are different, but for the first acquaintance of the device and the home workstation it will be necessary. Most Chinese IP cameras have their IP address printed on a small plastic sticker on the box, so you shouldn't throw it away. But more expensive devices come with a CD with the necessary software and a user manual; the IP address will be indicated there too. Next, the sequence of actions will be as follows:
Copy the software to your computer's hard drive (or, for some manufacturers, download the software from their website).

It is important that when running through VLC, the appearance of the image will be delayed by about a second compared to real time.
Not everyone is satisfied with the picture quality produced by a budget Chinese camera. It is difficult to enlarge and does not offer the best color rendition. You can configure it using the proposed software; the Media Settings: Quality and Rate sections will help with this. It is quite easy to increase the sharpness of the image; color rendering defects, if present, will most likely not be changed.
Setting up image reception via browser
The user may find that it is not possible to configure stream transmission not through the utility, but through the browser. Several additional steps will need to be taken. If you select Internet Explorer as the main browser when entering the management program using the “Activation via Browser” link, it will become obvious that the image does not appear. It is important that other browsers Firefox or Chrome do not have some of the Explorer settings, so it will most likely not be possible to transfer images through them.
You need to configure another utility, OCX (ActiveX plugin). In the IP camera management program, the configuration button will appear in the upper right corner.
In this case, a misunderstanding may arise between the computer and the program written in hieroglyphs; this problem is solved by installing Video Player Setup with the removal of all unnecessary characters. If you simultaneously start transmitting the stream through both channels, the problem with a second delay in image transmission can be solved, the image will begin to appear synchronously with reality.
The last step will be to configure the automatic camera rotation control; the joystick button can be found in the program. They also use simple options for moving in different directions and automatic horizontal or vertical patrol functions.
Self-configuring an IP camera will take no more than 30 minutes of the user’s time, but after completing all the necessary manipulations, he can easily take advantage of all its capabilities, including two-way audio communication and the ability to record images to a memory card.
Today in the video surveillance industry there is a trend of gradual transition from analog cameras to modern digital IP video capture devices. This fact is quite natural, since analog devices do not keep up with the development of modern technologies, when they offer the user much better image quality and ease of use of the video surveillance system as a whole for virtually the same amount. Plus, with the help of the latter, it is quite easy to organize remote control of an object, which in our time is also becoming an important point when creating a video surveillance system.
In connection with the widespread transition to IP cameras, more and more people began to be interested in the question of their correct connection and configuration. Of course, for a novice user this may seem like a difficult and insoluble task, but for those who have been familiar with computers for a long time, connecting and setting up IP cameras will not cause any particular difficulties. In this article, we tried to describe in as much detail as possible the process of connecting a digital IP camera to a computer, as well as setting the correct settings for the correct operation of the device.
Connecting the IP camera to the computer
Any IP camera connects directly to the computer's network card via. If there are several cameras, then to access the image from each of them you need to connect the IP cameras via a router.All IP cameras have their own address by default, and before we start setting up the IP camera, we need to know it. To do this, you can use specialized software, which usually comes with devices, or download the necessary utility from the manufacturer’s website. In addition, the IP address of the camera is usually written in the user manual or on the device’s label.
If you try to access the camera interface through a browser the first time you connect, you will probably fail. This happens because the computer and the camera are configured to work on different subnets. After we have found out the IP address of the camera, we need to bring it into line with the one used on your local network.
Today, the creation of remote video surveillance is especially important. Surveillance via the Internet is quite easy to carry out using a router with a dedicated IP address. Online video surveillance can be implemented in 4 ways, which you can read about.
Creating remote video surveillance is becoming more and more accessible with the help of special ones. Moreover, when implementing cloud video surveillance, you do not need a dedicated IP address, and equipment settings are kept to a minimum.
For video surveillance at remote sites, GSM cameras may be useful to you. They will be convenient to use at the dacha, in the garage, or in a country house, because they can quickly warn you about the occurrence of various extraordinary events at the site by sending a message to your mobile phone. You can read about GSM cameras for video surveillance using this link.
To find out the IP of the local network, you need to go to the “Sharing and Network Control Center”, then in the “Connections” line, select “Ethernet” or “Via Local Network”. In the window that opens, click on the “Details” button, then a new tab opens, where we find out the IP address of the local network - look at the line “Default gateway IPv4”, in our case the computer works on the network 192.168.99.*. Let's say the IP address of your camera was something like this: 192.168.0.24, now our task is to replace it with 192.168.99.24 - for you it can be any other numbers, but the principle remains the same.

Find out the IP address of the local network
You can change the IP address of the camera using the same program through which you found it out. Hikvision, for example, calls it SADP; other cameras come with their own programs. After the IP address of the camera is brought into line with the address of the local network, the image from it will become available at the new IP address, in our case it is http://192.168.99.24.
Changing the camera's IP address via its web interface
There is another way to get into the camera’s web interface, which involves changing the IP address of the local network. For example, the IP address of our camera is 192.168.0.24, and the local network of the computer is 192.168.99.22, but we need the computer and the camera to work in the same subnet (.99. or.0.). To do this, let’s bring the local network subnet in line with the camera address, for example, change it to 192.168.0.22. To do this, go to the “Sharing and Network Center”, then in the “Connections” line, select the “Ethernet” or “Via Local Network” item. A window should appear, as in the screenshot below. In this window, click on the “Properties” button, then select “IP Protocol version 4 IPv4”, call up its properties, and manually enter the IP address 192.168.0.22, and specify the address of our IP camera 192.168.0.24 as the gateway. Don't forget to save the settings.

Registering an IP address to access the camera. The picture is available for enlargement
Now, through any browser, go to the device’s web interface - enter the camera address 192.168.0.24 in the search bar. If you did everything correctly, a window should open to enter your username and password, which we take from the camera instructions. Usually by default they are admin/admin, admin/12345, admin/00000000, and other easy combinations. After entering the data, you will be able to view the image from the camera, as well as configure the camera.
In the camera's web interface, you need to match the camera's IP address with the local network address. Typically these settings are located on a tab called “Network”. For example, your router is located at the local network address 192.168.99.22, which means that for the camera we need to set an IP something like this: 192.168.99.24. We put a tick in the IP settings to “Fixed IP address” - we will need it to configure, and enter the data:
- IP address: 192.168.99.24;
- Subnet mask: standard 255.255.255.0;
- Gateway (IP address where our router is located): 192.168.99.22;
- DNS IP Address: 192.168.99.22.
If you do not want to view your cameras via the Internet, then simply check the box next to Dynamic IP (DCHP).
Now you need to assign a port to your camera. By default, port “80” is open, so if your camera does not have such settings, you must use it. If this line is available, we enter the values manually for each camera. For the first, for example, we will set port 8081.

Scheme for connecting IP cameras to a computer via a router and creating access via the Internet
Save the settings, disconnect the camera’s network cable from the computer and insert it into a free port on the router. After this, we reset all the manual IP address settings that we previously made on the local network to connect to the camera’s web interface to automatic - we simply check the dots for obtaining the IP address and DNS addresses automatically, and connect the router to the computer’s network card. If necessary, log into the camera’s web interface through the router using the IP address assigned to it ( http://192.168.99.24), and set up a wireless connection via Wi-Fi. We make the same settings for each camera, and do not forget to assign different IP addresses and ports to all other devices, if this is permissible (on some cameras there is no provision for manually setting ports, for them it will be standard - “80”). For example, we will assign IP 192.168.99.25 to the second camera and port 8082, the third 192.168.99.26/8083, the fourth 192.168.99.27/8084, and so on.
For video surveillance using IP cameras via a computer, you may need special programs. They can be included with the equipment or downloaded separately from the Internet. You can read about them at.
Instead of IP cameras, in some cases it is more appropriate to use. For example, when a video surveillance system consists of only one camera.
You can organize video surveillance at your dacha using a regular 3G router and several IP cameras. At the same time, it is very important that there are no interruptions in the cellular network signal in your area. Read the article about how to implement country video surveillance using this method.
Setting up a router to view IP cameras via the Internet
After setting up the cameras, it’s the router’s turn:
- We connect all configured cameras to the router via LAN network ports, or via Wi-Fi;
- We connect the router to the computer via Wi-Fi or a network cable;
- We go to its web interface and begin port forwarding so that the router, when accessing a specific address from the outside, knows which camera to issue from the internal network.
These settings can be located in sections called “Port Forwarding”, “Routing”, “WAN”, in the “Virtual Server” or “Virtual Server” tab. First, you need to check the box to activate the virtual server. Depending on the router model, you may come across similar settings:
- Service name - enter manually, for example, “First camera”;
- Port range - the port that we assigned in the settings of the first camera (8081);
- Local IP address (IP camera address) - for example, we have it 192.168.99.24;
- Local port - 8081, or 80 if the camera does not have port settings;
- Protocol: TCP – the IP camera works with this protocol;
- Protocol number: leave the field empty, or write any number, for example, 1.

Connecting and setting up an IP camera via a router
We prescribe the settings for each camera according to the above principle. Do not forget that each camera must have its own different IP address and port, if, of course, there is such a possibility.
To be able to connect to the cameras from any device with Internet access, you will need a static IP address. You can order it from your provider for a fee, or use the DynDNS service. Using this service, you can assign any domain name to your dynamic IP address, like http://your_unique_domain.ddns.ru. But first you need to activate this function in the router settings. In some routers, these settings are located in the “WAN” section on the “DDNS” tab. There you can specify the server (DynDNS, ASUS, NO-IP, etc.), your 3rd level domain name, and other necessary settings. Next, we register the domain name on the service (by the way, ASUS routers have their own free service for these needs), and register it in the router settings.
Checking functionality after setting up IP cameras
After setting up the IP cameras and router, let’s check their functionality. To do this, you need to open your browser and write the IP address of the camera and its port in the address bar in the following form: http://your_unique_domain.ddns.ru:8081, or http://your_static_IP_address:8081. When accessing the camera from your computer located on the same local network as the camera with a router, simply enter its unique IP address into the address bar.
If you have configured everything correctly, the system should work, and when you enter different ports in the address bar of the browser, you will see a picture from the corresponding camera.
So, we have looked at the question of how to connect an IP camera to a computer and configure it to work on a local network, as well as organize access to it via the Internet from any device. Remember that some nuances may vary on equipment from different manufacturers, but the basic principle of setup will always be the same.
With this they read:
Did you like the article? Share with friends on social networks!21 comments
Hello, of course, you can connect any, even the cheapest, IP camera to your laptop. Everything you described will be enough to connect one IP camera to a laptop.
Are there IP cameras with wifi and the ability to directly connect to it without using a wifi router?
Those. I have a phone with Android and wifi, I have an IP camera with wifi in an open field 😉 how to make them friends?Try using tinyCam Monitor to connect security cameras to Android. Using it, you can connect most IP cameras that have a WiFi access point to an Android gadget.
Hello, thank you for reading the article.
Question, can I connect any, roughly speaking, inexpensive IP camera to the laptop by “doing magic” with the IP address?
p.s. I need to shoot a video in the dark using a camera with IR illumination. For these purposes, will it be enough for me: an IP camera, software, a laptop?
Thank you


