The Android application technology platform has proven to be versatile and developer-friendly. You can develop an Android app and publish it on the Google Play Store with minimal restrictions. This concept has led to the rapid development of popular Android applications, some of which are not available on iOS and other platforms. To run an Android application, you usually need to use a smartphone or tablet with this OS - this is obvious. What to do if you want to try using Android without buying a device?
Fortunately, you have this opportunity; Android can be run even on an old desktop computer. There are several ways to accomplish this task, each of which has its own advantages and disadvantages.
Perhaps the easiest way to run Andoid apps on a Windows computer is to use the ARC Welder app for the Google Chrome browser. The application was developed by Google and can be used not only on Windows computers - this method also works on Chromebooks and Macs. The launch process is practically independent of the platform used. Simply go to the Chrome Web Store and install the ARC Welder app from the catalog.
The ARC Welder application is in beta and is intended primarily for developers. However, the process of downloading the app is quite simple. You need to upload the APK file to ARC Welder. The APK file can be obtained by backing up the app on a physical Android device or by downloading from various third-party sites on the Internet. We do not recommend downloading paid applications and games from dubious sites. There are resources that archive free apps, such as APK Mirror.
Once the required APK file is downloaded and ready for download, you can open ARC Welder from the list of extensions in Google Chrome and point to the file. Then you need to choose how to display applications - landscape/portrait mode, smartphone/tablet mode and clipboard access method. Not every Android application will launch this way, and some applications may lose some of their functionality. ARC Welder, unfortunately, does not currently have built-in support for Google Play services (unless you are an application developer and do not have access to the source code), so Google applications and some third-party applications will refuse to work.
Applications or games that run in ARC generally run smoothly. You can get full functionality from Evernote, Instagram and even Flappy Bird. You can only have one application installed in ARC Welder at a time; to launch another application you need to return to the installation dialog.
The application deployment process and the limitation of running only one application at a time create barriers to everyday use of the tool. However, the extension is suitable for the needs of developers and testers, or simply to get acquainted with the capabilities of the mobile platform.
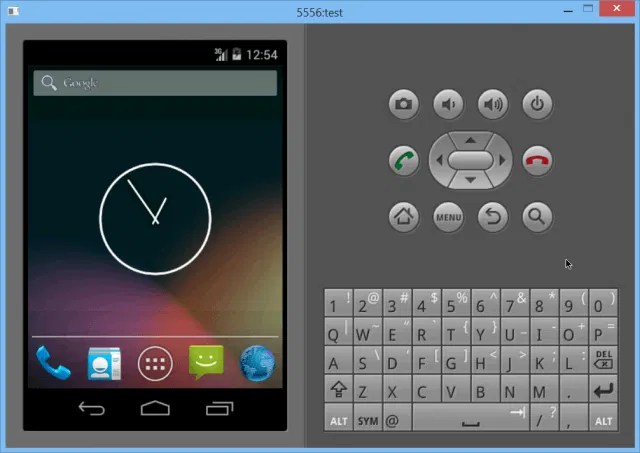
The next easiest way to run Android apps on a PC is to use an Android emulator developed by Google as part of its software development kit (SDK). The emulator can be used to create virtual devices running any version of Android with different screen resolutions and hardware configurations. The first disadvantage of this method is the rather complicated installation and configuration process.
Neither product is perfect - you need devices supported by the tools, such as the Dell XPS 12 in the case of the Intel version or the Lenovo ThinkPad x61 for Android-x86. You can install these environments on top of Windows, but this is not a good idea. The smartest way is to create a separate hard drive partition and install Android on it.
If your PC configuration is not supported by these products, you can try installing them in VirtualBox or VMware virtualization environments, which are faster than the Android emulator. These products may still not be suitable for testing games, but most applications will install and work correctly. You will need to install applications yourself, because... There is no Google Play integration in these products. For help, you can use the instructions on our website - Installing Android in VMware Workstation.

If you're looking for a way to run multiple Android apps and games at once, and it's easy to install and configure, then BlueStacks is your choice. represents one of the easiest ways to launch applications. However, the product uses a highly modified version of Android to run applications. BlueStacks contains a built-in Google Play store, and you have access to all purchased paid applications. The program is added to the list of Google Play devices under the name Galaxy Note II.
A separate BlueStacks window contains a list of applications divided into categories: games, social networks, etc. When searching for an application or clicking on the icon of a specific application, the unexpected happens - the Google Play client in tablet mode is displayed. The user can navigate the interface as they would on a regular Android device, making BlueStacks more than just an “app player.” In fact, the user can install third-party launchers such as Nova or Apex from the app store and select them as the default launcher. The home screen in BlueStacks with app categories is a variant of the home screen. Thus, by replacing it, you can feel like the owner of a real Android device.
Full access to the Google Play store eliminates problems with application deployment, and BlueStacks itself works stably and quickly. You can play most games, but you may have problems using the mouse. If your computer has a touch screen, you can use applications that support multi-touch. BlueStacks can turn a Windows 8 tablet into an Android tablet. The technology used in BlueStacks is called “LayerCake” because Android applications run in a separate layer on top of Windows.
The only drawback of BlueStacks is the use of a modified build of Android. All changes made by the product developer to run Android applications on PC may cause crashes and failures in the application. This modified environment is of little value to developers - there is no guarantee that applications that display and run correctly on BlueStacks will behave the same on a physical device. The service uses a freemium monetization model - you can either pay $2 for a subscription or install several sponsored applications.
Which way is better?
If you want to test an app before installing it on physical devices, Android emulator offers the best way to test the app on your computer first. The product is quite slow, but it is standardized, so the developer can see how the application will behave on a real smartphone or tablet. Porting Android to PC can achieve decent performance, but there may be issues and glitches and it requires compatible hardware.
If you need to get several Android applications on your computer at once, the best solution is BlueStacks App Player. The product provides full access to Google Play, works quickly and supports Windows devices with multi-touch. Don't forget about ARC Welder as a way to run one application at a time. The extension is free and easy to install.
Quite often, users cannot find their favorite applications on Google Play because they have been removed. Yes, indeed, this happens all the time. Either programs for downloading music from VK will disappear from the Market, then the well-known XModGames, which helps with online games, will disappear, or something else. In the end, you simply may not have enough traffic to download this or that application, because not all of them weigh 10 megabytes. Some games have even “stepped over” the one gigabyte level. What to do in such cases? Are there really no workarounds? Eat! That is why we decided to tell you how to install the application on Android from your computer! There are more than enough ways, but we thought carefully and settled on the two most effective, simple and popular. They will suit everyone!
How to install an application on Android from a computer
As mentioned above, we have prepared two options: the first involves installing a specialized program called “InstallAPK”, the second involves using your own Google mail. Well, the easiest way is to connect your smartphone to your computer via USB and drop the downloaded .apk (application or game) onto your phone and then run the installation file through Explorer. In some cases, installing a cache is required; to do this, read the instructions: “ ”.Both are extremely simple. Even the most inexperienced user can master them if desired.
Option one - installing applications via InstallAPK
First of all, you must download this program. And if for one reason or another you need to install an application on Android from a computer, you can use the above-mentioned software - it is the best in its business and works almost flawlessly. You can use it on any version of Windows, starting with XP.Unfortunately, some devices are not supported by the program. But you shouldn’t despair - there is a 100% option that really works flawlessly.
Gmail as an app installer
Perhaps you still thought that Google mail was only intended for exchanging letters. But no, this is far from true - you can also install applications through it. What does the computer have to do with it?
As you can see, both methods are extremely simple, but few people know how to install the application on Android from a computer. The main thing is not to forget about the “tick”, because without them you cannot count on a successful installation.
If you have already acquired such a miracle of modern electronics as a tablet PC or, in popular parlance, a tablet, then you have probably noticed that, by default, it has some programs installed that you will need for work. But this, as they say, is the necessary minimum. And how many interesting games and applications are just waiting for you to install them and start using them!
But have you never worked with the Android operating system before and don’t know what programs to install on your tablet? Well, it doesn't matter. Now we will fill this gap. It is most convenient to find and install applications for your tablet using the Android Market client, which should be included in the list of programs pre-installed on it. There is only one condition here. Whether via modem, Wi-Fi, or high-speed cable connection, your tablet must be able to access the Internet.
First of all, register with Google, create a mailbox there, and you will have your own account. Then you will be able to use all Google services under your own “nickname” (nickname, nickname).
Why do you need to register with Google? Yes, because this company today owns the rights to the Android OS, and one of its services, the Android Market, is an application store for tablet PCs with this operating system. But here - not only paid programs. Quite a lot of interesting free (Free) and trial (light) versions can also be installed on your tablet from the Android Market.
So, if you have access to the Internet, then you will probably understand how to download programs to your tablet right now. After all, this is a matter of a few minutes.
Installing programs on an Android tablet
How to install a program from Android Market
- First of all, you need to add the newly created Google account to the list of your accounts on your tablet.
- Next, go to the Android Market and carefully study what the developers offer for your tablet. There are a lot of applications. You can test them by downloading trial versions and then buy them. Or you can install free programs. It's up to you.
- When you make your choice, click on the icon of the application you like and go to the page with its description. Please review the information provided.
- In the upper right corner of the page, you will see a blue button labeled “Download.” Click on it, and the application will be installed on your tablet automatically. You will be surprised: “Is that all?” Oddly enough, but that’s all.
- It's really very simple.
- On the Android Market you are less likely to catch some kind of malware on your tablet than on third-party sites.
- Programs installed from Android Market will be updated automatically.
But what if you can’t access the Internet from your tablet? What to do in this case? How to install the program on a tablet?
Of course, you can always find a way out. Alternatively, use the method below.
How to install a program from a memory card
- The first thing you need to do is go to Settings, Application Settings and check the box next to Unknown Sources.
- On another device, go online, find the program you need, download the file with the .apk extension and move it to the tablet’s memory card in any way convenient for you.
- Find this file in the tablet’s file manager and click on it. The application will install automatically. If a warning window appears that the tablet will become more vulnerable after installing this application, agree with this. As you can see, it’s also nothing complicated.
If you have a USB cable, you can use another installation method.
How to install the program using a PC
- Search the Internet and download the InstallAPK program.
- Install it on your PC.
- Connect your tablet to your PC via a USB cable.
- Download the tablet application you need. As you probably already remember, it should have the .apk extension.
- Double-click on the file you downloaded. If the defaults are set correctly, the computer will understand what to do next. Or you will need to launch the InstallAPK program through the “Open with” menu. In any case, the application will be installed on your tablet.
As you can see, all three methods of installing applications on an Android tablet are surprisingly simple. So, as a “user” (user), you certainly have nothing to complain about. Choose any one, install whatever you like, and enjoy it to your health!
In this article we will tell you all the ways to install Android applications. Several ways to install APK from the Google Play store, file hosting services and using adb.
Method number 1. Install Android Applications
From the device in the official store
Almost all Android devices have the Google Play app store installed. In this store you can find millions of all kinds of applications - video and audio players, navigation, sports, office, and games.
In order to download and install applications from Google Play you need to:


Method No. 2. Uinstall Android applications
From PC to device in the official store (remotely)
Android has a way to install applications remotely; the main requirement is that your Android smartphone or tablet is connected to the Internet via a mobile network or Wi-Fi.

Method No. 3. Uinstall Android applications
From unknown sources
In Android, unlike iOS, there is an official ability to install applications not from the Google Play store, that is, you can install applications from various torrent and file-sharing sites. Be careful, because instead of a useful application, you can download a virus to your Android tablet or smartphone!
To install applications from unknown sources:

Video example of how to enable “Unknown Sources” in Android:

Method number 4. Install Android Applications
ADB Debugging Tools
ADB is an Android debugging and development tool (). To install the application on Android:
- connect android to pc
- Go to the command line and enter the command:
For example - adb install C:\Users\Vitaliy\Desktop\Vkontakte.apk
If you don’t like this method of installing applications, I advise you to use the Adb Run program, which can do EVERYTHING +
Do you love the game on your smartphone and would like to play it at home on the big screen? Or did the Android utility turn out to be so convenient that it would be useful to use it when working on a computer? There are cases when a program was created exclusively for this platform and the search for analogs for the PC does not give the desired results. For all the situations described, there is one solution - launching the Android utility on your computer. For these purposes, you will first need to select an emulator that allows you to run Android programs on a computer running Windows OS.
There are many similar programs available on the Internet. The most common ones are Bluestacks, Droid4x and Genymotion. All of them are free to download and are always available on the developers' websites. The application distribution is added to the emulator in two ways. You can use installation files with the APK extension, previously downloaded from our website, or access the programs directly through Google Play.
Let's consider options for using voiced emulators.
How to Install Apps Using Bluestacks
- Download the Android emulator on your PC and install it. After installation, a toolbar will appear at the top of the desktop.
- Along with the program, several current modern applications are automatically installed. You can run them to check their operation.
- To search for the necessary Android applications, use the search bar at the top of the main program window. BlueStacks will search multiple online stores at once. The largest of them (Market, GetJar, Appstore, 1Mobile and Amazon) are immediately available for search by default.
- To install from Google Play, you will need a Google account. You can use an existing entry or create a new one.
- After confirming your account, you will see a list of applications according to your search query. Select what you need. Please note that free ones must be marked “Free”. For paid ones, the purchase price is indicated.
- Click the “Install” button. In the window that appears, click “Accept”. The installation process will begin.
- After waiting for the installation process to complete, you can safely start launching your favorite Android application on your PC.
How to install apps using Droid4x
- Download the Android emulator to your computer and install it. A shortcut to launch will appear on the desktop.
- Launch Droid4x using the shortcut.
- A window will open in which icons of the most frequently used menus will immediately be displayed. Here, in the main window, there is a Google Play shortcut.
- We go to the Google Play store. In the search bar, type the name of the program we are interested in and click OK.
- From the proposed list, select the desired application and click “Install”.
- In the window that appears, click “Accept”. The installation process will begin.
- Immediately after installation is complete, you will be prompted to launch the application and enjoy the Android experience on the big screen.
How to install apps using Genymotion
- To receive a link to download installation files, you must register on the site using your email address. The link will come in a registration confirmation email.
- In the window that opens via the link, select the installation option and click the appropriate button.
- The installation will start, after which the VirtualBox, Genymotion and Genymotion Shell shortcuts will appear on the desktop.
- When you launch Genymotion using the shortcut, you will find the “Play”, “Add” and “Settings” buttons. They are used to create and launch a virtual Android gadget, and to configure the emulator.
- To create a virtual device, click “Add”, use your credentials created in step 1. A list of devices will appear in front of you.
- Check out the list and select a device, click “Add”.
- In the window that appears, click “Next”, after which the installation of the virtual machine will begin. Then, when prompted by the emulator, enter a name for your device and click Finish.
- To launch the device, select it in the main program window and click “Play”.
- After that, you can select, install and launch applications as if from the screen of your device.
Summarize
All emulators considered cope with the main function - running Android utilities on a PC. Regarding ease of use and performance, small conclusions can be drawn. They will help you choose an emulator in order to transfer Android applications to your computer.
BlueStacks- a simple emulator that performs the main task, but nothing more. The utility allows you to run games, but it is not always stable and performance leaves much to be desired. It is distributed as a shareware, that is, the basic set of functions is free, but you will have to pay for additional features. An acceptable option for home use.
Droid4x– also simple and undemanding, but, unlike its previous colleague in the shop, more functional and productive. A huge plus is the stability of operation and at the same time it is absolutely free, it never asks for the purchase of additional functions and other things. An excellent option for home use.
Genymotion– a higher rank emulator with many additional features. However, they will be of interest mainly to developers for the initial testing of their programs before testing on real devices. The quality of the product and focus on professional use have led to a disadvantage for ordinary users - the emulator is distributed on a paid basis. The free version does not have an Internet connection and many necessary functions. Not suitable for home use.


