Perhaps the most important point in setting up Windows immediately after the first launch is account registration, that is, the account to which our copy of Windows and other programs from Microsoft will be linked. This approach is not new to us: we have long been accustomed to the fact that we connect all Android devices to a Google account, and Apple gadgets to an Apple account. Microsoft accounts also existed for quite a long time, but most home users simply ignored them. Corporate networks are a different matter, but at home, why bother?
But if in the days of Windows 7, an account with Microsoft was listed as some kind of optional option, then in Windows 10 we must definitely select our own key to the “window”. By the way, contrary to popular legend, users of the “pirated” version can also do this.
Create an account
- Go to the Start menu (Start button), and then select Settings > Accounts > Your Account.
- Select Sign in with your Microsoft account.
- Follow the instructions to switch to your Microsoft account. You may need to verify your identity by entering a verification code.

However, the main “account” for Windows today is not considered a local account, but a network account, thanks to which your system communicates with the central Microsoft server. And in this big “passport” you can enter local accounts for all your households, creating for each of them its own set of settings, parameters and programs.
Features of Windows 10
An account from Microsoft is not only a “key” to Windows, but also a new mailbox, a personal cloud storage for your files on the OneDrive server, a personal photo album and, of course, the ability to use the Windows Store application store. In addition, the Skype dialer, which became part of Windows several years ago, will be linked to the same account.
In addition, a collection of programs for the new “tiled” interface, a photo album and a document folder will be synchronized with your account, so that when you log in from any computer or mobile gadget with Windows 10 under your account, you will immediately find yourself in your usual working environment .
After setting up your account, Windows will ask you to confirm it using a code sent to your mobile phone number (we also indicate this during installation) or to your email inbox. When creating a new account, you can skip this step, but in the future the system will repeatedly pester you and beg for your mobile phone number.
From time to time (for example, when upgrading the hardware of your computer or reinstalling the system), Windows will ask you to confirm your “authenticity”: to do this, you will need to indicate your email address to which you linked the system, and then enter a verification code in a special field , which will come to this box. Don’t be afraid - this procedure has nothing to do with checking the legality of your copy of Windows and is successful even on pirates.
After you link Windows to your account, the system will require you to enter a password every time you boot your computer. This is not very convenient (after all, Android does not require such sacrifices from us). But if you have only one account on your copy of Windows, you can enable automatic boot mode without a password.
Alas, if at the time of installing Windows the Internet is unavailable (for example, during installation with the network adapter disabled), the system will still install, but with a local account that is not connected to the Network. The difference between these types of accounts is one thing: a local account does not allow synchronization of your contacts, photos, calendar, and other things with the Microsoft server. Which, you see, negates most of the advantages of Windows 10.
The video explains in detail how to create a local account in Windows 10.
If you need to see all the existing user accounts that are using your device, this guide will show you four ways to do so in Windows 10.
In Windows 10, you can quickly check complete information about all user accounts. If more than one person is using your personal computer or you have more than one user account, if there is a need to check the complete information of all user accounts, then this article will help you. Additionally, in certain cases, you may also need to look at the hidden user accounts available on your system, such as the Administrator account, which is disabled by default.
To view all existing accounts in Windows 10, there are several ways to view this information using built-in tools and the command line.
In this guide, you'll learn four ways to see a list of all accounts available in Windows 10.
- How to view all accounts using the Settings app
- How to view all accounts using Computer Management
- How to View All Accounts in Windows 10 Using Command Prompt
How to View All Windows 10 Accounts Using the Settings App.
The easiest way to see the accounts available on your device is in the Settings app:
- Open the application by pressing the Win I keys.
- Go to settings group "Accounts".
- Click the section on the left.

On this page you will find existing user accounts configured on your PC, but this page is limited because it does not contain built-in user accounts such as the built-in administrator account.
Additionally, you'll notice that the current user account isn't listed either, but that's because that information is displayed on the "Your Details" page.
How to view all accounts using the Computer Management console.
If you're using Windows 10 Pro, you can use the Computer Management console to view all the accounts on your device.
- Right click on the button "Start" and select from the menu "Computer Management".

- In the console, go to the following path:
Local Users and Groups → Users
You will see a list of all accounts created in Windows 10.

How to View All Windows 10 Accounts Using Command Prompt
In Windows 10, you can quickly check complete information about all user accounts using one command.
- Open Command Prompt, type the following command and press Enter.
You will see the following details:

The very first account built-in admin account, the account is disabled by default - but you can enable this hidden admin account if you have a need.
Second account- User account managed by the system, as specified in the description. If you are using Windows 10.
Third account guest account.
The last user account used to access the computer. If you have multiple user accounts, you will find them below one by one.
There are several details that are visible on the command line screen. You will see the following:
- Account type
- Description
- Full name
- installation date
- Local account status
- Lockout status
- Password Changeable
- Password Expires
- Password required or not
- SID Type
- Status
AccountType = 512 indicates that all accounts are regular. If your computer is domain joined, you may see other values such as 256 (Temp Duplicate Account),2048 (Trust Account Interdomain), 4096 (Trust Account Workstation) or 8192 (Trust Account Server).
Disabled = FALSE / TRUE, indicates whether that particular account is active or not. If set to FALSE, this means that your account is not active and vice versa.
PasswordChangable = TRUE / FALSE indicates whether the password of this account can be changed or not. If set to TRUE, then you can change it.
PasswordExpired = TRUE / FALSE tells the password for this user account to expire after a specified amount of time.
How to View All Accounts Using PowerShell
Plus, you can even use a single command in PowerShell to view a list with detailed information about each account available in Windows 10.
- on behalf of the administrator.
- Type the following command to list all existing accounts and press Enter:
- You will see a list of all accounts configured on your device, with their description and activity.

If you need to export the list of accounts to a text file, you can add the following to the command. For example:
Get-LocalUser > c:\path\to\output\folder\list.txt
In case one of the accounts was created using a Microsoft account, the account name will only contain the first five letters of the email address.
These are the basic things you need to know to understand the details of all the user accounts on your Windows 10 computer.
Share this article with your friends
If you're using Windows 8 or 8.1, you're probably already quite familiar with the new user authentication mechanism. That is, in addition to the local account, these versions of the operating system support authorization through a Microsoft account. And although you can avoid using the latter, some features and modern applications still require you to log in using it - otherwise you simply will not be able to use them. This not only created a divide between the two types of accounts, but also led to dissatisfaction among users. Fortunately, sometimes Microsoft listens to the requests and expectations of its customers, and therefore in version 10 the company has relaxed its policies regarding user profiles.
Let's try to understand what the differences are between these two types of accounts in the new version of the operating system and what has changed compared to Windows 8.1.
What is a local account?
In the simplest terms possible, these are system resources with settings and programs for a specific user, accessed using a combination of username and password (although password protection is not necessary). If your OS version was released before Windows 8, then you are definitely a local profile user.
As the name suggests, a local account is created for only one system, so if you have more than one computer, then you use different accounts on each of them, note that you can always
In Windows 10, a local account allows you to install desktop apps, customize settings, and use the operating system the old-fashioned way. You can even browse the Windows Store, but you cannot download and install applications - for this, as well as for enabling synchronization of settings between user devices, a second type of account is required.
What is a Microsoft account?

This is a series of online accounts for the company's products that have simply been combined under one name. So, if you've ever used Hotmail, Windows Live and Outlook, or devices like Xbox or Windows Phone, then you already have such an account. By rebranding and merging these profiles, the company ensured that all of its services were fully integrated into one account. This means you can use it to access everything related to the Microsoft ecosystem.
Unlike local, you use your email address to sign in to the operating system with a Microsoft account, not your username. In this case, this could be an email from a software giant (hotmail.com, live.com or outlook.com), Yahoo!, Gmail, or even an address that was provided by an Internet provider.
This type of login does not allow you to disable password protection, but you can configure the system to enter it automatically each time you log in (see ). In addition, the Microsoft account has a two-step user identification system, which requires you to enter a security code when logging into your account from a device that is not on the trusted list.
Why should you use a Microsoft account?
Using such an account allows you to partially avoid the hassle of configuring all your computers “for yourself,” since some of the system settings can be synchronized between them automatically. In other words, certain changes made on one computer running Ten will be automatically reproduced on other computers with the same Microsoft profile.
The system allows you to synchronize the theme, web browser settings (in 10 the standard browser is Microsoft Edge, so synchronization of bookmarks, logins, etc. applies specifically to it), passwords for sites, applications and networks.

Another benefit of using a Microsoft account is the ability to download, install, and restore apps from the Windows Store. With a local profile, the app store will only be available in browse mode.
As the owner of a Windows 10 Mobile smartphone or other Windows 10 device, an online account will give you access to universal apps and games. This concept, which was originally introduced for Windows 8.1 and Windows Phone 8.1, means that once an app is purchased, it becomes available on all devices running the Microsoft platform. That is, by purchasing an application from any device running Window 10, it will become available on your other devices. This eliminates the need to buy the same application for each computer, smartphone or tablet and thus helps save a lot of money.

A Microsoft account will also help you with using OneDrive, because with it you can conveniently sync any type of file - again, between all devices.
Another feature of Windows 10 that is only available with a Microsoft account, but still does not support the Russian language, is called Cortana. This is an application that acts as a digital assistant. The feature is closely tied to Microsoft account and needs access to calendar, email, contacts and even web browsing history to be able to respond to the user's needs. So if you want Cortana to be able to schedule your meetings, remind you of something important, or even find good restaurants, you'll have to sign in to your Microsoft profile.
Finally, using a Microsoft account in Windows 10, you can connect with your family. This is an expanded version of Family Safety, containing all the options that will help you manage everything related to your children's online lives. The function allows you to manage settings separately for each device, block sites for adults, control the child’s activities and time spent on the computer and allow him to download only those applications and games that are suitable for his age category.
Why should you use a local account?
In Windows 8.x, the local account has extremely limited capabilities and does not provide access to many functions of the operating system. In 10, these restrictions were relaxed, and the status of the local account was raised almost to the level of Windows 7.
For example, in the previous version of the operating system, you cannot use the Calendar, Mail, and People apps without an MS account. In Windows 10, you can work with any of these tools without any restrictions, using a regular, local account. Even a native email client will allow you to choose any account (Outlook, Gmail, etc.) and will not force you to use a Microsoft account just to launch the application. This change will probably appeal to those who only have one computer, for whom the settings sync feature is completely useless, and also to those who are not interested in apps from the Store.

In general, the company's policy regarding local accounts has changed in a fairly positive way; With Windows 10, the corporation tried to find a balance between the two types of accounts, and at the same time made another attempt to present the new operating system in a more favorable light.
If you made a mistake when creating a Microsoft account, it !
Have a great day!
You create a new account during the installation process. But what if you want to add additional local accounts? Read on and we'll show you how to do it.
Why do this?
Millions of Windows users never create additional accounts on their computers, but use their primary accounts with administrative privileges. As practice shows, this is not safe, and users should get rid of this habit, or laziness to create a new account, as you wish.
Creating a secondary, non-administrator account for yourself and additional accounts for your children (to prevent dubious downloads from malicious sites from infecting your computer) is a great idea and one of the important things that will significantly increase the security of your machine.
You might prefer the online and synchronized features of a Microsoft online account, but we found a lot of benefits to a local account without all the online bells and whistles and potential privacy concerns. The standard local account is great for people who don't want to link their personal information to Microsoft, and it's also ideal for kids who don't need the extras (and may not even have an email address to associate with the account).
Let's take a look at the process of creating a secondary account in Windows 10.
How to create a new local user account in Windows 10
The first step is to access the Accounts menu. To do this, click on the search icon to the right of the Start menu and type “Accounts.”
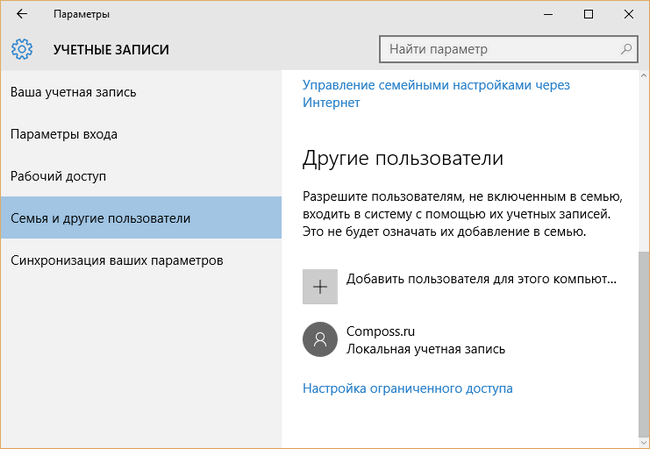
Select "Add, change, or remove other users" from the search results. Clicking on it will open the Accounts menu as shown in the screenshot below. Alternatively, you can go to Start -> Settings -> Accounts, then select "Family and other users" to get to the same menu.

Select "Add a user for this computer." Microsoft has made it so that during the process of creating an account, you will be strongly pushed towards an online account instead of a local one. So, let's be careful.

Ignore the prompt to provide an email or phone number. Instead, click the link at the bottom of the window: “The user I want to add does not have an email address.”

Since we don’t have an email address, Windows will prompt us to create an online account. Logical. But as we already said, Microsoft is quite insistent that we create an online account instead of a local one, and suggests creating a new email address through @outlook.com. But ignore this information and click on the link below “Add a user without a Microsoft account.”

If anyone remembers, in Windows, ten years ago, the account creation screen looked very simple: just a username and password and nothing extra. But now, as we see, everything is different... Enter your username and password and click the “Next” button.
After clicking the Next button, you will be redirected back to the account settings screen, and now you can see your new account. By default, the local account has limited rights (there is no ability to install applications or make administrative changes to the machine).
If you have a compelling reason to change your account type to one with administrative privileges, click on the account, select Change Account Type, and set it to Administrator.

You can also select "Delete" to delete an account that is no longer needed. If you need to make more changes (like child accounts or parental controls) be sure to check out for a more detailed look.
Windows has many protections against unwanted changes to computer settings, the registry, and other parameters that can dramatically affect the performance of the operating system.
One such security feature is User Account Control (UAC).
As is often the case with such system functions, for all their usefulness, they can become annoying, constantly reminding them of themselves, which can interfere with the user’s work with the computer.
In this episode, we'll look at how to disable User Account Control in Windows 10 and earlier versions of the operating system.
WHAT IS USER ACCOUNT CONTROL (UAC) IN WINDOWS
Account Control is a security utility built into the Windows operating system. It first appeared in Windows Vista, and remains in modern variations of the system, right up to Windows 10.
Disabling the User Account Control utility will seriously reduce the level of computer security, so you must perform these actions consciously.
This utility manifests itself as a window that appears when installing a program or game on a computer, as well as when making fundamental changes to the computer settings. The user is informed that when installing this file, the publisher may make irreversible changes to the operation of the computer, which is unsafe.
Depending on the UAC settings, the utility can work against all applications or, for example, only against suspicious programs from unverified publishers.
Proper use of the Windows User Account Control feature allows you to protect your computer from the penetration of virus applications, spyware, Trojans, malware and adware programs and other unwanted utilities.
HOW TO SET UP USER ACCOUNT CONTROL IN WINDOWS 10
It is recommended to disable User Account Control in Windows only in extreme cases; it is much better to configure this option so that it reminds you of its presence only when there is a real threat of infection. By default, in Windows the utility is set to a high level of protection, but this is easy to fix.
To set up User Account Control in Windows 10, type windows in the taskbar search box "Control Panel" and go to it. (If you have it installed, you can ask it to open the Control Panel.)
If you don't have a search field in the taskbar, then click menu "Start" and go to "Options".
There should also be a search field in which you can type a phrase "Control Panel".
Note: In earlier versions of Windows, you can access the Control Panel by right-clicking on the menu "Start" and selecting the item in the context menu "Control Panel".
After you have entered the control panel at the top of the window, set the viewing mode "Icons" and go to "User accounts".
A window will open where you need to select the item.
After this, a window will open where the User Account Control utility is configured.
The security system can operate in only 4 modes:
- Maximum. In this mode, the user will be notified of all attempts by applications to install on the computer. And also about all situations when major changes are made to the operating system settings. If you set this mode, users without administrator rights will have to enter a special password to make such major changes. Computer administrators will simply need to confirm their desire to install/configure an application or system.
- High. When the user makes changes to Windows settings, he will not receive a corresponding notification. User Account Control will be triggered in a situation where changes to the system can be made as a result of the installation/operation of a specific application.
- Average. This item differs from the high level of protection only in that when the user is warned about an application attempting to make changes to the system settings, the desktop will not darken. This option is recommended to be selected only in situations where dimming the desktop takes a long time, for example, on low-performance computers.
- Short. Completely disable User Account Control. The user will not be notified about his independent attempts to make changes to Windows settings, as well as about attempts to do this by applications.
Note: By reducing User Account Control to the minimum level, you run the risk of third-party applications introducing irreversible effects to Windows settings. This is also fraught with data loss.
VIDEO: How to set up User Account Control in Windows 10
Well, that's all for today! Please write in the comments whether you managed to configure or disable User Account Control in Windows? If you liked the video, please share it on social networks. And subscribe to our channel, if you haven’t already subscribed to alerts, by clicking on the bell next to the subscribe button!


