Nowadays, the Windows 7 operating system is widely used on modern computers. Over time, we may face the problem of slow booting and running of the computer. One of the reasons is the slow loading and operation of Windows 7. Speeding up the operation of this operating system directly affects the increase in computer performance. This can be achieved in several ways. The first is optimizing the operation of Windows 7 using the operating system itself. This is the fastest and most affordable way to solve the problem of how quickly your computer boots and performs tasks. The second method involves using special software. There is more than one program for optimizing Windows 7. Here we will look at several of them.
Windows 7: speed up with built-in features
The first thing you need to pay attention to is the temporary files directory. It is located on the system disk and, growing over time, can affect the speed of the system. To access it, you need to open the Run window from the Start menu. This can be done by pressing the Windows key combination + R. In the field that appears, enter the command %temp%, then click OK. In the window that opens, folders will appear that you can safely delete. There is not a single file here that is useful or necessary for you. This is system garbage. If some files are not deleted, it’s okay. This means that they are being used by some of the running programs. These files can be deleted later. Thus, we have cleared the directory for storing temporary files.
Working with the system disk
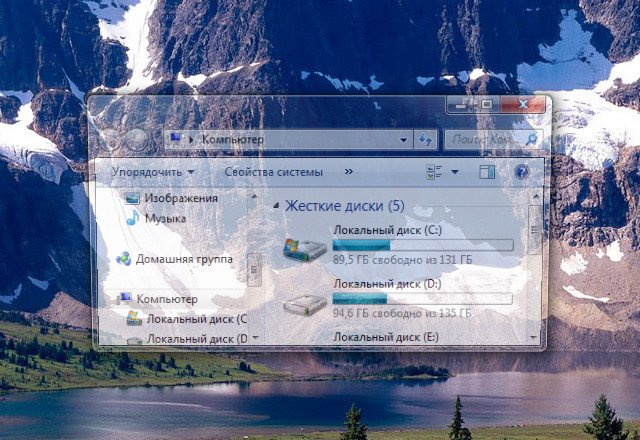
Go to the “My Computer” window and find the system drive. As a rule, it is designated by the letter C. Optimizing the operation of Windows 7 involves performing several operations with the system disk.
Cleaning up the C drive
Right-click on the disk icon and select “Properties” at the very bottom. Then in the “General” tab, click on the “Cleaning” line. Many users are afraid to click on this button, thinking that all information will be deleted. They confuse it with the Format command. In fact, there is a search for unnecessary files. Therefore, all your documents, movies, music, etc. will remain intact. In the window that appears, check the boxes next to all the elements and click OK. All. Disk C is cleared of system garbage.
Service tab
It is located in the same "Properties" window. In this tab you will need to perform two operations. First check the disk for errors, and then defragment it. These procedures take a certain amount of time. How much depends on how often you perform them and how cluttered the system disk is. To improve the performance of your computer, it is recommended that you repeat these procedures on all physical and logical drives. Thus, when you click on the “Run check” button, the system will check the hard drive for errors and notify you if serious problems arise. After that, she will offer to correct them. To execute this command, you must uncheck the "Automatically correct errors" box. If you leave it, the system will be able to start scanning only after restarting the computer. But it’s better to leave the bottom tick. In this case, the system will try to fix the bad sectors. This process is quite lengthy and can take about 30-60 minutes. It all depends on the size of the disk and the number of errors found.
Defragmentation
On a hard disk, information can be written either to adjacent or simply to free sectors located in different places on the disk surface. Thus, one file can be scattered in pieces over the entire surface of the disk. It is fair to assume that this greatly slows down the reading of this file and, as a result, the system as a whole. In this case, the disk is said to be highly fragmented. It is necessary to defragment it. To do this, in the "Service" tab, click on the defragmentation button. The windows may differ depending on the version of Windows 7. “Ultimate” may differ from “Home” in this regard. However, there are always two buttons: “Disk Analysis” and “Disk Defragmentation”, so there will not be much difficulty here.
Thus, using such simple functions, you can slightly optimize Windows 7. The acceleration of the system can be immediately noticeable. If no significant changes were noticed, then we continue. Next, you will need to configure the operation of the system itself.
Disabling unnecessary effects and swap file
Windows 7 optimization also occurs by disabling unnecessary system graphic effects. Although this will not bring a special increase in performance. It's better to pay attention to the swap file. This is such additional virtual memory. The bottom line is that our computer uses the hard drive as RAM. Thus, virtual memory consists of RAM and an area on the hard drive. And it turns out that the system operates, by and large, at the speed of the hard drive. Although Windows is supposed to use the drive only when there is not enough RAM, in reality it turns out that it always uses it. If your RAM size is more than 4 GB, then you can disable the page file. The hard drive is for storing data, but only current processes should be stored in RAM, and the hard drive is in no way suitable for this. Its data transfer speed is too low. To make changes, you need to go to the "Control Panel", then click on the "System" button and open the "Performance Options" tab. Here next to the visual effects there is an "Advanced" tab. By clicking on it, you will see the size of the swap file. Usually it is installed automatically by the system and is equal to 3.5-5 GB. By clicking on “Change”, remove the top checkbox and put a dot in front of “Without a paging file”. Before doing this, select the disks to which this will apply.

Next, click “Set” and OK. After a reboot, the changes will take effect. After these modifications in Windows 7, the acceleration of the system should be noticeable. If this does not happen or the computer begins to work slower, then it is better to enable the paging file. Also, some toys require a swap file to work. It is recommended to set its size from smallest to largest. But there is no point in setting more than 1 GB.
Registry changes
Now let's go a little deeper. Further settings, if performed incorrectly, may lead to system failure. Therefore, you do them at your own peril and risk. There is a real acceleration of the laptop. Windows 7 allows you to quickly make these settings. Let's get started. In the "Start" menu, select the "Run" command. You can also click on the Windows icon + R. In the window that appears, type the command regedit. The system registry editor window will open in front of us. In it, select the HKEY_LOCAL_MACHINE folder, then the SYSTEM folder. Then select Current Control Set, and then Control. Below we find the file WaitToKillServiceTimeout.

By default, on Windows 7, 8 the value is 10,000-15,000, and on Windows XP and Vista - 20,000. You need to change it to 5000. This will not harm your computer in any way. The program will simply finish twice as fast. It is not recommended to bet less than 5000. This is because programs may not have enough time to terminate properly and will complain about closing unexpectedly. Click OK and after the reboot it will all be applied.
system configuration
Now let's try to change a few things in the system configuration. To do this, open the “Run” window again and enter the msconfig command. In the window that opens, select the "Startup" tab. All programs that begin to load automatically when the system is turned on and during its operation are displayed here. It’s up to you, of course, to decide, but it’s better to uncheck most processes. Leave only those that are related to the operation of Windows and antivirus programs. As a last resort, you can always come back here and turn everything on again. Click “Apply” and after the system restart they stop turning on automatically. This greatly increases the boot speed of your computer. Next, in the same window, go to the “Download” tab.

Here we need to speed up the computer's startup itself. Click on "Advanced options". At the top, put a checkmark in front of the number of processors and set their maximum number on the computer. Here, both physical and logical cores are considered. We also check the box next to maximum memory. The maximum amount of RAM on your computer should appear here. Next, click “Apply” and OK.
But here you need to be careful. It happens that after setting the maximum number of cores after a reboot, the system crashes. In this case, you need to boot into safe mode and return the default settings in the msconfig (“Boot”) window. Then you need to restart your computer.
Power supply
Windows 7 is also optimized by adjusting power consumption. To improve system performance and computer performance, you need to choose the right power plan. Go to "Control Panel", then to "System and Security". Here we select "Power Options". In the settings, select "High performance". This will also help speed up the system. However, for laptop owners this can lead to rapid battery drain.
Speeding up work with third-party utilities
As mentioned above, there is a large amount of software. Various programs promise to speed up Windows 7. CCleaner is one of the best and most popular in this area. Having launched this utility, we need to pay attention to three functions: "Windows Cleanup", "Application Cleaner" and "Registry Cleaner".

When cleaning Windows, you must check all the boxes. The only place where it is better to remove it is at the very bottom. This way you will save several hours of time. The more boxes are ticked, the more thoroughly the system will be cleaned of various debris. Next, click the “Cleanup” button. You can view the report here later.
Then go to the "Applications" tab. Here we also check all the boxes and click the “Cleaning” button. Everything is ready, look at the report.

The last step is cleaning the system registry. Here we also select everything in the left column and click on “Search for problems”. After that, click “Correct”, and then “Correct marked”. Now your computer is practically healthy. This procedure can be done as often as you like: once a month, once a year, or every day. It won't do any harm. It is recommended to do this as soon as minor failures, slowdowns, or “glitches” of the system are noticeable. CCleaner is a simple and lightweight program for optimizing Windows 7.

Thus, you have learned the basic procedures that affect the speed of your computer. Windows 7 is optimized quite simply, and the above procedures are recommended to be carried out in case of system failures and slowdowns. If they do not lead to the desired result, then in this case it is necessary to contact computer specialists.
It has long been no secret that performance in Windows 7 has been sacrificed for beautiful animation. In your article Speeding up Windows 7, as I understand it, there was an attempt to solve the problem from the technical side, that is, by changing the system settings of the operating system. It seems to me that you need to optimize Windows 7 first of all by disabling visual effects, and only then experimenting with the page file, the registry, and so on. Sergey.
Optimizing Windows 7
Optimization is the process of modifying a system to improve its efficiency. Wikipedia.
Without a doubt, the Aero interface places a large load on the performance of Windows 7, and disabling some settings that directly affect animation usually immediately results in a significant increase in speed in Windows 7. And of course optimization of Windows 7 you need to start by turning off some visual effects. But which ones? Personally, at my work, in Performance Options->Visual Effects, there is a checkmark in the Ensure the best best performance, why do I need beautiful animation and smooth fading in my workplace? Now, if only you could smoothly disappear from work without anyone noticing, but unfortunately there is no such setting in Windows 7. But at home my friends didn’t allow me to turn off the Aero interface in Windows 7: “It’s beautiful, Dad.”
Well, we've talked a little, let's get down to business. What I propose, I personally have long found a golden mean for myself in the settings of visual effects, which our readers have repeatedly asked me about, and now I am sharing my experience.
I am sure that when you read the article to the end, you will turn off one third of the visual effects and be surprised, “Wow, I didn’t even know that all this was managed here.”
Start->Control Panel->System and Security->System->Advanced system settings->Performance->Options. Any visual effect can be disabled by unchecking it and clicking Apply.

1)Animation in the Start menu and pane whether tasks. This setting is responsible for the smooth appearance and fading of lists in the Start menu, as well as drop-down buttons on the Taskbar, for example, right-click on the Start menu and point it at the All Programs menu, then we can notice the effect of a smooth drop-out of the list of programs. Let's uncheck the item "Animation in the Start menu and taskbar" and do the same, as you can see in the illustration, the list of programs now does not appear smoothly, but quickly, it's up to you to put the checkbox back or not.


2)Animation of windows when minimizing and maximizing. The name speaks for itself. When opened, the window smoothly appears, and when closed, it seems to collapse. Let's open, for example, the window of the Computer system folder in the Control Panel, the effect is clearly noticeable, but now let's disable this setting and open it again, without a doubt the difference in the speed of the window's appearance will be noticeable.

3)Animated controls and elements inside the window. Responsible for the effect of smooth highlighting on buttons and scroll arrows in dialog boxes. For example, let’s open the Computer system folder again and move the mouse over the scroll arrow, we noticed the highlighting effect, now turn off this setting and do the same. It seems to me that this can be abandoned.


4) Enable Desktop Composition. Responsible for the transparency effect of each open window in Windows 7, as well as the Taskbar. Windows 7 has to store information about open windows in memory and show us their silhouette when we hover over a button in the lower right corner of the desktop called Minimize all windows. Many people believe that Windows 7 optimization, you need to start by disabling this effect and the performance increase will not go unnoticed.


5) Enable Aero Peek. In the lower right corner of the desktop, there is a button Collapse all windows; when you hover the mouse over it, we will observe this effect.


6) Enable eff transparency ect. If you disable this effect, the Windows 7 interface will lose a lot, the transparency effect will disappear in the windows, experiment, maybe your video card will pass this test, it’s worth it.
7) Smooth scrolling of lists. You can safely uncheck the box, the effect is not particularly noticeable.
8) Menu fades out after calling a command. Disable it, as it is quite difficult to notice the difference.
9) Using Display Stylestions for buttons and windows. If you disable this option, no one will distinguish the design of your operating system from Windows XP - with all visual effects disabled. If you, like me, can’t forget XP, you can also choose the classic theme. Right-click on the desktop, select personalization, then Basic Simplified Classic.


10) Casting shadows on desktop icons. Personally, I don’t see much difference whether there is a shadow behind the icons or not, you can turn it off
11) Show window contents when dragging, it seems to me that it’s better to display it, it won’t take up a lot of resources from you, as you can see in the second illustration, if you don’t display it, it won’t be very convenient.

 12) Show shadows cast by windows. The screenshot shows a shadow with an arrow; if you are not happy with it, disable the setting.

13) Show thumbnails instead of icons. This visual effect consumes quite a lot of Windows 7 resources; if you disable it, folders will open noticeably faster. It displays all image files in Windows 7 Explorer in miniature, as well as video files and others. If you often deal with images, then using this effect is quite convenient, you can immediately notice the photo and drawing you need, but many people who work with video complained to me, the fact is that Windows 7 generates all the thumbnails of video files in File Explorer. It varies and sometimes a video file simply cannot be found in a folder with other types of files, it takes such bizarre forms. By the way, everything is visible in our illustrations. The black rectangles in the folder are our films, next to them are graphic images, and this is what they look like when the effect is turned off.


14) Display transparent selection rectangle. When selecting several files with the mouse, you can notice a rectangular area moving after it, which does not particularly affect performance.


15) Displaying a shadow under the mouse pointer. It consumes virtually no computer resources.
16) Smooth out jagged screen fonts. The text on the screen with this visual effect turned off does not look very nice, let's leave it.

 17) Sliding when expanding lists. The effect of smooth drop-out of lists is not particularly noticeable, but can be turned off.
18) Save taskbar thumbnail view. You can experiment, if you need to, you can leave it.
19) when accessing the menu. It consumes a lot of resources and our time too, it’s better to turn it off.
20)Fade or glide effects when prompts appear. What's better for you, a hint with an effect or just a quick hint? Turn it off.
The question of how to speed up a computer interests a huge number of users, and interest in it does not fade. You can really influence the speed of your computer by optimizing the operating system. Most of the functions and capabilities of modern operating systems remain unclaimed by ordinary users. Many people, after reinstalling the OS, do not make any changes to the configuration and are content with the standard settings, which are not the most optimal.
We will analyze in detail all the most current methods for optimizing Windows 7 to improve computer performance. If you follow our recommendations, you will probably notice that your computer will run much faster.
Setting up visual effects
Problem. Operating systems of the Windows family have not only a convenient, but also a beautiful interface. This, in turn, imposes quite serious requirements on the computer hardware. With all the abundance of interesting visual effects, the hardware must ensure smooth operation and the highest possible performance. If the computer is not the most powerful, then a drop in performance is guaranteed. This problem is especially relevant for owners of low-power laptops and netbooks, whose manufacturers primarily set themselves the goals of increasing energy efficiency and reducing costs.
Solution. To solve this problem, it is recommended to turn off almost all visual effects and leave only the basic ones. In this case, you are guaranteed a productivity increase. Optimizing Windows 7 in terms of visual effects is quite simple. Go to the Start menu and enter “Visual Effects” in the search bar. Click on the section that appears “Configure presentation and system performance.”
For convenient settings, place the selector next to the “Ensure the best performance” item, and absolutely all the checkboxes will be cleared. After that, check the following boxes:
- Enable desktop composition
- Using Window and Button Display Styles
- Show thumbnails instead of icons
- Smooth out jagged screen fonts
Click “Apply” and restart the computer.
Optimizing your hard drive in Windows 7
Problem. All files written to the hard drive are divided into fragments using a special algorithm. This is done to make the most efficient use of the remaining disk space. As a result, when the computer tries to read a file, it collects a huge number of individual fragments scattered throughout the hard drive. This process is aggravated by the presence of tens of thousands of fragments of unnecessary files. This in turn can lead to a decrease in the performance of the hard drive and the system as a whole.
Solution. The only effective way out of the problem is regular cleaning of junk files and defragmentation of the hard drive. First, audit unnecessary information on your computer. Delete annoying movies (which, by the way, take up a fairly large amount of memory), music and other files that are no longer relevant for you. Then remove programs you don't use. To do this, go to the “Start” menu --> “Control Panel” --> “Uninstall a program.” We audit outdated applications and get rid of them using the “Delete” button.
After cleaning up the garbage, we move on to defragmentation. To do this, go to “My Computer”, right-click on the desired disk and select “Properties” --> “Tools” --> “Defragmentation”. Select the disk and click the “Disk Defragmenter” button.

Optimizing your hard drive will really help you speed up your computer. The effect will be especially noticeable on those computers where this procedure has not been carried out for a long time. Let us remind you that it is advisable to carry out defragmentation regularly to maintain optimal operation of the hard drive.
Optimizing autorun in Windows 7
Problem. Even on powerful and expensive computers, over time, a decrease in the loading speed of the operating system is noticed. And in most cases, the culprit is the huge number of programs that are running simultaneously along with the operating system. Update managers for various applications, social network agents, all kinds of instant messengers, and antivirus are added to startup. By the way, it is better not to remove the latter from startup, since ideally an antivirus program should constantly protect the computer in real time. We will disable all other “unexpected guests” from autoloads.
Solution. To easily and effectively remove unnecessary programs from startup, it is recommended to use the CCleaner program. Its main specialty is cleaning the registry (we'll talk about this later), but it also does an excellent job of optimizing startup, providing the user with a convenient and intuitive interface.

Launch the program, go to the “Tools” tab --> “Startup” and using the “Disable” button, remove from automatic startup all programs that you do not need.
Diagnostics of RAM and registry
Problem. It is believed that a dirty registry can negatively affect the speed of a computer, as can problematic RAM. Everything is clear with the registry. If installed applications are not completely removed, “garbage” remains in it (application settings, links to non-existent shortcuts, incorrect file extensions). Over time, there is more and more garbage. And if we want to speed up the computer, then the garbage needs to be removed.
With RAM, everything is somewhat more complicated. This is a very important component of the computer and it is simply impossible to talk about optimal system operation without adequate RAM. Failures in RAM can be caused by manufacturing defects, problems with the power supply, or even voltage surges. In any case, optimizing Windows 7 necessarily involves diagnosing RAM.
Solution. You can clean the registry using the previously mentioned CCleaner program. RAM diagnostics can be carried out using the operating system. To do this, open the Start menu and enter “Diagnose computer memory problems” in the search box.
A window should appear in which you need to select the type of check (it is recommended to select the first option).

After the computer restarts, a memory check will begin. It may take a long period of time, so do not plan any urgent computer-related tasks during the diagnostic period. When checking on the screen, you will see something like the following window:
The end of the diagnostics will be accompanied by a computer restart. The next time you log in, you will be able to view the results of the scan. Optimizing Windows 7 must necessarily include working with the registry and RAM.
Optimizing Windows 7 for multi-core processors
Problem. Many users have computers equipped with multi-core processors (with the number of cores from 2 or more). A larger number of cores in the processor should have a positive effect on the speed of the computer. Although the operating system itself automatically checks the type and characteristics of the installed processor, quite often only one core is used when starting the computer. Naturally, in this case, the loading speed of the operating system decreases.
Solution. The solution to this problem is very simple. The user can force the system to boot using the power of all processor cores. To do this, go to “Start” --> “All Programs” --> “Accessories” --> “Run”. Enter the command “msconfig” and click “OK”.

In the system configuration window that appears, go to the “Download” tab --> “Advanced parameters...”. Check the box next to “Number of processors” and select the maximum number. Click “OK”.

If you don’t know how to speed up your computer, or more precisely, how to influence the startup speed of the operating system, then this method is ideal for you.
Removing unnecessary gadgets
Problem. The standard and additional gadgets used in Windows 7 are undoubtedly very convenient and useful. Many users happily use them in their daily work to facilitate access to interesting information. On the other hand, gadgets can directly affect the speed of a computer, naturally in a negative way. Such gadgets will waste your system resources. On a powerful modern machine this may not be noticeable, but on weaker computers the performance drop will be noticeable.
Solution. Optimizing Windows 7 in terms of gadgets does not imply their complete removal. Keep 1-2 of the most frequently used and useful gadgets, and remove the rest. Still, with a high degree of probability, it can be said that you will receive most of the interesting information on the Internet. Why then load your system once again?
Optimizing Windows 7 with ReadyBoost
Problem. The Windows 7 operating system can use high-speed flash memory devices to effectively cache data from the most frequently launched applications. In fact, the memory of a USB flash drive or SD card can be used instead of the swap file. Such a cunning manipulation makes it possible to speed up the read-write procedure, which will ultimately have a positive effect on the speed of the computer and the overall performance of the system.
Not all Windows 7 users can increase the amount of RAM in the standard way (by purchasing a new stick). A variety of reasons can prevent this. These include restrictions that the chipset or motherboard manufacturer imposes on its products, and the impossibility of purchasing RAM of a suitable format.
Solution. To expand your computer's RAM, you can use standard USB flash drives and flash cards in SDHC/SD/MS format. To use a flash card, you will need a special card reader that is compatible with the card format. ReadyBoost technology is natively built into the operating system, so you don't have to download and install additional software.
Minimum requirements for drives when used in ReadyBoost:
- USB 2.0/3.0 standard supported
- Minimum read speed of 2.5 MB/s for information in 4 KB blocks
- Minimum write speed of 1.75 MB/s for information in 512 KB blocks
- Minimum free space 64 MB
Before choosing a drive for ReadyBoost, be sure to check its speed characteristics and make sure they meet the requirements. Using high-speed flash cards will provide maximum performance gains.
Go to “My Computer”, right-click on the external storage device and click “Properties”. Go to the “ReadyBoost” tab. Place the selector opposite the “Use this device” item and use the slider to set the limit on the amount of memory used. Next, click “Apply” and “OK”. If you want to provide the system with access to all free memory of the external storage device, then set the selector opposite the item “Provide this device for ReadyBoost technology”.

Use this clever method. We hope it will help you answer the question of how to speed up your computer.
Optimizing power supply in Windows 7
Problem. Very often, when working on a computer, users forget to configure the power management scheme - a set of hardware and system parameters that are responsible for the power consumption of individual system components. The power management scheme can be configured to maximize power savings (minimum performance), balance power consumption, or maximize computer performance (maximum power consumption). You can simply forget about this simple parameter and at the same time negatively affect the performance of the system.
This problem is relevant for laptop owners. By default, the system sets the balanced power mode. When the laptop battery runs out, the power saving mode is automatically set. Later, when the laptop is connected to the network, few people remember about the economy mode and the need to switch it. This is how the speed of the computer is lost on simple things.
If you are using a personal computer or laptop (but are running on network power), then adjusting the power plan can speed up the computer and improve overall system performance.
Solution. The solution to the problem is to control the power supply mode. Go to “Start” --> “Control Panel” --> “Power Options” and select the “High performance” mode.

If desired, you can customize the power plan. To do this, select “Configure power plan” --> “Change advanced power settings.” Set your own values as desired.

conclusions
We have analyzed 8 ways to optimize Windows 7 that will help increase the speed of your computer. It is very difficult to fit all optimization methods into one article, so this is only the first part of the material. In future articles we will continue to examine interesting and effective optimization methods, since this topic is quite broad and interesting.
computer-info.ru
Optimizing Windows 7 or how to improve computer performance
It is possible to increase the speed of your computer by optimizing the operation of Windows 7. Many existing functions in Windows that affect the speed and performance of the PC are not used by ordinary users. Most people use the default settings, and they are not the best for PC performance. Below are the main ways to increase speed to improve the performance of your Windows 7 computer.
Optimizing visual effects
Task
Windows 7 has a lot of beautiful visual effects, which increases the load on components and reduces PC performance. This reduces the performance of the computer, especially if the hardware is not up-to-date.
Answer
It is necessary to turn off visual effects, leaving only standard ones. This will immediately increase the speed and performance of your computer. In Windows 7, you need to type “Visual effects” in the “Start” window.
 Next, click on “Adjust system presentation and performance.” In order to speed up the process, you must activate the “Ensure the best performance” option.
- Increase the clarity of font display;
- Using types of displaying windows and buttons;
- Connect desktop composition;
- Show thumbnails instead of labels.
 Then click “Ok” and reboot.
Check and debug the hard drive in Windows 7
Task
Data is transferred to the hard drive in parts to optimize disk space. As a result, the PC, when opening files, spends a significant amount of time searching for them, and if there are a large number of junk files, the process slows down even more.
Answer
It is necessary to periodically check for the presence and delete unnecessary files, and defragment the disk. At the first stage, you need to manually delete unnecessary data from the computer’s memory, for example, unused programs, old movies, music, etc. To remove applications, you need to go through “Start” to “Control Panel” and then to “Uninstall a program”.
 Next you need to perform defragmentation. You need to go to “My Computer”, in the context menu of the disk, select sequentially: “Properties” - “Tools” - “Run defragmentation”. Click on “Disk Defragmentation”.
Cleaning the Startup directory
Task
Often, computer boot speed can be increased by simply getting rid of unnecessary programs in startup, for example, social network messaging services, updates for various programs, antivirus, etc. In fact, everything except the antivirus can be removed.
Answer
It is recommended to use the CCleaner application. It will help clean the registry and optimize startup speed. In the application, you need to go to the “Service” tab, and then to “Startup”. By clicking on “Turn off”, go through all the applications that you do not use regularly. 
Cleaning the registry and RAM
Task
When you uninstall programs, “garbage” accumulates on your computer (program settings, links, unnecessary shortcuts, erroneous extensions). The optimal operation of RAM is affected by possible defects in its manufacture, incorrect operation of the power supply and changes in network voltage.
Solution
Cleaning the registry is very easy using the CCleaner application. Analysis of RAM operation is performed using the built-in functions of Windows 7. In order to perform RAM analysis, you need to use the search bar through “Start” and type “Diagnostics of computer RAM problems”.
 After this, a menu will be displayed where you need to click on the 1st diagnostic method.
 The PC will reboot and begin analyzing the RAM. The process takes considerable time. After completing the process, the PC will reboot again and the user will have access to information about the analysis performed.
Connecting all processor cores
Task
To effectively increase computer performance, it is necessary to optimize Windows for multi-core processors.
Answer
You need to tell the OS to boot using the resources of all cores. Through “Start” - “All Programs” - “Accessories” - “Run” you need to type “msconfig” and click on “OK”.
 In the menu that appears, go to “Download” - “Advanced options...”. Check the “Number of processors” checkbox (to improve PC performance and speed, it is recommended to check the maximum possible number). Click on “OK”.
Disabling unused gadgets
Gadgets reduce PC performance. For maximum effect, it is recommended to disable them all.
Conclusion
The article discusses only the basic methods of increasing the speed and performance of a computer.
This topic is very extensive and it is impossible to cover it entirely in one publication, therefore additional methods for optimizing Windows 7 are described in a separate section.
windowsTune.ru
Optimizing and increasing the performance of Windows 7 OS (64-bit)
Windows 7 is a complex complex of interactions between many programs, so the speed of the OS is influenced by a huge number of factors. You can't just disable a couple of programs or change one setting to get a significant increase in system performance.
System optimization is a difficult task that requires care and an integrated approach. This article discusses the main possible actions to improve the performance of 64-bit Windows 7.
Using an SSD
If you use not an ordinary hard drive (hard drive) as the system drive, but a solid-state drive, then this alone will quickly and significantly increase the performance of your PC on Windows 7 (64 bit). The main advantage of an SSD disk is its many times faster data storage and playback speed (500 MB/s) compared to hard drives.
 Even loading the operating system from this media takes only a few seconds. Currently, all the equipment used in computers is high-speed; the only weak link in the interaction chain is HDD hard drives, which slow down the operation of the entire system.
Install a new BIOS and check the software is up to date
It is necessary to perform the following analysis: are the drivers updated, is the PC's BIOS up to date? When installing drivers, you should take into account the bit depth, i.e. For a 64-bit OS, you need to download the appropriate software for your computer hardware. If there are no drivers for a specific device for Windows 7 (64), you can download the appropriate software for Vista.
Increase RAM
Often the problem of slow operation of a PC with Windows 7 is a banal lack of RAM. The best method to fix the problem is to increase the RAM. This event always significantly increases the speed of the PC and leads to optimization of the OS. In order to ensure comfortable operation of Windows 7 (64-bit), you need at least 4 GB of RAM. 
Optimize the interface
windows Aero in "Seven" is the main "devourer" of system resources. Although it only adds some beauty and individuality to the external design and is completely unnecessary for work. Significant performance degradation due to Aero occurs on a PC with an insufficiently powerful graphics card or if it is built into the motherboard.
Turning off all Aero functions that are almost invisible to the eye will improve performance. To do this, you need to open the “Control Panel”, then go to the “System” tab and go to “Advanced system settings”. Next, in the “Advanced” tab, find and click on “Options”.
 Here you can disable functions such as: showing the contents of windows while moving, sliding effects, menu fading, animation, casting shadows on icons, cursors and windows, etc. Even disabling only some effects will already increase the speed of Windows 7, and in the case of an unpretentious user, it is recommended to click on “Ensure the best performance” in the settings.
Optimize the list of applications in startup
A significant number of applications are loaded simultaneously with Windows 7. The developers of these programs ensure that they are loaded in the background and the computer owner does not see them. But this is only necessary for utilities that are used constantly.
You need to disable autorun of unnecessary applications. The following programs must be loaded with the operating system: hardware drivers, firewall and anti-virus utility. To optimize the list of automatically loading applications, you need to hold down the “WIN” key, press “R” and enter “msconfig”. Next, open the “Startup” tab.
 Startup programs can be seen in the system tray on the taskbar. However, not everything is displayed there. A special application for Windows, “AutoRuns”, has been developed, which is distributed freely from the Microsoft Corporation resource. "AutoRuns" shows a complete list of downloadable applications. In the window of this application, you just need to uncheck the boxes next to the unnecessary program.
Disable unnecessary services
By disabling the start of some services, you can improve your computer's performance. To do this, you need to go to the “Control Panel”, then to “Administration”, where in the “Services” tab, select the unnecessary service and click “Disabled”. 
Defragment your disks periodically
With increased data fragmentation, the hard drive is forced to do extra work, and this affects the performance of the PC. It is recommended to run defragmentation manually to organize files for optimal functioning of the hard drive. 
Turn off automatic defragmentation
The creators of Windows 7 provided for background defragmentation, during which computer performance is significantly reduced. You must configure the process through the “Start” button. Select the “Accessories” line in the “All Programs” tab, then enter “System Tools”, where you can find “Defragmentation”. To increase the speed of Windows 7, a prerequisite is to regularly perform defragmentation manually.
Get rid of old, unnecessary or outdated applications
Some PC manufacturers release their devices with already installed applications that the user does not need. They reduce the speed of Windows 7 because they use memory and disk space.
It is advisable to rid your computer of all unused applications. This list should be supplemented with programs that the user himself installed, but which have lost their relevance over time. The simple act of removing these programs will improve system performance.
Remove unused gadgets
In Windows 7, gadgets increase the comfort of using a PC, but they all require system resources to start and function. By using only the gadgets that are necessary for regular use, system performance will increase.
Restart your computer
This recommendation can be easily followed by any user. Regularly rebooting your PC is easy. It is recommended to perform this simple procedure once every 7 days. This cleans up memory and shuts down some failing services, resulting in improved system performance.
windowsTune.ru
How to increase the performance of the Windows 7 operating system
The operating system has a rather complex structure. Its operation is ensured by a huge number of different programs - services and processes. There are many factors that affect the speed and performance of the Windows 7 system. This article describes how you can increase the speed of your personal computer.
The physical part of the computer (processor power, amount of RAM, solid-state drives) is not discussed in the article. Obviously, the better the PC, the more tasks it can solve, and the faster it copes with them. This guide describes the process of fine-tuning the system, which will bear fruit on any hardware.
General information
First, you need to understand what exactly affects Windows performance. This guide only covers factors that can be influenced by any user without assistance from computer specialists:

Defragmentation
This feature allows you to increase the speed of your hard drive and, consequently, the entire computer. Using a special utility, the system sorts all information on the media, optimizing the route of the reading head. 
Over time (due to deletion, new files, copying and editing), the data becomes fragmented again and the process must be started again.
Defragmentation is performed both using standard Windows tools and using special third-party programs. Also in the OS you can set up a schedule for regular operation at a time convenient for you. 
Note! Only the hard drive (HDD) needs regular defragmentation. Solid state drives (SDD) from such a procedure only wear out, without receiving any increase in performance.
Swap file
The function of the paging file is to compensate for the lack of free RAM on the computer. Some of the contents of RAM are transferred to the hard drive, freeing up space for tasks of primary importance. If you have a lot of physical memory installed, for example, 16 or 32 gigabytes, there is no point in making these settings.
To increase the swap size in Windows, you need to do the following:

Performance settings
There is a special section in Windows settings dedicated to increasing computer performance. How to open it is described in the previous section of the manual.
In addition to setting the swap volume, users may be interested in the following options:

Autorun
If you want to reduce Windows boot time and improve performance, it is recommended to disable unnecessary applications from startup. For example, if you rarely use Skype, you can cancel its automatic launch at the same time as the system starts, and turn it on only when necessary.
You can manage autorun in the configuration menu of the applications themselves. Torrent trackers, clients for cloud storage, instant messengers and other utilities running in the background have a special item in the settings.
But it’s much more convenient to work with a single list for Windows:

Registry optimization
To avoid any inconsistencies in the registry, you must install and uninstall all applications correctly. If any problems still arise, use CCleaner to clean out junk from the registry and bring performance back to the previous level.
The utility can be downloaded for free from the official website of the developer - Piriform. Follow the link http://www.piriform.com/ccleaner and click on the green “Download free version” button. Install the application following the Wizard's instructions. 
In the running program, go to the “Registry” section and click the “Search for problems” button, and then “Fix”.
windowsTune.ru
Increasing the performance of a computer with Windows 7 installed
 A new powerful computer pleases users with its performance, but over time its speed steadily decreases. In this case, many people have a reasonable question about how to speed up a Windows 7 computer without ruining anything in the system.
When considering the question of how to configure Windows 7, we have already touched on the problem of using various programs and archives with settings. We were talking about tweaks - small tricks that help increase system performance. However, you can do without third-party software.
You can really influence the speed of your PC or laptop using regular system optimization.
Many Windows functions are not in demand among ordinary users, so you can safely disable them, increasing the performance of the machine.
Disabling visual effects
The beautiful interface of Windows 7 is a great advantage and at the same time a serious drawback when it comes to optimizing the operation of your computer.
Various visual effects place high demands on the hardware, slowing down some more important processes.
If you have a low-power laptop or a computer with old hardware, then a drop in performance when visual effects are turned on cannot be avoided. To correct this drawback of Windows 7, you can use the built-in tools and remove all unnecessary “chips”.

To bring the interface back to normal, you need to leave the four effects marked in the screenshot enabled. After that, click the “Apply” button and restart your computer for the new configuration to take effect.
Hard drive optimization
Files recorded on the hard drive are divided into fragments that are scattered over the entire surface of the media. This was done primarily for the rational use of free space, but as a result, it often turns out that when a user accesses a specific file, the computer is forced to collect fragments scattered across the entire surface of the disk into a heap.
A huge number of fragments of already unnecessary (or deleted) files are added here. The result is a decrease in the performance of the hard drive and, as a consequence, the system as a whole. There are two ways to fix this problem:
- Periodically clean the disk from temporary and simply unnecessary files.
- Defragmentation of the hard drive.
Remove from your computer all unnecessary files and programs that take up a lot of space but are not used for their intended purpose. Leave only the essentials that you cannot do without.
To delete temporary files:

After cleaning the system of debris and uninstalling unnecessary programs, you can proceed to disk defragmentation, which is done using standard Windows tools:

Optimizing your hard drive is one of the most effective ways to increase the speed of your computer. This will be especially noticeable if you have not defragmented for a long time and have not destroyed “computer junk” for a long time.
Increasing the swap file
The lack of RAM and the inability to install an additional stick often leads to the fact that users cannot qualitatively improve the performance of the machine and are forced to put up with low system speed.
You can increase the paging file using a USB drive and the ReadyBoost technology built into Windows.
A regular flash drive or memory card in SDHC/SD/MS format can be used as a storage device. Even a regular smartphone or any other device with built-in memory that meets the following requirements will do:
- USB0/3.0 technology support.
- Availability of free space (minimum 64 MB, but usually more than 200 MB is required).
There are still some limitations on data transfer speed, but they are quite reasonable: any modern drive has much better characteristics than what is needed for ReadyBoost technology to work.

If you want to provide all free space for the paging file, select the "Provide for ReadyBoost" option.
Cleaning autostart
Even on powerful new computers, some time after the start of regular use, the user notices a decrease in the operating system startup speed. This is primarily due to the large number of unnecessary programs in autorun, which are added there without the knowledge of the car owner.
During installation, various messengers, automatic updating applications, social network agents and other similar programs are necessarily registered in startup and run along with the system, taking up resources.
The best solution is to remove all applications from startup except those that are vital for the system. The latter include antivirus with its services and system utilities. You can clean startup using CCleaner:

If there is no CCleaner utility, then use standard tools:

In Windows 8 and 8.1, this operation can be performed on the Startup tab in the Task Manager.
Checking the registry and RAM
The tails left in the registry after uninstalling programs negatively affect system performance, which leads to a decrease in the speed of the computer. The solution is simple - periodically clean the registry using the CCleaner utility already mentioned above.

If you have never cleaned the registry, then after the first “cleaning” you may notice a serious acceleration of the system.
Don’t forget about RAM, which can also have various malfunctions that affect the final performance. To check your RAM, use the built-in tool “Diagnostics of computer RAM problems”.
Select the first option, which involves rebooting and checking. Don't forget to close all programs. 
The scan can take quite a long time, so do not schedule any computer-related tasks during the scan - it is not recommended to interrupt the diagnostics, as this can lead to serious errors.
Power Options
A minimum number of users remember adjusting power settings, although this is one of the important components of adjusting computer performance. Typically, the power management scheme has three modes:
- Maximum savings – minimum productivity.
- Balanced energy consumption.
- Maximum energy consumption – maximum performance.
Switching the power mode is especially important for laptop owners. By default, the system is set to balanced mode, but as soon as the battery runs low, the power saving mode is automatically activated, which reduces performance.
When you plug in the laptop for charging, the economy mode does not switch, although there is no longer any need for it. On such trifles, users lose moments, which then add up to a noticeable slowdown of the computer.
If you work on a computer or laptop that is constantly connected to the network, be sure to configure the power supply:
- Go to “Control Panel”.
- Find the "Power Options" section.
- Select High Performance mode.
If necessary, you can customize the scheme for yourself by clicking on the “Customize power plan” link. On the "Advanced Options" tab you can set your own values.
Enable all processor cores
Nowadays it is almost impossible to find a working computer that has only one core; modern machines have 2 or more cores.
Usually the operating system automatically checks the type of processor installed, but it often happens that only one core is used at boot.
You can correct this shortcoming on your own:

Now, when starting the operating system, all processor cores will be used, which will significantly speed up loading.
Replacing thermal paste
Another useful tip that can seriously increase the speed of your computer is to replace the thermal paste on the processor. 

How to set a password for a program in Windows 7
There is little doubt that Windows 7 has the best performance right out of the box. The system disk is practically newborn, there is nothing superfluous in it, so the system “flies”. Yes, the manufacturers of Windows 7 tried to impress their future users, especially those who are replacing their previous system with Windows 7. At first, everything goes fine. The Seven starts up, shows decent performance, which pleases the user, but then it begins to upset him with its “slowness.”
Unfortunately, the developers of Windows 7, who probably work on super-fast PCs, thought little about the many settings that are responsible for system performance, counting on the fact that the bulk of users will be housewives with their own laptops and tablets. And not every more educated user, especially if he has problems with English, has access to the information on setting up system parameters to increase its performance, which is posted on the Microsoft website. The article makes an attempt to tell users what optimization of Windows 7 is possible, to introduce them to its techniques for increasing the speed of the operating system and the computer as a whole. The full list of functions and sections of the seven that can be customized and optimized is quite large. Let's look at the main ones.
Speed up Windows 7 boot
It is unlikely that any user will like it if he has to wait several minutes for the operating system to load. Although a computer with Windows 7 boots from previous versions of the OS, many users are not averse to speeding it up with some tricks.
Using multi-core
To enable support for multi-core processors at boot time, enter msconfig in the search bar. Then you need to follow the path “Boot” tab - “Advanced parameters” - “Number of processors”, mark it, set the value equal to the number of cores in the installed processor, and finish everything by clicking “OK”.


Then you need to restart the computer and make sure that the OS loading speed increases.
Disabling applications from startup
The OS loading speed also depends on the number of applications that are loaded simultaneously with Windows loading. Their list can be seen using the same msconfig command, but on the “startup” tab:

Often, this list includes (unbeknownst to the user) applications that do not require downloading at all, but they increase the download time. To optimize Windows, you should exclude such applications by unchecking them and clicking “OK”. After this you should reboot.
Speeding up PC shutdown
You can also speed up your computer's shutdown by reducing the time interval allotted for shutting down active programs. If they do not have time to complete on their own, Windows will forcefully stop them. To reduce the computer shutdown time, you need to edit the registry. Without going into details of this process, it should be said that in the registry you need to find the WaitToKillServiceTimeout parameter and change its value from 12000 to 2000.
Speed up launching applications from the Start menu
If you do not use the classic view of this menu, then you can optimize it, that is, increase its speed as follows:
- Right-click on the taskbar or Start button.
- From the context menu, select the “Properties” sub-item.
- In properties, open the “Start Menu” tab.
- On the tab, click “Customize”.
- Remove the checkbox from the “Highlight recently installed programs” item.

Graphics acceleration
In the case where the PC does not have a sufficiently powerful graphics adapter (it has a cheap video adapter or one integrated into the motherboard), the AERO interface can cause a significant decrease in system speed. You can optimize the graphics system in this regard by disabling some AERO functions, but without losing the main advantages of this mode. Which AERO features can be disabled and which can be left, and how to do this? And this is done like this:
- In the Control Panel (CP) we find the “System” section and click on the line “Advanced system settings”.
- Open “Advanced” and click on “Options”.
- Open the visual effects tab.
- Uncheck all parameters except those shown in the following figure and click “OK”.

Increasing file copy speed
The seven has a new function - the so-called “remote differential compression”. It is used when copying and moving files and consists of calculating the differences in the source and destination files. This is done to reduce the amount of data being rewritten, but requires additional time to calculate their differences. This feature can be disabled as follows:
- Select the “Programs and Features” section in the PU.
- Click on the line “Turn Windows components on or off.”
- In the constructed list of system components, uncheck the “Remote differential compression” element.

Enabling ReadyBoost
The optimization of Windows 7 conceived by the developers has been supplemented with a new function - ReadyBoost. The purpose of this function is to virtually expand the computer's RAM by connecting external USB drives and Flash cards. The OS will use them as cache memory, thereby speeding up read/write operations and increasing the speed of the entire system. You just need to enable it, and for this you need:
Registry optimization
The registry files of a computer with Windows 7 are a kind of database about the configuration and settings of the OS itself and installed applications. This database, unfortunately, tends to become cluttered and fragmented over time. And since it is accessed very often, this can cause a significant drop in the speed of the computer. Therefore, the registry should be periodically cleaned and defragmented.
The built-in defragmentation tools in Windows are not designed to work with the registry, so optimizing it is usually done using some third-party utility. An example is the CCleaner program, known to many users. After launching it, you need to select the “Registry” item in the menu. In the window that opens, click the “Search for problems” button and wait for the results of the analysis of the registry status. If any problems are found, then you need to click the “Fix” button.
Defragmentation of hard drives
Severe fragmentation of hard drives can also cause a decrease in computer speed. This especially applies to the system disk, since it is used almost constantly during system operation. To defragment it, you can use the tool built into Windows – the Defrag utility. To launch it you should:
- Click "Start".
- Click on “Computer”.
- In the window that opens, right-click on the system disk and select “Properties” from the context menu.
- In the properties window, open the “Tools” tab and click the “defragment” button. A window will appear that looks like:

As you can see from it, defragmentation can be performed in two modes - scheduled and manual. When manually defragmenting, you should first determine its need by running a disk analysis. If after this it turns out that the disk is heavily fragmented, then you need to start defragmenting it by pressing the appropriate button.
Disabling UAC
The UAC (User Account Control) feature is one of the most important system security features. You should carefully weigh the pros and cons of turning it off. And yet, many users disable it, relying entirely on high-quality anti-virus protection. You can disable the UAC feature completely or lower the security level. In any case, this requires administrator rights. Changing the protection level is done in this way.
Despite regularly updating versions of operating systems and improving their quality and reliability, as well as the speed of information processing in software, there still comes a certain moment when it happens.
Of course, the resource of normal operation of the system as a whole can be extended if you take into account all kinds of rules for operating the OS, however, the constantly accumulating minor errors, minor failures of various programs associated with system files will one day lead to a failure of the OS.
To maintain stable operation, the system has special built-in utilities, but their functionality is limited and resource-intensive, so they are not always suitable for deep scanning, analysis and cleaning of the OS. In this case, it is worth using special programs, external utilities with local action.
Today there are a great many such programs, many of which are practically ineffective, but from the entire arsenal for each OS, time-tested utilities are still distinguished that can restore system functions and significantly increase the life of the OS.
Using Windows 7 as an example, in this article we will consider two fairly well-known programs that meet all optimization requirements:
- CCleaner;
- Auslogics BoostSpeed.
Both programs can be downloaded for free from the Internet on the official website.
About utility utilities for OS optimization
For general information, deviating a little from the topic, let us once again remember the location of utility utilities for OS optimization. The main ones are:
- Disk Defragmenter;
To use disk defragmentation or disk cleanup, perform the following steps: open the Start menu - All Programs - Accessories - System Tools (we find these utilities in the general list).


To check the local disk for errors, do the following: Start menu - Computer - right-click on the required disk - in the menu that appears, select “Properties” - Tools - Run check. By the way, here you can also use defragmentation of this disk.


CCleaner program for optimizing and cleaning the system
Before downloading this software, you need to determine the bit depth of the operating system:

Start menu - Computer - right-click on the white field of the screen - Properties.

Now you need to find a program of any version, but in accordance with the bitness of Windows 7.

After downloading the product, install it by default on the system drive C by selecting the desired language in the menu item. To save traffic, especially when using a wireless Internet connection, it is recommended to uncheck the following items before installation:
- Automatically check for CCleaner updates;
- scanning cookies.

Considering that when optimizing Windows, the network is not involved and all maintenance processes take place exclusively within the OS itself, even a far from new version of the program will have an effect on solving the problem, since all the necessary functionality of the utility is already included in the general version package.

So, the program is installed, after which you should immediately restart the computer manually through the Start menu, even if the installation manager did not ask the user to do so. Speaking of rebooting, you need to constantly use it after installing any of the programs. To ensure normal operation of the OS, users should take this as a rule.
Having opened the shortcut on the desktop, we find a fairly simple interface with 4 buttons on the left edge of the screen. Moreover, not only the program version is indicated at the top, but also general information on the operating system and the main parameters of the computer.

Now you need to click on the “Settings” button on the left, select “Tracking” and uncheck all the boxes.

Here, going up the list, open the “Settings” column and disable automatic CCleaner updates.

Next, click the “Service” button and go to the “Startup” section. In this window, you can freely disable and delete those processes that are connected automatically every time the system starts. Naturally, each of them takes away part of the resources, a certain amount of memory. Here you can disable them using the corresponding buttons opposite: Enable; Switch off; Delete. This also applies to browser settings (connecting extensions and their updates, as well as updates to the browser itself, if it has not been previously disabled through the control panel).

The necessary program settings have been made, and now to work with the utility, in fact, only two functions are needed:
- Cleaning;
Having selected the “Cleaning” mode, we find next to it a list of files that will be scanned and, if necessary, deleted automatically. It is recommended not to remove existing checkboxes or add new ones; the necessary categories are already selected in the program by default.

Find the “Analysis” button at the bottom and click it. As soon as the analysis is completed and information about the files to be deleted appears, click on the “Cleaning” button and confirm the action with the “Ok” button. After cleaning the files, a report will appear on the screen.

Let's move on to the "Register" function. There is also a list of events and services that the utility is ready to optimize. Then click on the “Search for problems” button and wait for the process to complete.
If no problems are found in the end, you can close the program; optimization using the CCleaner utility is completed.

If a list of problems appears on the screen, click on the “Fix” button. Next - “Correct marked”, wait for the registry cleaning to complete and also exit the program.
Description of the Auslogics utility BoostSpeed to optimize your computer's performance
In one of the guides on the topic "" the Auslogics BoostSpeed program was briefly described. Now let's look at this product in general terms in more detail.
After successfully installing the software on your PC, open the program. At the top of the screen there are standard general control buttons:
- File;
- Settings;
- Reference.
Below, as in the CCleaner example, the Windows version and general PC settings are indicated. There are 4 main sections that you will have to work with:
- System check;
- Advisor;
- Resources;
- Tools.

In this case, there is no point in describing in detail each sub-item in the program, so we will only touch on the necessary ones, specifically for optimizing the OS.

So, first of all, open the first section - “System Check” and in the left column we find information on files and programs submitted for scanning. Click the “Check” button and wait for the process to complete.

Having received a report on the problems found, we eliminate them by clicking “Fix noted”. Once the problems are fixed, information in the form of a report will also appear on the screen.

Go to the “Advisor” section. It should be noted that this section is unlikely to be visited frequently in the future, since the Advisor only allows one-time disabling or setting up of some system services.

If the check has already been carried out previously, we will see the notification “No problems have been found on your system at the moment.”
If, when scanning the Advisor, a list of certain services appears, then you need to sequentially disable each of the presented ones by clicking the corresponding buttons under each of them. Thus, we will significantly speed up the system boot and increase the speed of any operation on this PC as a whole.
The next section “Resources” is extremely informative, where the operation of the system and its main blocks in real time is presented in the form of graphs.

Open the “Tools” section. Here are 9 functions shown, of which only a few are the most necessary for stable operation of the system:
- Disk maintenance;
- Registry maintenance;
- System settings;
- Speeding up the Internet.

Under each function there are interactive buttons highlighted in blue. In general, the program interface is also quite simple and convenient. For example, in the first item “Disk Maintenance” you need to go through three steps in sequence:
- Cleaning;
- Defragmentation;
- Finding errors.
We go into each of them and follow the instructions, and if at the end of any stage a utility request appears to reboot the system, then you should immediately perform it. Then re-enter the program and continue optimization from where you left off.
Registry Maintenance:
- Cleaning;
- Defragmentation.
System settings:
- Options;
- Service optimization.
In this function, in the parameters, you can disable all kinds of graphic visualization effects, optimizing the PC system with parameters below standard (for example, built-in video card (VGA), insufficient processor frequency, etc.)

In “Service Optimization” you can improve system performance by disabling some services, a list of which will be displayed immediately after selecting the appropriate PC profile.

And the last optimization feature is “Internet Speedup”. After the automatic check, the system’s operation will also be adjusted according to the criteria for setting up work on the Internet. There is no need to resort to manual optimization of Internet acceleration; in the “Internet Acceleration” section, the result of automatic configuration is quite effective.


