It has long been no secret that performance in Windows 7 has been sacrificed for beautiful animation. In your article Speeding up Windows 7, as I understand it, there was an attempt to solve the problem from the technical side, that is, by changing the system settings of the operating system. It seems to me that you need to optimize Windows 7 first of all by disabling visual effects, and only then experimenting with the page file, the registry, and so on. Sergey.
Optimizing Windows 7
Optimization is the process of modifying a system to improve its efficiency. Wikipedia.
Without a doubt, the Aero interface places a large load on the performance of Windows 7, and disabling some settings that directly affect animation usually immediately results in a significant increase in speed in Windows 7. And of course optimization of Windows 7 you need to start by turning off some visual effects. But which ones? Personally, at my work, in Performance Options->Visual Effects, there is a checkmark in the Ensure the best best performance, why do I need beautiful animation and smooth fading in my workplace? Now, if only you could smoothly disappear from work without anyone noticing, but unfortunately there is no such setting in Windows 7. But at home my friends didn’t allow me to turn off the Aero interface in Windows 7: “It’s beautiful, Dad.”
Well, we've talked a little, let's get down to business. What I propose, I personally have long found a golden mean for myself in the settings of visual effects, which our readers have repeatedly asked me about, and now I am sharing my experience.
I am sure that when you read the article to the end, you will turn off one third of the visual effects and be surprised, “Wow, I didn’t even know that all this was managed here.”
Start->Control Panel->System and Security->System->Advanced system settings->Performance->Options. Any visual effect can be disabled by unchecking it and clicking Apply.

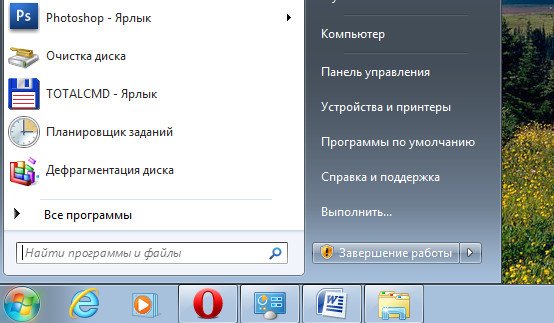
1)Animation in the Start menu and pane whether tasks. This setting is responsible for the smooth appearance and fading of lists in the Start menu, as well as drop-down buttons on the Taskbar, for example, right-click on the Start menu and point it at the All Programs menu, then we can notice the effect of a smooth drop-out of the list of programs. Let's uncheck the item "Animation in the Start menu and taskbar" and do the same, as you can see in the illustration, the list of programs now does not appear smoothly, but quickly, it's up to you to put the checkbox back or not.


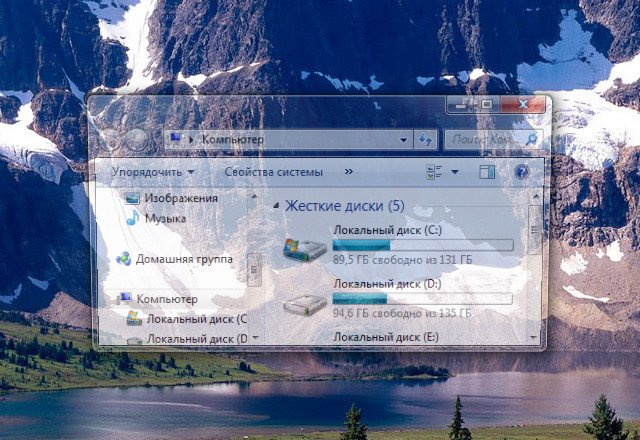
2)Animation of windows when minimizing and maximizing. The name speaks for itself. When opened, the window smoothly appears, and when closed, it seems to collapse. Let's open, for example, the window of the Computer system folder in the Control Panel, the effect is clearly noticeable, but now let's disable this setting and open it again, without a doubt the difference in the speed of the window's appearance will be noticeable.

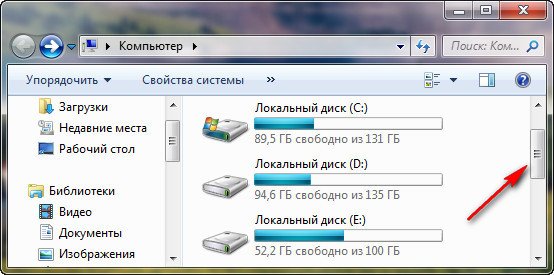
3)Animated controls and elements inside the window. Responsible for the effect of smooth highlighting on buttons and scroll arrows in dialog boxes. For example, let’s open the Computer system folder again and move the mouse over the scroll arrow, we noticed the highlighting effect, now turn off this setting and do the same. It seems to me that this can be abandoned.

4) Enable Desktop Composition. Responsible for the transparency effect of each open window in Windows 7, as well as the Taskbar. Windows 7 has to store information about open windows in memory and show us their silhouette when we hover the mouse over a button in the lower right corner of the desktop called Minimize all windows. Many people believe that Windows 7 optimization, you need to start by disabling this effect and the performance increase will not go unnoticed.


5) Enable Aero Peek. In the lower right corner of the desktop, there is a button Collapse all windows; when you hover the mouse over it, we will observe this effect.


6) Enable eff transparency ect. If you disable this effect, the Windows 7 interface will lose a lot, the transparency effect will disappear in the windows, experiment, maybe your video card will pass this test, it’s worth it.
7) Smooth scrolling of lists. You can safely uncheck the box, the effect is not particularly noticeable.
8) Menu fades out after calling a command. Disable it, as it is quite difficult to notice the difference.
9) Using Display Stylestions for buttons and windows. If you disable this option, no one will distinguish the design of your operating system from Windows XP - with all visual effects disabled. If you, like me, can’t forget XP, you can also choose the classic theme. Right-click on the desktop, select personalization, then Basic Simplified Classic.


10) Casting shadows on desktop icons. Personally, I don’t see much difference whether there is a shadow behind the icons or not, you can turn it off
11) Show window contents when dragging, it seems to me that it’s better to display it, it won’t take up a lot of resources from you, as you can see in the second illustration, if you don’t display it, it won’t be very convenient.

 12) Show shadows cast by windows. The screenshot shows a shadow with an arrow; if you are not happy with it, disable the setting.

13) Show thumbnails instead of icons. This visual effect consumes quite a lot of Windows 7 resources; if you disable it, folders will open noticeably faster. It displays all image files in Windows 7 Explorer in miniature, as well as video files and others. If you often deal with images, then using this effect is quite convenient, you can immediately notice the photo and drawing you need, but many people who work with video complained to me, the fact is that Windows 7 generates all the thumbnails of video files in File Explorer. It varies and sometimes a video file simply cannot be found in a folder with other types of files, it takes such bizarre forms. By the way, everything is visible in our illustrations. The black rectangles in the folder are our films, next to them are graphic images, and this is what they look like when the effect is turned off.


14) Display transparent selection rectangle. When selecting several files with the mouse, you can notice a rectangular area moving after it, which does not particularly affect performance.


15) Displaying a shadow under the mouse pointer. It consumes virtually no computer resources.
16) Smooth out jagged screen fonts. The text on the screen with this visual effect turned off does not look very nice, let's leave it.

 17) Sliding when expanding lists. The effect of smooth drop-out of lists is not particularly noticeable, but can be turned off.
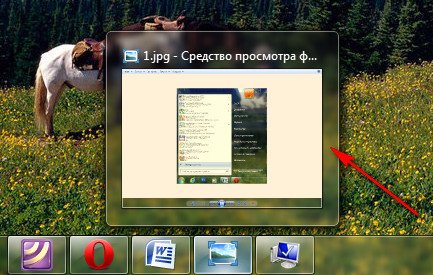
18) Save taskbar thumbnail view. You can experiment, if you need to, you can leave it.
19) when accessing the menu. It consumes a lot of resources and our time too, it’s better to turn it off.
20)Fade or glide effects when prompts appear. What's better for you, a hint with an effect or just a quick hint? Turn it off.
The question of how to speed up a computer interests a huge number of users, and interest in it does not fade. You can really influence the speed of your computer by optimizing the operating system. Most of the functions and capabilities of modern operating systems remain unclaimed by ordinary users. Many people, after reinstalling the OS, do not make any changes to the configuration and are content with the standard settings, which are not the most optimal.
We will analyze in detail all the latest methods for optimizing Windows 7 to improve computer performance. If you follow our recommendations, you will probably notice that your computer will run much faster.


Problem. Operating systems of the Windows family have not only a convenient, but also a beautiful interface. This, in turn, imposes quite serious requirements on the computer hardware. With all the abundance of interesting visual effects, the hardware must ensure smooth operation and the highest possible performance. If the computer is not the most powerful, then a drop in performance is guaranteed. This problem is especially relevant for owners of low-power laptops and netbooks, whose manufacturers primarily set themselves the goals of increasing energy efficiency and reducing costs.
Solution. To solve this problem, it is recommended to turn off almost all visual effects and leave only the basic ones. In this case, you are guaranteed a productivity increase. Optimizing Windows 7 for visual effects is quite simple. Go to the Start menu and type “Visual Effects” in the search bar. Click on the section that appears “Configure presentation and system performance.”

For convenient settings, place the selector next to the “Ensure the best performance” item, and absolutely all the checkboxes will be cleared. After that, check the following boxes:
- Enable desktop composition
- Using Window and Button Display Styles
- Show thumbnails instead of icons
- Smooth out jagged screen fonts

Click “Apply” and restart the computer.

Problem. All files written to the hard drive are divided into fragments using a special algorithm. This is done to make the most efficient use of the remaining disk space. As a result, when the computer tries to read a file, it collects a huge number of individual fragments scattered throughout the hard drive. This process is aggravated by the presence of tens of thousands of fragments of unnecessary files. This in turn can lead to a decrease in the performance of the hard drive and the system as a whole.
Solution. The only effective way out of the problem is regular cleaning of junk files and defragmentation of the hard drive. First, audit unnecessary information on your computer. Delete annoying movies (which, by the way, take up a fairly large amount of memory), music and other files that are no longer relevant for you. Then remove programs you don't use. To do this, go to the Start menu --> Control Panel --> Uninstall a program. We audit outdated applications and get rid of them using the “Delete” button.

After cleaning up the garbage, we move on to defragmentation. To do this, go to “My Computer,” right-click on the desired drive and select “Properties” --> “Tools” --> “Defragment.” Select the disk and click the “Disk Defragmenter” button.

Optimizing your hard drive will really help you speed up your computer. The effect will be especially noticeable on those computers where this procedure has not been carried out for a long time. Let us remind you that it is advisable to carry out defragmentation regularly to maintain optimal operation of the hard drive.

Problem. Even on powerful and expensive computers, over time, a decrease in the loading speed of the operating system is noticed. And in most cases, the culprit is the huge number of programs that are running simultaneously along with the operating system. Update managers for various applications, social network agents, various instant messengers, and antivirus are added to startup. By the way, it is better not to remove the latter from startup, since ideally an antivirus program should constantly protect the computer in real time. We will disable all other “unexpected guests” from autoloads.
Solution. To easily and effectively remove unnecessary programs from startup, it is recommended to use the CCleaner program. Its main specialty is cleaning the registry (we'll talk about this later), but it also does an excellent job of optimizing startup, providing the user with a convenient and intuitive interface.

Launch the program, go to the “Tools” --> “Startup” tab and use the “Turn off” button to remove from automatic startup all programs that you do not need.

Problem. It is believed that a dirty registry can negatively affect the speed of a computer, as can problematic RAM. Everything is clear with the registry. If installed applications are not completely removed, “garbage” remains in it (application settings, links to non-existent shortcuts, incorrect file extensions). Over time, there is more and more garbage. And if we want to speed up the computer, then the garbage needs to be removed.
With RAM, everything is somewhat more complicated. This is a very important component of the computer and it is simply impossible to talk about optimal system operation without adequate RAM. Failures in RAM can be caused by manufacturing defects, problems with the power supply, or even voltage surges. In any case, optimizing Windows 7 necessarily involves diagnosing RAM.
Solution. You can clean the registry using the previously mentioned CCleaner program. RAM diagnostics can be carried out using the operating system. To do this, open the Start menu and type “Diagnose computer memory problems” in the search box.

A window should appear in which you need to select the type of check (it is recommended to select the first option).

After the computer restarts, a memory check will begin. It may take a long period of time, so do not plan any urgent computer-related tasks during the diagnostic period. When checking on the screen, you will see something like the following window:

The end of the diagnostics will be accompanied by a computer restart. The next time you log in, you will be able to view the results of the scan. Optimizing Windows 7 must necessarily include working with the registry and RAM.

Problem. Many users have computers equipped with multi-core processors (with the number of cores from 2 or more). A larger number of cores in the processor should have a positive effect on the speed of the computer. Although the operating system itself automatically checks the type and characteristics of the installed processor, quite often only one core is used when starting the computer. Naturally, in this case, the loading speed of the operating system decreases.
Solution. The solution to this problem is very simple. The user can force the system to boot using the power of all processor cores. To do this, go to “Start” --> “All Programs” --> “Accessories” --> “Run”. Enter the command “msconfig” and click “OK”.

In the system configuration window that appears, go to the “Boot” tab --> “Advanced parameters...”. Check the box next to “Number of processors” and select the maximum number. Click "OK".

If you don’t know how to speed up your computer, or more precisely, how to influence the startup speed of the operating system, then this method is ideal for you.

Problem. The standard and additional gadgets used in Windows 7 are undoubtedly very convenient and useful. Many users happily use them in their daily work to facilitate access to interesting information. On the other hand, gadgets can directly affect the speed of a computer, naturally in a negative way. Such gadgets will waste your system resources. On a powerful modern machine this may not be noticeable, but on weaker computers the performance drop will be noticeable.
Solution. Optimizing Windows 7 in terms of gadgets does not imply their complete removal. Keep 1-2 of the most frequently used and useful gadgets, and remove the rest. Still, with a high degree of probability, it can be said that you will receive most of the interesting information on the Internet. Why then load your system once again?

Problem. The Windows 7 operating system can use high-speed flash memory devices to effectively cache data from the most frequently launched applications. In fact, the memory of a USB flash drive or SD card can be used instead of the swap file. Such a cunning manipulation makes it possible to speed up the read-write procedure, which will ultimately have a positive effect on the speed of the computer and the overall performance of the system.
Not all Windows 7 users can increase the amount of RAM in the standard way (by purchasing a new stick). A variety of reasons can prevent this. These include restrictions that the chipset or motherboard manufacturer imposes on its products, and the impossibility of purchasing RAM of a suitable format.
Solution. To expand your computer's RAM, you can use standard USB flash drives and flash cards in SDHC/SD/MS format. To use a flash card, you will need a special card reader that is compatible with the card format. ReadyBoost technology is natively built into the operating system, so you don't have to download and install additional software.
Minimum requirements for drives when used in ReadyBoost:
- USB 2.0/3.0 standard support
- Minimum read speed of 2.5 MB/s for information in 4 KB blocks
- Minimum write speed of 1.75 MB/s for information in 512 KB blocks
- Minimum free space 64 MB
Before choosing a drive for ReadyBoost, be sure to check its speed characteristics and make sure they meet the requirements. Using high-speed flash cards will provide maximum performance gains.
Go to “My Computer”, right-click on the external drive and click “Properties”. Go to the “ReadyBoost” tab. Place the selector opposite the “Use this device” item and use the slider to set the limit on the amount of memory used. Next, click “Apply” and “OK”. If you want to provide the system with access to all free memory of the external storage device, then set the selector opposite the item “Provide this device for ReadyBoost technology”.

Use this clever method. We hope it will help you answer the question of how to speed up your computer.

Problem. Very often, when working on a computer, users forget to configure the power management scheme - a set of hardware and system parameters that are responsible for the power consumption of individual system components. The power management scheme can be configured to maximize power savings (minimum performance), balance power consumption, or maximize computer performance (maximum power consumption). You can simply forget about this simple parameter and at the same time negatively affect the performance of the system.
This problem is relevant for laptop owners. By default, the system sets the balanced power mode. When the laptop battery runs out, the power saving mode is automatically set. Later, when the laptop is connected to the network, few people remember about the economy mode and the need to switch it. This is how the speed of the computer is lost on simple things.
If you are using a personal computer or laptop (but are running on network power), then adjusting the power plan can speed up the computer and improve overall system performance.
Solution. The solution to the problem is to control the power supply mode. Go to “Start” --> “Control Panel” --> “Power Options” and select the “High Performance” mode.

If desired, you can customize the power plan. To do this, select “Configure power plan” --> “Change advanced power settings”. Set your own values as desired.

conclusions
We have looked at 8 ways to optimize Windows 7 that will help increase the speed of your computer. It is very difficult to fit all optimization methods into one article, so this is only the first part of the material. In future articles we will continue to examine interesting and effective optimization methods, since this topic is quite broad and interesting.
Hello dear guests and readers of my blog. We continue to optimize the Windows system to achieve the best performance. Today we will talk about how to customize visual effects in Windows 7 and Windows 8.
Why do you need visual effects optimization?
Visual effects in Windows are designed to make the Windows experience more enjoyable for users. Especially the versions of Windows 7 and Windows 8 are distinguished by their beauty but also by their higher demands on computer resources. Although all modern computers work well in these interfaces, many owners of inexpensive laptops, netbooks, and tablets may notice problems with system performance. The Windows system in such devices loses its performance.
A Windows user can always turn off visual effects if necessary, which is what we will do.
How to customize visual effects in Windows 7?
If you decide to speed up your system's performance by disabling visual effects, you don't have to switch to the classic design scheme. All you need to do is set up visual effects correctly in Windows 7.
In order to customize visual effects in Windows 7 without disabling Aero mode, you need to go to the Visual Effects Manager. There are several ways to do this, the easiest way is to open the Start menu, enter the word “Visual Effects” in the search bar and click on the line “Customize presentation and system performance.” As a result, the Visual Effects Settings Manager window will open.
The second method is to launch the Start menu and go to Control Panel. Click on the line “Check computer status”.

Then go to “Computer performance information”.

Then, again in the left menu, select “Setting visual effects”

As you can see, all visual effects are selected by default to ensure the best look.

Also, you can see the “Ensure the best performance” option, when selected, Windows will adopt the classic gray design scheme, but this can significantly increase system performance.
In order not to lose the attractive appearance of Windows and at the same time improve performance, select the “Special settings” item. In the list of Windows effects below, disable all effects except the following lines:
- Enable desktop composition
- Using Window and Button Display Styles
- Show thumbnails instead of icons
- Smooth out jagged screen fonts.

Click “Apply”.
If you want to return to your previous settings, select "Restore Defaults".
If, after saving the changes, you no longer have the transparent Aero interface, you can enable it by right-clicking on the desktop and selecting “Personalize”.

How to customize visual effects in Windows 8?
In order to customize visual effects in Windows 8, you need to open the search bar by pressing the Win+Q keys. Enter the word “Visual effects” into the search, point to “Options” just below and click on the link “Adjust presentation and system performance”

- Thumbnail outputs instead of icons
- Fade and slide effects when accessing menus
- Smoothing jagged screen fonts
- Animation on the Taskbar
- Animating windows when minimized and maximized

Click "Apply to save the settings."
Actually, this is what setting visual effects in Windows 7 and Winodws 8 is limited to. If I missed something, I would be grateful if you supplement my article with your comments!
Good luck! See you again on the blog pages.
Well, and lastly the video
I offer a selection of my tips on how to optimize Windows 7. Most of the recommendations are relevant for systems that have an insufficiently powerful video card, memory and processor:
Do the following: Start - Control Panel - System. Choose Advanced System Settings.
In the window that opens, select Advanced - Performance - Options

In the tab Visual effects choose . Apply. Let's get a classic interface design.

If this view does not suit you, then you can enable one of the themes included in the Windows 7 package. On the desktop, right-click and select Personalization. And choose one of the design themes.

After selecting a theme and changing the design, you can further speed up the mode Aero Glass, turning off the transparency effect. In the window Personalization select an item Window color, and uncheck the item Enable transparency.

Save the changes and close the windows. In this mode, all mode features are retained. Aero Glass, and at the same time do not load a weak video card.
With each new version of Windows, the operating system receives more and more visual updates that turn the familiar “shell” into a work of art. Many users happily switched to Windows 7 after seeing all the options for personalizing the desktop and Start menu. True, not many users understand that colorful visual effects create additional load on the processor of a personal computer or laptop.
Correctly setting up visual effects does not mean giving up the beautiful design of Windows, however, a number of functions that really put a strain on the computer's processor have virtually no effect on the overall appearance of the operating system, so they can be disabled without hesitation.
Setting up visual effects
Opening Start→Control Panel→System.

Go to " Advanced System Settings" and open the tab " Additionally".

We look for the block “ Performance” and press the button “ Options”.

Types of visual effects settings
There are three types of effect settings that you should be aware of:
- The best view. This type of setting enables the activation of all options displayed in the operating system. The result will not be long in coming: the user will see a bright, stylish and memorable interface with good animation, but will be forced to sacrifice an impressive portion of PC resources;
- Best performance. Disabling all visual effects will significantly increase the performance of the computer, but the appearance of the OS will resemble Windows 98;
- Special Effects- your personal set of active visual effects.

It is not necessary to sacrifice design in favor of computer speed, since it is enough to carefully review the list of visual effects and disable those that will not affect the overall picture, but will no longer consume computer resources.
Let's look at the available options:
- Animation in the Start menu and taskbar. Only a few will be able to notice the animation. Turn it off.
- Animating windows when minimized and maximized. The difference between having an effect and not having it is whether the window appears smoothly or instantly. Turn it off.
- Animated controls and elements inside the window. Almost invisible to the human eye. Turn it off.
- Enable Desktop Composition. This option is one of the most power-hungry and represents a preview of a folder, file or window. If you do not use this feature, we strongly recommend disabling it.

- Smooth list scrolling. The lack of smooth scrolling is very irritating to the eyes, as the picture scrolls jerkily. Turn it on.
- Menu fades out after calling a command. The difference between the presence of an effect and its absence is the smooth or abrupt appearance of the menu. Turn it off.
- Using Display Styles for Windows and Buttons. This parameter is responsible for the look of Windows 7, for which many PC users switched to the new operating system. According to the law of meanness, it is also one of the most “gluttonous”, so if you can do without beautiful design, then turn it off.

- Casting shadows on desktop icons. The shadow of icons can only be seen on a light desktop. Turn it off.
- Show thumbnails instead of icons. Without picture thumbnails, it is very difficult to work with images or simply search for a specific photo or table. Turn it on.
- Show window contents when dragging. When the option is enabled, you drag the entire window, along with its contents, and when disabled, only its frame. Turn it on.
- Display a transparent selection rectangle. The selection changes only on the desktop, while in folders it remains the same. Turn it off.

- Displaying a shadow under the mouse pointer. Anyone notice this shadow? Turn it off.
- Smooth out jagged screen fonts. Makes the font smoother and easier on the eye. Turn it on. However, please note that in some games, disabling the option can significantly increase the FPS (frames per second) gain.
- Sliding when expanding lists. Turn it off.
- Fade or slide effects for menus and tooltips. Turn it off.


