- Easy to use. This LOST.DIR recovery tool is capable of getting back lost files from your Android device with just one click, so even beginners can understand it in a few seconds.
- LOST.DIR recovery in various situations. No matter your files are lost due to operating error, system freeze or crash, virus attack, sudden crash or formatting, it can easily recover them.
- Supports various data types and formats. It works for all, video, audio, document, email and other file formats such as JPG, ICO, PNG, BMP, GIF, PSD, TIFF, RAW, MP4, MP3, WAV, AVI, DOC, ZIP, etc. D.
- Loss-free recovery. With the best LOST.DIR recovery app, you can recover your lost files in original quality and format.
- Selective recovery. After scanning, you can view all your lost files organized by categories and formats and decide to recover all of them or specific files.
- Faster and easier. This LOST.DIR recovery tool is lightweight and can recover lost files quickly and safely.
- Moreover, data recovery is available for 10/8.1/8/Vista/XP and file systems such as NTFS, FAT16, FAT32, exFAT, EXT, etc.
In short, this is the best option when you want to recover files from LOST.DIR folder.
How to recover files from the LOST.DIR folder
Step 1: Scan the entire SD card to find lost files
Download and install the latest version of Data Recovery on your PC and also connect the external SD card of your Android phone to your computer.
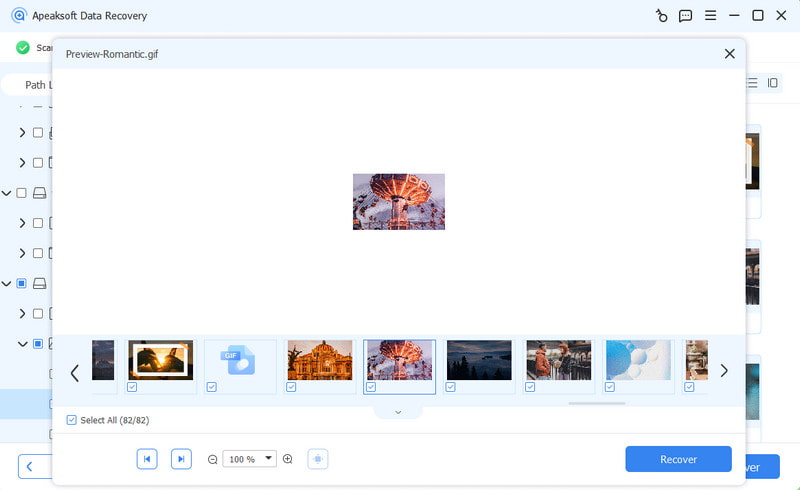
After launching the best LOST.DIR recovery software, you will see two parts in the main window: data type and. Firstly, go to the data type part and check the boxes of your desired data types like Image, Audio, Video, etc. Then go to the location part and select your SD card under Removable devices." Click the "Scan" button to start the LOST.DIR recovery process.

Step 2: Preview files before recovering LOST.DIR
When you go to the results window after a standard scan, you can see which files can be recovered by type and format. For example, go to the "Audio" tab in the left sidebar, several folders will appear there with the names of audio formats, such as MP3, WAV, WMA and others. You can then navigate to each folder and view your files. If you want to quickly find a specific file, enter a keyword in the field at the top of the window and click the Filter button. Don't get anything related to the file you want to return? The deep scan feature on the top right corner will check the SD card thoroughly and recover more data.
Moreover, it also allows you to get back your deleted lost files on your computer easily.
Step 3: Perform LOST.DIR recovery in one click
If you're ready, select all the files you want by checking the appropriate boxes, or you can select entire folders. The best LOST.DIR recovery tool will recover your lost files from LOST.DIR folder to another location as soon as you click the "Recover" button. Finally, click the "Open Folder" button in the "Recovery Complete" window to open the destination folder. You can now access your files and transfer them to your Android phone as usual.

Part 4. Frequently asked questions about the LOST.DIR file
1. Is it safe to delete LOST.DIR?
The LOST.DIR folder stores temporary files for your Android phone and plays an important role in recovering lost data. If you are sure that there are no important files in the folder, you can safely delete LOST.DIR to free up more space.
2. How to prevent Android from creating Android and Lost.DIR?
The creation of LOST.DIR starts when your phone gets stuck due to a sudden crash or damage. To prevent LOST.DIR from being created, you just need to prevent the SD card from being damaged, how to safely remove it, never delete while changing files on your phone, etc.
3. How to remove the LOST.DIR virus?
First, let's make it clear that LOST.DIR is not a virus, but a folder created by the Android system to collect lost files. You can remove the LOST.DIR folder by deleting it, but it will still appear on the next system boot.
4. What happens if we delete the LOST.DIR folder from the SD card?
It will free up more space for your Android phone after deleting the LOST.DIR folder, but the data stored in the LOST.DIR folder will last forever even if you use data recovery software. After deleting the LOST.DIR folder, a new LOST.DIR folder will be created on your phone to store the new data.
Conclusion
Based on the introduction above, you can understand what DIR is missing. This is a Recycle Bin replacement for Android devices. But it is not used to store deleted data manually, but saves lost data when there are sudden interruptions. In other words, LOST.DIR Android gives you hope that they will get back your lost data when Android hangs, powers off, crashes, etc.
To help you recover files from LOST.DIR folder, we have also shared a professional LOST.DIR recovery application, Apeaksoft Data Recovery. It supports a wider range of data types and formats. Moreover, this digital data recovery tool simplifies the LOST.DIR recovery process. Now you can stop worrying about data loss and can use your Android phone freely. If you have other questions about LOST.DIR, please leave a message below this post.
What is it for?
It is quite obvious that you have the LOST.DIR application installed on your device. From time to time the size of this folder may vary in gigabytes. In such situations, you may wonder about its contents and usage, and whether it can be removed to free up certain amounts of memory.
What is the LOST.DIR folder on the flash drive?
So, more details. Lost.dir is a system folder. This is where the Android OS puts files that were restored during system boot (i.e. when you turn on the phone). This is similar to the Recycle Bin in Windows. Files that are stored inside this directory are often recovered. In most cases, you will not find anything in this directory when you browse it. All data is encrypted and will be unreadable files or will not appear at all when viewing LOST.DIR. What kind of folder is in Android is clear. But how to understand its contents? In fact, everything is very simple. To understand its functionality and purpose, you need to know the principles of storing data on the device.

What files are stored in LOST.DIR?
What kind of folder is intended for such information? If you were saving any information, and suddenly the phone turned off during the copying process. Or, if you removed the SD card while files were being written to it, Android places copies of those files in the LOST.DIR directory to try to restore them the next time you boot (the next time you start the system). The data is also renamed during the copying process. So, if you find files with unknown names in the folder, do not be surprised as these are just renamed versions of the previous data present on your device.
Reasons for this conservation
Files may be stored in the LOST.DIR folder for the following reasons:
- The user abruptly pulled out the SD card from the phone while data was being transferred.
- An interruption occurred while downloading files on your Android device.
- The Android operating system suddenly froze.
- The device was turned off while the read/write process was in progress.

Recovery
What to do? To stop the constant loss of files from the LOST.DIR folder in your phone, you need to quickly recover the missing data before your Android smartphone storage space gets overfilled with some new data. Therefore, it is recommended to use any suitable LOST.DIR Android recovery tool. For example? Applications Yodot Android Data Recover, Recuva are several programs that can help in most cases.
With the help of such services, you can recover all types of files - pictures, APK files, audio, video, and so on from your Android smartphone or tablet. The utility returns missing or deleted data from internal as well as external memory (MicroSD cards). Many applications can even restore system files of famous brands Sony, HTC, Samsung Micromax and so on. When synchronized with a computer, you can work on Windows 8, 7, Vista, XP, Windows Server 2003 and 2008 operating systems.
How does the recovery process work?
Important point. You know what files are in your LOST.DIR folder. How to recover all lost data? This process can be studied using the Yodot Android utility as an example. All other services work in a similar way.

First of all, you better stop using your Android device as soon as you realize that the files have been deleted. Then follow these steps.
Connect your phone or tablet to your computer. Then, on your PC, check if your device shows up as a drive letter (for example, E:).
If not, remove the memory card from your phone or tablet and then connect it to your computer using a card reader (memory card slot on your PC/laptop or USB reader). In this case, you should see it as removable media. If the memory card is working, try connecting it with the device again. Otherwise, the data recovery program will not work.
The process of recovering LOST.DIR files on Android is as follows. Download Yodot Android software and install it on your Windows PC. Now connect your Android device to this PC operating system using a USB data cable. Launch the utility and then follow the instructions on the main screen.
The software scans and displays all drives associated with the Windows system installed on the computer. Select the drive that represents your Android smartphone and click the Next button. Then you need to select "Lost File Recovery" to "pull" the missing files from LOST.DIR in Android.
Allow the application to scan the selected drive. In a few minutes, the program provides all the files and folders from LOST.DIR that you can recover.

Select the files you want to return from two view types (for example, Data View and File Type View). Review them to check your choices and then save the extracted data to the desired location. However, remember that you must do this on the same Android device.
Is it possible to delete the contents of LOST.DIR?
A frequently asked question following the above mentioned “what is the LOST.DIR folder displayed on the flash drive?” The answer is “lost data storage.” So, can you remove it? To save memory space, you may well delete its contents since it only acts as a recycle bin. You can also remove it entirely, but it will reappear the next time you start the system. When Android displays the "Preparing external SD card" message, it is actually checking the contents of LOST.DIR. And if this directory cannot be found, it is created again.
How to avoid data loss?
And finally. Once you have an idea of what kind of LOST.DIR folder is being created on your media, you can take preventive measures to eliminate data loss.
- Avoid abruptly removing the Android device's memory card when transferring data to/from the system.
- Back up images or other files to another device.
- Use reliable antivirus software to protect yourself from virus attack. You can find such services in the official Google Play online store, including for free.
If you have examined the file system of your Android smartphone, you have noticed the Lost.Dir directory among the directories. Not many people understand for what purposes it is used. Often tens or hundreds of files weighing up to several gigabytes are stored in a folder. If you need to recover documents from this directory, you should use specialized file recovery programs. They will be discussed in more detail in this material.
Purpose of the LOST.DIR directory
This folder may not be on your phone. As a rule, it appears when connecting external drives or when performing write/read operations. During the latter, failures may occur that lead to data loss. The Android system has built-in utilities that automatically try to recover lost data.
If this process ends successfully, the file is moved to the LOST.DIR folder. Accordingly, the user can determine independently which files really need to be saved and which ones can be permanently deleted.
Placing data in this directory is carried out in several cases:
- emergency removal of a memory card from a smartphone;
- failure to download from the Internet, connection failure;
- freezing or unexpected shutdown of the gadget;
- turning off the power when removing the device's battery.
In most of these cases, the system moves the files that were worked with to LOST.DIR, after which, when the gadget is turned on, it successfully (or not completely) restores them. At the same time, there are cases when the user is required to independently restore lost documents and multimedia. This can be done using special software.
Is it possible to delete LOST.DIR
The directory can accumulate several hundred megabytes or even gigabytes of data, which will take up valuable free space. You are allowed to delete the LOST.DIR folder if you do not find any valuable files among its contents. If necessary, this directory will be created again by the system.
You can delete this section in the standard way through the phone functions. Just select the folder, call up the pop-up function menu, and click on the “delete” line. Alternatively, use one of the third-party file managers, such as Total Commander or ES Explorer. As a rule, normal user rights are sufficient to delete a directory. In this case, you do not need to obtain Root rights.
Recovering files from LOST.DIR manually
The problem with this method is that when the system moves data to the LOST.DIR folder, it often renames the files and removes the extension. It can be almost impossible to guess what exactly “Android” has placed in the catalog. If you are absolutely sure that photos are stored in the folder, you just need to add the jpg format to the file or the one in which your camera takes pictures.
One way to determine the file type is the size. Typically, photographs weigh between 100 kilobytes and several megabytes (depending on resolution). If the file takes up tens or hundreds of megabytes of space, then it may be a video file. To rename a large number of files, use third-party explorers: X-Plore File Manager and ES Explorer.
Using specialized utilities
If the above method is for lost dir doesn't suit you, let's find out how to recover files in a third party program. You must first connect your phone or flash card to your personal computer. We will look at an example of how to recover files using TestDisk and PhotoRec 6.11.3. First you need to download it and unpack it in a convenient directory.

The file search process will start. The operating time depends on the amount of data being analyzed. While searching for files, the window displays the number of files found and their types.
Please note that this program does not guarantee 100% file recovery. If the result does not satisfy you, try other analogues. Be careful, as such software can damage the smartphone’s file system.
- Connect the memory card to the computer. Make sure Windows recognizes it. Launch Data Recovery.
- Go to the data type selection section, and then check the boxes for the desired data types, such as “Image”, “Audio”, “Video” (depending on what you intend to restore).
- Go to the location selection section and specify the SD card as the source in the Removable devices section.
- Click the Scan button.
The program will perform a search and try to restore the found files in accordance with their formats. Once the search is over, you can see in each section what the program found. All files will be sorted according to formats. For example, in the audio section it can be mp3, aac, wav and more.
Often, owners of smartphones operating on Android, when entering the file manager, can see the Lost.dir directory in the list, but not everyone knows what purpose the folder serves. As a rule, it is not noticed until it takes up more than a couple of Gigabytes in the device’s memory.
What is the Lost.dir folder?
The Android OS has a special program that is similar to Chkdsk in Windows. Its name File System Check. It scans disk content and helps locate and recover data lost during a crash. In the case of an SD card program a folder is createdLost. dir, where damaged files are located.
What does the folder store?
Lost.dir stores lost data. Elements (or parts thereof) whose recording was urgently stopped are sent here. For example, if, when transferring data from a computer to a smartphone, the USB is removed before the copying is completed, the selected items will not end up in the intended location. And they will be written to this directory.
Also, files in the Lost.dir directory may appear when Android, in the process of scanning files, detects damaged and incomplete parts.
Losses also occur when abruptly disconnected battery or smartphone malfunction, in which it turned off or was rebooted without going through the standard procedure. Even if the smartphone is in standby mode, many programs are still functioning, for example:
- processedotkainstructionsth processor;
- receiving information sensors about the external environment; or downloading data from it;
- recording certain files to flash memory.
Is it possible to delete
You can delete a folder, but it is better not the directory itself, but its contents. Due to the fact that after some time it will be created automatically and will need to be erased again. Leaving it in place, you need to clean it only when necessary, for example, when lack of free space on the SD card.
How to delete a folder
First you need enter the directory and make sure that there is no important information, the loss of which is undesirable. After which it is possible to delete or clear the contents of Lost.Dir using the Android file manager.
But you can simplify the task and completely forget that there is a directory for storing garbage. Google Market has many utilities that track, incl. and for the state of Lost.Dir and those who delete its contents. For example, CCleaner. 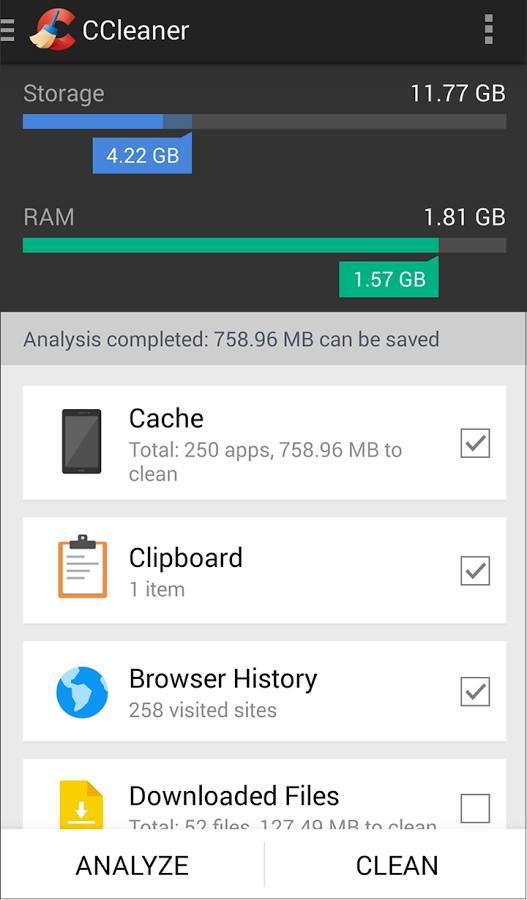
How to recover files from Lost.dir
It is usually impossible to restore the contents of Lost.Dir without special applications. In certain situations, you can specify the final title, sort the information by size, and manually add a specific document extension. For example, sort the data by volume, and you will be able to find photos among them (if there are not many of them). Copy the information, suitable in size with the photo in another directory. Next, you need to rename the elements by adding “.jpg” at the end. As a rule, this leads to the restoration of small pictures.


