Full HD monitors have recently become very popular. Now a resolution of 1920 by 1080 is almost the minimum requirement for a monitor. But what if the monitor supports and even recommends setting the resolution to 1920 by 1080, but it is not in the list of available ones? Or nothing happens, except for some blinking and glitches on the screen.
You will find answers to these questions in this article.
Why might the resolution not be set to 1920 by 1080?
Now we will provide a list of all possible reasons why Full HD resolution may not be in the list of available ones or may not be set correctly.
- Missing driver for the video card or video cards (if there are several of them, as is often the case in laptops);
- Missing monitor driver;
- Faulty or low-quality cable from the system unit to the monitor.
Now let's look at each point in more detail.
Video card driver
No matter how trivial it may sound, video card drivers are really responsible for a lot, including displaying a list of available screen resolutions. Even if you have a video card driver installed, it is better to definitely exclude it from the list of suspects.
Installing the video card driver
Monitor driver
A really common cause of problems with setting the resolution to 1920 by 1080 is a missing monitor driver. To check whether you have the driver installed on your monitor, in the window where you set the resolution, pay attention to the “Display” line. There should not be the words "Monitor Connection Module", "Generic PnP Monitor", "Generic PnP monitor" or "Standard Graphics Display".

Symptom of a Missing Monitor Driver
If this is exactly what you have written, then you need to find a driver for your monitor on the Internet and install it. Or rummage through monitor boxes. Very often a driver disk comes with it.
Poor quality cable from monitor to computer
There are many cases where problems with setting the resolution to 1920 by 1080 were due to the cable connecting the monitor and the system unit.
Try replacing it with another one that is known to work, borrowing it from friends or acquaintances to check.

VGA cable
Also, if you use (blue tips), then in this case we advise you to try connecting the monitor via a DVI or HDMI cable, if such connectors are available on the monitor and video card.
Today we will learn how to change the screen resolution in Windows 10 in several ways and look at the problems associated with this. These include: the inability to change the resolution, small or too large font after changing it, blurred fonts, etc. Finally, it is suggested to watch a video that shows how to change the resolution using the operating system.
Resolution is the number of dots (pixels) that determine the size of the image on the screen of any display. The first number indicates the width of the image, and the second number indicates its height.
So that the image does not look too large, or, conversely, small, this parameter should be set to a resolution equal to the physical one (the number of elements of the display matrix that form the image). This information is indicated in the monitor manual, on the display box, and is often displayed on the screen if the latter’s settings are incorrect.
Let's use the Windows 10 settings dialog
The method that operating system developers propose to use and change the display resolution in Windows 10 is the simplest. This is the operation of the new system settings window.
1. Press Win→I to open the “Options” window.
2. Go to the “Devices” section.
3. On the “Screen” tab, go to “Advanced settings”.

The three previous items can be replaced by calling the Desktop context menu and selecting “Display Settings”.
If there are several information output devices, you must select the one you need in the window.
4. In the list, select the option marked “Recommended” (this is the native, physical resolution of your display) and press “Enter” or “Apply”.
After this, you should evaluate the image quality and, if something happens, the settings can be restored within 15 seconds with a single click. It is not recommended to do this when choosing the native resolution value; in just a couple of minutes the eyes will get used to the new parameters and the picture will not seem unusual, low-quality, too small, etc.
The same thing, but through the Control Panel
In Windows 10, this parameter is changed in the usual way from the “seven”. This is done in the Control Panel.
1. Call it via Win→X.
2. Set up a way to visualize elements in the form of icons.
Or simply find the “Screen” icon through the search bar in the top right corner.
3. Click on this icon.

5. Select a display if there are several of them.
6. Specify the value for each of them.
7. Click “Apply” to write new settings to the Windows 10 registry.

Changing the resolution through the video card settings program
You can change the display resolution using a program that is installed along with the driver for the video adapter.
Let's look at how this is done using AMD as an example.
1. Call the “Setup Radeon” command through the Desktop context menu.

2. Click “Settings”, then “Advanced settings”.

3. We accept the terms of the license agreement.
4. Add a custom permission by clicking “Create”.
5. Specify any values manually and click “Check” to test the new resolution.

What’s interesting is that in this way you can achieve any resolution in both planes, even non-standard.
With nVidia video cards, the same is done through the NVIDIA control panel, which is called up through the desktop context menu.

Possible resolution issues in Windows 10
“Ten” automatically selects the physical resolution of the display and supports high values for this parameter, including 4K and 8K. But in certain cases, this function may not work and the list of supported values may not include the “native” one for the display. Then click “Graphics adapter properties” at the bottom of the advanced display options window.

Then click “List of all modes”. In the dialog that appears with a list of available settings, select the desired option and click “OK” until all windows are closed if the selected value is satisfactory.
Additionally, you should visit the device support site to see if it has a new version of software for controlling the operation of the graphics adapter (you can also check the update through the video card control panel).

It may be necessary to completely remove the old version of the software to integrate the new driver into the system. In this case, you should use the DDU utility, which also supports Intel video cards.
Visit the support resource (developer) of your display for the latest driver for it. Windows 10 does not always cope with the task of updating monitor drivers through Update Center.
Problems often arise when using cheap Chinese cables for connecting a video card and monitor or adapters. Try to get rid of them or change the connection interface if possible.
The image quality of the background image may be low due to the low resolution of the background image itself; it should be replaced with a larger one and the result checked.
Modern systems, starting with Windows 7, can independently select the optimal value for the screen, so basically there is no need to worry about this. It turns out that there are people, most likely beginners, asking the question of how to change the screen resolution, no matter what operating system or computer. The instructions will be individual for everyone and, I hope, will help you.
There are a couple more points that I will touch on here. Let's say you have a monitor with a resolution of 1920 by 1080 or higher. It is known that setting the value 800×600 for it will not work. Why? But because you will see screen distortion as the values do not match the physical values for the screen.
Let's start from the depths, namely seven. Using this particular operating system, you do not have to worry that the value will not be selected accurately. Although sometimes the value is set lower than necessary, so the knowledge that can be gleaned from this manual comes to the rescue.
The article touched on points on the topic, and the article itself is quite useful. If interested, you can read it.
To manually adjust the screen resolution, you need to right-click on an empty space on the desktop. A menu will appear where we select the option "Screen resolution".
One of the subsections of the control panel called “Display Settings” opens. Here we see three parameters:
- Screen;
- Permission;
- Orientation. (Read: )
Naturally, we are concerned about the second point. The first one is responsible for choosing an additional monitor, and the last one is already clear. Open the options tab "Permission" and select the maximum. In my case - 1366 by 768. Most likely, opposite the maximum resolution there will be a corresponding word - Recommended.

The note: It is worth paying attention to the moment when you cannot change the screen value. The fact is that you must install drivers for the graphics adapter. As a result, you can change the screen value not only from the control panel, but also in the video card settings. Below I will explain how to use these settings. (Drivers are usually installed automatically).
How to change screen resolution in Windows 10
The specified operating system has the same parameters from the control panel, but it still needs to be found. We won't bother, but let's see how to do this from the options menu.
As in the first case, we right-click on the desktop and select the option "Display Options".

A window opens with the “System” subsection. There are many tabs there, but we are interested in “Screen”. On the right side of the window we see several parameters:
- Night light mode – best suited for reading in the dark;
- Scale and layout– what we need;
- Multiple displays – we can connect additional monitors.
Finding the parameter "Permission" and change it to the maximum value, it will be marked “Recommended”.

In addition, you can specify the text size in applications. The standard value is 100%, but the value can be changed to 125%.
Unfortunately, this method is the only one in the top ten. The “Display” section has been removed from the control panel and the necessary settings can only be changed through the “Options” menu. That's how bad they are, these Microsoft people.
Using the graphics adapter utility
I’ll show you using an NVIDIA video card as an example, since I don’t have AMD.
When we click on the desktop with the mouse to call up the context menu, we can see the following items:
- Graphics characteristics (Intel HD Graphics);
- NVIDIA Control Panel.

Both of these sections have many settings, but only the first includes screen resolution settings. Let's look at the example of Intel HD. If you have this software, then launch it.
To make your computer screen settings as comfortable as possible for your eyes, you need to know how to change the screen resolution of your personal computer or laptop monitor.
Screen resolution is an indicator that determines the clarity of the display of all icons, pictures, that is, graphics in general. It is important to determine what will be best for the monitor.
Changing an extension using built-in OS features
The higher the resolution, the better the clarity of the display. For example, a 22-inch display will have a standard resolution of 1680*1050, which is optimal and maximum for this screen.
All available sizes are available in the settings; it is advisable to choose the largest one offered.
Follow the instructions to change the image resolution of your display:
- Go to the operating system desktop. Right-click on it and select screen options, as shown in the figure below;
- In the window that opens, you can adjust the size of text, icons and other system elements in real time. You can also adjust the screen orientation. To go to the selection tab, enter the word “resolution” at the top in the search bar;
- Select “change screen resolution”;
- Click on the drop-down list as shown in the figure and select the standard recommended one. Save the new settings.
Important! It happens that the recommended resolution is higher than the display. That is, the size of the final image does not correspond to the screen size, so some elements of the desktop may disappear from the user's field of view. Adjusting your monitor will resolve this issue. In the selection options, choose not the recommended one, but the one that fully displays all the elements of the desktop. At the same time, all graphics must be clear.
Several common types of expansion and corresponding display sizes:
- 1024*768 – perfect for screens of 15 or 17 inches. In a display with a resolution of 1024*768 pixels, the color depth is 16 bits;
- 1280*1024 – intended for displays whose size is 19 inches;
- Types of monitors measuring 24 inches most accurately convey the image at a resolution of 1920*1080. All displays with these parameters are FullHD.
Adjusting the screen refresh rate
The higher the display refresh rate, the correspondingly better the image quality. That is why, in addition to size, it is necessary to pay attention to this parameter. To change the refresh rate follow the instructions:
- Go to the control panel. In the search bar, enter “Screen” (without quotes);
- In the proposed search result, select the item that is responsible for the screen refresh rate, as shown in the figure;
- Set the refresh rate to the highest possible. This will eliminate possible periodic flickering of the monitor.
NVIDIA Software
How to find out the right resolution for your display? This can be done on the official website of the manufacturer or in the instructions that come with the device.
On the boxes of monitors and laptops from Samsung there is information on how to set the correct resolution and what to do if the real one does not match the declared one.
Using a special program that is preinstalled on all computers equipped with an Nvidia family video card, you can also adjust the resolution of the user's monitor. Follow the instructions.
The question of changing the resolution in Windows 7 or 8, as well as doing it in the game, although it belongs to the category “for very beginners,” is asked quite often. In this instruction we will touch not only directly on the actions required to change the screen resolution, but also on some other things. See also: (+ video instructions), .
In particular, I will talk about why the required resolution may not be in the list of available ones, for example, with a Full HD 1920 by 1080 screen it is impossible to set the resolution higher than 800×600 or 1024×768, about why it is better to set the resolution on modern monitors, corresponding to the physical parameters of the matrix, and about what to do if everything on the screen is too large or too small.
For Windows 8 and Windows 8.1 operating systems, changing the screen resolution can be done in exactly the same way as described above. At the same time, I recommend following the same recommendations.
However, the new OS has introduced another way to change the screen resolution, which we will consider here.
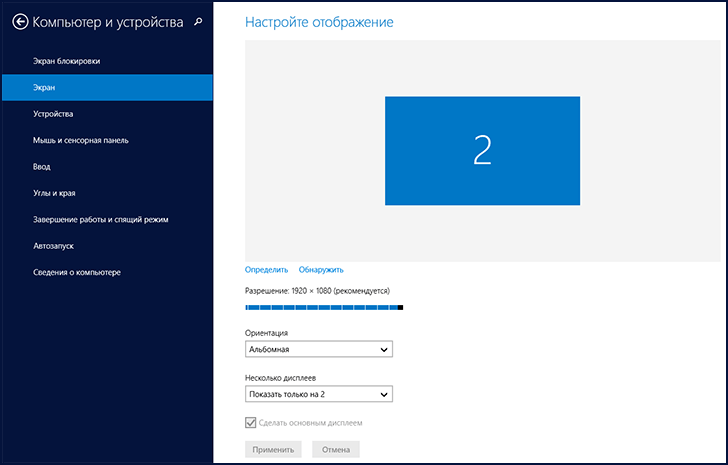
- Move your mouse pointer to any of the right corners of the screen to make the panel appear. On it, select “Settings”, and then, at the bottom - “Change computer settings”.
- In the settings window, select “Computer and devices”, then “Display”.
- Set the desired screen resolution and other display options.
Changing screen resolution in Windows 8
Perhaps this will be more convenient for someone, although personally, to change the resolution in Windows 8, I use the same method as in Windows 7.
Using graphics card management utilities to change resolution
In addition to the options described above, you can also change the resolution using various graphics control panels from NVidia (GeForce video cards), ATI (or AMD, Radeon video cards) or Intel.

Many users, when working in Windows, have an icon in the notification area for accessing the functions of the video card, and in most cases, if you right-click on it, you can quickly change the display settings, including screen resolution, simply by selecting the desired one in menu.
Changing the screen resolution in the game
Most games that run full screen set their own resolution, which you can change. Depending on the game, these settings may be located in the “Graphics”, “Advanced graphics settings”, “System” and others. I note that in some very old games you cannot change the screen resolution. Another note: setting a higher resolution in the game may cause it to slow down, especially on less powerful computers.
That's all I can tell you about changing screen resolution in Windows. I hope the information is useful.