Computers are so ingrained in our lives that it is simply impossible to imagine a world without them. Despite this, many users do not know how to care for their “iron horse”. For example, not everyone knows how to clean up drive C. This article will help fill the gap in knowledge.
Filling the system disk can lead to a number of inconveniences. If there is little space on drive C, the following problems may occur:
- You cannot install new programs;
- There is no room for operating system updates;
- PC speed decreases.
The first problem is easily solved. If there is not enough space on drive C, then you can install new programs in other partitions (D, E, etc.). But what to do with the second and third points? There is only one way out - you need to clean the system disk. How can this be done? How to free up space on drive C? The answer can be found in this article.
How to free up space on your system disk?
Many people have no idea how to clean up local drive C. People mistakenly believe that it is very difficult. Cleaning your computer is a quick and simple process that does not require any specialized IT knowledge. However, this procedure should not be neglected. The system disk should be cleaned at least once a month.
There are many ways to clean your computer from junk. We will look at the most effective ones in this article. Before we begin, it should be noted that the methods given below can be used to clean up the C drive from junk on Windows 10, Windows 7 and other versions of this OS.
Manually removing unnecessary programs
Of course, software takes up the most space. Therefore, when you need to clean drive C from garbage, first of all you need to pay attention to the software.
How to clean drive C from unnecessary files? To uninstall the program, you need to use the built-in Windows utility. To launch it, you need to go to the “Start” menu and select “Control Panel” in the drop-down tab. Then you need to go to the “Uninstall programs” section.
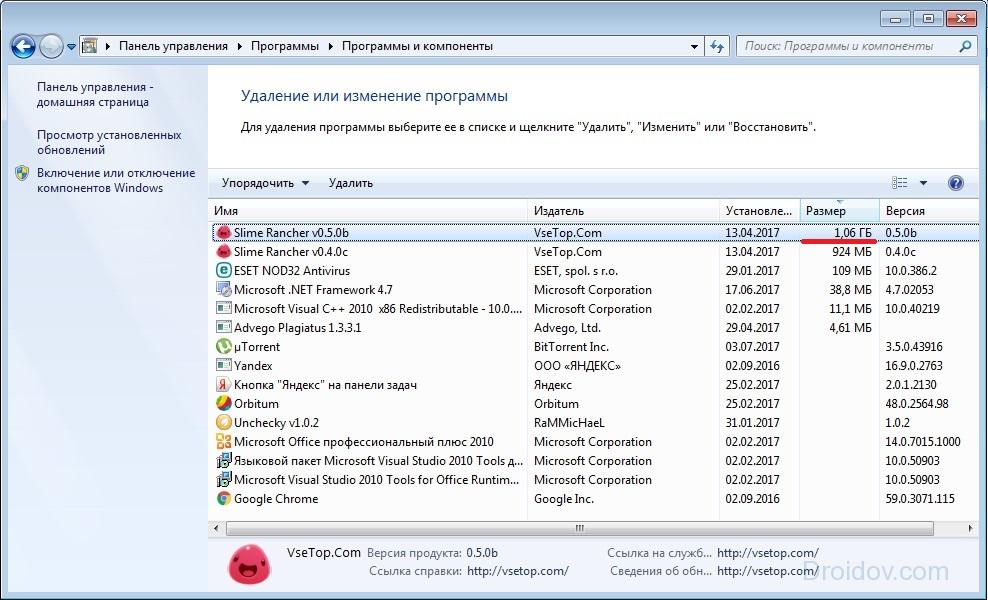
A new window will open containing information about all the programs that are on the computer. They can be sorted by size, date or name. What can I delete? First of all, software that is not used at all must be uninstalled. As a rule, these are completed games. To remove a program, right-click on it, after which the corresponding tab will appear.
Built-in Windows utility
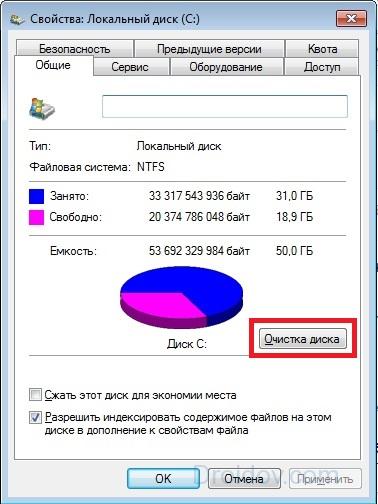
You can free your computer from garbage using a standard Windows utility. This is done very simply. You need to go to “Computer” and right-click on the disk that we will clean. In the drop-down list, click on the “Properties” item, after which a new window opens with information about the memory partition. We are interested in the “General” tab. Go there and click on the “Disk Cleanup” button.
The built-in utility will begin to analyze the data and look for unnecessary files. This will take a certain amount of time. After the program analyzes the computer's memory, it will produce a list of unnecessary files. They need to be ticked and then click “OK”.
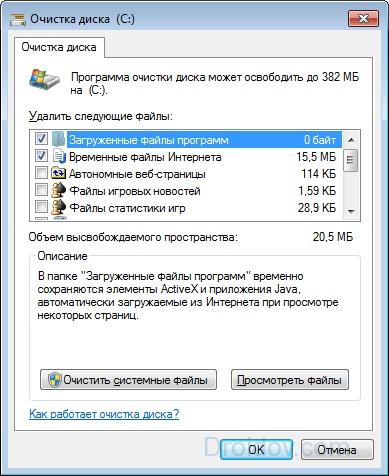
You won’t free up a lot of memory this way, but you can win a couple of tens of megabytes.
Temporary files
To carry out the correct installation or update of programs, antiviruses, etc. Temporary files are created on the computer. The operating system stores them in the Temp folder, which is located on drive C. Temporary files are not needed for the daily operation of programs. Therefore, software that uses intermediate resources deletes them automatically upon completion of installation or update.

However, sometimes a glitch occurs due to which temporary files are not deleted. This leads to the Temp folder gradually becoming clogged and taking up more and more space on the system disk. To fix this, you need to remove the intermediate files manually. This is done very simply. You need to go to the Temp folder, which is located at “Computer” > Drive C > Windows folder. To free up memory on drive C, you need to uninstall the contents of this folder.

In Windows 10, Windows 7 and other versions of the OS, there are two folders for storing temporary files. You can get to the second one through the Start menu. You just need to enter the search query %Temp%. The folder needs to be opened and cleaned. It is worth noting that sometimes the operating system may issue a warning that some files cannot be deleted. This indicates that they are currently being used by some program. If such a message appears, then simply click the “Skip” button.
"Basket"
“Trash” is a special folder that is a temporary storage for deleted files. Everything stored there takes up computer memory. Therefore, the “Trash” needs to be cleaned from time to time. To do this, you need to right-click on the folder and click on the “Empty Trash” item in the drop-down list. After this, the folder will be freed from garbage, and there will be more memory on drive C.
"Downloads"
Users quite often download movies, music, and games through the standard browser downloader. Files from the Internet are automatically saved to the Downloads folder. And, as you know, it is located on drive C. If a user often downloads some files from the Internet, then the free disk space runs out very quickly. To prevent disk C from becoming clogged, you need to check the boot folder from time to time for the presence of large files. 
You need to open “Computer” and go to “Downloads”.
You need to check the folder for large files and if there are any, they need to be deleted or moved to another drive.
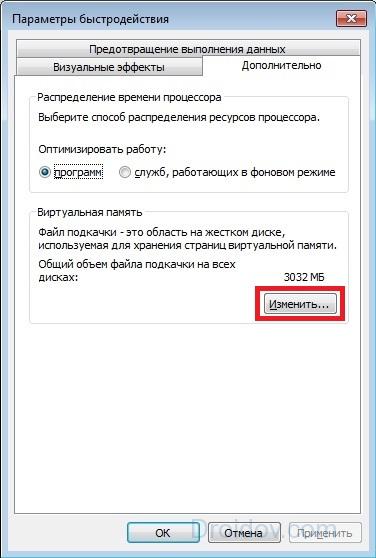
Swap file
In Windows OS there is a paging file. How does it affect memory and why is it needed? Sometimes the system does not have enough RAM to perform certain operations. In such cases, the file takes a certain amount of permanent memory from the disk and uses it as RAM.
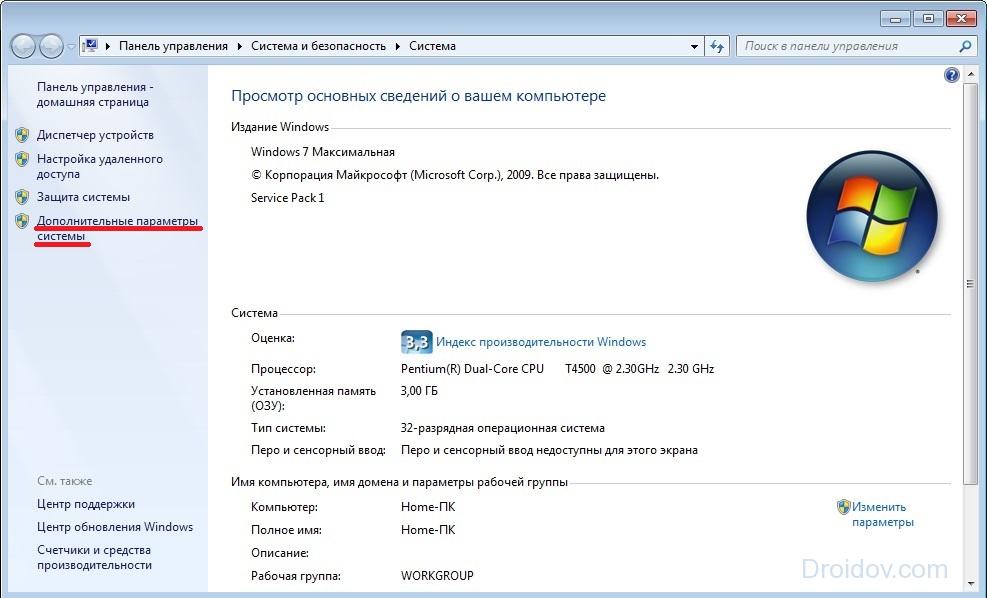
To free up drive C, you need to make sure that the paging file takes resources elsewhere. You need to go to the “Computer” folder, and then press RMB. In the tab that appears, click on “Properties”. A window will appear. In it, open “Advanced system settings”.
Then click on “Options”.

In the new window, go to the “Advanced” section and click on “Change”.
We install the disk from which the paging file will take memory. This is done as follows. Select drive C and check the box next to the “No paging file” property. To confirm, click on the “Set” button. With another disk, do the opposite and check the “Size by system choice” property.
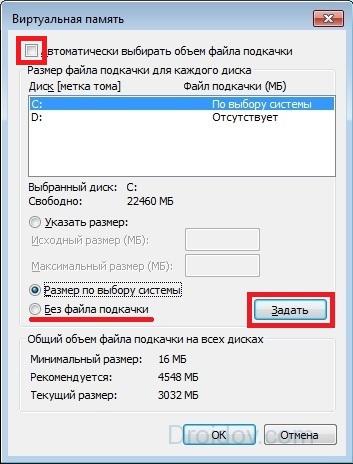
If the window does not allow you to change properties (the field with disks is dimly highlighted), then uncheck the box next to the “Automatically select paging file size” option.
Hibernation
To save memory on drive C, you can turn off hibernation on your computer. You need to activate the command line (Win + R combination) and write in it: powercfg.exe –h off. Press Enter and voila – hibernation is disabled. After restarting the computer, you may notice that there is a little more memory on the system disk.
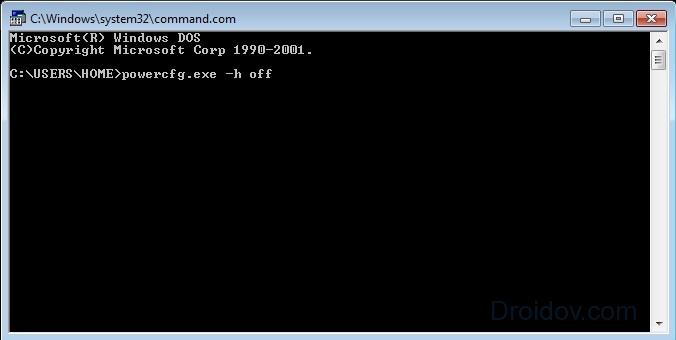
However, it is better not to turn off the hibernation mode unless absolutely necessary. This is an extremely useful feature that allows you to restore previously running programs, even if the computer was turned off. To reactivate hibernation, you need to write the command powercfg.exe –h on in the console and restart the PC.
Checkpoints
Checkpoints are created after various changes in the system (updating drivers, installing new software, etc.). They allow you to roll back the system if any problems arise. But for such an opportunity you need to pay with system memory. To free up drive C, you can delete checkpoints. This will give a couple of megabytes of memory. In this video you can learn how to delete restore points and thus clean up your local drive C:
Conclusion
The memory on drive C gets clogged up pretty quickly. This can cause a whole range of troubles. To avoid problems, you need to monitor the amount of free space and clean the system disk from time to time. Cleaning the C drive has a positive effect on the performance of the computer and does not take much time. There are many free ways to free up disk space when memory is full. Moreover, these methods are the same on all Microsoft operating systems. That is, disk cleanup on Windows 10, Windows 7, Windows XP, Windows Vista is identical.
Disk Cleanup searches your disk for files that you don't need for your work, and allows you to delete all or some of those files to increase the amount of free disk space. You can use this tool to perform the following tasks:
Delete temporary Internet files.
- Delete downloaded application files (such as ActiveX control files and Java application files downloaded from the Internet).
- Empty the trash.
- Delete temporary files.
- Remove unused additional Windows components.
- Remove installed programs that are not currently in use.
To run the Disk Cleanup tool, use one of the following methods.
- Click the button Start and select a team Execute. In field Open enter the cleanmgr command and click the button OK.or
- Click the button Start, select item All programs, and then - Standard, open the section Utilities and select a command or
- In Windows Explorer or My Computer, right-click the drive you want to free up space on and select Properties, open the tab Are common and press the button Disk Cleanup.
Deleting files from your hard drive
To remove files from your hard drive that are not needed for work, follow these steps.
- Click the button Start and select My computer.
- Properties.
- Open the tab Are common and press the button Disk Cleanup.
- Open the tab Disk Cleanup, select the checkboxes next to the file types you want to delete, and then click OK.
- Click the button Yes OK.
Removing Windows components
To remove unused Windows components, follow these steps:
- Click the button Start and select My computer.
- Right-click the drive you want to free up space on and select Properties.
- Open the tab Are common and press the button Disk Cleanup.
- Open the tab Additionally and in the group Windows components click the button Clear.The Windows Components Wizard window opens.
- On the list Components Uncheck the boxes next to the names of the components that you want to remove.
- If the checkbox next to the component name is grayed out, it means that this component is only partially installed. To remove individual components of a component, click the button Compound, uncheck the boxes next to the names of the components that you want to remove, and click OK.
- Click the button Further.
- On the Completing the Windows Components Wizard page, click Ready.
- Click the button OK, press the button Yes to confirm deletion, and then click OK.
Removing installed applications
To remove installed apps that you no longer use, follow these steps:
- Click the button Start and select My computer.
- Right-click the drive you want to free up space on and select Properties.
- Open the tab Are common and press the button Disk Cleanup.
- Open the tab Additionally and in the group Installed programs click the button Clear.A window will appear Installation and removal of programms.
- On the list Installed programs highlight the program to be removed and click the button Delete(or Replace/Delete).
- If a message appears asking you to confirm deletion, click Yes.
- Repeat steps 5 and 6 until all unused programs are removed and click Close.
- Click the button OK, press the button Yes to confirm deletion, and then click OK.
Deleting restore points
To delete all restore points except the last one, follow these steps:
- Click the button Start and select My computer.
- Right-click the drive you want to free up space on and select Properties.
- Open the tab Are common and press the button Disk Cleanup.
- Open the tab Additionally and in the group System Restore click the button Clear.
- Click the button Yes to delete all restore points except the last one.
- Click the button OK, press the button Yes to confirm deletion, and then click OK.
The accumulation of remnants of uninstalled applications, unnecessary registry entries, temporary files, logs that remain after updating Windows and programs, and other garbage reduces the performance of the computer. If all this is not removed, over time the PC becomes so slow and annoying that the user cannot stand it and reinstalls the system. However, after a couple of months everything returns to normal - the brakes, low FPS, and all sorts of glitches. Meanwhile, the problem can be solved simply - it is enough to do preventive maintenance 1-2 times a month using a computer cleaning program. We will talk about them today.
We have prepared a brief overview of the capabilities of the best Windows utilities that can speed up your system by up to 50-70% relative to the original level. All of them are free and designed for new users.

CCleaner is one of the most popular Windows cleaning utilities in user ratings. And one of the safest. Cleaning the registry and applications in CCleaner is configured in such a way that, even if you try, you will not be able to delete something important, thereby disrupting the performance of the system. In this part, the program can be used by novice users without fear. However, it also contains functions that it is better not to touch without proper knowledge. One of them is erasing disks. If you accidentally confuse it with Disk Cleanup (Windows' built-in optimization tool), you may lose some important data forever, as the program permanently destroys it.
Proper use of CCleaner can speed up your computer by 5-50%. The result depends on the initial clutter of the system and the amount of information on the disks.
CCleaner functionality
All application functions are divided into 4 groups, and groups into subgroups. The first group is “Cleaning”, includes sections:
- Windows (Edge and Internet Explorer web browsers, Explorer, system components, etc.).
- Applications (third-party browsers, multimedia, Internet applications, system applications, etc.).
Clearing both removes only temporary and unnecessary data, without affecting the main one.
The second group - “Register”, has no subgroups. Here is a tool for fixing registry errors and cleaning it from garbage.
The third group - “Service”, contains the following sections:
- Managing startup programs.
- Browser add-on management.
- Analysis of disk space distribution.
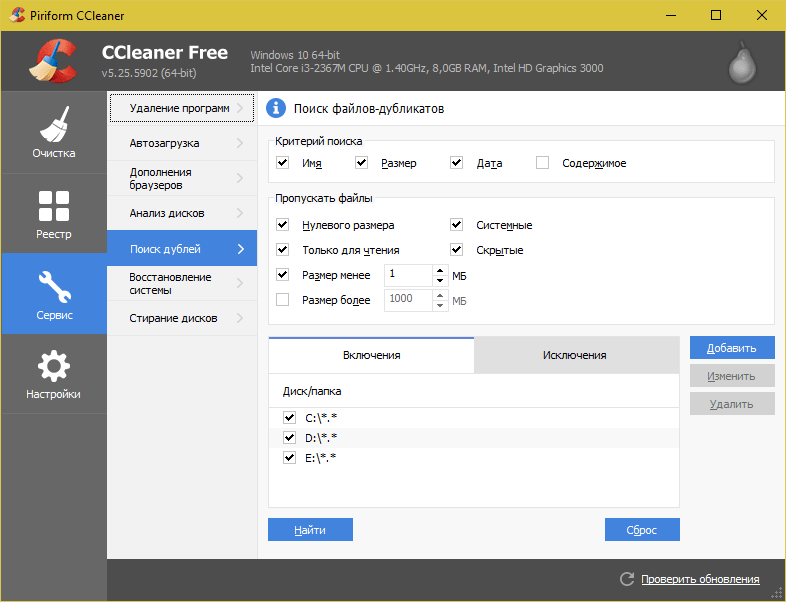
- Search for duplicate files.
- System Restore.
- Erasing disks.
The fourth group is “Settings”. It includes:
- Basic settings of CCleaner.
- Browser cookies (setting exceptions).
- Inclusions (objects that are always subject to removal).
- Exception (objects that the program should not process).
- Monitoring applications (setting up auto-cleaning).
- Trusted users.
- Additional parameters (for experienced ones).
CCleaner supports many languages, including Russian, Ukrainian, Kazakh. You can download it in both installation and portable versions. The latter can be launched, for example, from a flash drive.
Wise Care 365

Wise Care 365 is an impressive package of utilities for optimizing your computer, most of which are available for free (the application is available in two versions - free and premium, in the free version some items are blocked). Like CCleaner, Wise Care 365 scans the system for garbage, errors, incorrect (from the developers’ point of view) settings and makes it possible to fix them - both individually and “in bulk”.
With this program, the user can clean and optimize Windows without thinking about the purpose of a particular function. Just run the scan and click the “Fix” button after it.
Wise Care 365 functionality

Wise Care 365 features are also divided into groups. The first tab, “Check,” is intended for a comprehensive search and elimination of problems throughout the entire system. The following parameters are checked:
- Safety.
- Unnecessary files (temporary, cache, logs, etc.).
- Invalid registry entries.
- System optimization (presence of factors affecting performance).
- Computer history (opening documents and visiting web resources through Internet Explorer).
After scanning, the program determines the PC’s “health” index and offers to correct errors with the click of one button.
On the same first tab there is a panel of additional utilities. Available in the free version:
- Deleting files that cannot be deleted using Windows.
- PC shutdown timer.
- Recovering deleted files.
- Memory optimization.
- Uninstalling programs.
The second tab, “Cleaning”, contains several subsections:
- Cleaning the registry.
- Quick disk cleanup.
- Deep cleaning.
- Cleaning the system (unnecessary Windows components).
The third tab – “Optimization” – contains:
- Subsection “Optimization” (here you can change registry settings to stabilize and speed up Windows, increase network performance, and shorten the time it takes to turn your computer on and off).
- Disk defragmentation.
- Registry compression and defragmentation.
- Startup management.
The “Privacy” tab contains the following subsections:
- Wiping the disc.
- Overwriting files.
- Password generator.
On the last tab - “System”, the application shows running processes and a list of PC equipment.
Wise Care 365, like Ccleaner, has been translated into Russian and is available in installation and portable versions.
Windows Cleaner

The Windows Cleaner utility includes tools for freeing the system from unnecessary files, registry entries and unused programs that can be launched manually and on a schedule. Among the optimization tools, only startup management is present here. There are no options here aimed at increasing computer performance (not counting cleaning tools).
Windows Cleaner saves a history of previously performed cleanings. If you accidentally delete an important registry entry or file, the program allows you to undo the last operations - perform a system restore to a checkpoint.
Windows Cleaner functionality

The Cleaning section of Windows Cleaner contains two tabs: Files and Registry. The first one contains a list of unnecessary file system objects, the second one contains registry entries. The program supports 4 cleaning modes:
- Fast.
- Optimal.
- Deep.
- Custom.
After scanning, Windows Cleaner displays a list of objects to be removed. Strange, but the user does not have the ability to remove any file or entry from it. You can only exclude an entire group of objects from scanning (temporary files, memory dumps, report logs, etc.).
The “Service” section contains the “Startup” and “Uninstall programs” tabs.
“History” stores records of previously performed operations.
In “Settings” you set the cleaning parameters according to the schedule: interval, time, mode.
Windows Cleaner was developed in Russia. The official website contains reference information on working with the program in Russian, as well as a feedback form with the developer.
Glary Utilities Free

Glary Utilities Free is a free harvester application for optimizing your computer. Its set includes more than thirty utilities for all occasions, some of which are unique for products of this class or are found only in paid versions. For example, searching for and removing spyware (spyware), checking for updates to programs installed on your computer, encrypting files, optimizing memory, cutting and merging files, etc. A list of frequently used utilities is shown in the screenshot above.
Features of Glary Utilities Free

Glary Utilities Free functions are divided into 3 groups:
- Short review.
- "1-click".
- Modules
The "At a Glance" section contains general program settings and Windows startup controls.
“1-click” contains tools for quick system optimization:
- Cleaning the registry.
- Correction of shortcuts.
- Removing spyware.
- Recovering (checking) the disk.
- Privacy.
- Deleting temporary files.
- Autorun manager.
In the list of problems, next to each item there is an explanation. In addition, the user has the opportunity to prohibit the correction of any element by unchecking the checkbox next to it.
The “Modules” section contains all components (utilities) of the program that the user can run separately - as needed. This includes tools for cleaning, managing disk space, files, etc. In the bottom panel of all tabs of the main window there are shortcut buttons for some of them.
Glary Utilities Free has another interesting feature - creating a portable version of itself. The option is located in the "Menu".

WinUtilities Free
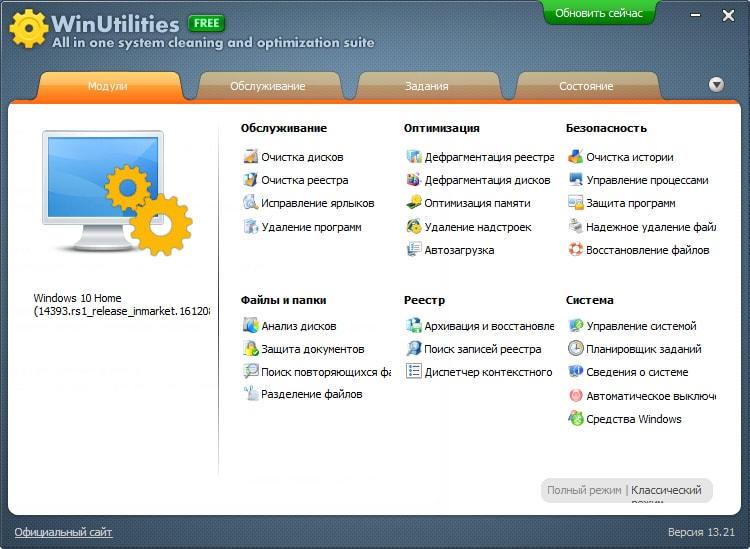
The functionality of the free version of WinUtilities Free, like Glary Utilities, is very diverse for applications of this class. It includes 26 system maintenance and cleaning modules. There is also a one-click Windows optimization function and its own task scheduler for performing scheduled operations.
Features of WinUtilities Free

The “Modules” tab of WinUtilities Free contains a list of all application components, divided into groups:
- Maintenance (cleaning disks, registry, shortcuts, etc.).
- Optimization (disk defragmentation, registry defragmentation, startup management, etc.).
- Security (cleaning history, managing running processes, deleting and restoring files).
- Files and folders (document protection, disk space analysis, duplicate search).
- Registry (backup, search for partitions and keys, context menu manager).
- System (launching Windows utilities, system management, task scheduler, setting automatic computer shutdown).
The “Maintenance” tab contains settings for quick scanning and system optimization with one click.
The “Tasks” section includes 4 scheduled PC maintenance options:
- Disk cleaning.
- Clearing history.
- Cleaning the registry.
- Disk Defragmenter.
The Status section shows information about the product.
InfoMan

InfoMan is an easy-to-use information management manager on your PC. Consists of five modules that are launched separately. The cleaning module is used to search and delete temporary files according to the list of a program or user.
Other InfoMan modules are for:
- Synchronize data in two specified directories.
- Password storage.
- Event reminders.
- Application settings.
After launch, the program icon is placed in the system tray. Modules are launched from its context menu.

Advanced System Care

Advanced System Care is the last program in our review for comprehensive computer maintenance from the famous developer IObit. In addition to cleaning and optimization tools, it contains tools to improve performance and protect various system components.
Advanced System Care Features

As with the other apps reviewed, Advanced System Care features are divided into categories:
- Acceleration.
- Protection.
- Cleaning and optimization.
- Tools.
- Center of action.
The “Acceleration” tab contains tools to improve computer performance: turbo acceleration, hardware acceleration, etc.
“Protection” contains tools to improve security - video identification of the user’s face, anti-spying tools in the browser, safe web surfing, etc.
“Cleaning and Optimization” contains utilities for removing garbage from the file system and registry.
“Tools” lists all application modules plus other IObit products.
The Action Center provides tools to automatically update programs installed on your PC and download other IObit products.
In addition, Advanced System Care installs a widget on the system that is constantly on the screen and displays the percentage of RAM and processor load.
The applications included in today's review support all editions of Windows, from XP to Windows 10. We decided not to talk about programs whose authors limited themselves to supporting systems up to Windows 7, since they are not relevant today.
» How to quickly and efficiently clean a Windows XP system?
How to quickly and efficiently clean a Windows XP system?
During each and every installation and removal of programs using an object such as the Recycle Bin, some changes are made to the computer's operating system. Such transformations do not always have a positive effect on the Windows XP registry. Moreover, while working on a computer, its system slowly but surely accumulates a large number of unused and unclaimed files.
All this can lead to a slowdown of the entire system as a whole, which will ultimately lead to a complete loss of Windows XP functionality. It is for this reason that in order to extend the life of the operating system, it is necessary to carry out a process such as cleaning after certain periods of time.
It is known that you can clean your computer system manually using the built-in tools of Windows XP, but this is quite painstaking work that will take a lot of time and also requires certain skills and knowledge. Fortunately, quite a lot of programs have now been developed and are being successfully used that make it possible to automatically perform such a process as cleaning Windows XP, that is, all its system folders and the registry. In this way, you can not only clean, but significantly increase the efficiency of the entire system and optimize the operation of your computer as efficiently as possible.
CCleaner program

One of the programs that can effectively clean the system is CCleaner. The utility is downloaded completely free of charge, therefore it is available to any user of a personal computer, moreover, it is ideal for Windows XP.
The main functions of such a program include:
- cleaning the computer system registry;
- cleaning the file system;
- control over installed applications, as well as various objects downloaded automatically.
Please note that in order to avoid possible problems during the registry cleaning process, it is recommended to use a special system built into the program for creating insurance copies of the Windows XP registry before starting the cleaning process.
So, to start the process, you need to download the program; its installation is simple and therefore does not require special attention. It is important to note that during the installation process you will simply be prompted to automatically install the Yahoo Search Toolbar. If this panel is not needed, you should uncheck this item. After installation and subsequent launch of the program, you will see the corresponding window.
System cleaning process
 As a rule, to clean the system you just need to delete unnecessary files, but the recycle bin is not suitable for this. The “cleaning” section makes it possible to find and delete those objects that are no longer needed on a particular computer. Very often these are just temporary files that belong to the Windows XP operating system. The working area of the module that performs cleaning consists of two fields – left and right. On the left side of the window you can turn on and off the cleaning process of different areas of programs that the utility supports, while the right side is usually empty during the startup process. While the program is running, information on the cleaning process is displayed on the right side of the program.
Cleaning the registry
In order to properly clean Windows XP, it is necessary to put the system registries in a certain order. The program discussed in this article does an excellent job of this. Its cleaning module allows you to quickly find and correct all erroneous entries in the system registry, the presence of which affects the speed of the entire system as a whole, and delete them. It is worth noting that in the working area of the module it is possible to select areas of the registry that are necessary or, conversely, not required to be processed. In order to start looking for a problem in the registry, you just need to click the “search for problems” button. Even though CCleaner is a very reliable program, you should always save backup copies before performing the cleaning procedure.

If more than one error is detected during the registry analysis, which usually always happens, the program will ask for an action to take, and this will be done for each error found.

Program management
The CCleaner program has a special “Service” section, which is designed to remove programs that are installed on the computer, and is also able to configure the list of applications that automatically launch when the operating system boots.
Particular attention in the process of cleaning the system deserves the removal of unnecessary programs. The special “Uninstall Programs” subsection usually displays a list of different applications that have been installed on the computer over time. In the standard deletion system, through such a thing as the recycle bin, which is present in the operating system panel, some objects may not be displayed, since such a function is provided by some developers. But unlike the Windows system, CCleaner is able to display all the programs that have been installed on the computer at one time or another through the use of the installer.

There is another important feature of the CCleaner application - it is a special function related to the removal of programs that were uninstalled incorrectly through an application such as the recycle bin. As a rule, this happens in a situation where the standard uninstaller of a particular program being uninstalled did not work entirely correctly, or if the program files were manually deleted by the user without using it. In order to remove a program using its own installer, you need to select it in the CCleaner window and start the uninstallation process.
If for some reason the uninstaller did not work, you will need to click the “Delete” button. In this situation, the utility will find and delete not only the file of this program from the disk, but also all traces left from it in the registry of the personal computer. It is important to remember that the Uninstall programs mode in CCleaner is ideal only for removing those applications that cannot be removed using ordinary standard means.
Another rather interesting feature of the cleaning program is the ability to rename any reinstalled program. In some situations, this function is extremely necessary.
As for such a process as startup, this is one of the most useful sections in the system. In order to properly clean the operating system, it is necessary to reduce the number of loaded programs to a minimum at an automatic level. This section is designed to manage the list of programs that start automatically when the system boots. Quite a lot of programs during the installation process create special autoloading modules designed to automatically check for updates via the Internet, and often the user does not even know about it, and the recycle bin will not help here.
Such applications greatly slow down loading, consume a certain amount of traffic, reduce processor power, and also take up a certain amount of RAM on a personal computer. It is not so easy to find and disable such automatically launched programs on your own, even when using conventional mechanisms. This is based on the fact that many are designed this way to mask their automated activities. CCleaner is designed to see and immediately disable those programs that were downloaded automatically and are completely unnecessary.
System Restore
The latest version of the cleaning program has a new section that allows you to manage special recovery checkpoints of the Windows XP operating system. Essentially, these are archives of a special format that are created automatically by the operating system and, as a rule, take up quite a lot of space.
Setting up CCleaner
In the “Settings” section of the described utility, it is possible to define the rules and parameters of the program’s action related to the cleaning process. For example, in the special subsection “Cookie files”, if necessary, you can configure similar files for those sites that need to be deleted, or perform the exact opposite actions with sites that need to be left. As a rule, experts recommend deleting cookies from advertising resources, which can be deleted without much regret, but this should not be done with frequently used sites.

Conclusion
The CCleaner utility makes it possible to significantly speed up and also effectively stabilize the operation of a personal computer by completely deleting files from it that are not used by any other programs, but at the same time take up disk space, and, just as importantly, take up system resources.
To maintain optimal system performance, it is recommended to start the system at least once a week, then the PC will always work stably and quickly. At the same time, it is recommended to use a program to defragment the hard drive. All this will ensure the efficient operation of the entire system as a whole.
When working with Windows XP, a lot of temporary files appear on your hard drive, which must be regularly deleted in order to free up additional space on the storage medium. To do this, the operating system provides a special utility that will automatically delete all unnecessary files from the computer and free it from garbage.

Open the start menu, from the utility submenu, call the disk cleanup command, and a window for working with the application will appear on the screen. At the top of the window, Windows XP displays a message about the amount of disk space that can be freed by deleting temporary files. Check the box next to the desired file categories, such as temporary files or files placed in the Recycle Bin, so you can see what exactly is being deleted. Select one of the list items and information about the file type will appear at the bottom of the window. Some deleted files can be viewed; to do this, select the Recycle Bin item in the list, click the View Files button, the contents of the Recycle Bin folder will be displayed on the screen, in order to clean up additional system components. Click on the additional tab, from this tab you can remove Windows XP components, unused programs or old restore points, after all the parameters are set, click OK and Windows XP will delete unused files, freeing up additional disk space.
Just do not format your hard drive under any circumstances, as all information recorded on it will be deleted and lost, and in order to recover data after formatting, you will have to take it to a service center.


