Hello, friends! In today’s “Crib Sheet,” as promised, we begin formatting tables in Word 2016. And we’ll start with questions about their boundaries. Anyone who has already read knows that when creating a table using any of the five methods described there, frames are added by default. It's clear... Otherwise, what kind of table will it be? Another question is that these external and internal dividing lines do not always suit us. Now we will look at how to change the borders of tables in Word at your discretion. We will learn how to make the frames and internal lines of tables bold, choosing the desired line thickness, colored, and invisible.
For the convenience of my visitors, I have divided this article into small subsections that answer one specific question regarding the design of borders/frames for Word tables. The result is a kind of FAQ that will be easier for you, friends, to navigate.
How to make table borders in Word using the “Table Styles” collection
We click on the table with the left mouse button, and the “Working with tables” panel opens. We go to its “Design” tab. On the left in the “Table Style Options” window, for ease of perception of tabular data, we can set the necessary selection of rows or rows, their alternation, color and fill intensity. You can highlight with color or lines the row/column of headings or summaries (see Fig. 1). 
After this, open the next window “Table Styles”. Here Word provides us with a large number of templates with different combinations of fill and frames (see Fig. 2).

And if you also want to modify the selected template somehow, then click on the line “Change table style”. This line is hidden at the very bottom of all table templates. When you click on it, a window opens in which you can change the thickness and color of the lines, remove/add fill to individual cells (see Fig. 3). 
You, friends, also have the opportunity to see how all these operations are carried out with your own eyes. Video at your service. 🙂
How to set borders using the Border Styles gallery
As in the first case, open the “Working with Tables” panel and the “Designer” tab. Select the table. The easiest way to do this is by clicking on the small cross located at the top left, which is called the “table movement marker”. Go to the “Framing”, “Border Styles” section. By default, Word offers you to choose a frame from one of 12 options, however, in this case, change their color and thickness at your discretion. In the “Borders” drop-down window, you can specify the location of lines that require changes (see Fig. 4).

Those interested can watch a short video explaining all the nuances.
How to customize/highlight table frames at your discretion without using ready-made styles
Select the table by clicking on the “table movement marker”, that is, the cross at the top and left, then in the “Working with Tables” panel, “Designer” tab, go to the “Framing” section. In the window that opens, select the type of outline, thickness and color of the lines, and in the “Borders” window set their location (external, internal, etc.) (see Fig. 5).

How to highlight the borders of only one or more cells
First way. To change the borders partially (select some cells), you can perform all the steps in steps 2 or 3 except selecting the entire table. And the cursor must be placed in the cell whose borders are subject to special framing.
Second way. You can act through the “Coloring borders by pattern” button from the menu in the “Border styles” table. First, you need to select the appropriate contour, width and color of the lines. In the video below I clearly demonstrate how to create table frames at your own discretion and how to select one or more cells.
How to make table borders invisible/remove in Word
In order to remove table borders in WORD you need to:

How to remove the top/bottom borders of a table or borders of individual cells in Word
It is easier and faster to remove individual sections of table borders using an eraser brush. To do this you should:
- open the “Working with Tables” panel;
- select the “Design” tab;
- click on the line “no border” in the “Line type” drop-down window; the cursor will change to a brush;
- Erase with a brush any areas of the borders that need to be removed.
In the video below, I demonstrate the entire chain of simple actions to delete all table boundaries or individual sections of them.
So, friends, today we figured out how to do different kinds borders in Word tables, as well as how to remove them. I hope this article was helpful to you. The series of articles about tables in Word does not end here. Stay tuned for new publications. All the best.
Your guide to WORD 2016 GALANT.
Haven't you read these articles yet? I advise...
Good afternoon, comrades! I'll tell you a story from my practice. It was precisely this that formed the basis for writing this article.
In the middle of the day, I received a call from a colleague from the accounting department and, as it seemed to me then, the simplest question: “How can I transfer a table from Excel to Word, but so that everything fits on one page and then can be edited?” Then I thought that my colleague was tired, because she had never asked such “simple” questions before.
We have:
- an Excel table that needs to be edited in Word;
- unloading was carried out from 1C using standard means;
- The table does not want to fit onto the sheet as it should.
Answer: “Command “Copy”, go to document, command “Paste”. If it doesn’t help, go to the “Insert” tab, the “Table” button, then “ Excel table", insert your data into the area that appears; if the area is small, stretch it. If you want it to just be pasted, you can select the table in Excel, click on the triangle after the “Copy” button and select “Copy as picture”, go to Word, paste.”
Indeed, in most cases these two methods will help. As always, there is one “But”. If the table is small. I'll demonstrate.
We see that actions with the clipboard are simple and commonplace. But, as was written earlier, we must check what will happen if we insert a complex table, especially one prepared in another program?
For this we need a large table in Excel. I won’t post it in full in the article; the file with the example will be in the links.

Now we select it, copy it, go to Word and paste it. The picture will be as follows.

Even if you reduce the margins, the picture will remain the same - the document will not fit on the page. Our actions:
- select the table inserted into Word;
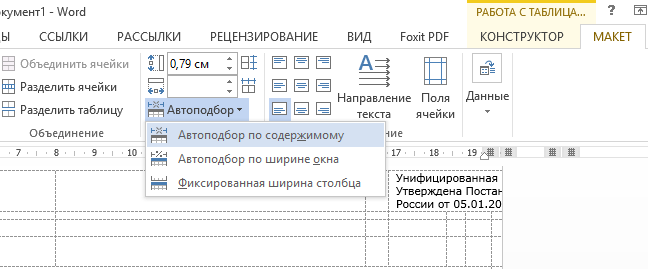
- go to the “Layout” tab, in the “Cell Size” button block, click “Autofit”;
- select the “Auto-select by content” value.
Let's get what we need.

Creating tables in a Microsoft program Office Word will allow you to enter all the necessary data, format the text inside the cells, make the desired border size, and most importantly, select the desired font, which is not available in many other programs for working with tabular data. However, Word has one main drawback: you cannot automatically calculate the sum of all your rows or columns, and other mathematical calculations are also not available in it. To do this, you will need a special option that allows you to import ready-made tables from Microsoft programs Office Excel. When you have already imported a table, there is a high risk of losing all formatting settings. Find out in this article how to align a table in Word after import, unsuccessful copying, or simply when creating a new table.
How to align a table in Word relative to the page
If the columns and rows are confused in the program regarding the page layout or text, then returning it to the desired position will be very simple.
- Open your spreadsheet.
- Using the small icon on the top left corner of the table, start moving it to the desired position.


- Release the cursor. Your table has moved to the right place with all the entered data.

How to align text in a Word table
Depending on the initial settings, your text can be placed on the right, left or center of the cell; to change this, follow the algorithm:
- Select the desired cell with the cursor.


- Click on the selection right click mouse and select “Align Cells”. Don't click on it, just hover your mouse over it.


- A list of icons will appear on the right indicating the location of all possible positions of your text inside the cell. For example, choose a central location.

- You'll get directly formatted text that's perfectly centered in the area.

- This rule works on all cells in the table; if you need to format them all, then select the entire table with the cursor.


- Also, right-click and select the desired text location. Now your entire table contains cells with plain text.

An object located close enough to the edge of the page to be in the non-printable area of most printers. If this is not corrected, the object will not print.
The object is one of the following actions.
-
Text field
Drawing or picture
AutoShape
The non-printable area depends on the desktop printer you select for printing. The layout check will prompt you for the printer selected in Seal on the tab file to Define the non-printable area. However, if the layout cannot be obtained necessary information from the printer, it assumes a default non-printable area of 0.25 inches (0.6 cm).
To search and select an item, click the error message in the task pane Layout check, click the arrow and select the command Go to this item.
To verify the problem, identify the non-printable area of the printer, print a sample page, or consult the printer documentation. Then move the object if necessary.
Moving an object
You can move an object or group of objects by dragging, sliding, or dimensioning its position on the page.
Drag an object to a new location
Shift object
On the tab File click the button Options and select Additionally.
Under Editing Options, select the checkbox use custom shift parameter, and then enter the desired amount of objects to move when shearing.
Select an object and press one of the arrow keys to move the object in the desired direction.
The object moves the specified distance each time you press an arrow key. The default offset distance is 0.13 inches (or equivalent if you are using a different unit of measurement). However, you can change the offset distance.
Instructions
Place the object exactly on the page
Right-click the object and select context menu Format< тип объекта > .
On the tab Layout in Group position on page Enter the positive measurements of the horizontal and vertical position of an object or group of objects.
Doesn't the text fit in a table cell created in Word? More precisely, not all the text is visible in the cell, since part of it is hidden behind its borders. The reason for this could be either the table settings or the paragraph settings. Therefore, to get rid of this problem you need to change these settings.
For example, a table with a list of textbooks should look like this.
But in reality it turns out like this:

That is, the height of the rows in this table is too small to reflect full information about books.
The table might look like this:

Here, not only is the height of the lines small, but also the width of the text seems to creep onto the borders of the cell (second column) or even hide behind them (third column). In addition, we see that the height of the third line is too high. Of course, this doesn’t happen often, but it still happens, especially when you have to edit ready-made tables that someone else created earlier.
Row height and table cell width in Word document can be adjusted automatically depending on the text size, we talked about this. But in this case this is not the case, and all the unsightliness of the table is due to incorrect settings of the table and paragraph properties.
Table settings
To change the properties of an entire table or an individual cell, you need to select this table or cell whose settings do not suit us, and right-click in this place and go to the drop-down menu. In which (drop-down menu), you need to find “table properties” and left-click on it. What will cause the window to open "table properties".
 In this menu you can change the row height and column width
 To increase or decrease the row height in the “row” tab, you need to check the box next to the height parameter and select the “minimum” mode; now the row height will change depending on the text in the cell (the larger the text, the higher the table row height).
If the row height is too large and the text does not even fill it all, then perhaps in the table properties it is set to Exact size line height and/or the value specified is too high. Then you should set the mode to “minimum” and reduce (or delete) the table row height value.
If the text “creeps” onto the cell borders, it is possible cell margins are set incorrectly, or rather the width of the fields is zero. To set the cell fields or change them, you need to go to the “cell” tab, “parameters” and change this indicator here.
 In the “cell” tab, fields inside the cell are configured
 Paragraph settings
If the text in the table does not just “creep” onto the cell boundaries, but part of it is actually hidden behind it, you probably need to change the paragraph parameters of this test. To do this, select the required cell or the entire column and in the main menu enter the “Paragraph” settings window.
In the paragraph settings window, you will need to change the indentation (left, right and first line), usually you need to set zero values everywhere. In this case, the position of the text in the cell will depend only on the settings of the cell margins (which we have already changed).
 You can also change paragraph parameters inside the table.
 Thus, changing Table and paragraph properties can make tables more neat and attractive. This can be done using the word processor Word. In addition, some of the valuable information will not be hidden behind the boundaries of the table cells. And that's good too!
Video


