This problem occurs at the most inopportune moment. During an urgent copying of information, a reading error alert suddenly appears, since the flash drive is protected. You can find a quick solution, within 5 minutes, to this problem from our article.
The instructions will describe several ways to unlocking protection of a USB flash drive, if the disk has write protection, as well as possible reasons for its appearance.
What causes the “Disk is write protected” message to appear?

How to remove mechanical write protection on a portable USB/SD device
This issue is resolved mechanically in a couple of seconds.
Carefully inspect the flash drive or SD card for the presence of a small switch. Perhaps the toggle switch is located at the end of the device.

If the switch is in the right position, then the device is write-locked, and to remove the protection, return the toggle switch to the left position, and options with the opposite function are also possible - open on the right side, locked on the left. Typically, positions are marked with padlocks or the signature Lock/UnLocked.
Advice! Try file transfer options with different toggle switch positions.
How to remove entry protection in “Registry Editor”

If you do not see a line in the right column named "StorageDevicePolicies", then you should follow the steps below:

How to remove write protection via Command Line
One way to remove the USB device error when trying to write is to use the “Command Line” to enable writing.
- In the Windows search engine (next to the “Start” button or in its menu), write cmd and select the requested item. Open it by right-clicking to run as administrator.

- Next in the line you need to enter the command “Diskpart” (write or copy all commands without quotes). Use the Enter key after each command you enter.

- Type "list disk".

- Enter “select disk 1” (1 in this example is a flash drive).

- The entered text “attributes disk clear readonly” will delete all data on the USB drive.

- The new “clean” command will delete all downloaded files from the flash drive.

- To create a partition, use the “create partition primary” command.

- Enter the command “format fs=fat32”, which will format it to FAT32.

- Enter the "exit" command to exit the Command Prompt. Now you can restart your PC and check the USB flash drive by writing some files to it.
How to remove protection through the “Local Group Policy Editor”
This method may also have an effect on fixing a disk write error.
Step 1. To launch the “Policy Editor” menu, use two keys “Win + R” and enter “gpedit .msc”, activate the command with the Enter key or the “OK” button.

Step 2. In “Local Computer” you should enable “Computer Configuration” and select “Administrative Templates”.


Step 4. On the right side of the editor, select all the “Removable drives” sections one by one and activate the “Disable” value:

Close the Local Group Policy Editor window and restart your PC.
How to recover a Transcend flash drive using JetFlash Recovery Tool
You can download the program if you follow the link: https://www.transcend-info.com/Support/Software-3/ and install it on your computer. This free version is available for download with USB device recovery functions. The utility's interface will be understandable even to an inexperienced PC user, and in a short time, within 5 minutes, you can fix the error that appears when starting a USB flash drive.
In the example, the transcend jetflash v30 2Gb flash drive will be used.

If fatal, a window will appear warning that your flash drive cannot be repaired using the program.

Top 5 programs to disable write protection
| Photo | Name | Description |
|---|---|---|
| JetFlash Recovery | The program supports flash drive manufacturers A-DATA, JetFlash, Transcend. System resources are practically not used, due to the simple interface and basic functions of the undemanding utility. Brings significant fixes to restore working functionality of flash drives | |
| USB Flash Drive Online Recovery | A free utility designed to recover a flash drive. The English version has a simple and intuitive interface. Without an Internet connection, it refuses to scan and correct errors. Requires user registration | |
| Kingston Format Utility | Fixes all common errors with protection and other bugs. During diagnostics, it permanently clears all files. Supports FAT32 system only. No separate installation of the utility is required, no registration, does not contain advertising and is absolutely free | |
| HP USB Disk Storage Format Tool | A simple, universal utility with a simple English interface for removing protection from a flash drive. Designed to format a wide range of USB device manufacturers. With the provided application, bootable flash media with MS-DOS OS are created | |
| AlcorMP | A program for “resurrecting” flash drives from the microchip manufacturer Alcor is more suitable for experienced PC users. The utility analyzes the memory of a USB drive and can be used to reflash the device controller. The developers stopped developing their program, but the released version continues to stably and confidently treat and also restore flash drives, correcting write errors |
Video - How to remove write protection from USB flash drives and SD memory cards
Question from a user
Hello. I'm trying to write one Word document from my hard drive to a flash drive, but an error appears that the drive is write-protected. This has never happened before, I didn’t hit the flash drive, didn’t drop it, didn’t do anything with it...
Interestingly, I tried to delete some file from the flash drive - exactly the same error appeared, no access. Those. in fact, I can only copy previously recorded data from a flash drive. Tell me how to remove this error?
PS Windows 7, 8 GB Kingston USB flash drive (the most common)
Hello.
Such an error can be caused by several reasons: a hardware malfunction of the flash drive (for example, if you accidentally dropped it before), a virus infection, “manual” installation of write protection, etc.
In this article, I will look sequentially at all the popular causes (causing this error) and ways to eliminate them. I think that by presenting the article in a similar format, it will be simpler and easier for you and other users with the same error to solve the problem.

Typical error when deleting a folder from an SD card // example
Reasons blocking writing to a flash drive
We will eliminate it consistently!
1) Check if there is a hardware write lock
Experienced users probably remember that floppy disks used to have a small lever, thanks to which it was possible to protect the information on it from unwanted deletion (or modification). And in my opinion, the thing was extremely useful!
Nowadays, most USB flash drives do not have such protection; some manufacturers (mostly Chinese) produce such flash drives. Therefore, some users do not attach much importance to some “locks” on the flash drive body. Meanwhile, if the protection is turned on, then you will not write anything to such a flash drive (see photo below).
Well, SD cards (used in cameras, for example) have a small switch on the side. If you move it to the Lock position, the flash drive becomes read-only.

The moral of the last sentences: first of all, check whether there is mechanical write protection, whether the lever is positioned correctly (and in general, whether your device has one).
2) Is the flash drive (computer) infected with a virus?
I remember my student days... When it was necessary quite often to bring and connect a flash drive to computers “infected” with viruses (and knowingly and knowing about it in advance) - otherwise it would be problematic (if not impossible) to print materials. After such a connection, I had to check the flash drive for viruses and clean the “infection”.

If you do not have an antivirus on your computer, I recommend choosing one from the list:
3) Is there room on the flash drive?
I understand that this question is somewhat banal, but still. If the size of the recorded file is larger than the remaining free space on the flash drive, you may receive a recording error.
To find out how much free space is left on the flash drive: open "My Computer", then right-click on the flash drive and open it properties. In the tab are common- it will be indicated how much space is occupied and how much is free.

4) Isn't it worth writing protection in the registry?
First you need to open the Registry Editor as an administrator. This can be done, for example, through the task manager: to launch it, press the keyboard shortcut Ctrl+Shift+Esc(or Ctrl+Alt+Del ).
Next click file/new task and to the line open enter the command regedit(note that the task will be performed as an administrator).

By the way, you might find the article on how to open the Registry Editor useful.-
(for Windows XP branch: HKEY_LOCAL_MACHINE\System\CurrentControlSet\Services\USBSTOR )
Important! If the branches StorageDevicePolicies will not be in the registry - it means you do not have a blocking entry in the registry. Just in case, you can create a branch (a branch in the registry is analogous to a folder in Explorer) and then the Write Protect string parameter with the value "0". Creating branches and parameters resembles working in a regular Explorer, the same as creating a simple folder.


5) Check the file system of the flash drive for errors
A similar error can also appear due to errors in the file system of the flash drive. For example, in the process of copying a file, you removed the flash drive from the USB port or simply turned off the light - errors could well appear on it (by the way, the file system may be marked in such cases as RAW).
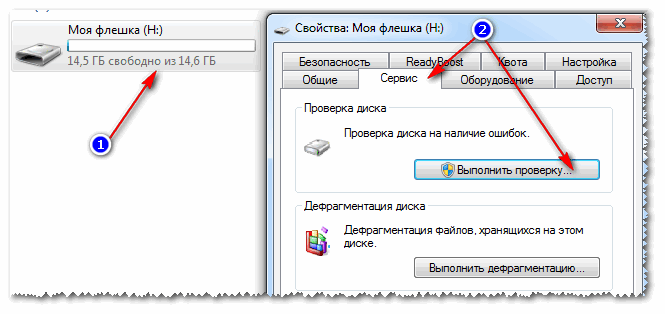
To check the flash drive for errors, open "My computer", then open properties flash drives, and in the section service click the button (check the disk for errors, see screenshot below).

6) Is there a Read-Only attribute on the flash drive?
Another reason why Windows may give an error when writing a file to a USB flash drive is read-only attribute (if it is installed on a flash drive). There is nothing wrong with this attribute, it just tells the system that this disk is read-only, so it does not write data to it.
By the way, this happens quite often if you have picked up certain types of viruses, or, for example, downloaded something from torrents (the uTorrent program often creates files with a read-only attribute).
And so, let's remove this attribute.

7) Check if there is any protection in the Group Policy Editor
Writing to a flash drive can be disabled through the Group Policy Editor. Therefore, I also recommend checking if the treasured parameter is there...
Note: users of Windows entry-level and home versions will not be able to open the Group Policy Editor.
To open the Group Policy Editor:
- press a combination of buttons Win+R;
- enter the command gpedit.msc;
- click Enter .

It should have the option "Removable drives: disable writing". Open it and see if it's turned on...

By default, the parameter should be set to “Not set” (see screenshot below). If this is not the case for you, switch it to this position, save the settings and restart the computer.

Parameter responsible for prohibiting recording
8) Formatting a flash drive
Perhaps this is the last thing you can do if all other advice has been in vain and led nowhere. Formatting the media helps in many cases, including with our error, discussed in this article.
Note: copy all the necessary data from the flash drive; when formatting, everything will be deleted from the flash drive (just in case, I warn you ☺)!
In most cases, to format a flash drive, just go to "My computer", select the flash drive among the disks, right-click on it and select the command in the context menu "Format" .

If you fail to format the media: errors appear, the computer freezes, etc., then you need to use special utilities to format it. One of these that I recommend is HDD LLF Low Level Format Tool.
HDD LLF Low Level Format Tool
A small utility used for low-level formatting of disks and flash drives. Helps in the most difficult situations when it is impossible to format the media through Windows. Interfaces supported: S-ATA (SATA), IDE (E-IDE), SCSI, USB, Firewire.
The utility is distributed in several versions: there is also a portable version that does not require installation.
Because There is no Russian in the program, I will show with an example how the media is formatted.
After launching the utility, click the button "Continue for Free".


When it ends, Windows will prompt you to format the flash drive (you can format it in the usual way through “My Computer”). As a rule, after low-level formatting, a flash drive can be formatted easily and without errors in Windows.
By the way, if your flash drive still doesn’t work, I recommend trying to restore it. Here is another way described in this article:
That's all I wanted to say! I would be grateful for any additions on the topic.
The era of floppy disks is long gone, but sometimes when trying to write to a flash drive, the user may encounter a situation known since the days of using floppy media - it is blocked and cannot be used.
We will look at how to solve this problem in detail in our article today.
So, you need to write some information to a flash drive, you insert it and receive a message like “The disk is write-protected, remove the protection or use another one.”
This problem can be solved quite quickly, and we will talk about this a little later, but now we should say a few words about the purpose of installing protection from downloading on .
Note! This operation is performed for only one purpose - which can spontaneously be copied to removable media without the user’s knowledge.
Methods for removing write protection from a flash drive
There are 2 key ways to remove protection from a flash drive: hardware and software.
The hardware solution is to install a lock switch, which is present in some drive models, as well as SD cards.
Most often, the toggle switch is located on the side edge of the drive.
Carefully inspect your existing drive and look for an open/closed lock icon or the word Lock on it.
Note! Removing the lock is very simple - just move the lock lever in the opposite direction. That's all. Insert the media into the appropriate slot and repeat the file writing operation again.
The software solution involves the interaction of a flash drive controller, which is responsible for the ability to record information.
You can remove write protection using this method using the command line of the Registry Editor or Local Group Policy.
Learn more about all of the above methods.
Removing protection using regedit
1. Click “Start” and enter - in the search field. Right-click (RMB) on the program and in the context menu go to the “Run as administrator” item.

2. Go to the StorageDevicePolicies section:
HKEY_LOCAL_MACHINE\SYSTEM\CurrentControlSet\Control\StorageDevicePolicies
Important! Important! If there is no such thing, you will have to create it. To do this, click on the section Control - New - Section. We call it “StorageDevicePolicies” without quotes. If there is no such section, you need to create it.

Create (RMB in the right column of the registry) a DWORD parameter (32 bits) in the created branch. For convenience, let's call the element WriteProtect.

3. Make sure that the WriteProtect value is 0. Right-click on WriteProtect and select “Change”. If the value is “1” you need to change it to “0” and click “Ok”.

4. Close the registry editor, remove the media and restart the computer. Insert the flash drive. Now the flash drive works as usual, allowing you to write files.
Removing protection using Diskpart
If we were unable to unlock using regedit, let's try to do it using the Diskpart command interpreter, which allows you to manage the commands that the user enters into the command line when working with partitions and disks.
1. “Start”, enter the name - cmd - in the search field. Right-click in the program and select “Run as administrator” in the context menu.

2. Now you should enter the commands: diskpart and list disk, and after entering each of them, press the Enter key.
3. In the list above, determine what serial number in the name the flash drive has.
This can be done based on the specified size, in our case an 8 GB flash drive, presented in the table as “Disk 1” with a capacity of 7441 MB.
4. Select the disk with the “select” command, clear the attributes that allow only reading “attributes disk clear readonly”.
If, you should enter the following commands: “clean”, create a partition “create partition primary”, format it in NTFS “format fs = ntfs” or FAT “format fs = fat”.

Removing protection using the Local Group Policy Editor
1. Open it by pressing the Win + R key combination, after which you should enter the command gpedit.msc and press “OK” or Enter.

 How to remove write protection from a flash drive - here are the coolest ways, read! If the user’s attempts to erase, format, write, edit, save the file, transfer or other similar actions with a flash drive are unsuccessful, then he is probably dealing with a protected flash drive and needs to decide how to remove the protection. The guide below contains all the necessary instructions on the issue at hand.
Causes of the “disk is write-protected” error. Why is the flash drive write protected?
When the PC complains that the disk is write-protected, it is necessary to first clarify the cause of the problem.

- Hardware;
- Software.
The disc can be write-protected at the request of its owner, simply by using a mechanical switch on the device or by using software tools. Also, the media is often programmatically blocked by the system itself, malicious applications, etc.
Main types of write protection
The first type is mechanical write protection: Manufacturers of flash drives take care to protect the integrity of information stored on their media. The simplest type includes equipping the device with buttons on the body or toggle switches with a “lock” icon.
The second type is software write protection: Software refers to a more reliable type of protection, in which special utilities are used to block access to information.
The easiest way to remove write protection from a flash drive (USB or SD card) in case of mechanical protection
If a USB flash drive or SD is mechanically write-protected, then how to remove the protection in this case?
You should inspect the media itself for the presence of a switch. On some USB flash drives, usually a small toggle switch is located at the end.
Almost all SD cards are equipped with a switch, so before using them, you need to install the switch, as shown in the photo below.
Owners of computers with the “Total Commander” utility installed, in any unclear case, turn to the capabilities of this file harvester, stuffed with many features.
In order to eliminate the problem in question, it is enough to follow several steps:
- Click “Configuration”;
- After that, click “Settings”;
- In the menu that appears, go to the “File Operations” tab and check the box: “Auto select method”;
- Click “Apply”;
- Click “Ok”;
- Ready.

You will need to complete the following steps:

Note: Sometimes the section described in paragraph 11 is missing. In this case, you need to create it. This is done simply: by right-clicking on the mouse in the “Control” subfolder, hovering the cursor over the “Create” line and clicking “Section”.
How to remove protection from a USB flash drive using Diskpart?
If the disk is write-protected, the “Command Line” (CS) will help you quickly unlock it, but the information on the USB drive will be erased.
Steps:
- Through “Start”, launch “KS” with extended powers;
- Then in “KS” type “Diskpart”;
- Click “Enter”;
- Type "list disk";
- Click "Enter";
- Enter “select disk (here indicate the letter that the removable media is designated in the system, no need to insert parentheses)”;
- Input;
- Then execute “attributes disk clear readonly”;
- Enter "clean";
- "create partition primary";
- "formatfs=fat32";
- Input;
- "exit";
- Input;
- Ready.
How to remove protection from a disk using local group policy?
If there are no positive results in deciding how to remove protection from a flash drive using the above methods, you will have to use a complex method and fix the problem through group policies (GP).
Action steps:
 If you decide how to remove protection from a USB flash drive, it is more convenient for the user to use “KS”, then you will need to run this tool with extended rights.
Action steps:
- In the search line type “cmd” or “KS”;
- Right-click on the search result;
- Open "KS" with extended rights.
- Diskpart;
- list disk;
- select disk (here indicate the letter that the removable media is designated in the system; no need to insert parentheses);
- attributes disk clear readonly;
- exit.
- Ready.

Programs to resolve the “disk is write-protected” error
All companies that produce USB drives develop software to work with them. However, all these programs can lead to a positive result only when the user is logged in with administrator rights. The second important condition is that the software matches the drive model. In order to obtain accurate information about the media, it is convenient to use the “ChipGenius” utility. It is free and always available on the resource: “mydigit.cn”.
The application displays detailed information about the flash drive, based on which you can accurately determine which software to use.

Having found out the necessary information, it is recommended to visit the page http://flashboot.ru/iflash/, where you can select an application for your flash drive. The last paragraph of this guide provides examples of common software that can effectively solve problems that arise.
How to remove write protection from individual folders or files?
To remove the protection of an individual directory, you need to go to its “Properties” and check the corresponding boxes in the “Security” section.
If there is a ban on editing, for example, a text document, then you can simply copy its contents to another file and save it with normal settings, that is, without protection. Or use the file menu “Save as...”.
To remove system protection from a file, call up the context menu for it and click “properties”. Uncheck the “read only” box.
Often one file or folder is used by several applications at once and as a result the problem we are considering occurs. You need to close all utilities that use the file or directory. After this, access will be immediately provided.
Sometimes a folder or file is protected with passwords. To hack them, specialists have developed applications, for example, “Office Password Recovery.” This is one of the most effective utilities for cracking access codes. You only need to perform a few sequential steps:
- Click “open”;
- Go to the “attack” tab;
- Click “start”;
- Wait until the process completes;
- Ready.
You can also access individual directories and files by starting the PC in Safe Mode.
When the described methods do not help, it is recommended to install the “Unlocker” application, which, after installation, will appear in the context menu, so using it to work with individual files is especially convenient.
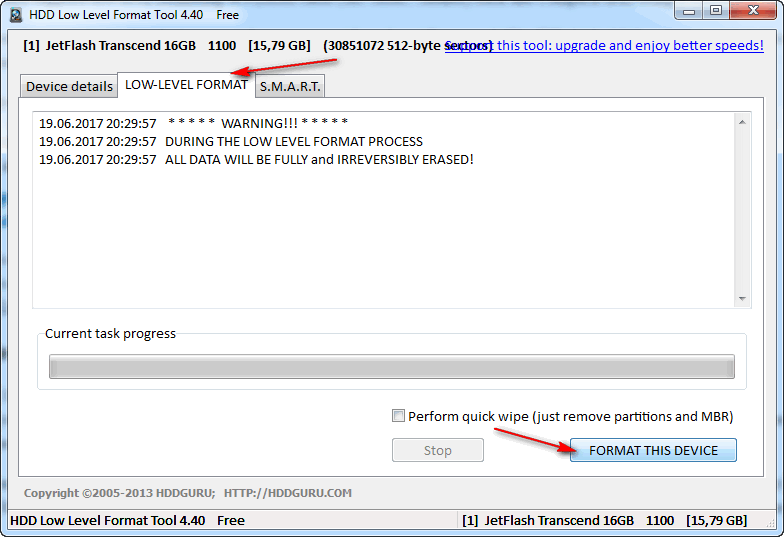
To do this, you will need to install a paid or free modification of the “HDD Low Level Format Tool” (mainly they differ only in the speed of formatting and the lack of automatic updating).
In addition to flash drives, the program can work with USB hard drives. The installation wizard will help you quickly install the utility on your PC.
If it is not important for the user to receive regular updates and is ready for formatting speed limitations, then it is better to choose the free option.
 After installing the program to format a protected flash drive, you must perform the following steps:
- Select the flash drive.
- Click “Continue”.
- Read the information in the first tab of the program menu and go to “Low-level format”.
- Confirm your commitment and then click “FORMAT THIS DEVICE”.
After waiting for the process to complete, the mission will be completed, that is, all bytes of information have already been erased. In order to use the device in normal mode in the future, you will need to format it using the tools built into the OS.
Programs for formatting protected flash drives
The following programs have earned a significant number of positive user reviews:
AlcorMP— This utility, in addition to removing protection, does an excellent job of restoring the functionality of a USB drive.
You can select the “Russian” language in the menu, so even for beginners it does not cause difficulties.
HP USB Disk Storage Format Tool— The application is suitable for many flash drives, and it is also available for installation for free on the official resource.
In addition to unlocking and formatting functions, the utility can create bootable flash drives.
JetFlash Recovery Tool— Transcend owners appreciated the speed and simplicity of this program, which is capable of correcting errors in reading write blocks and unlocking protection.
Using this software will not complicate the user, since the built-in wizard will help you perform basic operations with a USB flash drive.
Apacer Repair— Owners of flash drives from Apacer easily cope with blocking, thanks to the proprietary utility.
If it is impossible to format the media using standard OS tools, the program will effortlessly complete the task within a few minutes.
Check Disk— A fully functional modification of the program is distributed freely on the Internet.
In addition to the main formatting function, the utility is used to monitor and correct errors on hard drives and USB drives (including flash drives).
How to remove write protection from a flash drive - step-by-step instructions
The era of floppy disks is long gone, but sometimes when trying to write to a flash drive, the user may encounter a situation known since the days of using floppy media - it is blocked and cannot be used.
We will look at how to solve this problem in detail in our article today.
So, you need to write some information to a flash drive, you insert it and receive a message like “The disk is write-protected, remove the protection or use another one.”
This problem can be solved quite quickly, and we will talk about this a little later, but now we should say a few words about the purpose of installing protection against downloading on a digital medium.
Note! This operation is performed for only one purpose - to protect the drive from viruses that can spontaneously be copied to removable media without the user’s knowledge.
Methods for removing write protection from a flash drive
There are 2 key ways to remove protection from a flash drive: hardware and software.
The hardware solution is to install a lock switch, which is present in some drive models, as well as SD cards.
Most often, the toggle switch is located on the side edge of the drive.
Carefully inspect your existing drive and look for an open/closed lock icon or the word Lock on it.
Note! Removing the lock is very simple - just move the lock lever in the opposite direction. That's all. Insert the media into the appropriate slot and repeat the file writing operation again.
The software solution involves the interaction of the operating system and the flash drive controller, which is responsible for the ability to record information.
You can remove write protection using this method using the command line of the registry editor or local group policy in Windows 7/8.
Learn more about all of the above methods.
Removing protection using regedit
1. Click “Start” and enter regedit in the search field. Right-click (RMB) on the program and in the context menu go to the “Run as administrator” item.
2. Go to the StorageDevicePolicies section:
HKEY_LOCAL_MACHINE\SYSTEM\CurrentControlSet\Control\StorageDevicePolicies
Important! Important! If there is no such thing, you will have to create it. To do this, click on the section Control - New - Section. We call it “StorageDevicePolicies” without quotes. If there is no such section, you need to create it.
Create (RMB in the right column of the registry) a DWORD parameter (32 bits) in the created branch. For convenience, let's call the element WriteProtect.
3. Make sure that the WriteProtect value is 0. Right-click on WriteProtect and select “Change”. If the value is “1” you need to change it to “0” and click “Ok”.
4. Close the registry editor, remove the media and restart the computer. Insert the flash drive. Now the flash drive works as usual, allowing you to write files.
Removing protection using Diskpart
If the flash drive could not be unlocked using regedit, let's try to do it using the Diskpart command interpreter, which allows you to manage the commands that the user enters into the command line when working with partitions and disks.
1. “Start”, in the search field enter the name of the Windows command line - cmd. Right-click in the program and select “Run as administrator” in the context menu.
2. Now you should enter the commands: diskpart and list disk, and after entering each of them, press the Enter key.
3. In the list above, determine what serial number in the name the flash drive has.
This can be done based on the specified size, in our case an 8 GB flash drive, presented in the table as “Disk 1” with a capacity of 7441 MB.
4. Select the disk with the “select” command, clear the attributes that allow only reading “attributes disk clear readonly”.
If the flash drive needs formatting, you should enter the following commands: “clean”, create a partition “create partition primary”, format it in NTFS “format fs = ntfs” or FAT “format fs = fat”.


