The iPad's large, high-resolution screen is the best Apple device for presenting photos to friends and family.
It is especially convenient to view images in slide show mode on the spacious tablet screen.
There are many ways to transfer photos from a computer to an iPad or vice versa, and they are different from each other.
How to transfer photos to iPad via iTunes:
This is the official way to transfer photos from your computer to your iPad, and also the easiest.
1. The first thing you want to do is collect all the photos and pictures that you want to see on your iPad in a certain place on your computer. You can put the images on your PC desktop, or move them to a separate, newly created folder.
2. Open iTunes and connect the tablet to the computer via a USB cable to synchronize.
3. Open your iPad's overview page by clicking on the icon in the iTunes window.
4. Navigate to your photos section by clicking the Photos tab at the top right of the iTunes overview page.
5. Select the data transfer method “Synchronize photos from” by checking the box next to this phrase.
6. Select the path to the folder with the transferred photos. After first pressing the “Select Folder” key, check the boxes for folders with images or individual photos that you would like to transfer to your tablet. You can also mark all the folders shown in the dialog box by checking the box next to the phrase “All folders.”
7. Click on the “Apply” button that appears at the bottom right and wait for the photos to download to your iPad.
Through the file manager.
Although this is an unofficial way to download photos from a computer to an iPad, it is quite fast and simple.
1. Connect your tablet to your PC via a USB cable.
2. Launch any file manager on your computer.
3. Open the folder with the downloaded photos. Select all the files needed for transfer and copy them.
4. Follow the path in the file manager: /var/mobile/Media/DCIM/100APPLE, and paste the copied files here.
Using Photo Stream.
With this method of uploading photos to iPad, you do not need to connect the tablet via a USB cable; now you need a reliable Wi-Fi wireless connection. Of course, you will first need to install the iCloud for Windows program on your PC and set up the control panel of this program, and then using this tool will be quite easy.
1. Open the folder on your computer that contains your photos. Select the image files you want to download to your iPad and copy them.
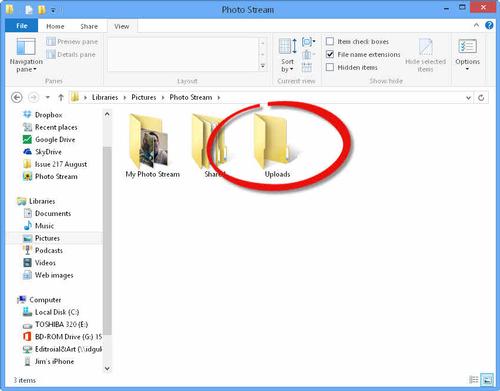
2. Open the “Photo Stream” folder in “Pictures”, “My Pictures” - this folder was created when installing the iCloud program.
3. In the “Photo Stream” folder, open the “Uploads” folder, paste the previously copied photos here.
4. The uploaded photos will appear in the photo stream, specifically in the Photos application of your tablet.
Using the iPad transfer program.
This free program must be downloaded from the Internet and installed on your PC.
1. Launch the installed iPad transfer program and connect your tablet to your computer.
2. Press the “PC to iPad” button in the open program to start uploading photos.
3. Next, click the “Add file” button to select the files you want to transfer to iPad.
4. After selecting the photos to be loaded, click the “Import” button, and the selected data will be transferred to the tablet.
As you can see, there is nothing difficult about transferring photos from a computer to an iPad. You can also use other, unnamed methods of data exchange, such as cloud storage Yandex.Disk, Google Drive, Dropbox.