While working with video, some users may need to remove sound from a video. This may be an unsuccessful audio track, the need to add your own audio instead of the existing one, or other reasons that inspire the user to cut audio from the desired video. Of course, you can turn to the functionality of various desktop programs, but I suggest the user not to waste his time on installation third party applications, but take advantage network services, making it easy to separate video from online music.
The online services that I will describe below are in most cases video converters that have a function to turn off the music, thus allowing you to extract music from the video.

Most of them work in the following way: you go to such a resource, upload the video you need to it, and activate the audio mute function. Carry out the process of converting your video by pressing the appropriate button, and then save the resulting result file to your disk (usually in the same format as the video file uploaded to the resource).
Top 4 tools for removing audio from videos online
To extract excess music from a video, leaving only the video sequence itself, I recommend using the following network services:
Cloudconvert.com
The most popular service on the RuNet for removing sound from a video is the English-language resource cloudconvert.com. The main purpose of this resource is to convert files from one format to another (there is various formats documents, audio, video, presentations, fonts and so on). We are interested in the ability to separate video from audio online, and the cloudconvert service gives us such functionality.
To remove music from a video using the cloudconvert website, follow these steps:

Audioremover.com
Second English speaker online service The one I want to talk about is audioremover.com. Its free functionality is designed to separate video from music, the whole process is completed in a couple of clicks, and then you can easily save the result to your disk. However, the resource is only capable of processing video files up to 500 megabytes in size.
To work with audioremover.com do the following:
- Go to audioremover.com;
- Click on the “Browse” button and tell the service the path to your video on your computer’s hard drive;
- Click on “Upload” to upload this video to the resource and process it;
- Click on “Download video” to save the video without sound to your PC;

Convert-video-online.com
The specified service convert-video-online.com is another popular online video and audio converter. Among its advantages are its free nature and the presence of a Russian-language interface, which will undoubtedly appeal to many Russian-speaking users. It's worth mentioning that this tool is not capable when needed.
To cut audio from a video using this service, do the following:

Ezgif.com
The functionality of the ezgif.com service is quite wide, allowing you to perform various operations on working with video (, changing its size, adding various effects, converting to GIF format et cetera). We are interested in the reverse functionality, which allows you to scroll the video, as they say, “backwards”, and turn off the sound on it. Then the video processed in this way is again run through this resource, it again takes on a normal appearance, but without sound.
To work with ezgif.com do the following:

Conclusion
In this material I reviewed online converters that allow you to remove sound from the required video, their functionality is described and characteristics. The most convenient of all services is the audioremover.com service - you just need to upload a video with music to this resource, and then save the specified video without music to your PC.
Often, when downloading foreign films, you can find several audio tracks with translations into various languages, as well as with original sound. It even happens that for one film there are several versions of translation into Russian.
You will need
- - computer;
- - video editing programs.
Instructions
You will need
- VirtualDubMod program
Instructions
- VirtualDubMod
Let's say you have a video and you want to remove the sound from it, completely cut out the audio track. This can be done using various video editors, such as Sony Vegas, Movie Maker, Adobe Premier, etc. But because of this generally banal operation, is it worth installing additional software on your computer, which, by the way, is not at all free? In this case, it is much easier and more effective to use online services!
In order to remove sound from a video, we will use Cloudconvert.com. This cloud service, with which you can convert anything into anything :) Although we are not going to convert anything, by and large, this online service is ideal for our needs. Why? Now I’ll tell you everything.
Go to Cloudconvert.com and click on the “Select files” button.
Select the desired video file on your computer’s hard drive. It is also possible to provide a link to it on the Internet or download it from:
- DropBox
- Google Drive
- OneDrive
After this, a page will open where the file name will be indicated (in my case Webinar), its format (in my case MP4), and there will be a button with an icon in the form of a wrench. We click on it.

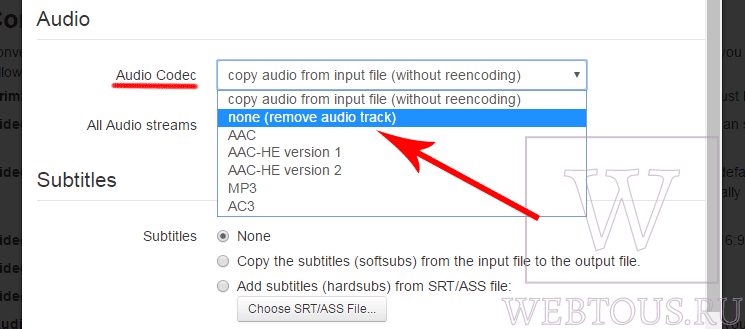
In the window that opens, in the AUDIO section there will be an item “Audio Codec”. In the drop-down menu, select the “none (remove audio track)” option. By doing so, we indicate that we intend to remove the audio track from the video.
If you wish, you can do additional options with the video:
- Convert it to another format
- Cut/add subtitles

After that, click on the “Start Conversion” button, and after certain time(depends on the size of the source file) You will receive a result that can be downloaded to your computer.

Start playing the video and make sure it is already without sound :)
You can use the Cloudconvert.com online service completely free of charge. The maximum video upload size is 1 GB. You have a daily limit of 25 conversion units.

So, for example, converting one text file or image is equal to one unit. But in the case of video files, as far as I understand from the description, one conversion unit is equal to one minute of the time spent by the service on conversion. Maybe I'm wrong. If you know from experience how things really stand with this, write in the comments.
When working with video materials, there is often a need to remove the original sound of the recording in order to correct it and add it separately or replace it, for example, with musical accompaniment. This is easy to do in Sony program Vegas.
The nuances of working with sound in Sony Vegas.
There are two ways to get rid of an audio track: delete it or simply mute it. The latter is preferable if you do not know for sure whether it will be useful during the creation of the project or not.
Method 1
Before deleting the audio track, add the video to the Sony Vegas editor. You see the storyboard at the top, and the audio layer below, and they are inextricably linked. If in this moment try to erase the audio sequence, the clip will disappear along with it.

To separate audio from video, select it and press U. Check element dependencies by dragging the edge of the video sequence. If it moves on its own, the separation was successful.

Opposite the audio track there is a small settings window. Click on it right click mouse and select “Delete Audio Track” or “Remove Audio Track” (depending on the software version). The audio will disappear.

Method 2
You can also simply remove the sound, muting it but keeping the track. To influence not the entire row, but only an element, press S on the keyboard and select the desired piece, then right-click and select “Switches” (or “Toggle”) - “Muffle”.

To mute a whole audio track or several at once (if the track consists of fragments), look at the menu opposite it - there is an icon with the corresponding caption.

In this way, you can not only achieve silence, but also make volume changes in the right places. To do this, press Shift + V and place markers on the track where changes will be made. As you move the markers, a sound curve is created. To use this function effectively, a fair amount of skill is required, but it produces interesting transitions. Now, if necessary, you can return to the original sound, which would be impossible if you deleted the audio track.
Adding a new track
Now let's talk about how to insert music or voice recording into a project. First of all, you need to prepare the appropriate file in MP3 format and save it in some folder. Then import the video sequence into the editor and press Ctrl + Shift + Q (or through the “Insert” menu – “Audio/Video Track”).

Next, insert the desired piece of music. If several tracks are planned throughout the clip, a separate audio track is created for each of them: Sony Vegas follows the same principle - “one object - one layer” - which is typical for graphic editors like Photoshop. If you muted the original audio track, it is not necessary to separate the video and audio before using Sony.
We voice the video
If you want to add your own voice to the video, connect an external microphone (on laptops it is built-in) and create a new empty audio track (right-click on the last left menu, where the editing tools are located). A window will pop up asking you to save the recording to a specific folder. We agree or change the location and click OK.

A multi-colored indicator appears on the right - the microphone is ready for use. At the bottom, press the “Rec” button and dictate the text.

On the same line you will find a Stop icon. After recording, the audio can be listened to and processed if necessary - at the end of the track there is an icon that opens the corresponding options. In the list you will find a great variety sound effects, clarity settings, reducing extraneous noise.
We recorded a panorama with an expressive landscape, but extraneous sounds spoil all the harmony? Don’t rush to send the file to the trash – the problem can be easily fixed using a video editor. From this article you will learn how to remove sound from a video and replace it in the VideoMONTAGE program.
A couple of clicks and there is no sound
“VideoMONTAZH” is an editor designed to make video processing as easy as possible for beginners. Its functionality includes all the basic tools necessary to obtain high-quality results. In addition to comprehensive improvement of video footage, the software provides a number of functions for working with audio. To erase an audio track from a file, install the editor on your PC and follow the instructions below.
☛ №1. After launching the video editor, click the button labeled "New project" in the start window. Next step the software will offer to set the format of the future video file, you can select one of the proposed options or leave the option "Install automatically".
You can choose one of standard formats or enter the value manually
☛ №2. Drag the clip from which you want to remove audio to the bar at the bottom of the screen. Use the command "Import video", if you want to copy a video track from a DVD. After the desired file has been downloaded, go to the tab "Edit" and select "Sound replacement".

If you add several videos, each of them needs to be edited separately
☛ №3. To completely remove sound from a video, you need to click on the command Add Audio > Select Music from Collection. A window with a list of compositions will appear in front of you, find the track among them "Silence" and apply it. The name of the audio track speaks for itself - the sound will completely disappear from the video.

If the video lasts less than 15 minutes, trim the “Silence” track; if longer, add it to the list again
The lack of sound can cause discomfort and sometimes anxiety when viewing. Directors often use a similar technique to create so-called suspense, completely immersing the viewer in what is happening on the screen. And if in a movie such an artistic technique works like a charm, then in an ordinary video it looks as if the creator forgot to attach a sound track. If you do not intend to add tension to watching the video, we recommend adding music to the background.
In addition to “Silence” in the collection you will find several more melodies that suit different moods - calm and cheerful, quiet and louder. Select an audio recording that matches the content of the video, or upload your own by clicking "Select a file". If the video recording is long, you can connect several tracks or loop one, adding it again.

You can select any part of the audio track; it is not at all necessary to trim the melody only from the beginning or end
The program also allows you to create from several excerpts, applying a single musical background to the entire project. To do this, you need to place video fragments on the slide bar and open the tab "Music". By clicking on the plus icon, select music files, adjust their duration and sequence. To remove the original audio tracks from all videos at once, simply uncheck the command "Put music on original sound» . If you wish, you can leave this function enabled, in which case the background melody will be overlaid on top of the original one.

You can edit the sound of background music, make it loud or, conversely, barely audible
Correct and improve your video in 5 minutes
Now you know how to remove sound from a video and forget about spoiled footage forever. However, installing the “VideoMONTAZH” program will open up many more possibilities for you in terms of processing video files! Just a couple of minutes are enough to polish and improve even an unremarkable video.
- Trim off excess
After uploading a clip, you can reduce the size of the video and cut out excess, simply by marking the boundaries of the segment that you want to leave. Move the black marks on the timeline or fill the time period manually.

The program will allow you to remove unnecessary things from the video while maintaining high quality
If an extra object ruins the composition, use cropping, so you can highlight the desired area of the image, focusing on the main thing.

The same option will help you get rid of horizontal or vertical black bars in your video.
- Adjust the speed
Manage time the way you want - speed up the clouds slowly creeping across the sky or, conversely, slow down the falling leaves from a tree. Correctly adjusted speed can greatly increase the expressiveness of a clip. To change it, just select the appropriate command from the drop-down list. So you can speed up or slow down the clip by 1.5, 2 or 3 times with just one click!

Videos sped up or slowed down in the program will also not lose quality
- Improve image quality
“Video Montage” will eliminate jitter in the frame in seconds using the option "Image stabilization", which you will find in the tab "Improvements". Check the box next to the corresponding line and evaluate how much the image has changed. In the same section, you can make the picture brighter, increase the saturation of shades, or, conversely, eliminate overexposure by darkening the frame. In the “Cropping” section you can either rotate the video 90 degrees or cut off the excess.

Using auto-enhancement tools, you can adjust the color balance in your video in just one click
- Apply effects
Go to the tab "Effects"– and you will see dozens of filters, ready to instantly make your video original and atmospheric. The presets are divided into thematic categories - vintage, romantic, children's. To apply an effect, just select it with one click.

With stylish filters from the program's collection, your video will look more professional
If you wish, you can use manual settings and develop your own unique filter from scratch. To do this, you need to select several improvements and adjust the parameters of each of them. The video editing program offers to tint the image, age it, apply film grain, color noise, spray or engraving effects, apply masks, highlights or flares.

By combining different effects, you can use completely new, unique filters in each of your projects.
The program is not limited to the described functions - replace the background, create music video cards, record with a webcam. With the VideoMONTAGE editor, nothing is impossible or inaccessible - download the software, and working with video files will become your favorite hobby!


