Apple players, despite their high quality, sometimes break. The cause of troubles rarely lies in a manufacturing defect; in 99% of situations, the owner of the Apple equipment is to blame.
Any malfunction requires disassembly of the device. But when starting the operation, remember that responsibility for the outcome will lie with you. The warranty will then cease to apply. So you should think many times whether to take your iPod for repair or perform the procedure yourself.
The fourth line player from Apple is one of the best products in its niche. It combines style and attractive design, productive hardware, an excellent display and a large amount of memory. Thanks to these features, millions of fans around the world trust this iPod model.
But let us note once again that any high-tech device can break down. Moisture getting inside the case or falling are the main factors leading to failure of the player. After their impact, the gadget begins to function malfunctions or does not react at all to actions, turning into a piece of metal. In such situations, disassembling the case is required. This is standard procedure in repair shops. But often owners of Apple devices, out of a desire to save money, do it themselves.
The instructions below tell you how to disassemble your iPod Touch 4. If you decide to undergo this operation, do not forget to prepare the necessary tools in advance. You can purchase a professional set in many stores online. You will also need an industrial-type hair dryer - you won’t be able to open the case without heating it up.
First, let’s look at the cases in which repair of the iPod Touch 4 (display or other elements) is required.
Music lovers do not part with their favorite player - usually the devices accompany them everywhere. When choosing the best for themselves, many opt for the iPod. This product is close to ideal in terms of the combination of the most important characteristics - sound quality, appearance, functionality and other parameters. But like any technology, sometimes iPods need repairs. The most common factors for device failure are long-term use and careless handling. iPod Touch 4 repair is necessary in the following situations:
1 When the headphone jack becomes loose. This kind of breakdown occurs quite often. This is caused by poor storage and handling conditions of the player, when the plug is placed in the socket at the wrong angle. Replacing the part or restoring it will help here. This task is best left to experienced repair shop specialists. Note that repairing an iPod Touch 4 is a more complicated operation than working with other models of Apple players. This is an innovative type of device, and it is necessary to diagnose not only mechanical damage, but also software components. 2 Software glitches. Jailbreaking an iPod Touch 4 often leads to such dire consequences. Jailbreaking an iPod is not recommended unless absolutely necessary. Such a useful procedure as flashing also sometimes causes the iPod to break down. Before the procedure, you should make sure that the installed software matches the operating system version of your device. This discrepancy often becomes a source of conflict. Here, the risk zone is precisely “jailbroken” devices. Also, unlocking iPhones and other Apple devices often leads to slowdown or failure of their operation. These types of upgrades are often fixed in repair shops. But, of course, no one can provide any guarantees that the player will function normally after this. 3 Other factors. Power surges in the network during the process of independently flashing the iPod touch (even minor interruptions) can lead to failure of the electronic components of the “filling”. If the device's memory is full of incompatible or unofficial software, it can also completely disrupt the functioning of the player. Falls and other mechanical impacts often cause iPod breakdowns (the screen breaks, etc.). Liquid getting inside the case is also a common occurrence, causing owners of Apple devices to worry about the safety of their device. To be fair, we note that in workshops, 90% of situations are resolved successfully. And only in rare cases, the iPod cannot be saved.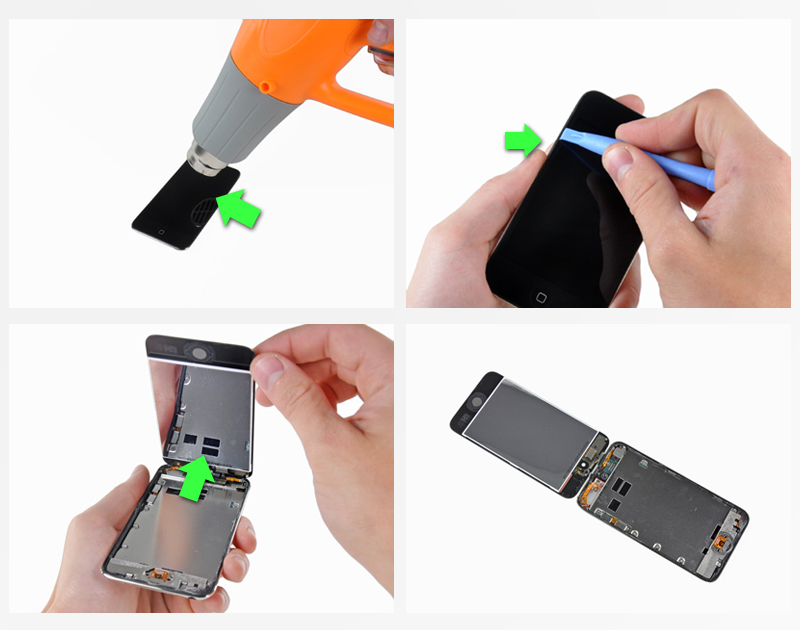
iPod Touch 4 disassembly algorithm
So, let's start disassembling. The steps will be like this:
- We heat the front panel with a hairdryer to soften the adhesive masses.
- Using a plastic spatula, we pick up the screen structure along all the borders. We lift the element and place it near the body. Remember that the part is attached with only 2 cables, which are easy to damage. The first loop is disconnected instantly. But this won’t work with the second one. It is secured with a shielding plate. The display and glass are combined into a single unit for protection. This fact is a big drawback during repairs, because the entire module will need to be replaced. Besides, it won't be cheap. But there is also a positive point in all this - dust particles will not accumulate between the display and the glass.
- To remove the metal shielding plate, unscrew the 8 screws. They are located along the border of the plate. Dismantling is done by prying them off with a plastic spatula. By removing the plate, we will open access to the system board, battery and cables. Now the element can be removed and analysis can continue.
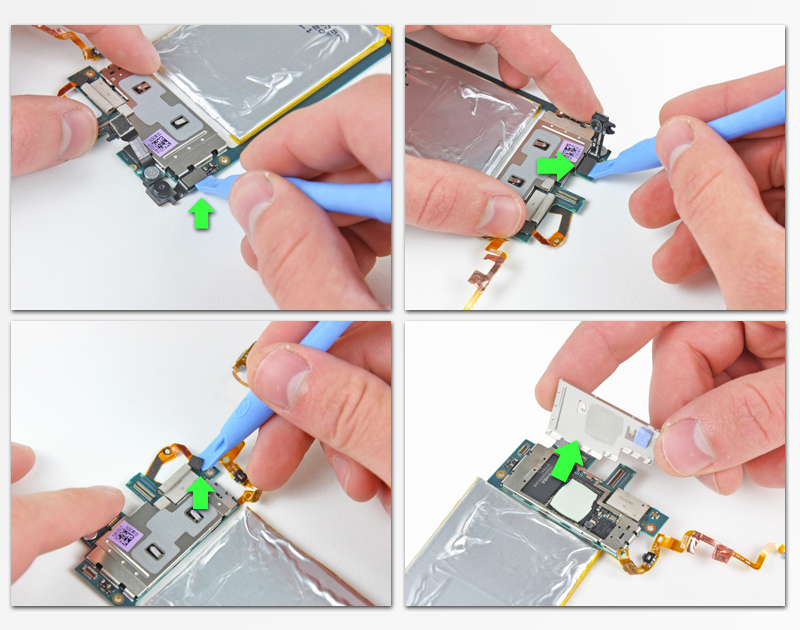
- Remove the 3.5 inch jack. To do this, unscrew the only screw and use a plastic spatula to disconnect the cable from the board. After this, the part comes off well and can be replaced if it is faulty.
- We continue to disassemble the iPod of the fourth line. At this stage we dismantle the board and battery. You'll have to work hard here. Because the Power element cable is soldered to the board and glued to the case. You should carefully peel it off. Then the Home button will become visible. Unscrew the screws and remove the cover.
- We peel off the cable of the volume elements using a special device. We remove the display structure, having first disconnected it with a plastic spatula. The display can be replaced if necessary. Let's say it was broken or there were dead pixels.
- We remove the copper screen, which serves to dissipate heat and protect the battery and display from overheating.
- We remove both cameras. Using a plastic spatula, we disconnect the contacts and remove them. Then we carry out a replacement (in case of malfunction).
- We remove the external antenna again using a plastic spatula and change it if necessary. To access the main elements, you need to remove a special protection plate.
At this step, your device is 100% disassembled. You can replace absolutely any faulty element and return the player to functionality. Assembling the device is no more difficult than opening it - you just need to assemble all the parts in reverse order. When performing the procedure, the main thing is to be as careful as possible.
It is better to keep the instructions before your eyes and constantly refer to them so as not to confuse the steps. But at the slightest opportunity, it is still better to contact a repair shop. Especially if the damage is serious, independent repairs can cause irreparable harm to the device - it will not be repairable at all. In addition, remember that the warranty will no longer be valid after disassembling the iPod at home.