This post was written not for the sake of holivar, but simply to share experience. I’ll answer the main part of the questions right away:
- Why is this necessary?
- It's just necessary!
- There is MacOS, why is there Windows on a Mac?
- Everyone chooses for themselves what is more convenient for them to work with! I like Apple hardware, but I'm used to working in Windows!
- Are there virtual machines?
- They work slowly!
- There is a Bootcamp!?
- There is little space on the Air, and Windows alone takes up about 30-40GB, with all the software!
Answered all the questions?! If you are still wondering how to do this, then welcome to the post...
If you have an external CD drive, this post may not be for you, here I will tell you how to install Windows on a MacBook Air without a drive.
In order to pull this all off, we need:
- 2 USB flash drives (one for Windows 7 (from 4GB), the other for drivers (from 1GB))
- 1 PC - with Windows 7
- Internet
- and of course the brand new Macbook Air 2010 Late
Stage 1. Preparing a bootable flash drive with Windows 7
First, let's prepare the flash drive and make it bootable. To do this, we need a PC with Windows 7 and a Windows disk (preferably x64, since the laptop supports x64).Now we have a USB flash drive formatted in FAT32, which is active, i.e. may become bootable.
In order to install the bootloader, you need to do this in CMD:
- F: (my CD-ROM is designated by the letter F:, yours may be different)
- cd\boot\
- bootsect /nt60 E: (where E: is the name of the flash drive)
Step 3. Make Macbook See USB Flash with Windows
All my attempts to get the Macbook to see the bootable flash drive failed, so I had to use Google.It turns out I'm not the only one who needs pure Windows/Linux on a Macbook, and there is a program for this rEFIt.
Download it from the official website: . I installed the latest version 0.14. It is installed as standard, like any application in MacOS.
After installation, you need to restart your computer 2 times. On the second reboot, you need to hold down the right-option and a similar menu will appear (USB Flash with Windows should be in the MacBook):
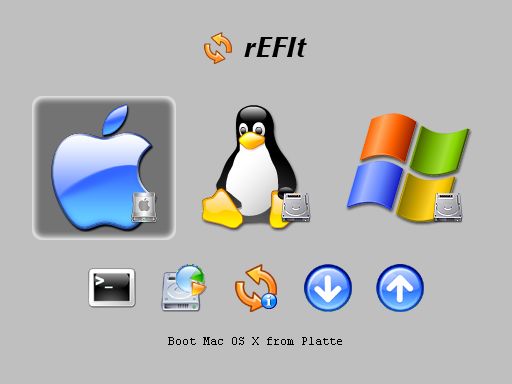
You will have a MacOS icon and a Windows icon by default. We need to select Windows.
After launching the installer, entering the key, select “full installation”.
A list of partitions on which the SSD is allocated will be displayed:
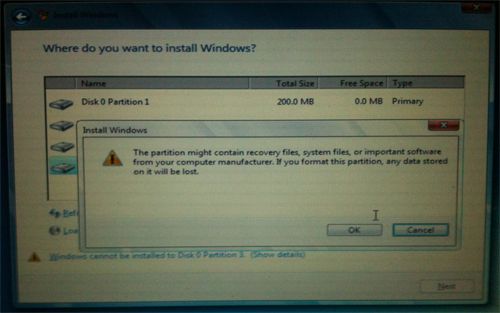
I will delete all sections! And we create new ones, when creating Windows will offer, or rather order, to create a 100MB system partition.
I divided the disk into 100MB(), 40GB (system), and the rest.
Once everything is installed, the computer will reboot and Windows will start, at the beginning, it will probably hang on a white screen for a long time, and look for the MacOS partition, this will be cured after installing the driver, and the Bootcamp application in Windows, to quickly find the desired partition, hold down the left option and selects the Windows drive.
After the installation is complete, install the drivers from the second flash drive and reboot. After the reboot, go to Bootcamp, select the disk to boot Windows and click Reboot Now. ALL! Now you won't see the white Macbook startup screen for about a minute.
A little about how it all works
After working for 2 days on a brand new MacBook, I appreciated all the advantages of an SSD. Windows loads for 10-15 seconds (from pressing the power button until all the icons in the system are loaded)Word opens in 1 second
Photoshop CS5 - the first time in 4 seconds, if you turn it off and on again for 2 seconds (most likely due to ReadyBoost, and all sorts of new features in Windows 7)
The application response time is instantaneous.
And all this with a combination of Core2Duo, DDR3, Multi-touchpad, 1440x900...
In a word, I am very pleased! And it doesn’t matter what Windows or MacOS costs, because the MacBook Air 2010 Late is an excellent piece of hardware!
Happy New Year and good gifts to everyone!