Hi all! Today I want to tell you how to process photos in Photoshop for beginners or those who have just recently started learning this wonderful editor. It's no secret that sometimes photographs turn out, to put it mildly, not what we expected them to be. Either they are too dull, or too bright, there are a lot of pimples, or the sharpness is not best quality. Therefore, today I will try to tell you in an accessible language how to fix this.
Eliminate skin defects
First of all, I recommend looking at people, if there are any in the photo. The first thing that is important during processing is identifying defects. In this situation, I mean acne, scars, herpes (God forbid), from a flare-up, scratches, hair coming out, bruises, etc.
I don’t see much point in writing in detail about this, since I have a separate article for each case. I would just like to list a few tools that usually help eliminate defects.

- Patch. Select this tool and select the problem area of the skin with it, then drag it to a healthy area by holding down the left mouse button.
- Healing Brush - Before using the tool, you need to select the donor area by holding down the alt button. And then you will need to paint over all pimples, blackheads, etc.
- Precision healing brush. This tool is also intended for covering up defects, but differs from its “brother” in that there is no need to select the donor area. It takes information from neighboring areas.
I described all these methods in the article about . You will see for yourself that it is not difficult.

Applying the Camera RAW filter: processing a photo in a minute
This method is insanely simple. Many photographers use the filter. I would even say it differently. They initially shoot in the format CR2, which is essentially higher quality. After that, when you go into Photoshop, this filter is automatically turned on.
But in fact, there is no problem, since starting with the version of Photoshop CS5, filters have been replenished with a new brother. I hope everyone has been using a more advanced version of the editor for a long time.
Main Feature this method is that absolutely anyone can handle it, even a beginner and a complete zero, since everything happens only in one single filter, which only intuitively needs to be adjusted a little. Let's take this photo as an example.


By looking at the stories first, you can see for yourself what wonderful changes have occurred in photography. In my opinion, simply excellent.
Using the Adjustment Menu on a Single Layer
This method of processing photos in Photoshop is quite crude, but for beginners it will do just fine.

Now you can compare the changes. They may not be particularly large, but the processed photo clearly looks better. Of course, the absolute disadvantage of this method is that you cannot return to the previous step and edit it. But there is a way to do this, and I will talk about it below. Well, in general, look at the other functions yourself and twist the sliders. Perhaps you will find something interesting for yourself.

Processing a photo using adjustment layers
This method of processing photos in Photoshop may seem difficult for beginners at first glance, but in fact it is very simple, and any user can handle it.
Adjustment Layers
An excellent photo processing function that does not require any special skills. The essence of this method is that we apply each function on a separate adjustment layer, of which we can have a great variety. And in fact, it is much more convenient than the method we did above.
For example, I took a photo of a girl in rather faded colors. She herself begs to be made brighter, richer and simply delight the soul.

This completes the work with adjustment layers, but we have to move on.
Selecting an area
Now we have to work with some areas separately, since applying effects to the entire image at once will not end well. For example, we need to make the sky brighter, more saturated and bluer, and if we apply everything to one photo, then our girl will also apply everything to herself. Therefore, let's do the following.
- Select a girl with any of the . I will use , as I think it will work great here. We begin to highlight the girl. Don’t be too keen on accuracy, but the main thing is that the whole body is captured, or rather its naked parts and face.

- Now, be sure to make sure that you are on the background layer with the girl, then click right click mouse inside the selection and select "Copy to new layer".

- After this, the cut out girl will appear on a new layer, which is higher than the background one. Your task is to place it above all others so that adjustment layers do not affect it. To do this, hold down the button on the new layer and drag it above the rest.

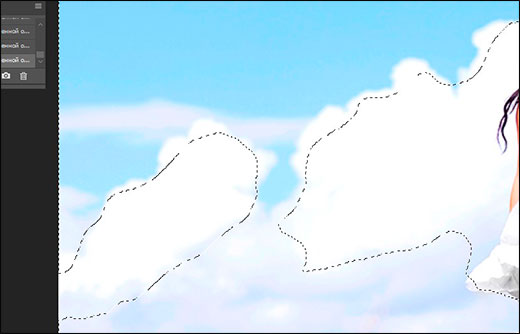
- Now go back to the background layer and start selecting the sky. In this case, I decided to use the function. Select a brush, and then click on the quick mask button itself, then start painting over the entire sky, remembering to change the brush size to get into more difficult to reach places.

- After that, click on the quick mask again to deselect it. Next we'll need to invert the selection so that we're working with the sky and not what's around it. To do this, press the key combination SHIFT+CTRL+I.
- Next, you will need to add some saturation. To do this, without removing the selection, press the key combination CTRL+U, then move the “Saturation” slider a couple of tens of units to the right. You can also play with the brightness until you reach the most interesting shade.

- Now let's get back to the girl. It was not for nothing that we endured it. Since we moved it from under the adjustment layers, it again became pale, as it originally looked. But if this is not done, then on the contrary, she will be too dark. And now we can find the right balance. To do this, our copy of the girl needs to reduce the opacity until you think it’s enough. In my case, 33 percent is enough.

Bottom line
Having studied several in various ways, I came to the conclusion that if you want to make quick and high-quality processing, then it will be enough to use the Camera RAW filter in Photoshop. It showed itself to be excellent, and the time it takes to process a photo, even for novice users, actually takes 1-2 minutes.

The only thing I wouldn’t recommend is creating an action for this and letting the photos change in a continuous process. Even if the pictures were taken by one photographer on the same day, the settings that you made for one picture may not be suitable for them. I know that many unscrupulous wedding photographers do exactly this to save time. You see, they don’t want to process 300-400 photos one at a time.
But if you really want to engage in high-quality photo processing, because you are drawn to it, then I highly recommend checking out these cool video tutorials, which clearly explains how to use Photoshop for awesome photo processing.
And if you are new to Photoshop, then the first thing I recommend is to study this course. Everything is chewed literally down to the smallest detail and looks simply in one breath. . And the main thing is that everything is told in human language, so you don’t even want to be distracted.
As you can see, there is nothing complicated. Therefore, no one should have any questions about how to process photos in Photoshop for beginners. At least I am sure that these tools will be enough for you.
Well, this is where I end my article. I hope you liked it. Don't forget to subscribe to my blog updates, and also follow the news in my public pages. Good luck to you. Bye bye!
Best regards, Dmitry Kostin.
Tools for automating actions in Photoshop can significantly reduce the time spent on performing the same type of operations. One of these tools is batch processing of images (photos).
The meaning of batch processing is to record actions in a special folder (action), and then apply this action to an unlimited number of photos. That is, we process it manually once, and the rest of the images are processed automatically by the program.
It makes sense to use batch processing in cases where it is necessary, for example, to change the size of photographs, raise or lower the lighting, or make the same color correction.
So let's get started with batch processing.
First you need to place the original images in one folder. I have three photographs prepared for the lesson. I named the folder « Batch Processing» and placed it on the desktop.

If you noticed, this folder also contains a subfolder "Ready photos". The results of processing will be saved in it.
It’s worth noting right away that in this lesson we will only learn the process, so many operations with photos will not be performed. The main thing is to understand the principle, and then you can decide for yourself what kind of processing to do. The procedure will always be the same.
And one moment. In the program settings you need to disable mismatch warnings color profile, otherwise, every time you open a photo you will have to press the button OK.
Let's go to the menu "Editing - Color Settings" and uncheck the boxes indicated in the screenshot.


Now you can start...
After analyzing the pictures, it becomes clear that they are all slightly darkened. Therefore, we will lighten them and tint them a little.
Open the first picture.
Then call the palette "Operations" on the menu "Window".

In the palette, you need to click on the folder icon, give the new set a name and click OK.

Then we create a new operation, also call it something and press the button "Record".

First, let's resize the image. Let's say we need images no more than 550 pixels wide.
Let's go to the menu "Image - Image Size". Change the width to the desired one and click OK.


As you can see, changes have occurred in the palette of operations. Our action was successfully recorded.

For lightening and toning we will use "Curves". They are called by keyboard shortcut CTRL+M.
In the window that opens, set the current on the curve and drag it in the direction of lightening until the desired result is achieved.

Then we go to the red channel and adjust the colors a little. For example, like this:

At the end of the process, click OK.
When recording an action, there is one important rule: if you use tools, adjustment layers and other functions of the program, where the values various settings change “on the fly”, that is, without the need to press the OK button, then these values must be entered manually and press the ENTER key. If this rule is not followed, then Photoshop will record all intermediate values while you drag, for example, the slider.
Let's continue. Let's assume that we have already completed all the steps. Now we need to save the photo in the format we need.
Press the key combination CTRL+SHIFT+S, select the format and location to save. I selected the folder "Ready photos". Click "Save".

The last step is to close the image. Don't forget to do this, otherwise all 100500 photos will remain open in the editor. Nightmare…

We refuse to save the source code.
Let's take a look at the operations palette. We check whether all actions were recorded correctly. If everything is in order, then press the button "Stop".

The action is ready.
Now we need to apply it to all photos in the folder, and automatically.
Let's go to the menu "File - Automation - Batch Processing".

In the function window, select our set and operation (the last ones created are automatically registered), specify the path to the folder with the sources and the path to the folder in which you want to save the finished images.

After pressing the button "OK" processing will begin. The time spent on the process directly depends on the number of photos and the complexity of the operations.

Use the automation provided to you by Photoshop and save a lot of time on processing your photos.
In 1C there are many configuration objects that are in one way or another connected with accounting - that is, they allow it to be maintained - directories, documents, registers, and so on. However, what to do when you need to create a program in the 1C language that has nothing to do with accounting, but is required for the programmer’s official needs or to make the user’s work easier?
A great example is batch processing of documents. This is a tool that allows you to hold/change/print not just one document, but many at once, according to a selected list. Agree - very convenient.
To implement tools in 1C to facilitate the work of a user or administrator of a 1C database, there is special object configurations - 1C processing. 1C processing can be part of the configuration or distributed as separate files(then processing is called external processing 1C).
1C processing allows you to develop your own tools both for 1C programming and for setting up or managing 1C. Thanks to this, there are hundreds of standard treatments on the Internet (developed by 1C) and thousands of amateur treatments on the Internet.
It's time to try doing 1C processing yourself. Details below.
What are 1C processing and how are they used?
A small introduction. Those who are already familiar with 1C processing can skip this point.
So processing is a tool written by a programmer. It cannot do anything on its own and does not save data to the 1C database, unlike, for example, a document - which is saved to the database and can be independently recorded and processed, without additional programming. 1C processing functions depend entirely on the programmer who wrote it.
Based on functionality, 1C processing can be divided into three types:
- Auxiliary processing of 1C configuration
Each typical configuration has many treatments. They are used as additional interface forms (user desktop, configuration overview), as part of the configuration functionality (entering initial balances, initial filling of the database, closing the month). - Objects (Classes)
Anyone who knows other programming languages is already familiar with the concept of object. This is a certain class that has at its disposal a set of “variables” and “functions”. Its beauty lies in its self-sufficiency - that is, everything needed to perform its functions is collected in one class.In 1C, classes can be created using 1C processing: “variables” - 1C processing details, “functions” - functions in the 1C processing object module (Export mark for public functions). Convenience lies in both creating an instance of such a class and moving it between configurations.
A good example is the processing of 1C printing (additional printed forms), which you can find in standard configurations in the Additional directory printed forms. They always have a public Print() function and standardized usage.
Please note that, of course, such "classes" are not directly associated with data - they need to be passed or read in the "constructor".
- Additional user and admin tools
There are many generic tools available for use by the typical DBA that are not tied to a specific configuration. Such tools are often not included in the standard configuration package and are distributed separately (usually on ITS disks). In addition to standard ones, programmers post a lot of their own tools on the Internet.Examples include: 1C processing of work with commercial equipment, 1C task console (displays a list of tasks running on a schedule), 1C query console (allows you to execute any queries without programming), etc.
Where are 1C processing located?
So, there are 1C processing built into the configuration and external treatments 1C.
Built-in 1C processing is used situationally by the programmer developing the configuration - that is, they can either be displayed in the user menu (part of the Service menu), or opened programmatically from other 1C objects (for example, from a directory form).
One way or another, under administrator rights you can open a list of processing options built into configurations and any of them, if it can be opened (that is, if it has a screen form and the programmer has not set a lock to open it). To do this, use the Operations/Processing menu in the thick client; use the All functions/Processing menu in the thin client. If you don't know how to find these menus - .

In the configurator, 1C processing built into the configuration is located in the Processing branch.

External 1C processing is opened both in the configurator and in Enterprise using the File/Open menu.
Safety. Pay attention to . The 1C processing object module is executed automatically when you open 1C processing in Enterprise mode. Therefore, if you open a processing written by an attacker, it can be performed automatically without any questions.
How to do 1C processing yourself
So, let's get to the fun part - the algorithm for creating 1C processing yourself from scratch.

Good post-processing of photography is an art; it is a complex matter that requires considerable experience and skills. Even in the era of highly developed digital technologies and in the era of Photoshop, the main work remains with the photographer, who can, with the help of successful processing, create a masterpiece, or, on the contrary, ruin a good photo. In this article we will dwell in detail on the main subtleties graphic processing, we’ll tell you how best to process it, and what it’s better not to do at all.
Film photographs require certain conditions to work with the image, while photographs taken digital cameras we can make stunning and properly balanced ones right in the camera. Depending on the manufacturer and camera model, the image quality does differ, but taking beautiful pictures, with the right composition, taken in good lighting and settings, and also filled with interesting meaning can be improved. To do this, the main thing is to know what and how to do.
Photo: LJ
Only a photographer or an artist knows what his work should be like, only he sees what is missing in it, and what should be removed. The photographer's task is to achieve the result he is striving for.
Depending on what you want to achieve in your image, there are several options for image post-processing.
- Take a beautiful photo while maintaining its natural and realistic look
- Give the image more drama, create an unrealistic image
One option excludes the other, so before you start, you should decide what exactly you are aiming for. An important point is to understand what and why you are doing, very often, people process the image for several hours, only because they simply do not know what result they are striving for. There are times when you can process a photo in just a few minutes, simply by creating several adjustment layers, adjusting contrast, color balance and exposure in Photoshop.
 Photo: Phil Selby
What is needed for photo processing
First of all, before you start, figure out what you want to do. Imagine the future image and only then load Photoshop.
Having imagined the final result and finding an image that matches the given image is already half the battle.
Be creative, photo editing is an art in itself that cannot be learned and can never be fully repeated. Of course, you should get acquainted with the works of the masters, but you shouldn’t try to do the same. Yes, and before starting serious work, you should decide what Photoshop tools, you will need, you may have to use some brushes or filters that you don’t have, make sure you have them before you start processing. The process itself, the result of the work, depends only on you, and on your vision as an artist.
 Photo: Gina
What not to do when processing photos
- Don't try to imitate the editing style of others, it may work from time to time and may turn out well, but their style may not suit you as an artist and your photographs.
- Don't try to save initially unsuccessful pictures with post-processing. Yes, this way you can improve the image and make it acceptable for viewing and maybe even for printing, but such a photograph will never turn out to be a real masterpiece.
- Make sure the processing doesn't change the core essence of your original image.
- Don't overdo it. You shouldn't show off your skills and knowledge of Photoshop by using them all at the same time in one photo.
- The presence of a huge number of advanced image processing packages can either kill art or elevate it. new level. Approach processing wisely, think about what and how you are doing.
 Photo: Betina
Conclusion
Find that delicate balance that will help you learn to create miracles, and do amazing things. beautiful pictures. Always remember that processing should help the image become better and more interesting, it certainly should not spoil your work.
And finally, people looking at your photo should enjoy it and admire your skill as a photographer. You shouldn't be proud of the fact that you know how to process images well and are just a Photoshop guru, you should strive to be proud of yourself as a photographer.
 Photo: Ed McGowan
 Photo: Longbachnguyen


