Free space on a laptop's virtual desktop is never too much. And while owners of 27-inch iMacs can frivolously scatter icons, open several windows at once and work in two or three applications at the same time, fans of “computer compacts” with a screen diagonal of 13 or 11 inches have to endlessly send open applications to the Dock and immediately return them them back. You can solve the problem by purchasing a separate monitor, but we are not looking for easy and expensive ways, so we will try increase work space Mac using iPad and related applications.
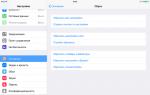
You will need to change settings for each application. monitor orientation additional monitor. After pairing your devices, go to Settings – Monitors – Location.

The monitor whose desktop is displayed with a white menu bar is the main one. The connected iPad acts as a secondary display. Drag it and place it anywhere relative to the main one (left, right, top, bottom).

Duet Display
Genre: Utilities, Video
Publisher: Rahul Dewan
Version: 0.3.3
iPhone + iPad: 899 rub. [Download from App Store]
Mac: Free download]
- Requirements: OS X 10.9+, iOS 7.0+
Pros: speed of operation, permissible load on the processor, the iOS device does not discharge during use
Minuses: price, supports only one device
Today, the transmission of almost any digital signal can be carried out wirelessly: many audio systems support broadcasting sound over Bluetooth, Wi-Fi or Air Play, various wireless modules that display the video stream over the air. Despite one undoubted advantage (the absence of wire tangles), wireless signal streaming also has a significant drawback - instability.
Application developers Duet Display decided to give the user the opportunity to enlarge the Mac screen using the “old-fashioned method” - by using the Dock cord. This solution made it possible to kill two birds with one stone: almost complete absence of delays and simultaneous charging of the iOS device.
To get started with Duet Display, you will need to download two clients: one (absolutely free) for Mac, the other, which costs 899 rubles, for iPad.
Once both clients are installed, connect your iPad using a Lightning cord to Mac. First, launch Duet Display on your Mac, and then tap on the icon on your tablet. The connection will happen automatically.

The number of settings in the Duet Display application is kept to a minimum. You have the option to select the frame rate of the relayed screen ( 30 or 60 fps), set one of the modes energy efficient or focused on performance work. Finally, select the desired resolution for the desktop displayed on the iPad.
Duet Display also copes well with video playback, while the peak processor load rarely reaches 50% (it all depends on the model and power of the computer you are using). You can control the screen displayed on your iOS device using your fingers.

iDisplay
Genre: Utilities, Video
Publisher: Shape GmbH
Version: 3.2.0
iPhone + iPad: 618 rub. [Download from App Store]
Mac: Free download]
Requirements: OS X 10.5+, Wi-Fi network
Pros: no wires, ability to connect multiple iOS devices, cross-platform
Minuses:
A special feature of this client is the ability to connect an iPad wirelessly using a Wi-Fi access point. Before you start, you will also need to install two versions of clients iDisplay: for Mac and iOS. Once the installation is complete, make sure both devices are connected to the same Wi-Fi network and restart your Mac.
Launch iDisplay on your Mac and then open the app on your iPad. The list of detected servers will display a computer with an application already running that acts as a server. We connect, allow access on the Mac (a corresponding dialog box will appear) and within a couple of seconds the OS X desktop will appear on the iPad screen.

iDisplay, unlike Duet Display, allows you to recast your Mac desktop right away for several devices. To do this, go to the application settings and on the tab General select the number of connected devices. Thus, you can configure the display of what is happening on the Mac screen on several iOS devices at once.

Alas, wireless data transmission makes itself felt. You will have to forget about broadcasting videos and watching movies. iDisplay is perfect as a screen displaying various alerts, text information or windows that do not require dynamic operation.

Air Display
Genre: Utilities, Video
Publisher: Avatron Software
Version: 2.0.5
iPhone + iPad: 618 rub. [Download from App Store]
Mac: Free download]
Requirements: OS X 10.7+, Wi-Fi network
Pros: no wires, ability to connect multiple iOS devices (in version 2), Retina support
Minuses: stuttering, heavy CPU load
Working with also involves installing two clients: for OS X and iOS. Once you've launched the app on iOS, open the Air Display menu on your Mac and, with your device selected, click Connect.

Launching Air Display for the first time and pairing it with an “external monitor” will cause the resolution to change chaotically on both devices. Before you can begin normal operation, you will need to make a few adjustments.
Go to Air Display settings (on Mac), tab General and check the boxes as follows:

On Mac, open Settings – Monitors. Go to the tab Location And disable the item Enable video repeat of monitors. Then, on the external monitor you need to set the required resolution.

The Air Display app takes full advantage of the iPad's Retina display, allowing the user to set resolutions up to 2048 x 1536 pixels. Alas, it is unlikely to work with such a scan during wireless relaying. Air Display provides two operating modes: presentational, during which the iPad serves exclusively as an external monitor, and an operating mode that allows you to control the system with your fingers and even use a virtual keyboard.