How do I rotate my Mac's screen? For working with spreadsheets or Word documents I often feel that it would be more useful to have the display in portrait orientation.
For some apps, games, and functions (like coding, digital art, or when using your PC as a status update screen in a public space), it makes sense to rotate your Mac's display. Displaying in landscape (often widescreen) orientation is suitable for most tasks, but not all, and rotating the screen and using it in portrait orientation may be useful.
Physically, rotating the display is simply a matter of accessing the screen mount and rotating it if possible, but you'll also need to access software preferences and tell macOS (or Mac OS X) to output graphics in a view that's rotated 90 degrees clockwise or counterclockwise (or even 180 degrees if for some reason you want to use the display in reverse order). Luckily, this part of the process is very simple, and we'll go over the process below.
Remember that not all monitors can be rotated, and in our experience this works better for external monitors than for a laptop's built-in display. (Again, there aren't many situations in which you'd want to.) For those desperate to rotate the MacBook's built-in screen, we found a workaround that works, but it has side effects, sometimes causing a persistent minor issue (for which we have a solution) and, in at least one case known to us, much more serious problem, for which we have no solution. That's why we also explain in the MacBook section of this article why we don't recommend rotating the laptop's built-in screen.
1. Open System Settings(you can click the Apple logo in the top left corner of the screen and select "System Preferences..." from the drop-down menu, or select its gray gear icon in the Dock if you haven't deleted it). Select Displays is the first option in the second row.
2. Under the Display section (make sure it's highlighted in blue at the top and not Color), there is an option labeled Rotation that is set to Standard by default. Change this to 90 degrees to rotate the screen clockwise a quarter turn.

(Note that if you have two screens, then two windows will appear at this point: one for each display. You can rotate each window individually if you wish, and the hardware supports this.)
What if the rotation setting is not shown?
Generally speaking, the Rotation field appears if your hardware supports the feature, and is hidden if it doesn't. If rotation isn't listed in the Displays list, then you're probably out of luck.
However, in earlier Mac versions OS X doesn't automatically show the Rotate box, and we found that even in macOS Sierra, System Preferences could be forced to offer a Rotate option even if it didn't do so automatically. By holding down Alt and Cmd while clicking the System Preferences icon, and then continuing to hold it while clicking the Displays icon, you may see a rotation option that wasn't there before. (Some people report that simply holding Alt + Cmd while opening Displays can do the trick, but we found that you need to do this while opening System Preferences, too. Your mileage may vary.)
Keep in mind that when we used this override to make the Rotation option appear for the laptop's built-in screen (which we'll cover later in this article), we ran into difficulties and wonder if the Alt + Cmd System override causes preferences for presenting the option. which is not officially supported by the hardware.

How to Rotate a MacBook's Built-in Display
As noted above, laptops, or at least MacBooks, generally don't offer the ability to rotate their built-in screens. You can try to get around this by holding Alt + Cmd, opening System Preferences > Displays, and then selecting new parameter turn that has now appeared.
But there is a warning here.
Some people have found that although screen rotation on a MacBook can be achieved by holding Alt and Cmd while selecting displays in System Preferences, this causes serious problems later on.
My rotated MacBook screen turned black!
The author's brother did this, but then discovered that his MacBook (a 2016 12-inch model running macOS Sierra) became completely unusable: "It gets stuck on screens crashing and freezes... I can't see anything on the screen, so I can't go into System Preferences to change it back, then it crashes. "
We tried to reproduce the problem on our workhorse MacBook Pro(2015 13-inch model running macOS Sierra and 2nd external monitor, connected and set as the main display), and got a different, but also problematic result: the laptop screen completely disappeared. black, and the Displays section of System Preferences (when viewed through an external monitor) no longer recognizes the presence of a laptop screen, even if the laptop itself is still running.
This issue has been reported elsewhere, as have some workarounds; Most users find that turning off the laptop and restarting it solves the problem and keeps the laptop screen in the desired direction. The author of the above linked thread found that pressing Shift + Cmd + Q and then E to return to the login screen has a similar effect. We tried this and it actually solved our problem, leaving us with a regular external monitor and the laptop's built-in monitor rotated 90 degrees.

Holding Alt+Cmd while going to System Preferences > Displays and then changing the Rotation setting for the built-in screen back to Standard got us back to square one, without repeating the black screen issue.
So this solution seems good, but apparently it's too late for the author's brother, who is serving Apple support could not help over the phone and who had to make an appointment to see a specialist in person. And so at this time we advise caution when turning built-in MacBook screens I do not recommend this for those who are not confident in their ability to solve problems that arise. We do wonder if the Alt-Cmd override trick really allows us to access features that are not officially supported by the hardware and is thus a bad idea.
How to rotate a Mac monitor mount so it doesn't break or become overweight
Be careful with the display when rotating it. It is important to ensure that it will not be overloaded and that a different orientation is not likely to place undue stress on the mount - not all displays and not all mount mounts are designed to handle this kind of rotation. When in doubt, check the documentation online.
If the mounting mechanism is not up to the job, you may need to consider a new monitor. For our detailed buying advice in this direction, see Best screens monitors for Mac.
Click right click mouse on the desktop and select “Screen Resolution” or “Display Settings” (depending on the version of Windows installed on your computer).
- If you are using Windows XP this will not work. Skip to step 5 of this section.
In the window that opens (at the bottom of it), find the “Orientation” menu. By default, Landscape is selected in the menu. Most video cards allow you to rotate the screen using this menu.
- If this menu is grayed out, you have a problem with your graphics card drivers or your computer manufacturer has disabled the screen rotation feature. In this case, go to step 4.
Open the menu and select the desired orientation.
- "Landscape". This is the default orientation.
- "Portrait". Rotate the screen 90° to the right. This will move the right edge of the image to the bottom of the monitor.
- "Landscape (reversed)." Flips the screen upside down. Wherein top part The image will move to the bottom of the monitor.
- “Portrait (inverted).” Rotate the screen 90° to the left. This will move the left edge of the image to the bottom of the monitor.
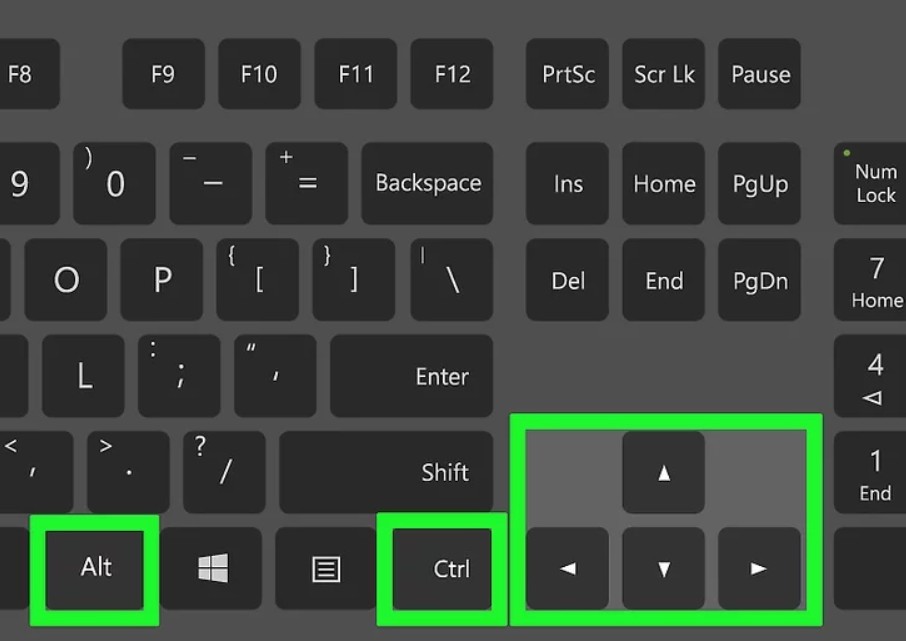
Keyboard shortcuts. Some video cards support keyboard shortcuts for rotating the screen. The following keyboard shortcuts work with built-in graphics Intel cards. If you have discrete video card NVIDIA or AMD, then the given keyboard shortcuts most likely will not work.
- Ctrl+Alt+ ↓ - turn the screen upside down.
- Ctrl+Alt+ → - rotate the screen 90° to the right.
- Ctrl+Alt+ ← - rotate the screen 90° to the left.
- Ctrl + Alt + - return the default screen orientation (landscape).
Check your video card settings. NVIDIA, AMD and Intel companies allow you to change the settings of their video cards through special utilities. Such utilities can be accessed through the menu that opens when you right-click on the desktop, or through the Start menu, or through the Windows Control Panel.
- Look for the Rotation or Orientation option. In NVIDIA Utility, find the Screen Rotation option (in the menu on the left). In AMD's utility (called Catalyst Control Center), under Desktop Settings, find the Rotation menu. IN Intel utility In the “Monitor Settings” menu, find the “Rotation” section.
Create a keyboard shortcut to rotate the screen. If you are using an AMD or ATI graphics card, the Catalyst Control Center utility will allow you to create a rotation key combination.
- Right-click on your desktop and select Catalyst Control Center.
- Click "Settings" and select "Hot Keys".
- From the drop-down menu, select "Manage Desktop" and set the keyboard shortcut you want to use for the different rotation options. It makes sense to choose the combinations given in step 4 since they are not typically used for any other functions.
- Don't forget to check the box for the specified keyboard shortcut to take effect.
Update your drivers if there are no other options. If the keyboard shortcuts don't work and there are no screen rotation options in your graphics card configuration utilities, update your graphics card drivers. Download the latest drivers from your video card manufacturer's server rather than through Windows Update.
- Utilities for AMD cards and NVIDIA automatically detect and download the latest drivers. Or you can find latest versions drivers on the website of your video card manufacturer.
- If you don't know your video card model, click ⊞ Win + R and enter dxdiag. Go to the Monitor tab to find out the model and manufacturer of your video card.
I can imagine the situation - you turn on the computer, it loads and the image on the monitor takes on the wrong orientation. What to do? Panic! We urgently need to fix it and turn the screen on the computer to its normal position. And it doesn’t matter why this incident happened - someone’s “bad” joke or you turned it around yourself.
All described methods are applicable to computers based on OS Windows (7, 8, 8.1, 10) and are arranged in order: from simple to complex. Let's not waste any time and let's get started.
Flip your computer/laptop screen using hotkeys
The most in a simple way return the image position back - use a hotkey combination.
Select the required combination on the keyboard depending on the current screen position:
- The screen is rotated 90 degrees to the left - Ctrl + Alt + right arrow;
- Screen rotated 90 degrees to the right - Ctr + Alt + left arrow;
- The screen is rotated 180 degrees (upside down) - Ctrl + Alt + downward arrow.
The keys must be pressed simultaneously, otherwise nothing will work.
Try the combination Ctrl keys+ Alt + F8 - This will return the graphics settings to Default.
Did it help? Bookmark this page (just in case) and you can continue working. If everything remains in place, we try the next method.
Flip the image through the screen parameters.
While digging through the settings, you could accidentally change the screen orientation from landscape, to portrait, or portrait, thereby flipping the image. Now the task is to return everything back.
1. On an empty space on the desktop, right-click. IN context menu select Display Options.

2. You will end up in Windows settings, section "Display". Find the "Orientation" item, select "Landscape" and save the changes.

All of the above steps were performed on Windows 10. The only difference from younger versions is the design of the settings window. Don't be alarmed if the window design from the screenshots doesn't match yours.
Rotate the screen back through the graphics settings
If all the described methods do not help and the failure occurs on program level, you can try to rotate the screen through the settings graphics adapter. The sequence of actions will depend on your device and the model of the installed video card.
Let's decide on the type of graphics adapter:
- Intel Graphics – for Laptops and personal computers without discrete video card;
- Nvidia graphics – for PCs with an installed video card from this company, as well as laptops with the specified video adapter and a connected external display;
- AMD Graphics - for PCs with GPU from AMD and laptops with an external display connected.
Intel Graphics Options
This method is mainly suitable for owners of mobile PCs - laptops and netbooks, since the display operates on the basis of graphics integrated into the device’s processor. Title and appearance The settings window may vary depending on the processor model.
1. On an empty space on the desktop, right-click and in the context menu click “Graphics Options” - “Rotate” - and the required rotation angle.

2. If the specified item is missing, go to “Graphic characteristics”.

3. In the HD graphics control panel window, mark the required rotation angle.

Don't forget to apply the changes; you won't need to reboot your device.
Video cards from Nvidia and AMD
This method will help owners of personal computers and mobile PCs with an external monitor connected via the HDMI port. All operations will be carried out from the video card control panel and do not forget to update the drivers first.
- Right-click on an empty space on your desktop and, depending on your graphics card manufacturer, open “AMD VISION Engine Control Center” or “Nvidia Control Panel” from the context menu.
- In the menu, find the “Display” tab and open the “Rotate display” item.
- All that remains is to return your monitor to its normal position by selecting the required rotation angle.
Conclusion
In this manual, I described all available methods to solve the problem. If none of the described actions helped to flip the image, try using one of the restore points or scanning your device for viruses. Also, a banal driver update often helps.
Well, if the problem is solved, thank the author with a like and a comment, I will be pleased.
Rotating your computer screen allows you to view the monitor in 90-degree portrait mode or flip it upside down in landscape mode. This may be useful for reading documents or e-books or for installing monitors in hard-to-reach places.
Rotating the screen on Windows or Mac is usually very easy, but sometimes computer manufacturers make the process more complicated. To rotate your computer screen in Windows, you will need to go to the " Screen Options» and change settings "Orientation". In some cases, you can also use keyboard shortcuts or check your graphics card's control panel. To rotate your computer screen on a Mac, go to "displays in your system preferences" and change the "Rotation" field in the external display settings.
Quick Guide
- Right-click on the desktop.
- Click " Screen Options".
- Select menu Orientation.
- Select " Landscape" (upside down) or " Portrait"(inverted).
How to flip the screen on Windows

- Landscape. This is a standard option on standard monitors.
- Book. This will rotate the display 90° to the right, so that the right edge of the monitor now becomes the bottom of the display.
- Landscape (inverted)- this will flip your screen upside down so that the top edge of the monitor is now the bottom edge.
- Portrait (inverted)- this will rotate the display 90° opposite, so that the left edge becomes the bottom of the display.
How to Flip the Screen Using Keyboard Shortcuts (Intel).
Some graphics adapters support hotkeys for changing the display orientation. You can use these keyboard shortcuts to quickly switch between orientation modes. These combinations will most likely work if you are using integrated graphics Intel adapter. For many users of Nvidia or AMD cards, these hotkeys do not work.
- Ctrl + Alt + ↓ - Flip the screen upside down.
- Ctrl + Alt + → - Rotate the screen 90° to the right.
- Ctrl + Alt + ← - Rotate the screen 90° to the left.
- Ctrl + Alt + - Return the screen to standard landscape orientation.
Using the video card control panel.
Nvidia, AMD, and Intel graphics adapters usually install a Control Panel that allows you to configure the graphics adapters. You can usually access this control panel from the menu that appears when you right-click on the desktop, but you may have to find it in the Start menu or Windows Control Panel.


Create your own hotkeys for screen rotation (AMD).
If you are using a video card AMD or ATI software Catalyst Control Center allows you to create shortcut keys to rotate the screen.
- Right-click on your desktop and select Catalyst Control Center.
- Click the Settings button and select Hotkeys.
- Select "Display Manager" from the drop-down menu and then set the keyboard shortcuts you want to use for the different rotation options. The shortcut keys in step 4 are not typically used for other functions, making them a good choice.
- Be sure to check the boxes to enable the new hotkeys.
Update your video card drivers if you don't have screen rotation options.
If you don't see any rotation options and the keyboard shortcuts don't work, you can enable this feature by updating your graphics card drivers. Be sure to download drivers directly from the manufacturer and not from Windows Update.

If more than one method does not work
The screen rotation feature may not work for everyone, depending on your hardware manufacturer. Most computers have this enabled, but your computer may not support screen rotation. Laptops are the most common victims of losing the ability to rotate the screen.
Open the Apple menu and select System Preferences. You can only rotate external displays, and the display must support rotations (not all). If you are using earlier versions of OS X, you can try to make the built-in display rotate, but this does not work in newer versions.

If force majeure has occurred and by some chance the screen has turned over or you need to turn it over for ease of use, then you should know How to flip the screen on a computer.
The methods depend on what operating system you have and what driver you have. Let's look at the most quick way- these are hotkeys.
How to flip the screen on a computer? Using hotkeys
Just need to press at the same time CTRL + ALT + arrows(to the right or to the left, look as necessary) - and use them to carry out the turn itself by as many degrees as you need. This method is also suitable for laptops with installed operating system Windows 8, Windows 10.
I think your question has already been resolved and if it’s not difficult, leave a comment at the bottom of the article, I will be grateful to you.
There is such a way - rotating the screen through the control panel
Actually, you need to go to “ ”, select “All control panel elements” - “Screen” - “Setting screen resolution”.
And in these settings, select the position that is required. Also in this window you can configure screen rotation for each of the available monitors, if there are two or more of them. It looks like this:

There is also a simplified version of rotation: press the right mouse button, hovering the cursor over an empty area of the screen and select “Screen resolution” in the pop-up menu, and then simply select the desired screen orientation.

How to flip the screen on a computer using a driver program
The proposed options provide commands for the Russified interface of all programs. In any case, if you are unable to flip the screen through the driver, you can do as shown above. There will be no difference in the result.

- ATI (instructions without screenshots) - in the driver menu, select “General display tasks” - “Rotate desktop”. The program will offer rotation options in the form of arrows or as an image of the screen in a changed position.
Rotate the screen using Intel graphics
The key combination that also works for this graphics adapter is: Ctrl + Alt + arrows. Or right-click anywhere on the desktop, then select “Graphics characteristics”.
Or, next to the minimize screen button in the tray, click the Intel icon, then select “Graphics characteristics”. In the main mode menu, select “Basic settings” - “Rotate” - “Rotate to normal view”. And everything is ready.

There is an easier way: after clicking Intel, simply select “Graphics Options” - “Rotate”.

on Mac OS X
For OS X older versions, it works like this: in the “Display” control panel menu, in the list of connected displays, select external, and in the menu that appears, select “Rotation” and from the proposed one click on the desired position: 90 0, 180 0, 270 0.
Then you need to disable the Screen Mirroring feature (if necessary). This is done simply - at the bottom, on the left, you need to check the box next to this function and that’s it, then - Apply.

For MacBook or iMac OS X 10.9 and earlier, you must close the System Preferences window while holding open menu“Display” and turn it there.
The order of the revolution is as follows: Apple menu - “System Preferences” - simultaneously press the ⌘ Cmd + ⌥ Opt and “Display” keys. In the proposed menu, select the screen position.
Carefully! For OS X 10.10, this method is not suitable, and when used, serious failures may occur.
Bottom line
We looked at the main ways to flip the screen on a computer with the most common software applications and systems. As you can see, the principle is the same almost everywhere, however, these settings are different systems hidden in different places.
P.S. If you have anything to add or say, be sure to write in the comments, with respect, Vladislav Nikitin.


