Zip is a popular data archiving format that supports data compression without any loss. Archiving a file actually reduces its size and thus makes it easier to transfer data over the network. If the files you transfer are stored confidential information, then enabling password protection on the ZIP file makes it more secure and reliable. So ZIP file is basically a well-known tool that is often used for compression large files and documents with a ZIP file extension. It's not limited to just folders and separate files(such as photos), but can also compress software files.
It is for this reason that most software products available in ZIP file extension. The widespread use of this tool requires serious protection, otherwise, much of the information compressed in the ZIP archive may fall into the wrong hands.
For security purposes, people always store sensitive data in encrypted archived files before sending it to other users.
So how do you pack files or folders into an archive? Which software Is it best to use for compression?
Below are three simple ways help with solving this problem:
Option 1. Create an encrypted Zip file using WinZip.
Option 2. Create a password protected Zip file using WinRAR.
Option 3. Create a password protected Zip file with 7-Zip.
Option 1: Create an encrypted Zip file using WinZip
If you have WinZip installed on your computer, you need to do the following to encrypt zip files:
Step 1. Create an encrypted zip file. To do this, run the WinZip program.

Step 2. Click the Encrypt radio button in the Actions panel. Click the Options button that now appears in the Actions panel to set the encryption level.

Step 3. In the "File" panel, select and add files to Zip by clicking "Add to Zip".

Step 4. When the Encrypt dialog box opens, you must enter a password.

Step 5. In the Action panel, click Save as.

How to Add a Password to an Existing Zip File
Even if the file is already compressed (it can be zipped with built-in compressed tools Windows folders 10 or other tools), you can still encrypt data in an existing Zip file using WinZip. To do this you need to do the following:
Step 1. Using the right mouse button, click on the Zip file in the folder window.
Step 2. Select "WinZip" > "Add to Zip file...".

Select the “WinZip” tab, then “Add to Zip file...”
Step 3. Enable Encrypt. Enter your password when WinZip asks for it.

Step 4. Then click "OK" and save this setting.

Option 2: Create a Password Protected Zip File Using WinRAR
Make sure WinRAR is installed on your computer. If you don't have it, install it by going to the official website. Then use it to password protect the zip file in two ways as shown below.
Method 1: Setting a password when writing a file
Step 1. Using the right mouse button, click on the file/folder that you want to archive along with the password and select “Add to archive” from the context menu.

Step 2. In the "Archive name and parameters" dialog box, select the "General" tab, enter a name for the archive or use the default name, select "ZIP" in the "Archive format" section and click the "Set password" button.

Step 3. Enter your password, then enter it again to verify, and then click OK. Click OK again. It will then create a password protected ZIP archive in the location where the original file/folder is located. The password will extract or open the files in the ZIP archive.

Method 2: Password to protect an existing ZIP file
Step 1. Using the right mouse button, click on the existing ZIP file that you want to password protect and select “Open with WinRAR” from the context menu.

Step 2. In the WinRAR menu, go to “Tools” and click “Convert archives”.

Step 3. In the “Convert archives” dialog box, in the “Archive types” section, specify the location where the archive will be saved, and then click “Compression”.

Step 4. In the Set default compression options dialog box, select the General tab, select the ZIP format, and click Set password.

Step 5. Enter your password and return it for verification and click OK. Click OK again, click Yes when asked if you want to encrypt the converted archives and finally click OK.

Step 6. After the conversion is complete, close the dialog and WinRAR. Then the original ZIP file will be converted to a password protected ZIP file and you can delete the original ZIP file.

Option 3: Create a Password Protected Zip File with 7-Zip
7-Zip is the best free utility to compress files with open source code for Windows. Follow these simple steps to easily create a password-protected Zip file.
Step 1. Download the 7-Zip installer and install it. Go to www.7-zip.org, download 7-Zip installer. Launch it and install 7-Zip on your computer.

Step 2. Create a zipped file using 7-Zip (as in the screenshot below). Once the installation is complete, locate the file, multiple files, or single folder that you want to archive. Select one or more items, click right click mouse and select: “7-Zip” > “Add to archive”.

Step 3. Set a password for the archived file. In the "Archive format" option, select zip. In the Encryption section, enter the password in the first field, followed by the same password in the second password field. Then select the appropriate encryption method.

Step 4. Click "OK" to create the compressed archive. Now you will have new file with a zip file extension in the same folder as the file, files or folder you chose to compress in step three.

Add a file or folder to an existing ZIP file

Attention! If you have forgotten your password, you may not be able to access these files. To recover your password, you can use ZIP Password Refixer to recover the encrypted zip file.
How to Choose the Right Encryption Methods in 7-Zip
ZipCrypto is known to be relatively weak and cannot be expected to protect against access to specialized password recovery tools.

AES-256 is stronger encryption and is now only supported by 7-Zip, WinZip and some other ZIP archivers. If you have critical security requirements for important files, you should use AES encryption.
Video - How to put a password on an RAR, 7z, ZIP archive
Archivers are applications that allow reduce size any file without data loss. In addition to their main purpose, they allow you to set a password for the created archive. Let's look at how to do this in the most popular archivers.
Currently, WinRar is the most widespread and popular program for creating archived files. Allows compress information in format rar And zip. In addition to the fact that it has a huge number of settings, it also allows you to set passwords. It is worth noting that name encryption will only be available in rar format.
The first and most common way is:
If in context menu the above item is missing, you can simply run archiver and select it necessary files and folders. Press the button Add and repeat the above steps.
Another way to password protect one or all archives that will be created by the program in the future is to click key icon(bottom left) in the application interface. We set the necessary options and, if necessary, check the box “ use for all archives». 
Setting a password in 7-zip
The archiving process in this application is not much different from the previous one. You can archive using this application in formats zip And 7 z. More precisely, the program can work with a much larger number of formats, but it only allows you to set a password for these two.
The procedure is almost identical to the one described above:

We use WinZip
Now this application is used quite rarely, but nevertheless the program also allows you to archive data, but only in one single zip format.
An archive of files is created mainly to compress them and increase free space on the hard drive, but sometimes an archive is created because it is possible to set a password on it to protect information. This can be done with many archiver programs, but we will next look at how to set a password on WinRAR archive.
The program allows you to set a password for a WinRAR archive only at the time of creating the archive. But if the archive file is very large, the creation of which took quite a lot of time to compress the information, you can put a password on the rar archive without repacking it. We will look at how to do this at the end of the article.
To set a password for an archive using WinRAR, you need to open the archiver, find the files or folders to be archived, and click on the menu item "Add" or in Windows Explorer after right-clicking on the archived files, select the item in the menu "Add to archive…".
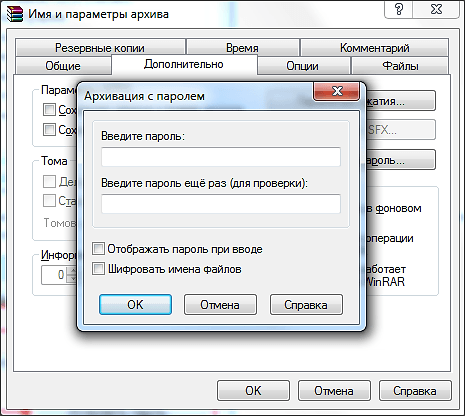
In the window that appears "Archive name and parameters" press the button at the bottom right "Set password…".
When entering a password, you can check the box "Display password as I type" to see the entered password instead of dots, and also enable the function "Encrypt file names", which will not allow you to read the file names in the archive before unpacking it.

After entering the password, click "Ok" in the previous window and the archive with the password will begin to be created. Now, when you try to open the archive, a window will appear asking you to enter a password.

Now let's see how to set a password for an existing archive. As mentioned earlier, the WinRAR archiver does not offer to set a password for an existing archive, so this archive must be re-archived with special parameters. You need to do the same as when setting a password when creating an archive, but in the window settings "Archive name and parameters" in the column "Compression method:" you need to install "Without compression". This will allow you to avoid wasting time on re-compressing the information, and the file will simply be rewritten with a password set on it.
In today's article I decided to show using a very convenient file manager Total Commander. Despite all the apparent complexity, you can set a password in just a few mouse clicks; for this you do not need deep computer knowledge.
Hello, my dear readers! I keep sharing with you useful tips and your own experience, which may be useful to you when creating and developing your website and just in everyday life.
In this article I will discuss in detail the method of setting a password for an archive in .zip or .rar formats. At the end of the article, I posted a video in which I discussed in detail how to set a password.
How to set a password for an archive
To set a password you will need Total program Commander, you can read about how to install it and how to use it to archive files and unpack archives.
Let's get started. Let's say you have a folder with a set of files that you need to protect with a password.
Open Total Commander so that in the first window there is a folder for archiving, in the second window we open a folder in which we will place the finished archive.

With the left mouse button, select the folder that you are going to archive and click the “Pack files” button.

In the window that opens, select the format in which the future archive will be saved. There is no fundamental difference in rar and zip archives, but you should remember that archives in zip format are opened by the standard built-in Windows archiver, while opening rar format requires an additional program. Keep this in mind if you are going to distribute a password-protected archive of materials to your subscribers.
After selecting the archive format, you must check the box next to the “Encrypt” line and click the “OK” button.

In the password entry window, you must enter the password you created. Attention! Be sure to write down your password!

After entering the password, click “OK” and in the next window, enter the password again.

Total Commander automatically creates an archive.

Now, if you try to open the archive, it will open unhindered, however, when you want to open any file located in the archive, the system will ask you for a password, and if you enter the wrong password, you will see a message something like this:

So, in the article we looked at the technical aspects how to set a password for an archive . I also recorded a video for you in which I once again showed the sequence of actions.
If you have any questions, ask them in the comments, I will be happy to answer! Also leave your feedback, was the information from this article useful to you?
Thanks for sharing the article on in social networks!
- Related Posts
Archiving is a great way to save disk space and also better organize your files. But, some files require additional protection. Therefore, many users are interested in how to set a password for an archive. If you are also interested in this question, then you have come to the right place. In this material you will learn how to put a password on an archive using such popular archivers as WinRAR and 7zip.
How to put a password on an archive using the WinRAR archiver
First, it should be noted that you can set a password for an archive only at the time of creating the archive itself. If you already have an archive for which you want to put a password, then you will have to.
And so, in order to put a password on the archive, right-click on the files that you want to add to the password-protected archive. After this, in the menu that opens, you need to select the “ ” item.
After you have selected the “Add to archive” menu item, a window will appear in front of you. Here you can configure all the parameters that are relevant to the archive being created.

In order to access the archive we create, you need to go to the “Advanced” tab and click on the “Set password” button.

After this, a small window will appear in front of you to enter your password. To avoid errors, the password must be entered twice, in the upper and lower fields.
If you do not want to enter your password twice, you can check the box next to “Display password as you type.” In this case, the lower field for entering the password will disappear, and the password itself will be displayed normally, and not in the form of dots as before.

Separately, we need to talk about the “Encrypt file names” function. This function hides your file names. If you do not enable this feature, your archive can be opened and the file names can be viewed. In this case, in order to open the files themselves or completely unzip the archive, you will need to enter a password. If you enable name encryption, the archive will be completely protected with a password. In this case, without entering the password, you won’t even be able to look at the names of the files. After entering the password and enabling (or not enabling) the encryption function, the small window with the password must be closed by clicking on the “Ok” button.


After this, the creation of an archive with the password you set will begin. The time it takes to create an archive depends on the performance of your computer and the size of the files being archived. After archiving is completed, the created archive will appear in the same folder as your source files.
How to put a password on an archive using the 7zip archiver
Another very popular archiver is the 7zip archiver. Unlike WinRAR, this archiver is completely free. In order to put a password on an archive using 7zip, you need to right-click on the files and select the menu item “7zip – Add to archive”.

After this, a window with archiving settings will open in front of you. In the 7zip program, the interface is much simpler and clearer. There are no tabs and all functions are located in one window. In order to put a password on the archive, you need to enter the password in two fields that are located under the inscription “Encryption”.

After we have entered the required password, we can change other archiving parameters. If you are satisfied with everything, then click on the “Ok” button.

After clicking the “Ok” button, the process of archiving your files will begin. As with WinRAR, this process may take some time, depending on the amount of data and the performance of your computer.


