But really, it is the desire to create a perfect artificial intelligence, be it a game model or mobile program, inspired many of us to become programmers. The problem is that behind tons of educational material and the harsh reality of customers, this very desire has been replaced by a simple desire for self-development. For those who have not yet begun to fulfill their childhood dream, here is a short guide to creating real artificial intelligence.
Stage 1. Disappointment
When we talk about creating even simple bots, our eyes fill with sparkle, and hundreds of ideas flash through our heads about what it should be able to do. However, when it comes to implementation, it turns out that the key to unraveling the actual behavior model is... mathematics. To be a little more specific, here is a list of its sections that need to be studied at least in the format of a university education:
-
Graph theory;
Theory of Probability and Mathematical Statistics.
Linear algebra;
This is the scientific springboard on which your further programming will be built. Without knowledge and understanding of this theory, all ideas will quickly break down due to interaction with a person, because artificial intelligence is actually nothing more than a set of formulas.
Stage 2. Acceptance
When the arrogance is a little knocked down by student literature, you can start learning languages. It’s not worth rushing to LISP or others yet; first you need to learn how to work with variables and single-valued states. Both for quick learning and further development is perfect, but in general you can use any language that has the appropriate libraries as a basis.
Stage 3. Development
Now let's move directly to the theory of AI. They can be roughly divided into 3 categories:
Weak AI - the bots we see in computer games, or simple assistants like Siri. They either perform highly specialized tasks or are an insignificant complex of such, and any unpredictability of interaction baffles them.
Strong AI are machines whose intelligence is comparable to the human brain. There are currently no real representatives of this class, but computers like Watson are very close to achieving this goal.
Perfect AI is the future, a machine brain that will surpass our capabilities. It is the dangers of such developments that Stephen Hawking, Elon Musk and the Terminator film franchise warn about.
Naturally, you should start with the simplest bots. To do this, remember the good old game “Tic Tac Toe” when using a 3x3 field and try to figure out for yourself the basic algorithms of actions: the probability of victory with error-free actions, the most successful places on the field to place a piece, the need to reduce the game to a draw, and so on.
As you understand even from the names, these are APIs that will allow you to create some semblance of serious AI without wasting time.

Stage 5. Work
Now that you have a clear idea of how to create AI and what to use, it’s time to bring your knowledge to new level. Firstly, this will require studying a discipline called “Machine Learning”. Secondly, you need to learn how to work with the appropriate libraries of the chosen programming language. For the Python we're looking at, these are Scikit-learn, NLTK, SciPy, PyBrain, and Nump. Thirdly, in development there is no way around
This week you could read an extremely motivating case from a GeekBrains student who studied the profession, where he talked about one of his goals that led to the profession - the desire to learn the principle of work and learn how to create gaming bots yourself.
But indeed, it was the desire to create perfect artificial intelligence, be it a game model or a mobile program, that pushed many of us onto the path of a programmer. The problem is that behind tons of educational material and the harsh reality of customers, this very desire has been replaced by a simple desire for self-development. For those who have not yet begun to fulfill their childhood dream, here is a short guide to creating real artificial intelligence.
Stage 1. Disappointment
When we talk about creating even simple bots, our eyes fill with sparkle, and hundreds of ideas flash through our heads about what it should be able to do. However, when it comes to implementation, it turns out that the key to unraveling the actual behavior pattern is mathematics. Yes, yes, artificial intelligence is much more complicated than writing application programs- knowledge about software design alone will not be enough for you.
Mathematics is the scientific springboard on which your further programming will be built. Without knowledge and understanding of this theory, all ideas will quickly break down due to interaction with a person, because artificial intelligence is actually nothing more than a set of formulas.
Stage 2. Acceptance
When the arrogance is a little knocked down by student literature, you can start practicing. It’s not worth rushing to LISP or others yet - first you should get comfortable with the principles of AI design. Python is perfect for both quick learning and further development - it is a language most often used for scientific purposes, for which you will find many libraries that will make your work easier.
Stage 3. Development
Now let's move directly to the theory of AI. They can be roughly divided into 3 categories:
- Weak AI – bots that we see in computer games, or simple assistants like Siri. They either perform highly specialized tasks or are an insignificant complex of such, and any unpredictability of interaction baffles them.
- Strong AI are machines whose intelligence is comparable to the human brain. There are currently no real representatives of this class, but computers like Watson are very close to achieving this goal.
- Perfect AI is the future, a machine brain that will surpass our capabilities. It is the dangers of such developments that Stephen Hawking, Elon Musk and the Terminator film franchise warn about.
Naturally, you should start with the simplest bots. To do this, remember the good old game “Tic Tac Toe” when using a 3x3 field and try to figure out for yourself the basic algorithms of actions: the probability of victory with error-free actions, the most successful places on the field to place a piece, the need to reduce the game to a draw, and so on.
Several dozen games and analyzing own actions, you will surely be able to isolate all the important aspects and rewrite them into machine code. If not, then keep thinking, and this link will be here just in case.
By the way, if you have finally taken up the Python language, then you can create a fairly simple bot by referring to this detailed manual. For other languages, such as C++ or Java, you won't have any trouble finding step-by-step materials. Once you feel that there is nothing supernatural behind the creation of AI, you can safely close your browser and begin personal experiments.
Stage 4. Excitement
Now that things have gotten off the ground, you probably want to create something more serious. The following resources will help you with this:
As you understand even from the names, these are APIs that will allow you to create some semblance of serious AI without wasting time.
Stage 5. Work
Now that you have a clear idea of how to create AI and what to use, it’s time to take your knowledge to the next level. Firstly, this will require studying a discipline called “Machine learning”. Secondly, you need to learn how to work with the appropriate libraries of the chosen programming language. For the Python we're looking at, these are Scikit-learn, NLTK, SciPy, PyBrain and Numpy. Thirdly, in development there is no way around . Well, and most importantly, you can now read literature about AI with a full understanding of the matter:
- Artificial Intelligence for Games, Ian Millington;
- Game Programming Patterns, Robert Naystorm;
- AI Algorithms, Data Structures, and Idioms in Prolog, Lisp, and Java, George Luger, William Stubfield;
- Computational Cognitive Neuroscience, Randall O'Reilly, Yuko Munakata;
- Artificial Intelligence: A Modern Approach, Stuart Russell, Peter Norvig.
And yes, all or almost all literature on this topic is presented in a foreign language, so if you want to create AI professionally, you need to improve your English technical level. However, this is relevant for any area of programming, isn’t it?
Neural networks are created and trained mainly on Python language. Therefore, it is very important to have a basic understanding of how to write programs in it. In this article I will briefly and clearly talk about the basic concepts of this language: variables, functions, classes and modules.
The material is intended for people unfamiliar with programming languages.
First you need to install Python. Then you need to install a convenient environment for writing programs in Python. The portal is dedicated to these two steps.
If everything is installed and configured, you can start.
Variables
Variable- a key concept in any programming language (and not only in them). The easiest way to think of a variable is as a box with a label. This box contains something (a number, a matrix, an object, ...) that is valuable to us.
For example, we want to create a variable x that should store the value 10. In Python, the code for creating this variable would look like this:

On the left we we announce a variable named x. This is equivalent to putting a name tag on the box. Next comes the equals sign and the number 10. The equals sign plays an unusual role here. It does not mean that "x equals 10". Equality in this case puts the number 10 in the box. To put it more correctly, we assign variable x is the number 10.
Now, in the code below we can access this variable and also perform various actions with it.
You can simply display the value of this variable on the screen:
X=10 print(x)
print(x) represents a function call. We will consider them further. The important thing now is that this function prints to the console what is located between the brackets. Between the brackets we have x. Previously, we assigned x the value 10. This is what 10 is printed in the console if you run the program above.
Various simple operations can be performed with variables that store numbers: addition, subtraction, multiplication, division and exponentiation.
X = 2 y = 3 # Addition z = x + y print(z) # 5 # Difference z = x - y print(z) # -1 # Product z = x * y print(z) # 6 # Division z = x / y print(z) # 0.66666... # Exponentiation z = x ** y print(z) # 8
In the code above, we first create two variables containing 2 and 3. Then we create a variable z that stores the result of the operation on x and y and prints the results to the console. This example clearly shows that a variable can change its value during program execution. So, our variable z changes its value as many as 5 times.
Functions
Sometimes it becomes necessary to perform the same actions over and over again. For example, in our project we often need to display 5 lines of text.
“This is a very important text!”
“This text cannot be read”
“The mistake in the top line was made on purpose”
"Hello and goodbye"
"End"
Our code will look like this:
X = 10 y = x + 8 - 2 print("This is a very important text!") print("This text cannot be read") print("The error in the top line was made on purpose") print("Hello and bye") print (“The End”) z = x + y print(“This is a very important text!”) print(“This text cannot be read”) print(“The mistake in the top line was made on purpose”) print(“Hello and bye”) print ("The End") test = z print("This is a very important text!") print("This text cannot be read") print("The mistake in the top line was made on purpose") print("Hello and bye") print(" End")
It all looks very redundant and inconvenient. In addition, there was an error in the second line. It can be fixed, but it will have to be fixed in three places at once. What if these five lines are called 1000 times in our project? And everything is in different places and files?
Especially for cases where you need to frequently execute the same commands, you can create functions in programming languages.
Function- a separate block of code that can be called by name.
A function is defined using the def keyword. This is followed by the name of the function, then parentheses and a colon. Next, you need to list, indented, the actions that will be performed when calling the function.
Def print_5_lines(): print("This is a very important text!") print("This text cannot be read") print("The error in the top line was made on purpose") print("Hello and bye") print("The End")
Now we have defined the print_5_lines() function. Now, if in our project we once again need to insert five lines, then we simply call our function. It will automatically perform all actions.
# Define the function def print_5_lines(): print("This is a very important text!") print("This text cannot be read") print("The error in the top line was intentional") print("Hello and bye") print(" End") # Our project code x = 10 y = x + 8 - 2 print_5_lines() z = x + y print_5_lines() test = z print_5_lines()
Convenient, isn't it? We have seriously improved the readability of the code. In addition, functions are also good because if you want to change some of the actions, then you just need to correct the function itself. This change will work in all places where your function is called. That is, we can correct the error in the second line of the output text (“no” > “no”) in the body of the function. The correct option will be automatically called in all places in our project.

Functions with parameters
It is certainly convenient to simply repeat several actions. But that is not all. Sometimes we want to pass some variable to our function. This way, the function can accept data and use it while executing commands.
The variables we pass to the function are called arguments.
Let's write a simple function that adds two numbers given to it and returns the result.
Def sum(a, b): result = a + b return result
The first line looks almost the same as regular functions. But between the brackets there are now two variables. This options functions. Our function has two parameters (that is, it takes two variables).
Parameters can be used inside a function just like regular variables. On the second line we create a variable result, which is equal to the sum of the parameters a and b. On the third line we return the value of the result variable.
Now, in further code we can write something like:
New = sum(2, 3) print(new)
We call the sum function and pass it two arguments in turn: 2 and 3. 2 becomes the value of variable a, and 3 becomes the value of variable b. Our function returns a value (the sum of 2 and 3) and we use it to create a new variable, new .
Remember. In the code above, the numbers 2 and 3 are the arguments to the sum function. And in the sum function itself, the variables a and b are parameters. In other words, the variables that we pass to a function when it is called are called arguments. But inside the function, these passed variables are called parameters. In fact, these are two names for the same thing, but they should not be confused.
Let's look at another example. Let's create a function square(a) that takes one number and squares it:
Def square(a): return a * a
Our function consists of just one line. It immediately returns the result of multiplying the parameter a by a .
I think you have already guessed that we also output data to the console using a function. This function is called print() and it prints the argument passed to it to the console: a number, a string, a variable.
Arrays
If a variable can be thought of as a box that stores something (not necessarily a number), then arrays can be thought of as bookshelves. They contain several variables at once. Here is an example of an array of three numbers and one string:
Array =
Here is an example when a variable does not contain a number, but some other object. In this case, our variable contains an array. Each array element is numbered. Let's try to display some element of the array:
Array = print(array)
In the console you will see the number 89. But why 89 and not 1? The thing is that in Python, as in many other programming languages, the numbering of arrays starts from 0. Therefore, array gives us second element of the array, not the first one. To call the first one, you had to write array .
Array size
Sometimes it is very useful to get the number of elements in an array. You can use the len() function for this. It will count the number of elements and return their number.
Array = print(len(array))
The console will display the number 4.
Conditions and cycles
By default, any program simply executes all commands in a row from top to bottom. But there are situations when we need to check some condition, and depending on whether it is true or not, perform different actions.
In addition, there is often a need to repeat almost the same sequence of commands many times.
In the first situation, conditions help, and in the second, cycles help.
Conditions
Conditions are needed to perform two different sets of actions depending on whether the statement being tested is true or false.

In Python, conditions can be written using the if: ... else: ... construct. Let us have some variable x = 10. If x is less than 10, then we want to divide x by 2. If x is greater than or equal to 10, then we want to create another new variable, which is equal to the sum of x and the number 100. This is what the code will look like:
X = 10 if(x< 10): x = x / 2 print(x) else: new = x + 100 print(new)
After creating the variable x, we begin writing our condition.
It all starts with the keyword if (translated from English as “if”). In parentheses we indicate the expression to be checked. In this case, we check whether our variable x is really less than 10. If it is really less than 10, then we divide it by 2 and print the result to the console.
Then comes keyword else , after which begins a block of actions that will be executed if the expression in parentheses after the if is false.
If it is greater than or equal to 10, then we create a new variable new, which is equal to x + 100 and also output it to the console.
Cycles
Loops are needed to repeat actions many times. Let's say we want to display a table of the squares of the first 10 natural numbers. It can be done like this.
Print("Square 1 is " + str(1**2)) print("Square 2 is " + str(2**2)) print("Square 3 is " + str(3**2)) print( "Square 4 is " + str(4**2)) print("Square 5 is " + str(5**2)) print("Square 6 is " + str(6**2)) print("Square 7 is " + str(7**2)) print("Square of 8 is " + str(8**2)) print("Square of 9 is " + str(9**2)) print("Square of 10 is " + str(10**2))
Don't be surprised by the fact that we add lines. "beginning of line" + "end" in Python simply means concatenating strings: "beginning of line end". In the same way above, we add the string “The square of x is equal to ” and the result of raising the number to the 2nd power, converted using the function str(x**2).
The code above looks very redundant. What if we need to print the squares of the first 100 numbers? We are tormented to withdraw...
It is for such cases that cycles exist. There are 2 types of loops in Python: while and for. Let's deal with them one by one.
The while loop repeats the necessary commands as long as the condition remains true.
X = 1 while x<= 100: print("Квадрат числа " + str(x) + " равен " + str(x**2)) x = x + 1
First we create a variable and assign the number 1 to it. Then we create a while loop and check if our x is less than (or equal to) 100. If less (or equal) then we perform two actions:
- Output the square x
- Increase x by 1
After the second command, the program returns to the condition. If the condition is true again, then we perform these two actions again. And so on until x becomes equal to 101. Then the condition will return false and the loop will no longer be executed.
The for loop is designed to iterate over arrays. Let's write the same example with the squares of the first hundred natural numbers, but through a for loop.
For x in range(1,101): print("The square of the number " + str(x) + " is " + str(x**2))
Let's look at the first line. We use the for keyword to create a loop. Next, we specify that we want to repeat certain actions for all x in the range from 1 to 100. The function range(1,101) creates an array of 100 numbers, starting from 1 and ending with 100.
Here's another example of iterating through an array using a for loop:
For i in : print(i * 2)
The code above outputs 4 numbers: 2, 20, 200 and 2000. Here you can clearly see how it takes each element of the array and performs a set of actions. Then it takes the next element and repeats the same set of actions. And so on until the elements in the array run out.
Classes and objects
In real life, we do not operate with variables or functions, but with objects. Pen, car, person, cat, dog, plane - objects. Now let's start looking at the cat in detail.
It has some parameters. These include coat color, eye color, and her nickname. But that is not all. In addition to the parameters, the cat can perform various actions: purr, hiss and scratch.
We have just schematically described all cats in general. Similar description of properties and actions some object (for example, a cat) in Python is called a class. A class is simply a set of variables and functions that describe an object.
It is important to understand the difference between a class and an object. Class - scheme, which describes the object. The object is her material embodiment. The class of a cat is a description of its properties and actions. The cat object is the real cat itself. There can be many different real cats - many cat objects. But there is only one class of cat. A good demonstration is the picture below:

Classes
To create a class (our cat's schema), you need to write the keyword class and then specify the name of this class:
Class Cat:
Next we need to list the actions of this class (cat actions). Actions, as you might have guessed, are functions defined within a class. Such functions within a class are usually called methods.
Method- a function defined inside a class.
We have already described the cat’s methods verbally above: purring, hissing, scratching. Now let's do it in Python.
# Cat class class Cat: # Purr def purr(self): print("Purrr!") # Hiss def hiss(self): print("Shhh!") # Scratch def scrabble(self): print("Scratch-scratch !")
It's that simple! We took and defined three ordinary functions, but only inside the class.
In order to deal with the incomprehensible self parameter, let’s add one more method to our cat. This method will call all three already created methods at once.
# Cat class class Cat: # Purr def purr(self): print("Purrr!") # Hiss def hiss(self): print("Shhh!") # Scratch def scrabble(self): print("Scratch-scratch !") # All together def all_in_one(self): self.purr() self.hiss() self.scrabble()
As you can see, the self parameter, required for any method, allows us to access methods and variables of the class itself! Without this argument, we would not be able to perform such actions.
Let's now set the properties of our cat (fur color, eye color, nickname). How to do it? In absolutely any class you can define the __init__() function. This function is always called when we create a real object of our class.
In the __init__() method highlighted above, we set our cat's variables. How do we do this? First, we pass 3 arguments to this method, which are responsible for the coat color, eye color and nickname. Then, we use the self parameter to immediately set our cat to the 3 attributes described above when creating an object.
What does this line mean?
Self.wool_color = wool_color
On the left side, we create an attribute for our cat called wool_color, and then we assign this attribute the value that is contained in the wool_color parameter that we passed to the __init__() function. As you can see, the line above is no different from normal variable creation. Only the prefix self indicates that this variable belongs to the Cat class.
Attribute- a variable that belongs to a class.
So, we have created a ready-made cat class. Here is his code:
# Cat class class Cat: # Actions to be performed when creating a "Cat" object def __init__(self, wool_color, eyes_color, name): self.wool_color = wool_color self.eyes_color = eyes_color self.name = name # Purr def purr( self): print("Purrr!") # Hiss def hiss(self): print("Shhh!") # Scratch def scrabble(self): print("Scratch-scratch!") # All together def all_in_one(self) : self.purr() self.hiss() self.scrabble()
Objects
We created a cat diagram. Now let's create a real cat object using this scheme:
My_cat = Cat("black", "green", "Zosya")
In the line above, we create a variable my_cat and then assign it an object of class Cat. This all looks like a call to some function Cat(...) . In fact, this is true. With this entry we call the __init__() method of the Cat class. The __init__() function in our class takes 4 arguments: the self class object itself, which does not need to be specified, as well as 3 more different arguments, which then become attributes of our cat.
So, using the line above we have created a real cat object. Our cat has the following attributes: black fur, green eyes and the nickname Zosya. Let's print these attributes to the console:
Print(my_cat.wool_color) print(my_cat.eyes_color) print(my_cat.name)
That is, we can access the attributes of an object by writing the name of the object, putting a dot and indicating the name of the desired attribute.
The cat's attributes can be changed. For example, let's change our cat's name:
My_cat.name = "Nyusha"
Now, if you display the cat’s name in the console again, you will see Nyusha instead of Zosia.
Let me remind you that our cat’s class allows her to perform certain actions. If we pet our Zosya/Nyusha, she will begin to purr:
My_cat.purr()
Executing this command will print the text “Purrr!” to the console. As you can see, accessing an object's methods is just as easy as accessing its attributes.
Modules
Any file with a .py extension is a module. Even the one in which you are working on this article. What are they needed for? For comfort. A lot of people create files with useful functions and classes. Other programmers connect these third-party modules and can use all the functions and classes defined in them, thereby simplifying their work.
For example, you don't need to waste time writing your own functions to work with matrices. It is enough to connect the numpy module and use its functions and classes.
At the moment, other Python programmers have written over 110,000 different modules. The numpy module mentioned above allows you to quickly and conveniently work with matrices and multidimensional arrays. The math module provides many methods for working with numbers: sines, cosines, converting degrees to radians, etc., etc....
Installing the module
Python is installed along with a standard set of modules. This set includes a very large number of modules that allow you to work with mathematics, web requests, read and write files and perform other necessary actions.
If you want to use a module that is not included in the standard set, you will need to install it. To install the module, open the command line (Win + R, then enter “cmd” in the field that appears) and enter the command into it:
Pip install [module_name]
The module installation process will begin. When it completes, you can safely use the installed module in your program.
Connecting and using the module
The third-party module is very easy to connect. You only need to write one short line of code:
Import [module_name]
For example, to import a module that allows you to work with mathematical functions, you need to write the following:
Import math
How to access a module function? You need to write the name of the module, then put a dot and write the name of the function/class. For example, factorial 10 is found like this:
Math.factorial(10)
That is, we turned to the factorial(a) function, which is defined inside the math module. This is convenient, because we don’t need to waste time and manually create a function that calculates the factorial of a number. You can connect the module and immediately perform the required action.
James Loy, Georgia Tech. A beginner's guide to creating your own neural network in Python.
Motivation: Based on personal experience in studying deep learning, I decided to create a neural network from scratch without a complex training library such as, for example, . I believe that for a beginning Data Scientist it is important to understand the internal structure of a neural network.
This article contains what I learned and hopefully it will be useful for you too! Other useful articles on the topic:
What is a neural network?
Most articles on neural networks draw parallels with the brain when describing them. It's easier for me to describe neural networks as a mathematical function that maps a given input to a desired output, without going into too much detail.
Neural networks consist of the following components:
- input layer, x
- arbitrary quantity hidden layers
- output layer, ŷ
- kit scales And displacements between each layer W And b
- choice activation functions for each hidden layer σ ; in this work we will use the Sigmoid activation function
The diagram below shows the architecture of a two-layer neural network (note that the input layer is usually excluded when counting the number of layers in a neural network).
Creating a Neural Network class in Python is simple:
Neural network training
Exit ŷ simple two-layer neural network:
In the above equation, the weights W and the bias b are the only variables that affect the output ŷ.
Naturally, the correct values for the weights and biases determine the accuracy of the predictions. The process of fine-tuning the weights and biases from the input data is known as neural network training.
Each iteration of the learning process consists of the following steps
- computing the predicted output ŷ, called forward propagation
- updating weights and biases, called backpropagation
The sequential graph below illustrates the process:
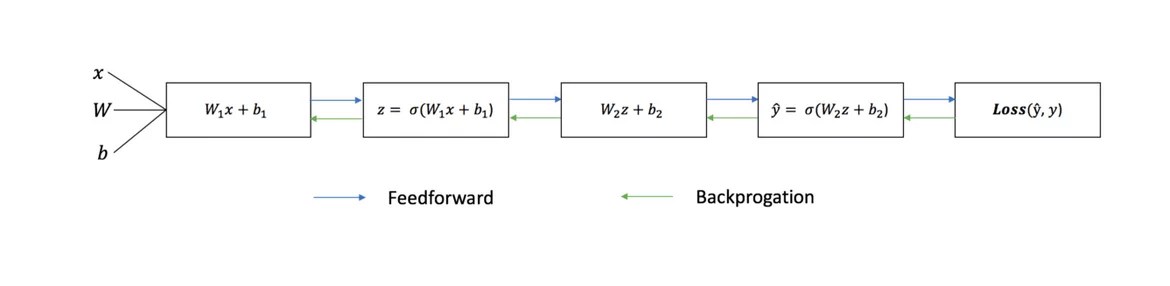
Direct distribution
As we saw in the graph above, forward propagation is just a simple calculation, and for a basic 2-layer neural network, the output of the neural network is given by:
Let's add a forward propagation function to our Python code to do this. Note that for simplicity, we have assumed offsets to be 0.
However, we need a way to assess the “goodness” of our forecasts, that is, how far off our forecasts are). Loss function just allows us to do this.
Loss function
There are many loss functions available, and the nature of our problem should dictate our choice of loss function. In this work we will use sum of squared errors as a loss function.

The sum of squared errors is the average of the difference between each predicted and actual value.
The learning goal is to find a set of weights and biases that minimizes the loss function.
Backpropagation
Now that we have measured the error in our forecast (loss), we need to find a way propagating the error back and update our weights and biases.
To know the appropriate amount to adjust the weights and biases, we need to know the derivative of the loss function with respect to the weights and biases.
Let us recall from the analysis that The derivative of a function is the slope of the function.

If we have a derivative, then we can simply update the weights and biases by increasing/decreasing them (see diagram above). It is called gradient descent.
However, we cannot directly calculate the derivative of the loss function with respect to weights and biases because the loss function equation does not contain weights and biases. So we need a chain rule to help with the calculation.

Phew! This was cumbersome, but it allowed us to get what we needed — the derivative (slope) of the loss function with respect to the weights. Now we can adjust the weights accordingly.
Let's add the backpropagation function to our Python code:
Checking the operation of the neural network
Now that we have our complete Python code to perform forward and back propagation, let's walk through our neural network with an example and see how it works.
 Ideal set of scales
 Our neural network must learn the ideal set of weights to represent this function.
Let's train the neural network for 1500 iterations and see what happens. Looking at the iteration loss plot below, we can clearly see that the loss monotonically decreases to a minimum. This is consistent with the gradient descent algorithm we discussed earlier.
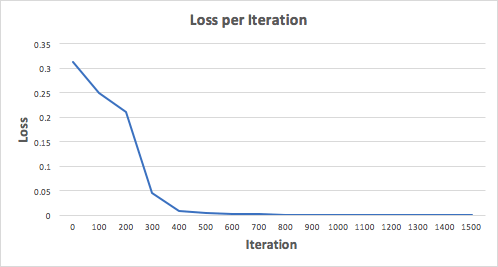
Let's look at the final prediction (output) from the neural network after 1500 iterations.

We did it! Our forward and backpropagation algorithm has shown that the neural network performs successfully, and the predictions converge on the true values.
Note that there is a slight difference between the predictions and the actual values. This is desirable because it prevents overfitting and allows the neural network to better generalize to unseen data.
Final Thoughts
I learned a lot in the process of writing my own neural network from scratch. While deep learning libraries like TensorFlow and Keras allow you to build deep networks without fully understanding the inner workings of a neural network, I find it helpful for aspiring Data Scientists to gain a deeper understanding of them.
I have invested a lot of my personal time in this work, and I hope that it will be useful to you!


