Did you buy your iPhone secondhand or just want to delete all your contacts before selling? Then you need to completely empty your phone book. How to delete contacts from iPhone and what is needed for this? Despite the fact that Apple specialists are doing everything possible to make life easier for users, some methods smack of serious labor and time costs. Let's figure out how to clear the phone book on iPhone 4s, 5s, 6s and other versions.
In order to delete all contacts from the iPhone, we can use the phone book functionality. And here a giant crutch created by Apple specialists will be waiting for us. In any other phone, we can go to the contact’s context menu and select “Delete”. The guys from Apple are clearly not looking for easy ways, so the button to delete the selected contact is very far away.
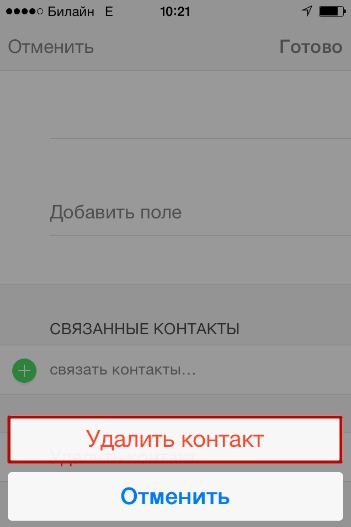
So, how to delete the selected contact? To do this, you need to go to the phone book, select desired contact and display information about this telephone recording. At the top of the menu that opens, find the “Edit” button and click it. We get to the next menu, go down to the very bottom, and only here we find the treasured red delete contact button. Agree, everything could be done much simpler.
Also alarming is the fact that we cannot select several contacts at once and send them to the trash as is done in the operating room Android system– here you can select all contacts with one touch. And one more touch will be needed to delete the entire phone book.
Bulk deletion of contacts
As you already understand, there are obvious problems with the good old manual deletion of contacts in iOS. Then how to delete all contacts at once on an iPhone? This is where we will find real freedom, since there are quite a few ways to delete contacts en masse.
The first method is to use the iTunes application:
- We launch the program;
- We connect the iPhone and wait until it is detected;
- Go to the device information section;
- Check the box “Sync Contacts”, and just below, in the “Advanced” section, check the box for deleting contacts;
- Click on the “Apply” button and confirm your intentions.
After a few seconds, all contacts will be deleted.
The next method is to synchronize contacts with an empty phone book. In this case we will need again iTunes app. We go to the same section with information and select synchronization with an empty contact book, for example, with Outlook that is not used on the computer. After synchronization starts, all contacts from the phone book on the iPhone will be deleted.
Don’t forget to check the “Contacts” checkbox on the “Advanced” (or “Advanced”) tab so that synchronization will delete all entries from the current phone book on your iPhone.
Another way is to disable contact synchronization with iCloud - go to the settings on your smartphone and disable contact synchronization. After this, iPhone will offer to delete existing contacts. You can similarly delete any other contacts from other accounts.
But the most drastic way is to completely erase all data using the reset function - go to the corresponding menu, select “Erase content and settings” and confirm your intentions. After this, not only contacts, but also all user data will disappear from the device..
The last method is the fastest - it allows you to quickly return the device to its original form, when there are no contact data and user files in it.
Removal using Jailbreak
You've done it on your own iPhone jailbreak? Then you have two more ways to delete contact information from your smartphone. The first method is to delete contacts by making changes to the device's file system. To do this, you need to download one of the file managers, install it on your computer and get into the file system - the phone book on the iPhone is stored at privatevarmobileLibraryAddressBook.
Next, we delete files with the *.sqlitedb extension and enjoy the empty phone book. The second method is to install third-party software on the iPhone to work with contacts. As we know, Initially, there is no ability to install programs from third-party sources. But if you have already carried out the Jailbreak procedure, then you get the opportunity to install the software from anywhere - find a program for working with contacts, install and run it, and then delete all or part of the contacts.
Remember that the Jailbreak procedure results in complete loss of warranty - you do this procedure at your own peril and risk.
A user who has just switched from Android to iPhone will probably be surprised at how complicated and confusing the procedure for deleting a number on an Apple device is. On an Android smartphone, you can simply open the contact’s context menu and press “ Delete" But no context menu, no delete key, which would be located in a visible place. The owner of the gadget will be forced to climb through the book of numbers to find the required button.
We will simplify the task for a novice user and tell you how to erase a contact directly on the iPhone. In addition, we will describe methods for mass deletion of numbers that require the use of special software.
Manual removal numbers involves performing the following actions:
Step 1. Go to the application " Contacts» on your iPhone and select the contact you want to delete.
Step 2. Click on the button Change" in the upper right corner of the screen.
Step 3. Scroll down the next screen to the bottom - there you will find the button " Delete contact».

That's what you need. Click on it.
Step 4. Confirm that you want to say goodbye to the contact - click " Delete contact" again.
This deletion method is suitable if you need to erase a single number. If you need to clear the directory completely, deleting contacts one by one will take a lot of time. To perform this task, it is better to use special software.
How to delete all contacts at once on iPhone?
There are several ways to clear the phone book on iPhone. The most famous involves using the iTunes media combiner. Here's what you need to do to delete all contacts:
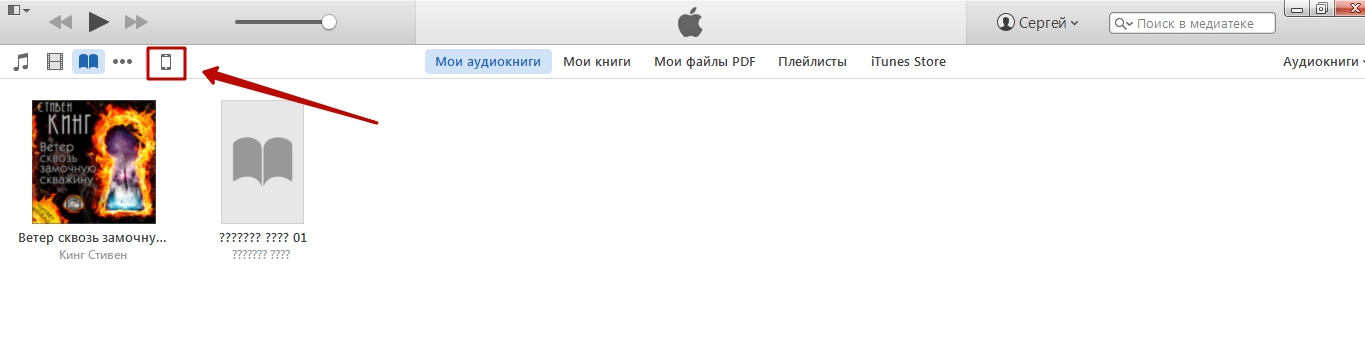
Step 1. Connect your device to your PC with a USB cable and open iTunes.
Step 2. Click on the button " iPhone».
Step 3. On the menu " Settings" Choose a section " Intelligence».

Step 4. Check the box next to " Sync contacts with" and in the drop-down menu select any option: " Windows Contacts" or " Outlook" Make sure that next to " All contacts" there is a period.

Step 5. Scroll down the page to the block " Add-ons" and check the box next to " Contacts».

Step 6. Start the synchronization process - click " Apply».

As synchronization progresses, iTunes will replace the contents of your phone books iPhone information stored on a computer. If there is no file of the appropriate format on the PC, it is obvious that the directory will be empty.
There are more quick way delete all contacts from iPhone – completely reset the device. To do this you need to follow the path " Settings» — « Basic» — « Reset" and select the option " Erase content and settings».

As a result, not only contacts, but also all user data will disappear from the device. It is better to perform a full reset procedure immediately before selling your iPhone.
How to quickly delete multiple contacts at once via iCloud?
If you need to delete several contacts at once (but not the entire phone book), you should turn to the iCloud cloud. For the method to work, you must log in with the same Apple ID on your PC and iPhone.
We will describe the entire procedure for deleting numbers via iCloud from beginning to end:
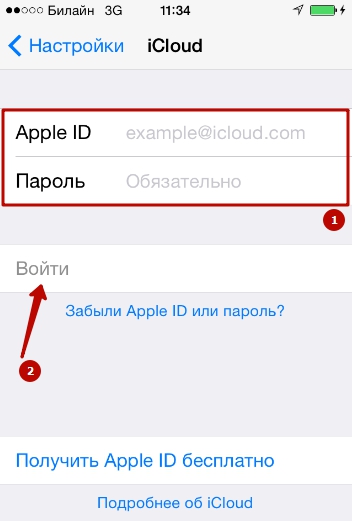
Step 1. IN " Settings» iPhone select section « iCloud».

Step 2. Enter your Apple ID and password in the appropriate fields. Then click " To come in».
Step 3. The iPhone will ask if you want to merge the information on your device with the data stored in iCloud. Select the option " Merge».
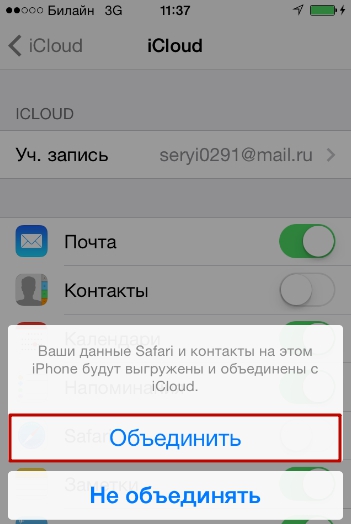
Step 3. Switch the toggle switch " Contacts» to the active state.

After this, you can put your iPhone aside.
Step 4. Go to www.icloud.com from your PC and enter your Apple ID/password.

Step 5. Hold CTRL on your keyboard and select the contacts you want to erase.

The selected contacts will appear in the list on right side screen.
Step 6. Click on the small gear in the lower left corner.
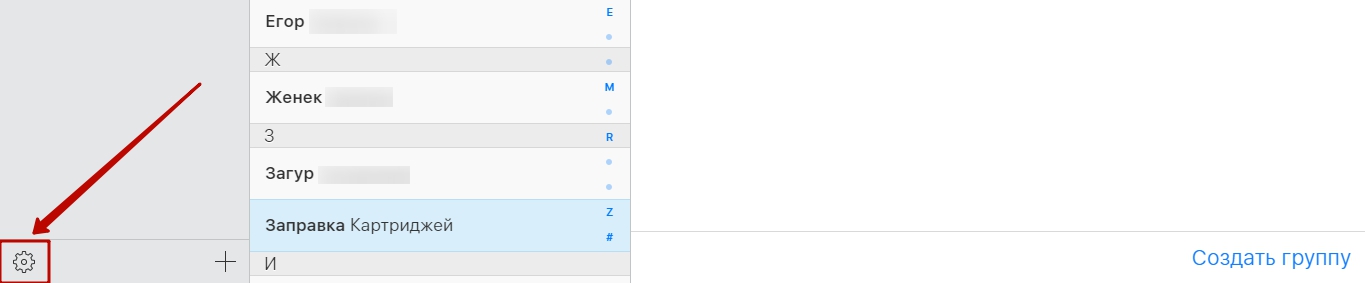
In the menu that appears, select the option “ Delete».

Step 7. Confirm that you really want to erase the number - click " Delete».

Wait a few seconds and you will see how the contacts you erased via iCloud will one by one disappear from your phone book.
How to delete numbers from a jailbroken iPhone?
The owner of a jailbroken iPhone has more options for deleting contacts from mobile device. For example, he can use a tweak called Erase Contacts. The tweak is available in the BigBoss repository and is distributed completely free of charge. After installing the application on iPhone screen the following icon appears:

Image: 2mobile.com
Just click on the Erase Contacts icon and confirm the operation - all contacts from the phone book will be deleted.
There is another way - connect the jailbroken device to your PC and erase contacts through one of file managers(say iTools or iFile). IN file system The telephone directory is stored at privatevarmobileLibraryAddressBook. If your iPhone is not jailbroken, this method will not work - in the “ User system"you just can't find the folder" Private».
Conclusion
There are many ways to delete contacts from an iPhone. It is necessary to choose a specific method based on the goal. If a user believes that a number of useless numbers are cluttering his phone book, he can erase several entries at once via iCloud. To delete one number, there is no need to contact iCloud - you can perform this operation directly on the device. If the user is preparing the gadget for sale and wants to erase all contacts, he will have to choose one of two options - use the iTunes media harvester or simply perform full reset gadget via " Settings».
Hi all! Even such a simple operation as deleting contacts from the phone book on the iPhone can still raise some questions and cause some difficulties. No, it’s quite easy to get rid of one number - it can be done standard means phone. Selected - deleted. Elementary!
But if you need to remove everything phone numbers straightaway? Or do a selective deletion (for example, remove 50 from 100)? Selecting and washing one at a time is very long, tedious, boring, and generally gets boring quickly. Is there a solution to this problem? Of course! In this article I will tell and show you how to do all these operations in almost two clicks!
Intrigued? Maybe there will be more :) Let's go!
Deleting one contact
It’s still worth starting with standard methods, so to speak, without wisdom. In fact, I won’t describe anything in particular; I’ll give fairly brief instructions.
Let's go to standard application“Contacts” and select any name.

In the upper right corner, click on change. Scroll the screen to the end and click delete.


That's all! Agree, it’s very simple. However, if you have notebook There are quite a few phone numbers, and you need to get rid of them all at once, then read on!
Erase the entire address book on iPhone
Entire contacts can be deleted by performing a full reset () - that is, erasing all content and settings. Yes, not only they will be “destroyed,” but absolutely all information. A rather radical way to solve the problem, but it has a right to exist.
If you still need to save the rest of the information, you will either have to select and “weed out” each phone number separately (a rather labor-intensive task), or use the method described below.
How to delete multiple contacts at once from iPhone?
Unfortunately, using standard methods You won't be able to do this on your phone (which, in my opinion, is quite strange). But we have a smartphone in our hands! This means you can expand its functions using a special application. In fact, there are quite a lot of programs that allow you to increase the functionality of the phone book (including deleting several selected contacts). One of them I can recommend is Groups.
Free program, which allows you to do almost all possible operations with the phone book on the iPhone. Including:
- Creating groups.
- Selecting contacts (for example, duplicates) and then deleting them.
- Sorts numbers in the phone book by various attributes (company, e-mail, address).
Important! After installation, you will be asked to provide the application with access to the phone book; of course, for correct operation, be sure to click “allow”.


I would like to note this point - all the methods for deleting contacts on an iPhone described in the article are suitable for any model. It doesn’t matter what you have in your hands – the “entry” iPhone 4(s), 5(s), 6(plus) or the “advanced” iPhone XS. These operations are valid for any of them.
Finally, a little advice, if the contacts are not deleted (or rather, they immediately reappear after erasing), this means that you have synchronization enabled (saving backup copies) in the cloud iCloud storage. What to do? You just need to turn off synchronization. Believe me, there is nothing complicated about it - (with pictures, blackjack and... everything you need)!
P.S.S. Questions? Clarifications? Personal experience? Feel free to write in the comments!
As you know, phone numbers that you write down in the iPhone are saved only in its memory and are not stored on the SIM card. To be honest, in our opinion, this is not entirely correct, but there is no way out. Therefore, in order not to lose contacts, you need them, for example, with Outlook.
If you just purchased, say, brand new iPhone 4S, then you will not find any contact entries in it, except for one standard one. It’s a completely different matter when you purchase a device second-hand, which certain time used. In this case, you will receive a phone that will contain the telephone numbers of the previous owner, and since you clearly have no use for them, you need to get rid of them. Theoretically, you can delete one contact at a time, but what to do if there are hundreds of them? Is there really no function that would allow you to immediately clean your phone? There is, but it is not as simple as it might seem at first glance. But let's not get ahead of ourselves and start in order.
Deleting individual phone numbers
- To do this, you need to go to the “Phone” section on your iPhone, select “Contacts”, find the desired contact and click on it.
- After this, you will see the details of the person whose number you want to delete. In the upper right corner there is a “Change” button - click on it, scroll down the page and click on the “Delete contact” button. Now you confirm the action and, voila, the number is no longer there.
Delete all contacts at once
If you decide to delete all phone numbers at once, then you will have to resort to a different way to solve this problem.
- To do this, launch iTunes, connect the phone to the computer using a cable.
- In iTunes, in the “Devices” section, select our gadget, then go to the “Information” tab.
- Here you need to synchronize contacts with the “Windows Contact Book” or Outlook (don’t forget to check the box next to the selected item!), select “All contacts” just below. An important detail - it is necessary that the program with which your iPhone will be synchronized is empty, because only in this case will the phone be cleared of numbers.
- Now we go down a little lower and in the “Replace the following information on this iPhone” field, check the box next to the “Contacts” item.
- Now click on the “Apply” button. We wait until the procedure is completed (it can take up to several minutes) and, voila, your phone is cleared of information you don’t need.
It is worth noting that this operation is available for owners of devices such as iPhone 2G, 3G, 3GS, 4, 4S and 5.
How to roll back iOS seven iPhone 4. Several rollback methods.
Rolling back iPhone four from iOS seven to iOS 7: two methods
The iOS seven operating system on the iPhone can only satisfy a user who is not demanding of his gadget. The system works slowly, the hardware operates at the limit of its modest capabilities, and, unfortunately, its capabilities do not have the resources to third party programs, games are often not enough. The result of running iOS seven on the iPhone is slowdowns, crashes, delays and other attributes of the new OS. At first, Apple allowed users to roll back to iOS, alas, then they closed the shop. However, as you may have guessed, loopholes still remain.

otkat ios seven na 6.1.3 iphone 4
iFaith - a reliable way to roll back your operating system
We will look at two ways that will allow you to roll back iOS to a lower level. The iFaith program would not be the first option. However, we must warn you in advance that for a successful result we will need not only this program, but also the saved SHSH blobs from iOS 6.1.3. For the process to be correct, we need:

- iPhone four with iOS 7. More modern models such as the fifth model, iPhone 4s, iPod are not iPad tablet, will not work with the iFaith program;
- The iFaith program itself. It is worth saying that oil like this only works on the Operating System. Therefore, manipulation of iOS seven occurs using a PC;
- Saved SHSH from iOS 6.1.3 or about 30 years ago;
- Properly saved data from iPhone four (use iCloud);
- iTunes version 11.0.5 is different below. Please first remove your current iTunes. Only then can you download old version programs. If the rollback from iOS seven to iOS six is successful, then iTunes can be updated again;
- Backup to iCloud not iTunes;
- Firmware iOS 6.1.3.
The important point is the fact that iTunes backups were not received backward compatibility. This can be understood in such a way that if a rollback is made to iOS 6, it will not be possible to restore the state of the iPhone from backup copy iOS 7. Those programs and games that are synchronized with iCloud (if activated, Notes, Calendar, Reminders) will be restored after flashing. Co third party applications Our client is left with a purely individual decision. It is recommended to transfer pictures and videos manually to your computer or save these files in the Dropbox cloud. Audio from the recorder too the best option Save it to your computer or send it to yourself by mail.
Detailed instructions for iFaith
Similar articles
First, we check what remains for our client to do, whether the steps described above are being followed. Pay special attention to saving data from iOS 7. Now, of course, connect the iPhone four to personal computer(preferably with a native cord or otherwise 100% working) cable. Let's break down the rollback of an iPhone with iOS seven into three steps for convenience. Whatever you need, let's go.
Step 1
Launch iFaith on the PC and do not press the “OK” button. If the oil flows through, it means that the iPhone four is connected correctly. Now we find a button with the English name “Show Available SHSH Caches on Server”. The program will ask you if you want to use the connected iPhone 4. To continue, click on the “Yes” button. Now they will offer three options - we need to select the third one in the list - “Show list of available SHSH blobs on TSS server".
Downgrade "rollback" of ios 9.3.5 to ios 6.1.3. iPhone 4s. 5, iPad two Step by step 100% works!
In this video question we will downgrade the firmware iPhone 4s, iPad 2, iPhone 5. or rollback ios 9.3.5 on ios 6.1.3 .
Similar articles
The program will show us all SHSH blobs from Cydia servers. If you have previously used iFaith with an iPhone four, then the saved SHSH blobs will also be available. We need to select the appropriate file to rollback from seven OS to 6.1.3. Select and wait for loading. Then the program will ask you to specify the folder where the file will be saved. Choose a desktop. The program will notify you when SHSH for six OS is downloaded. Click "OK". Next, we will be informed that the file verification has been successfully completed. Click “OK” again.
Step 2
After the last operation, iFaith will again ask if you want to use the connected iPhone. We refuse him and close the program. Open it again and click “OK” to continue. From the available tasks, select “Build signed IPSW w/ blobs”. Click “Browse for blobs” and find the saved SHSH blob file (we store it on the desktop). When the program accepts this file, click “OK”.
Select the option called “Browse for the IPSW” and indicate to iFaith the location where the previously downloaded iOS 6.1.3 firmware is located. If you have not downloaded the firmware before connecting the iPhone four, then you can entrust this to iFaith. The firmware is verified, and then the “Build IPSW” button should appear. We click on it.
Now you need to give the program time to complete the operations; the process will not take more than ten minutes. When the process is completed, the message “finished creating your custom “signed” IPSW” will appear. Remember the file name well and click “OK”. Rollback of seven OS is already near.
Step 3
In order for the rollback to continue, you must enter the iPhone four into DFU mode. To do this, turn off the iPhone four and press the “Start” button. Now all you have to do to roll back seven OS is follow the instructions on the screen. But there is a problem, the instructions are on English language. And if among our readers there are people who are not particularly familiar with this language, then they too will be able to roll back the gadget using our translation:
Prepare to press and hold the Home and Power buttons after five seconds;
Press and hold the Power and Home buttons for ten seconds, get ready to release the power button;
Release the “Power” button, but the “Home” button must be pressed for another thirty seconds.
After iFaith finds four iPhones in DFU mode, it will activate the iREB utility and say that your gadget has been successfully “pwned DFU” (translation you better not know). Click “OK” and “OK” again to exit the program. The rollback is almost complete, there are a couple of operations left with iTunes. The program will say that a new device has been detected in recovery mode. Click “OK” to continue.
To permanently roll back the seven firmware, hold down the “Shift” button and click on “Restore iPhone”. Indicate where the firmware created using iFaith is located. Hint: The file will contain the words "signed" and "iFaith" in its name. The rollback is complete. Now iTunes starts the process iPhone recovery four on iOS firmware 6.1.3. Wait for it to complete, say goodbye to seven OS and disconnect the gadget from your computer. Once everything is restored, you can set up your phone by following the prompts operating system . Everything is ready, the rollback is completed successfully.


