In some cases, when deleting an application, it may not be enough to simply throw it into the trash. To completely clean the computer and remove the program, additional manipulations are required. Multifunctional media player iTunes, also known as iTunes, is one of these non-standard applications.
-
Five reasons to delete iTunes
- The root cause that may prompt a user to remove iTunes is the incompatibility of the application with third-party products. Apple programs, as you know, are fundamentally not friendly with them. As a result, the media player takes a long time to load and freezes when playing and synchronizing audio and video files, or simply stops starting due to a system failure. The application also does not support the entire operating system - Windows XP. However, it is worth trying to update the product to a more new version: It is possible that this will solve the problem.
- Another reason to distrust iTunes is its interface, where there are too many points in which you can get confused at first. The user does not want to understand all the functionality of the program, and after fiddling with registration in the iTunes Store for some time, he decides to delete the player.
- The presence of a similar product from another manufacturer with a simpler and clearer menu is another reason for the user to choose not in favor of iTunes (even if the programs do not conflict with each other).
- There are a number of other methods besides iTunes to create copies and then restore your media library. This can be done using OS tools on your computer or using iCloud.
- Finally, you may need an earlier version of the player, which will require you to uninstall the current one.
How to completely remove a player from your computer with all components
Let's consider correct methods removing an application from a computer under Windows and Mac OS operating systems.
For Windows OS
There are two ways to uninstall iTunes on this operating system. First - take advantage standard means Windows. Let's break this procedure down into stages.
- First, you need to end some iTunes processes in the Task Manager. They can work in background every time you start operating system, and you don't have to open the application itself. Here is their list:
- AppleMobileDeviceHelper.exe;
- AppleMobileDeviceService.exe;
- iTunesHelper.exe.
- To stop their work, you need to call the “Task Manager” using the key combination Alt+Ctrl+Del. After that, go to the “Processes” tab and find one of the items listed above, for example, AppleMobileDeviceHelper.exe. By clicking on it right click mouse, select “End process tree” from the drop-down menu.
- Then you need to follow the path “Start” - “Control Panel” - “Programs and Features”. In addition to the application itself, you should remove other elements of it, and in a strictly defined sequence:
They are installed on your computer automatically and are needed to connect and iPhone sync, iPad and iPod Touch, as well as to update Apple products.
You should not restart the computer until all components have been removed or only partially removed. This can lead to unpredictable consequences.
Apple supportRemoving iTunes service files
On official page site by technical support Apple assures iTunes users:
In most cases, removal iTunes programs and related components from Control Panel will remove all support files related to those programs.
Apple supporthttps://support.apple.com/ru-ru/HT204275Nevertheless, some service folders and files remain on the computer. You will need to remove them manually. These are the folders:
- C:\Program Files\Common Files\Apple
- C:\Program Files\iTunes
- C:\Program Files\iPod
- C:\Program Files\QuickTime
- C:\Windows\System32\QuickTime
- C:\Windows\System32\QuickTimeVR
- C:\Users\"Username"\AppData\Local\Apple
- C:\Users\"Username"\AppData\Local\Apple Computer
- C:\Users\"Username"\AppData\Local\Apple Inc
- C:\Users\"Username"\AppData\Roaming\Apple
Cannot delete iPodService.exe file
In some cases, when you try to delete the iPod folder, a warning appears: “The file iPodService.exe cannot be deleted. The object is in use by another user or program." To solve this problem, you need to go to the “Task Manager”, in the “Processes” tab, select iPodService.exe and click on “End Process”.
Cleaning the registry
To completely clear your computer of remaining application entries, you need to check the registry.
- To access it, click Start, type regedit in the “Search programs and files” field and select this program from the search results.
Press Ctrl+F to open the search window, type iTunes in the appropriate field and press Enter.
The search result will show all entries associated with the application. Delete these entries by right-clicking and selecting Delete.
Alternative Methods to Uninstall iTunes
For faster and reliable removal applications, you can use third-party programs designed specifically for such purposes. Among them are, for example, CCleaner or Revo Unstaller. They allow you to uninstall other programs and clean up your computer's registry in just two steps. Let's look at this process using Revo Unistaller as an example.
Follow these step by step instructions:
- In the program settings, in the “Uninstaller” tab, check the “Force stop executable files during their uninstallation” checkbox. This will eliminate the need to go to the Task Manager.
- In the program, we remove iTunes and its components in order.
- In the next window, select “Scan Mode” – “Advanced”.
- After the program has scanned the remaining entries in the registry, mark all the items and click “Delete”.
- Next, the program scans the remaining files and folders - we also mark all the items and delete them.
For Mac OS
The first thing a Mac OS user will encounter when trying to remove a media player in the usual way, - inability to do this operation. You will receive the following error message.
This is due to the fact that iTunes is built into the operating system itself and is protected from deletion. However, there is a way to remove the application. What should be done?
- From the Finder menu, select Go, then Programs.
- Find iTunes in the list; Right-click on it and select “Properties”.
- In the window that appears, at the bottom right there is an icon with a yellow lock; Click on it and enter the administrator password in the appropriate fields to unlock the system program.
- At the bottom of the iTunes.app Object Properties window, find the heading " General access and access rights" and select "Read and write" - for each user, then close the window.
After this, you can move iTunes from the Applications folder to the trash.
Deleting an iTunes Library
Regardless of how you uninstall the application, a folder with your media library data remains on your computer. You can only remove it manually. Default The full path to this folder looks like this: C:\Users\"Username"\Music\iTunes. Accordingly, to get rid of it, simply transfer the folder to the Trash.
If you can't install a later version of iTunes
After installing one of the later versions, you may receive an error message.
To resolve this issue, go to the My Documents\My Music\iTunes folder and delete iTunes files Library.itl and iTunes Library.xml.
Lifehacks with iTunes
The folder for storing your audio and video files can be changed in the program settings. For this:
- From the iTunes menu, select "Edit - Preferences...".
- In the window that appears, go to the “Add-ons” tab.
- Below the "Location" window iTunes folders Media" click on the "Change..." button.
Then you can select your directory to store your media library.
What else can you do
Music purchased by the user from the iTunes Store is protected from conversion to other formats regular means. But this ban can be circumvented. There are three ways to do this.
First, you can set iTunes' built-in encoder to MP3 format.
- In the program menu, click “Edit” – “Settings...”.
- In the “Basic” tab, click “Import Settings...”.
 You need to go into import settings to import music
 - Next, select: “Importer” – “MP3 Encoder”, “Settings” – “Custom...”.
 Walk through specified path to get to custom music settings
 - In the window that appears, in the “Stereo bitrate” menu, select the required quality, for example, 320 kbps (the highest), then click “OK” to save all settings.
 Select the quality in which your music will be played
 - However, keep in mind that the songs in their original format are also saved in the library. In addition, previously purchased AAC songs cannot be converted.
Secondly, you can copy the song to a CD and re-record it to your computer, choosing any convenient format.
Thirdly, you can record the desired composition using third party program, such as Apowersoft Streaming Audio Recorder. To do this, you need to click on the corresponding sound recording button in the program itself and turn on the song in iTunes. As a result, you will have a new recorded sound, which you can later re-encode into any format.
Despite the apparent complexity, the iTunes removal procedure looks so only at first glance. In most cases, the problem encountered with the application can be resolved by downloading the latest update from the official website. But if you have clearly decided to deal with the program once and for all, and without leaving a trace, this article will help you carry out this operation competently, quickly and without harm to the computer.
Problems with iTunes can be different - sometimes errors occur when synchronizing information on devices, when downloading updates, and often due to service or system incompatibilities. There are many ways to fix errors that appear when using the famous media player from Apple, but the most effective is to completely remove iTunes from the computer and then perform a “clean” installation again.
Step-by-step process for complete removal
Built-in way
The “Delete or change a program” assistant built into the Windows 7-10 operating system (the name may not be very sonorous, but the main message and available functionality is immediately clear) deals with any software in about five to ten minutes.
Just call up “My Computer,” click on the shortcut marked in the screenshot, and you can safely completely clean out all Apple-related programs from the system, including uninstalling iTunes.
The method is easy and affordable - no additional steps, preparatory steps, settings or downloading of alternative software. Even beginners who have encountered both Windows and iTunes for the first time will not have any problems. It’s too obvious, each stage is intuitive, and the consequences are clear even without any hints. However, behind the simplicity, logic and conciseness there are also tiny, barely noticeable subtleties that can spoil the final result.
We are talking, of course, about how “superficially” the system tool “Delete or change a program” copes with the task - immediately after removal, the system remains and unnecessary files, and some non-working services, and even with documents and entries in the registry, it’s a complete mess.
About "deep" complete cleaning In such conditions, you can’t even dream of removing iTunes partially. After all, immediately after uninstallation, everything will have to be modified manually. And go into the registry, and check all directories, and part with already useless plug-in libraries with the *dll extension. And beginners definitely won’t be able to cope with such a set of mandatory actions.
Using third party programs
The best way to avoid all sorts of problems is to use third-party tools that significantly simplify the uninstallation process. Each user can choose which forces to turn to independently. But, if you give at least some advice, then the really ideal option is IObit Uninstaller. No advertising, a clear interface, total predictability of actions and help in solving several other problems:
- No need for orders and rules. On the official site Apple instructions iTunes removal takes up almost two pages. It is necessary, they say, to first deal with the Apple Software Update programs, then clean out the Apple Application Support files, and then Bonjour. Once the order is disrupted, some documents and catalogs will definitely remain in the system. Or, even worse, they will violate the procedure for removing other software. With IObit Uninstaller you don’t have to remember anything - everything will happen automatically and error-free. Well, if confusion does occur, then nothing will affect the result;
- Residual files. By the way, about the “garbage” accumulating in the system. The "Uninstall or change a program" tool leaves both unnecessary and empty folders, and does not touch the Program Files directory and is in no hurry to clear Temp. And you can’t even dream about “correcting” registry paths. You will have to fix everything manually, looking into each directory and dealing with a whole series of instructions for interacting with the registry. Why such difficulties if every operation can be made automatic?
And, since the advantages of IObit Uninstaller are visible to the naked eye, then the iTunes removal algorithm will be as follows:
- Download the tool from (all more or less current ones are supported Windows versions– modern “Ten” and long-unused “XP”), go through all the installation stages, and then launch the already installed program and go to the main menu;
- Immediately go to the search and enter the name “Apple”, filtering out unnecessary software and focusing on the most important thing;
- Check the box next to each product that appears in the list. And Apple Mobile Device Support, and Apple Software Update, and Bonjour. Agree to create a “Restore Point” (at least just in case - it’s difficult to immediately predict how this or that interaction with the system will end, and a suitable version for rollback is never superfluous), wait for the collection to complete necessary information, accept all conditions and proceed directly to uninstallation;
- If the entire preparatory stage has been completed correctly, all the boxes have been ticked, restore points have been created, and the correct principles of “deep” cleaning have been selected, then all that remains is to observe the events that take place. IObit Uninstaller automatic mode will delete unnecessary remains (files, documents, directories, empty folders, some duplicates, entries), clean the registry (the same Apple Software Update leaves more than 350 items in the system, and iTunes interacts with a whole collection of different information branches!), deal with scheduled tasks and turn off unused services;
- The procedure will take no more than five minutes, and, as a result, Apple products will disappear from every disk personal computer. The media library will remain in the system (if music, movies and videos are not synchronized with iCloud, Apple Music or App Store, namely from a PC) and backups, responsible for recovering information from iPhone, iPad or iPod. However, sometimes backups also rest in iCloud - it all depends on the choice of users;
- What you should take care of is the reboot. The last but important step will allow you to finally proceed with a “clean” installation iTunes updates or to use iTools, WALTR2 or other “substitutes” Apple media player, allowing you to interact with iOS.
Hi all! Now I will say one very banal thing - unused games and applications take up the precious memory of your iPhone, and to free it up, they must be deleted. Moreover, it would seem that such a simple process as erasing programs should not cause any difficulties. Clicked and deleted. This happens most often. But often does not mean all the time.
Sometimes, some program or toy refuses to be removed or other problems arise. That is why I have already prepared instructions (large and useful), which will teach you how to completely, completely and irrevocably delete programs and games downloaded to your iPhone or iPad, and will also tell you how to behave if something doesn’t work out. Let's go! :)
How to remove a program from iPhone and iPad
Here we have three methods - you are free to choose absolutely any one. The process for each of them is quite simple, so... I'll keep it short:
In fact, the simplest and quick way– this is of course the first. This is what is used in most cases. However, others also have the right to exist. For example, uninstalling a program through Settings allows you to control the amount of memory on your iPhone or iPad. Well, there’s no need to talk about using iTunes - many people work with their device exclusively using it, and it’s much more convenient for them to do it this way.
By the way, in my practice I met a person who persistently proved to me that it is possible to correctly remove programs and, in general, to fully work with Apple equipment only through iTunes. All the rest - complete error and stupidity. Thank God our communication was short-lived.
Is it possible to completely remove a program from an iPhone and how to do it?
As soon as you use any of the methods indicated above, you completely remove the program. However, it will still appear in the "purchases" section as a cloud with an arrow. Which means it is available for download at any time from under your account.

Unfortunately, you cannot completely remove applications from this list. Because it goes against the grain this list– allow the user to download applications without forcing him to pay for them again. However, they can be hidden and not shown in the list of previously downloaded ones.
How to Hide a Game or App from Purchases on iPhone or iPad
To do this, you will need to be connected to a computer and have iTunes installed.
Updated! Just recently Apple went crazy and now there is no App Store in iTunes on your computer. Just like that - they just took it and put it away. But we need him! What to do? Don't despair - I have it.
Have you downloaded and installed the “correct” version? Now let's get down to business:


That’s it, this way the application is completely “removed” from the device and is not visible in the purchase list. It turns out that it’s as if you never downloaded this program or game - it’s not on the device, and iCloud cloud it doesn't show up either. However, everything can be returned back.
How to display all programs in the shopping list
To display all those applications that we hid with you in the previous paragraph, we also need iTunes.
- Open iTunes and sign in with your Apple ID.
- Again, click on the name and select “Account Information” from the list.
- You may be asked to enter your password again - do so.
- In the window that opens, find the item “iTunes in the cloud.” Under it there will be an inscription - “Hidden purchases”, and on the right - “Manage”.
- You will see all hidden content. Just select the one you need and click “Show”.

But sometimes these manipulations are not enough for complete removal, because there is also information that accumulates during interaction with a program or game. Let's find out how to get rid of it...
How to delete all game data on iPhone and iPad?
As you progress through any game, so-called game progress, achievements and other merits that you earn in the process accumulate. And that's great. But sometimes you want to start the game “again”, without all these saves, but when you reinstall the game you have to start not from the beginning, but from the level you finished.
What to do in this case? How to erase everything and start from scratch? There are two solutions and it all depends on where this data is stored:

Only by clearing this data, we can say that the application or game has been completely removed from the iPhone or iPad. But sometimes problems arise...
Why are games and applications not deleted in iOS and what should I do?
It would seem that what could be difficult about deleting a program? But believe me, this happens...
Listed below are the most popular problems that a user may encounter, as well as their solutions:
- There is no cross on the application icon or there is no delete button (if the actions are performed through the settings). Solution! Most likely, restrictions have been set and deletion is blocked. You can remove them by going to Settings – Universal access – Restrictions – Uninstall programs.
- The game was deleted, but the empty icon from it remained and is not deleted in any way. Or the application is in standby and loading mode, and they cannot be deleted! Solution! Everything about such ailments is possible.
- You can delete, but not all applications - some do not have a cross. Solution! There are two possible options here: standard applications from herself Apple(, weather, calculator, etc.) it is impossible to delete them (with the advent of iOS 10 this opportunity became available). Or, these are programs downloaded when using jailbreak - some of them must be removed directly through Cydia (Cydia - Manage - Packages).
It would seem like a simple process - to delete a game or application, but I didn’t expect how voluminous the article turned out. Therefore, if you read it to the end, then it is worth noting this matter and praising yourself by giving it a “like”!
P.S. And of course, if you have any questions or something doesn’t work out, feel free to write in the comments. I'll try to answer everyone!
All owners mobile devices from Apple occasionally encounter problems when using . Not rare this program does not work correctly and produces various errors. To solve this problem, it is often recommended to completely remove iTunes from your computer and reinstall it from scratch.
But, complete removal iTunes is not such an easy task. The fact is that other Apple programs are installed along with iTunes and you need to remove them all separately. Now we will tell you how to completely remove iTunes computer under operating room control Windows systems 7 or Windows 10.
Step No. 1. Shut down the iTunes and Apple processes.
To ensure that nothing interferes with the removal of iTunes, it is advisable to start this procedure by completing the processes. To do this, you need to open the Task Manager (for example, by pressing CTRL-SHIFT-ESC) and go to the Processes tab (if you have Windows 7) or the Details tab (if you have Windows 10).
Next you need to study the list of running processes and complete everything related to the iTunes program or Apple products. Most likely, you will find processes such as AppleMobileDeviceHelper.exe, AppleMobileDeviceService.exe, iTunesHelper.exe, iPodService. Feel free to complete all these processes. To do this, right-click on the process and select “Finish” or “Cancel”.
More detailed information about processes that belong software Apple companies can be read.
Step No. 2. Remove iTunes through the Panel Windows management.
Once the process is complete, you can begin uninstalling iTunes. To do this, you need to open the Windows Control Panel. If you have Windows 7, then you can use Start to do this.

In Windows 10, everything is no longer so simple. Here you will need to press the combination Windows-R keys and execute the "control" command.

After opening the Control Panel, you need to go to the “Uninstall programs” section.

As a result, you should see a list of all installed programs. To quickly find all Apple programs, use search bar in the upper right corner of the window. Enter the query “Apple” and the system will show programs that relate to this company. Most likely, you will have 5 or 6 programs installed, these are: Apple Mobile Device Support, Apple Software Update, iTunes, Bonjour and Support Apple programs(or Apple Application Support).

In order to completely remove iTunes from your computer, you need to remove all these programs. This is done very simply, right-click on the program, select the “Uninstall” option and follow the installer’s instructions.

After completing the removal of one program, we move on to the next and so on until everything is deleted.
Step No. 3. Delete the files remaining after iTunes.
In order to completely remove iTunes from your computer, you need to additionally clean the folders from files that might remain there. To do this, manually open the following folders and check if there are any files there.
- C:\Program Files\Bonjour
- C:\Program Files\Common Files\Apple\Mobile Device Support
- C:\Program Files\Common Files\Apple\Apple Application Support
- C:\Program Files\Common Files\Apple\CoreFP
- C:\Program Files\iTunes\
- C:\Program Files\iPod\
- C:\Users\UserName\AppData\Local\Apple\
- C:\Users\UserName\AppData\Local\Apple Computer\
- C:\Users\UserName\AppData\Local\Apple Inc\
- C:\Users\Username\Music\iTunes (folder with iTunes library, if you want to keep the contents of the library, then delete this folder no need)
If we manage to find something, feel free to delete it. Once completed, restart your computer and you are done, you have completely removed iTunes from your computer.
AppStore abounds free applications: the user’s eyes literally run wild when he first enters this virtual store. The user installs fun applications one after another, without thinking about their usefulness, as well as what the memory clutter will lead to: the device will freeze. At the first “alarming symptoms,” the user already begins to think about how to remove applications from the iPhone before the need arises to reset the settings to factory settings. Fortunately, there are several removal methods - the owner of an Apple gadget has the right to choose which one suits him best.
Removing games and applications from the desktop (this method is also called 5-touch method) – simplest option. Follow these instructions:
Step 1. Click the button Home" to return to the desktop.
Step 2. Touch your finger to the icon of the application you would like to remove and hold for 2-3 seconds until all the icons begin to shake. After this you can remove your finger.
You will see that “crosses” have appeared in the upper left corners of the icons.
Step 3. Click on the “cross” - the iPhone will ask you to confirm the deletion operation and warn you that all data stored in the program will be erased.
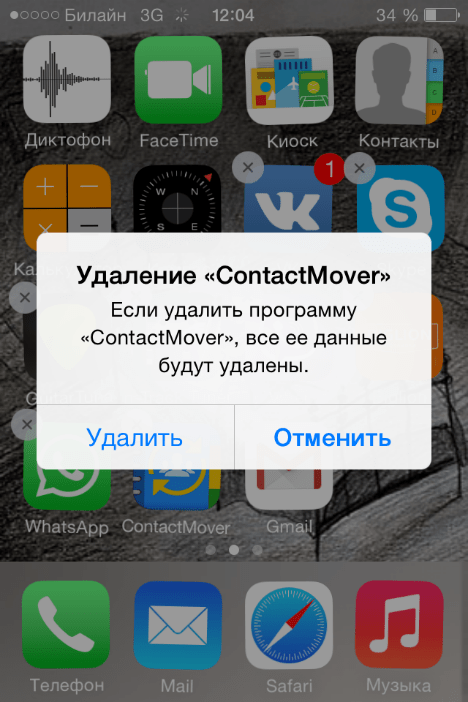
Step 4. Click " Delete", and the icon will disappear from the desktop - this means that the program has been removed from the iPhone.
Step 5. Click the button Home" again so that the icons stop shaking and you can fully use the gadget again.
Please note that the icons of built-in applications also “shake” when pressed for a long time, but the “cross” does not appear above them.
It is not possible to remove any stock apps from iPhone.
Remove unnecessary applications through “Settings”
Uninstall programs through the built-in application " Settings» is possible only from those gadgets on which it is installed iOS version above 5.0 (inclusive). This method is more informative - users can see how much memory a particular program takes up, and it is on this that they can base the decision on whether to delete it.
To completely remove a program via " Settings", proceed like this:
Step 1. Follow the path " Settings» — « Basic» — « Statistics", and you will see a list of programs installed on the gadget. Initially, only the most “significant” applications will be shown - if you want to view the full list, click on the “ Show all programs."
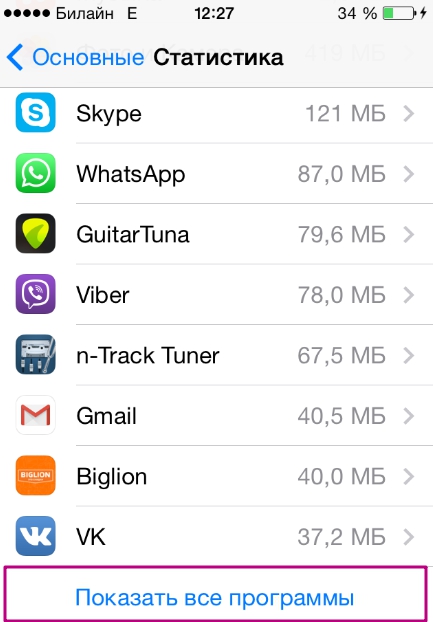
On the right you can see the weight of the application.
Step 2. Select the application you don’t need, click on its icon and on the next page click on the “ Remove a program" Then confirm the deletion in the window that appears.
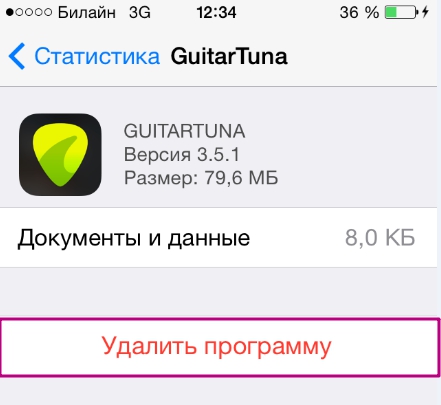
This completes the removal procedure.
How to completely remove applications via iTunes?
You can also erase apps from your iPhone using iTunes, even if this is not the most convenient and fastest way. You need to do this:
Step 1. Connect your gadget to your PC via USB cable or Wi-Fi and launch iTunes.
Step 2. Select your connected device in the sidebar on the left. If there is no panel, you can call it by pressing CTRL+S.

Step 3. On the device management screen, select the " Programs».

Step 4. You can delete it in one of two ways. First way: find unnecessary program in the list and click " Delete».

Second way: Scroll through your home screens, select the one with the unnecessary application, and double-click on the screen with the left mouse button. Then just click on the “cross” located above the unnecessary application.

Step 5. Click " Apply", and after synchronization the program will be deleted from the iPhone.
Applications are not uninstalled: what is the reason?
If, when pressed for a long time, the icons shake, but the cross does not appear in the upper corner, this means that the settings prohibit the removal of programs. You can remove this ban like this:
Step 1. Follow the path " Settings» — « Basic» — « Restrictions».
Step 2. Enter your security password (the same one that you always enter when unlocking your gadget). Be careful: there are only two attempts!

Step 3. Switch the toggle switch opposite " Uninstalling programs» to active position.

You can then uninstall apps as usual.
Owners of a jailbroken iPhone may also encounter problems when uninstalling programs from Cydia - often there is simply no “cross” on the icons. In this case, it is better to erase applications directly through an alternative store (path " Cydia» — « Manage» — « Packages»).
Is it possible to erase game data on iPhone?
Progress in games from the AppStore is tied to the account, so if the user wants to start the game over, he has two options:

It was after deleting the game data from iCloud the user can be sure that he has erased the application completely.
Conclusion
An important advantage available to owners of Apple equipment is that even after deleting from the iPhone, any application can be restored, because programs are not tied to specific device, and to the account in iTunes. Users of paid software do not need to worry about re-downloading remote application they won't have to pay again.


