How to install mods for GTA San Andreas?
I want to download a brand new car or buy a weapon, but you don’t know San Andreas? Using the proposed guide, you can easily make all the necessary changes to the game.
First you need to download the IMG Tool 2.0 program. Now let's decide how you can install mods for GTA San Andreas.
- We make copies of the “Data” and “Models” folders, which are located in the game directory. We save them in a safe place so that you can return to the starting position and try again if incorrect installation mods.
- For greater reliability, we install it manually using IMG Tool 2.0.
- Download an archive with a new car from the Internet. It contains 2 files in TXD and DFF formats, where the car is located.
How to install a mod on the Infernus car
- Unpack the archive with the files Infernus.DFF and Infernus.TXD into a folder.
- In the game directory, specify the path to the “Models” folder.
- Open GTA3.IMG with a list of models and textures used.
- We find the files Infernus.TXD and Infernus.DFF.
- We delete them by pressing RMB - “Delete”.
- We are installing a new car. In the “Commands” menu, select “ADD” (you can use the hotkeys CTRL+A).
- We indicate the path to the files unpacked from the archive where the new car is located.
- Using the “Shift” key, select both files at once.
- The mod is installed. The new machine is ready for use.
Some mods are unique in nature, that's how they were created. If you want to see the parameters of these mods during the game, then we will write the necessary data into the system files manually.
- We find in text files archive anything regarding changing files that are responsible for the type of wheels, color scheme or physical features of vehicles. Some of them look like this: carcols.dat, сarmods.dat, handling.cfg, vehcicles.ide.
- We open them with text editor. If under the phrase about the changes there is the name of the car and a digital code (for example, LANDSTAL 5000.0 3000.0 2.0 0.0 0.35), then copy this data and replace it with the same line in system files. If you opened the files using Notepad, then we perform the following operations:
- Cancel "Word Wrap".
- We follow the path “Menu” - “File” - “Open” - select the folder “ GTA San AndreasDATA." In the “All files” window mode, find the desired file and open it.
Now you know how to install mods for GTA San Andreas.
A mod is an add-on created by third-party developers or ordinary fans of the game. Such add-ons are especially popular among fans of the GTA series. With the help of a mod, the game world can be changed almost beyond recognition, changing absolutely everything, even the surrounding area. Therefore, if you have long been tired of the original GTA San Andres, but you do not want to part with it, try installing an add-on on it.
You will need:
- Installed on the computer GTA San Andreas.
- The modification itself that you want to install.
- IMGtool program.
Change Process
The downloaded mod is usually an archive. Unzip its contents to your desktop. You should be interested in two files having the permission .dff and .txd. It is these files that are responsible for the appearance of new weapons, skins, vehicles, etc. in the game.
To install the mod, just replace the original files in a certain game directory with the downloaded ones.
We will do this using IMGtool.
- Open the "File" menu.
- Specify the path where the “Models” folder is located in the game directory.
- Find "GTA3.IMG" and open it. You will see a list of files that are responsible for all the models and textures presented in the game.
- Sort everything alphabetically for easy searching (Tools => Sort => Name) or press F2 so you can enter a search term.
- Find the original recordings you want to replace. They have the same name as the files you extracted from the downloaded mod.
- Delete the original entries by highlighting them and clicking Delete.
- Copy the files from the mod in their place to install it. To do this, click the “ADD” line, which is located in the “Commands” menu, specify the path to the mod and add necessary files.
After completing the actions, you can close the program - all necessary changes to the game will be made automatically.
Important note: Save a copy of the MODELS catalog in another location. If something goes wrong while installing the mod, you can restore the game to its original appearance.

This utility allows you to clearly see what changes will appear after you install the mod.
Using this application, you can automatically change the physics of the car, its color, wheels, etc., as well as import vehicles and weapons from other games in the GTA series.
- Launch the program and click the "Installer" button.
- Then specify the location of the original game files, as described above.
- Open the “ReadMe” file, which is located in the folder with the modification files.
- Find the lines in it that indicate the parameters of the vehicle (Carcols, Handling, ide). Enter their values in the appropriate lines of the program.
- Click “Install” and try the new transport in action.
You all know that mods from our site are installed automatically. To add a mod to a site, it’s no longer enough to simply download an archive with instructions. However, we have tried to simplify the addition as much as possible. Now I will tell you what needs to be done for this.
Video instructions for adding modifications to the site from DEMON91052
In your custom menu(top right) two additional items now appear: Add a mod and My mods. On the page "My mods" There is a list of all the modifications you have previously added. Since you most likely have not added a single mod yet, I will talk about this point later. Now go to the Add a mod page.
Before you is the following picture:
On this page you generate data for the future mod installer. First you need to fill in basic information such as "Name", "Short description",
"Author's nickname" "author's email" "Author's website" "Converter", "Mark" "Model". You usually see all this data when you run the mod installer. Only the field is required to be filled in "Name", but try to fill in all fields. Don't forget to indicate the authors, after all, it is thanks to their work that we have these fashions. If you add a car mod, be sure to indicate it Mark And Model, so that the mod falls into the desired category of our File Catalog.
Next you need to select the version of the game ( Vice City, San Andreas, GTA 4) for which this mod is intended. After selecting the version, you can add the remaining data.
(As an example, I will add a car mod to GTA San Andreas - Pagani Huayra ver. 1.1. Look carefully at how I filled out the fields).

Choose Category, in which the mod will be placed (in my example, this is the category - GTA San Andreas Cars).
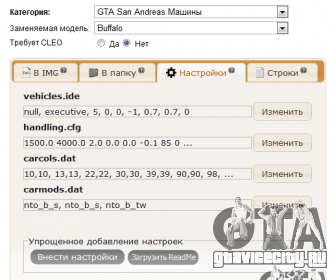
We also choose Replaceable model to replace which the author made this mod (in my example, the author defaulted to this model as a replacement - Buffalo). When you select a replacement model, the standard settings of the car from the game are automatically substituted in the Settings tab. Next I will show how we will change these settings. And we indicate whether the added mod uses the CLEO library. (In my example, the CLEO library is not required)
Below you have 4 tabs: To IMG, To Folder, Settings and Lines. Each tab has a tooltip that describes what it does. For a hint to appear, simply hover your mouse over the question mark next to the tab you are interested in.
In the first tab - In IMG- you must provide the installer with files that should be placed in any *.img archive. If this is not required, then you can leave nothing in this tab. To download files click on the button "Download files"(it may appear with a slight delay) and select the desired files. You can have several at once. After selecting the files on your computer, click the button "Open".
(Since I am adding a car mod, I need to upload the files of the added model to this tab: buffalo.dff and buffalo.txd)

The files you select will immediately begin to be uploaded to the server. If you change your mind, you can stop downloading by clicking on the “Cancel all downloads” button or you can remove any from the queue separate file by clicking on the cross next to it. For each file you must specify the path to the *.img archive. The path is relative to the game folder without a leading slash. When downloading, all files are assigned a *.img archive by default ( models\gta3.img for GTA SA,VC or pc\models\cdimages\vehicles.img for GTA IV). The default path can be changed by clicking on the pencil icon next to it.


Each already downloaded file can be edited or deleted. Therefore, at any time you can change the path to the *.img archive or the name of the added file.

For the mod that I am adding as an example, the author provided painting work. Accordingly, I also upload these paint jobs to the B IMG (these are four textures with paint jobs: buffalo1.txd, buffalo2.txd, buffalo3.txd, buffalo4.txd). This is what my completed tab looks like now In IMG:

If, when installing a mod, you need to add or replace some files in the game folder, then this can be done in the second tab - To a folder. Everything is the same as when adding to *.img, only the path must be specified not to the file, but to the folder to which we are copying. If you need to copy directly to the game folder (the root folder of the game, where the gta_sa.exe file is located), then leave the path empty. If you need to place the file in a subfolder, then specify the path to it (for example data, or CLEO, or common\data).
(I'm adding a regular car mod without support for the CLEO library or any other functions, so I'm skipping this tab because I have nothing to add to it)

On the third tab you need to enter various settings for transport:
- wheel size and frequency of appearance of cars - vehicles.ide;
- characteristics, control settings and behavior of the car - handling.cfg;
- transport color - carcols.dat;
- availability of tuning - carmods.dat (only for GTA SA).
When choosing Replacement model on this tab, the fields are automatically filled in with standard settings from the game. Standard settings are suitable for mods only in isolated cases, so do not forget to make your own settings for the added mod. Next I will tell you how to do this
For your convenience, we have come up with a simplified addition. If you have a regular mod, for example new model machine, you can quickly make settings by downloading the ReadMe file included with the mod. To do this, click on the button "Download ReadMe" in the block "Easy addition" and select this same ReadMe file. After it is loaded, the system will try to recognize the settings and enter them into the table.
Also, for your convenience, we have come up with another option for simplifying adding settings. Click on the "Add settings" button and you will see fields for making settings (I add Pagani Huayra ver. 1.1, which replaces the Buffalo in the game. To make new control settings, I fill out this tab):

Just copy here the lines that need to be replaced in these standard files, click on the button "OK" and they will be automatically added to the table.
And here are the new settings I made:

Adding the settings described in the previous tab is only suitable when adding a regular transport mod, i.e. new car, motorcycle, helicopter, etc. Of course, the majority of such mods are, but sometimes it is necessary to replace or add lines in files for more complex mods. This is what the last fourth tab is for - Lines. Here manual addition. Click on the button "Add" and you will see an adding form where you need to fill in the lines (file path, search type, phrase, new line), but more on that next time (I'm adding a regular car mod without any changes to other game files, so I'm skipping this tab because I have nothing to add to it).

After everything required parameters will be entered You must enter the code from the picture and you can press the button "Add mod." If everything is correct, a message indicating the successful addition of the mod will appear on the screen:

Next, let's move on to the list of your modifications. This is the My Mods item in the user menu.
On this page you can view the list of your modifications, download, edit, add screenshots and videos, and also delete any of your mods. You can edit and delete a modification until you submit it for publication (green arrow).

So, after generating the mod, we need to download it and check its functionality before publishing it, and also take screenshots of it in the game (we do not publish mods without screenshots on the site!).
(Lately we've been getting a lot of questions about how to take a screenshot from a game. That's why we post it detailed instructions:
How to take a screenshot of a game screen).
1. Click on the icon "Download"- marked with a red circle in the screenshot above - a new standard window will open for downloading files from our server.
2. Download the mod you just generated.
3. Install it into the game.
4. Find the installed mod in the game and check its functionality. In my case, this mod is a car; to quickly find it in the game I use a trainer: GTA San Andreas Crazy Trainer.
5. Take screenshots (at least 3 from different angles, preferably 5 or more). As I indicated above, it is very convenient to take screenshots in the game using Fraps.
6. Exit the game and go to the My Mods section on the website to add the screenshots you just took and send the file for publication.
Adding screenshots to the generated mod.
To go to the section Screenshot management- click on the camera icon - marked with a red circle in the screenshot below:

The page opens "Screenshot management". To upload screenshots, click on the button "Download files"(it may appear with a slight delay) and select the desired screenshots. You can have several at once. After selecting, click the button "Open" and they will start uploading to the server:

If during the process of uploading screenshots you uploaded an extra one or you simply did not like the uploaded screenshot, then you can always delete it by hovering the mouse cursor over it and clicking on the “cross” - the screenshot will be deleted immediately. You can also sort the screenshots in the order you need - just drag and drop the screenshot. The screenshot that comes first will be featured on home page site.
From this article you will learn how to install mods on cars, motorcycles and other vehicles for GTA San Andreas.
Step 2- open the archive, extract the modloader.asi file and the “modloader” folder into the folder with your game.
Step 3- create in the “modloader” folder new folder with any name (necessarily in English letters).

Step 4- download the archive with the transport of your choice (in this case, let it be ).
Step 5- open the archive, extract the files with the extension txd and dff to your folder.
To enable the mod directly in the game, you need to:
1. After loading the game, go to the pause menu, select “Settings”, “Mod Configuration”, “Modifications”.

2. In the list of installed modifications, you can disable/enable the mod you need.

Installation using Alci's IMG Editor
Step 1- download the program.
Step 2- open the archive and run the exe application.

Step 3- click File, Open and select the location of the gta3.img file
This disk image file contains all the skins, all the vehicles, various textures, etc. It is located in the folder models, in the game folder. This is where we need to throw new transport.

Step 4- download the archive with transport and extract the files to any location.

Step 5- click Actions - Import (remove it exists), and select the files that were recently extracted from the downloaded archive, click “open”.


Step 6- When exiting, the program will ask if you want to save the changes. Select "Yes".

Sometimes the files in the archive are named completely differently than the models in the game. In this case, it will help you GTA Garage Mod Manager (GGMM). This program allows you to visually see the fleet and through it you can find the original model to replace with a new one.
Installing GGMM:
Step 1- download the program.
Step 2- open the application and extract the folder to any location on your computer.
Step 3- copy and paste all the files in the unpacked folder into your game folder.
After installation, open the application, select the transport you need. On the left is the original file name (for example, landstal). Next, you just have to rename the downloaded car model to the original name (example: in the downloaded archive it was “Far.txd Far.dff”, after the renaming it became “landstal.txd landstal.dff”)

To quickly find the car you need in the game, I recommend using. To do this, press the keyboard shortcut Ctrl+Z, Then "Car Spawn" and choose the desired transport.

About handling
handling.cfg- this is a file that is responsible for the physics of all vehicles in the game. Often, modmakers can add not only models to the archive with a vehicle, but also change the settings of the vehicle itself, adding handling.cfg to the archive with the modification. In the game this file is located in the folder data. It can be opened through Notepad and through search (keyboard shortcut Ctrl+F) you need to find a line by the name of the car model and replace this line with the one given in the archive with the mod.
This line needs to be deleted (from the original file in the data folder):

This line (from the mod archive) needs to be copied and pasted in place of the deleted line in the original game:

Result:

If you want to know how to add cars without replacing the original ones, we recommend reading.
Change " appearance games" and create a more interesting gaming atmosphere. In the game you can replace: cars, skins, weapons, textures, objects and much more!
How to install mods in GTA San Andreas
- The game itself must be installed on your computer, preferably .
- In the folder with already installed game there is a models folder. We go into it, look for the gta3.img file and copy it to the desktop. If in the future you have problems with the game, simply return the above file back to the models folder and agree to a replacement.
- Download and run - a program for installing mods. If the program is initially installed English language, then it can be changed in the settings, to do this you need to click File -> Language -> and check the box next to Russian.
Let's start installing the mod:
In the program, select: File -> Open.

In the window that opens, go to to the folder with the installed game-> next to the models folder and select the gta3.img file -> click Open.


The message Files added should appear at the bottom left of the program.

Last step: click File -> Rebuild the archive.

In the window that opens, go to the models folder and select Save -> We confirm the replacement.


