Setting up the Taxi interface
Setting up the Taxi interface in 1C: Accounting 8 edition 3.0
The materials of the article are current as of 08/20/2014.Reproduction of the article is permitted with the author indicated and a link to the source.
Starting with version 3.0.33, the 1C: Accounting 8 program began to be supplied with two interfaces. The new interface is called “Taxi”. It is precisely this that the developers recommend using when working with the program now, since in a few months old interface will be removed from the program and only Taxi will remain.
But not all users liked Taxi at first after switching from version 2.0 and having received answers to the question: “What exactly do they not like?”, we can conclude that what they don’t like is basically simply not configured by the user.
This article discusses the main options for customizing the Taxi interface in 1C: Accounting 8 edition 3.0 in user mode.
When we launch the standard configuration of 1C:Accounting 8 edition 3.0, we open:
region system commands(at the top)
toolbar (top left)
section panel (left)
the initial page (in which we see the Accountant’s Task List, Manager’s Monitor, a field for full-text search and links to go to reference information on various 1C company sites) (Fig. 1).
A window will periodically appear in the lower right corner with a recommendation to configure backup, by clicking on which you can go to the backup settings section. Please note that the backup settings are individual for each user, i.e. Having configured backup for one user, this window will still appear for other users until each of them enters the settings and unchecks the “Perform automatic backups” checkbox. If each user configures backup “On shutdown”, then when exiting the program to create backup copy other users' work will be blocked while the backup is being created, which may create some inconvenience for other users, so I recommend that one of the users set up the backup.
I will not dwell on setting up the “System Commands Area”, since it is the same as in the Interface in the previous version of 1C: Accounting 8.
Many users who switched to the Taxi interface find it inconvenient because the Section Panel is on the left, not on the top (this was more common) and that the Taxi interface does not have the ability to display windows in Bookmarks so that they can return to a previously opened form.
Both of these inconveniences can be solved to some extent by adjusting the location of the panels.
To do this, turn to Menu - View - Panel Settings (Fig. 2).

Here you can configure by dragging areas which panels you want to see and where to place them. For example, we will place the Section Panel and the Toolbar at the top, and at the bottom we will place the Open Panel (Fig. 3). It is the Open Panel that will replace our usual Bookmarks.

As a result, we will get a more familiar and, in my opinion, more convenient view of the program (Fig. 4).

Depending on the size of your monitor, you can position the Function Panel of the current section either on the left (Fig. 5) or on top under the Section Panel.

Or you can not display it at all, since the Taxi interface provides another option for accessing the Function Panel commands (in my opinion, more convenient) - this is by clicking on the Function Panel element, since in this case we will see all the available commands.
If, when placing the Panel open windows we open many windows from below, then the inscriptions in the bookmarks become unreadable (Fig. 6).
Therefore, with wide-format monitors, some may find it more convenient to place these bookmarks on the right (Fig. 7).

You can also add visibility to the Favorites Panel and the History Panel, but in order not to load the monitor to the detriment of the workspace, I do not do this, and if necessary, you can use the buttons on the Toolbar to access these services (Fig. 8).

You cannot go to the Section Panel settings using the right mouse button as was the case in the previous interface. It is configured through Menu - View - Settings section panel (Fig. 10).

You can remove sections you don’t need, change the order in which they are displayed, and also select a display option (text, picture or picture and text) (Fig. 11).

To change the composition of the Function Panel of the current section, you need to click on the corresponding section of the Section Panel and select Navigation Settings, where you can add or remove the visibility of certain commands, as well as change the order in which these commands are displayed. Moving a command to the Important submenu means that the command will appear at the top of the list and in bold.
At the initial stage of getting used to the new interface, as well as after each update, I recommend adding all commands to the selected commands field. This way you will be able to find rarely used commands faster, so that you don’t get the impression that some commands are missing (Fig. 12).

To restore the default settings of commands that, according to developers, are used most often, you can use the More button - Set default settings (Fig. 13).

But even with everyone visible available commands in all sections, you may encounter a situation where you cannot find the command you need.
And then the All functions command will help you. Unfortunately, by default this command is not visible. In order for it to appear, you need to go to Menu - Tools - Options - check the box “Display the command “All functions”” and then it will appear in the menu.
By calling All functions you will see a tree of all program objects from which you can find and open any reference book, document, report or processing (Fig. 14).

If you have a gray bar at the very bottom on which red inscriptions periodically appear with some current and accumulated calls and they bother you, then this performance panel can also be removed through Menu - Tools - Options - Display performance panel.
The Favorites Panel has been developed in the Taxi interface.
You can add any section, list, database object, report or processing, and even a command to this panel.
For example, we often look at:
Bank statements,
documents for the sale of goods and services,
SALT and SALT reports on the account
deleting marked objects.
Let's add these elements to Favorites and in the future, to open the Bank Statements or SALT journal, just open the Favorites panel and click this command(Fig. 15).

To add an element to the Favorites Panel, you need to click on the star that appears to the left of the element when you hover over it with the mouse.
Elements in the Favorites list can be moved by simply dragging, you can rename them, and we can mark the most significant elements for us as “important” and they are highlighted and displayed at the beginning of the list.
You can also mark even a specific document in the favorites panel (for example, so as not to look for it tomorrow if you still need to work with it) or, for example, if we often look at dollar rates, we can quickly access the dollar element from the Currencies directory.
At widescreen monitor The Favorites panel can be pinned to the screen and then the most frequently used commands will always be visible (Fig. 16).

There is also a History panel, which stores information about the latest opened documents and reference books, indicating the date and time of opening of these documents, through which you can also go to previously open documents and reference books (Fig. 17).

In total, no more than 200 lines are stored in the history. The History panel can also be docked to a screen area.
Well, the last thing we will configure from the appearance of our interface is setting up the Start page.
It is configured through Menu - View - Settings home page(Fig. 18).

For example, you can remove the Desktop and the Information Center and place, for example, the Transaction Journal or the Bank Statements journal. Or if the manager is engaged, for example, only in issuing documents to customers, then you can place a journal of customers’ documents on the home page.
Often, users who have switched to the Taxi interface complain that the document forms do not have convenient buttons with texts, there are no buttons, for example, copy, edit, mark for deletion, and so on.
All these commands, of course, exist and you can see them by clicking on the More button. Some commands are also available from context menu, called by the right mouse button.
But in Taxi you can configure which buttons, in what sequence and in what form you want to see them on the form screen.
To do this, click the More button and select Change form (Fig. 19).

Here you can specify which buttons should always be visible (to do this, you need to click on the command of this button and set the “Only in More” element property to No. The buttons will appear in the command panel.
Also, if you are already accustomed to pictograms, then in order to fit more buttons you can set the display of the “Picture” buttons. (although not all buttons have pictures).
After that, you can arrange the buttons in the order that is most convenient for you, using the arrows or simply dragging them with the mouse.
As a result, you can get, for example, this type of document Sales of goods and services:

Please note that documents with tabular parts There are 2 more buttons. One is common for commands related to the entire document and the second is for commands related to the tabular part of the document.
Setting up the form, including the tabular part, is located in the More button, which applies to the commands of the entire document as a whole.
In the same way, you can customize the view of the document journal by changing the displayed columns of the list.
If you want, you can even change the date format if you don't like the time being shown after the date (but I don't recommend doing that).
Well, if you are already an experienced user, then to save space you can disable information links - tips at the bottom of the forms.
Well, if during the setup process you did something wrong and now you don’t know how to fix it, then you can always return to the standard settings.
Return is located in the More button of Form Settings (Fig. 21).

In addition to command buttons, forms can have their own navigation bars, which you can also customize as you see fit (Fig. 22).

This can be done through the View Menu - Setting the Form Navigation Panel (Fig. 23).

With the development of the platform and configuration, new possibilities for customizing the user interface will appear without the participation of programmers. I will try to keep you updated on the most interesting changes.
I wish you success,
Sergey Golubev
1C: Enterprise Accounting, edition 3.0 is the first version of the configuration, which provides the ability to customize the interface. On the one hand, this opportunity compensates for the fundamental differences in appearance new version from the previous one - 1C 8.2. On the other hand, it gives users flexible options for customizing their workspace, focusing only on existing needs, their own convenience and individual taste.
It is worth noting that during the existence of edition 3.0, which respectively works on the 1C:Enterprise 8.3 platform, the interface has undergone several changes. In particular, the number of available interface options has been increased, including:
- Standard (as in previous versions 1C: Accounting 8)
- Taxi
Standard
When version 3.0 was released, its interface was identical in structure to version 8.2, but differed in design: the names of the sub-items of the upper horizontal menu, and also added pictograms.

A visual comparison of editions 3.0 and 2.0 shows that the interface structure has remained unchanged.

Clicking on a menu item brought up a drop-down list, and in the new version, sub-items are displayed as tabs.

Since this type of interface was the first, it remains the most popular. You can change its structure by going to “Administration-Program Settings” - item “Interface”.

allows you to access submenus without closing the active window.*

*Horizontal menus:
- Panel section located directly below the main menu;
- A panel of actions or commands available in the selected section.
The vertical navigation bar displays the structure of the section's content.
Using menu sub-items, you can customize the contents of panels and their display at the user's request.
(next item) allows you to add and delete sections, as well as items of the main horizontal menu, up to its complete removal.

allows you to open additional windows under the main menu - standard reports, information, contacting technical support (the horses essentially duplicate the vertical panel).

allows you to add/remove submenu items, which previously could only be done with the participation of programmers.

Taxi
In the Taxi interface, the section panel is initially located on the left.

The implementation of customization of panels in this interface is carried out by dragging and grouping panels at the user's request in a special editor window.

The panel editor window allows you to group by dragging, adding and deleting panels such as the section panel, open panel, toolbar*, current section function panel, favorites panel, history panel.

*Panels located at the top of the editor window, in this moment active.
Section sub-items are configured (the section panel is vertical) after their activation (the sub-item settings button is in the upper right corner).

The action panel settings window allows you to add and remove sections, even completely deleting them.

Interface nuance: selected sub-items are marked with asterisks

*Often external modifications are added here
Similar to the interface of edition 7.7
The menu structure is very similar to the standard version.

The ability to customize the 7.7 interface is located on the top panel on the right (down arrow), which allows you to add and remove buttons. It is active in all interfaces.

Working in one or another configuration on the 1C:Enterprise 8.1 platform, accountants daily use mainly the same menu items and submenus, buttons on toolbars. However, not every user is comfortable standard interface programs. V.V. talks about how to customize the interface for yourself. Fishing, company "1C".
There are situations when a frequently used menu item is hidden quite “deeply”, or desired button does not fit on the screen, and an important action does not have a hotkey combination.
The simplest solution that comes to mind is to go to the configurator and configure the interface the way you need. But there are not always specialists with the appropriate level of qualification nearby. In addition, not all users have the same user experience criteria.
Is it really necessary to adjust the current interface or create a new one in the configurator for each user of the database (and there may be more than a dozen of them)? No! Thanks to the possibilities of fine tuning interface for platform 8.1 there is no need to call a qualified specialist or go into the configurator*.
Note:
* To be completely precise, there may be prerequisites for creating an individual interface for the user in configurator mode, but these issues are beyond the scope of this article.
Customization tasks are solved quite elegantly - using personal toolbars. For example, we will use the accounting interface of the standard configuration "Enterprise Accounting" (rev. 1.6) with demo data.
But before moving on to describing the mechanism for individually customizing the interface, let’s outline some general capabilities that the 8.1 platform provides to its users. In particular, you cannot see at once all the standard menu items and all the toolbars that are built into the platform by default (regardless of the configuration). And this is not a mistake. The point is that some features are context-sensitive, and therefore are only available when they make sense.
It’s easy to get them - on any empty space next to the available toolbars, just click right button mice. In the list that opens, you will immediately see all available panels, and the enabled (visible) ones will be marked with a check mark.
A good example is working with a spreadsheet document. Compare the composition of menus and panels in the absence of an active spreadsheet document - see fig. 1 and if present, see Fig. 2.

Rice. 1

Rice. 2
In most cases, it is enough to use the menu items that appear or enable the desired toolbars.
Be aware: context-sensitive UI elements will disappear if not active windows, with which they are associated, and appear when such windows are activated.
So, let's start learning about customizing the interface.
First, let's decide which menu items or important buttons you should always have at hand. For example, let's choose the following:
- "Operations" -> "Routine operations" -> "References and calculations" -> "Calculation";
- "Sales" -> "Maintaining a sales book" -> "Sales book";
- "Reports" -> "Other" -> "Universal report";
- "Service" -> "Data Search";
- "Enterprise" -> "Production calendar";
- "Table" -> "View" (note - this is a submenu).
- "Tips", which are located on the "Support" toolbar (the panel created when developing our configuration);
- "Freeze table" of the standard "Spreadsheet Document" toolbar (for example, when working with tables you need to frequently freeze the header).
We have decided on the necessary functions.
Their composition, although somewhat chaotic, is indicative.
For example, the “Calculation” menu item is hidden quite deeply, and the “View” submenu is not always immediately available to us.
To ensure that we always have this entire set at our fingertips, we will use the ability of the 8.1 platform to create personal toolbars.
To do this, you need to enter the settings mode, call up the list of toolbars (similar to the method described above for turning on/off standard toolbars - see Fig. 1) and select “Settings...”. An interface settings window will open, in which on the “Toolbars” tab you will see all currently available toolbars (Fig. 3).

Rice. 3
Let's create our own toolbar and name it, for example, "My Menu". To do this, click the “Create…” button and write a name.
After clicking "OK" we will see our panel in the list of available panels (Fig. 4).

Rice. 4
In addition, our new empty (without a single element) panel will appear in the center of the screen (Fig. 5). The most important thing has already been done.

Rice. 5
All that remains is to fill our menu with the necessary elements.
While remaining in setup mode, let's sequentially fill the panel with the previously selected elements.
The general principle is this: we select the desired element in those places where we usually find it in the interface presented to us, press and hold the Ctrl key and “drag” this element onto our panel with the mouse (left button) (drag and copy).
What should we do if the drop-down menu blocked the visibility of our panel (Fig. 6)?

Rice. 6
Just grab it with your mouse by the left edge of the title and drag it to comfortable spot.
The first element on our list is “Calculation” - drag and drop (Fig. 7).

Rice. 7
Please note that the Ctrl key must be pressed until the end of the drag.
This is easy to control: after you finish dragging an element onto our panel, there should be a plus sign (“+”) next to the mouse cursor. If everything is done correctly, you will see a result similar to Fig. 8.

Rice. 8
Similarly, we drag the second item of our personal menu - “Sales Book”. The result is something similar to Fig. 9. Why is only the icon visible? Because the configuration developers assigned an image to this menu item, and the 8.1 platform by default displays only images in panels if they are specified. If you want to see an inscription or a picture and an inscription (as in the original menu), just right-click on the element you need and select the desired display mode. Let’s choose to display both pictures and text for the “Sales Book” (Fig. 10).

Rice. 9

Rice. 10
Next, we fill our panel with the selected elements. For “Data Search” we will also enable the display of pictures and text. Having reached the “Table/View” item in our list, we already have a panel in the form shown in Fig. eleven.

Rice. eleven
Here we may encounter the fact that the “Table” menu is currently unavailable (the reasons are described above). Deciding this problem, at the same time we will try out the possibilities of adding items to an existing menu. All this time we have been working in interface setup mode. Now you will have to close it temporarily - in the “Settings” window, click the “Close” button. Please note that all our developments have been preserved and are already available for work on our panel. To access the "Table" menu, open any spreadsheet document or create a new one. After this, call the setup mode again. Now we have access to the desired menu and can drag, similar to the previous rules, the “View” submenu from it (Fig. 12).

Rice. 12
There are two more buttons available through the toolbars of our interface. Dragging them is completely similar to dragging menu items: just left-click the button you need, press Ctrl and drag this button to our panel.
The "Freeze Table" button can be found in the "Table" menu, which we made available earlier. But for the purity of the experiment, try turning on the “Tabular Document” panel that is also available (Fig. 13).

Rice. 13
That's all - we have completely filled the "My Menu" toolbar with the elements we need. Just close the settings window again with the "Close" button and you can get to work, always having your own set of functions at hand.
In conclusion, we note a few important points.

We configure "Taxi" for ourselves in 4 steps (1C: Accounting 8.3, edition 3.0)
2016-12-07T18:49:42+00:00In this article I will talk about how to make working in the new 1C: Accounting 8.3 “Taxi” interface truly convenient and comfortable for an accountant.
Follow just 4 steps to set up the Taxi interface for yourself and enjoy all its benefits. If you are still in doubt: to switch or not to switch, then my opinion is unequivocal - to switch. Taxi is better. Taxi is more convenient. And it’s very easy to adapt to it.
If the "Taxi" interface is not yet enabled, enable it:
Select the “Taxi” option and click the “Restart” button:

Then Necessarily go to the “Administration” section, “Interface” item:

And we also set the “Taxi” option here and press the “Restart” button again:


Step #2. Setting up the section panel.

Here, on the right side of the window, select sections that we rarely use or don’t use at all and click the delete button:

Most often, such “unloved” sections are “Manager”, “Production” and “OS and Intangible Materials”:

And finally, in the lower left part of the window, set to show “Picture and text”, if it’s easier for you to find sections with pictures:
Click OK and the section panel will change:

Result: All that was left was what was needed, pictures appeared.
Step #3. Setting up the open windows panel
In the new interface, you can't switch between open windows because the open windows panel is hidden by default. Let's display it.


After dragging, click OK and now the windows we open will be displayed at the bottom of the main 1C window:

Result: at the bottom of the main window, directories, documents, magazines, etc. that we open are displayed.
Step #4. Turn on the "All functions" menu.
A very useful feature when you tried to find some report or document, but could not do it through the sections panel. In this case, the “All functions” menu will help you out, from which you can open all reports, documents, reference books, etc.
This option is hidden by default, but is easy to show.
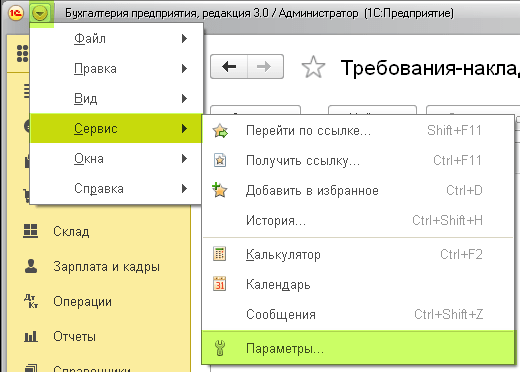
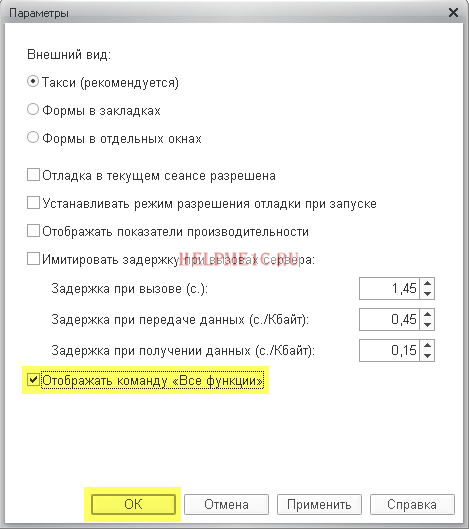
Check the box "Display All Functions" and click OK. Now any report, document, reference book, journal or processing can also be selected like this:


Result: it became possible to open reports, documents, journals, directories and processing that could not be found in the main menu of the system.
We're great, that's all
By the way, for new lessons...
Sincerely, Vladimir Milkin(teacher
Subsystem in 1C 8.3— a metadata tree object that is responsible for building the configuration command interface.
Below in the article we will talk about subsystems starting from version 8.2.
The fact is that version 8.1 (as well as a regular 8.2 application) also had subsystems, but they served completely different purposes, more likely for the developer than for the user. Using subsystems in 8.1, different functionality was usually separated. The subsystems also helped when combining different 1C configurations - it was possible to specify which system to transfer.
1C subsystems and programmer interface
In versions 8.3 and 8.2, subsystems are the main tool for building a command user interface. “Subsystems” metadata objects have a hierarchical structure; to configure a “submenu” in the interface, you need to add a subordinate subsystem:

Properties and Settings
Let's look at the settings and properties of the subsystems in the configurator:

Get 267 video lessons on 1C for free:
To include in command interface — if you forgot to set this flag, subsystem will not be displayed in the interface.
The button opens the interface settings panel, where you can configure interfaces depending on the role of the current user:

Picture— the picture assigned to the subsystem is displayed in enterprise mode. You can select a standard image, or you can add your own by first creating it as a configuration object Picture:

On the tab Functional options indicates a list of functional options in which this subsystem is used.
Tab Compound defines a set of metadata objects participating in a given subsystem.
On the tab Other you can describe the help for the subsystem and specify the settings Include in help content— whether to include this section general information background information by configuration.
If you don't see a report or processing in the managed interface
This problem very often arises among novice developers - it seems that a report or processing was added to the subsystem, but it is not visible.
The first reason for this may be that the object does not have a controlled form defined.
The second reason is that on the object’s Commands tab, the “Use standard commands” checkbox is selected. This is due to the fact that to open processing, either your own procedure can be described, or a standard one can be used:


