Due to an incorrect shutdown of the computer (for example, a sudden power outage), errors made when working with applications that interfere with the file system (for example, Acronis Disc) or as a result of a PC infection malware, structure hard drive may be damaged. Because of this, one of its sections (or its entirety) may stop working. The easiest way to get rid of the error is to run a HDD check using a standard utility. Windows CHKDSK. However, in some cases, when trying to launch it, the user may see a message: CHKDSK is not valid for RAW disks - we’ll figure out what to do in this case in the text below.

In Windows, RAW drives are drives that have no file system. For example, if you delete a partition of your hard drive through one of the utilities, it will take on the RAW state. If the file system of a partition is critically damaged, it can also become RAW, since the OS will not be able to load and read the file system table.
Thus, if the disk worked normally, files were freely written to it, but now it does not open, and the CHKDSK utility does not want to correct errors on it, then enough serious problem, which, in most cases, can be corrected in only one way - formatting. Next, we will fix the error CHKDSK is not valid for RAW disks.
How to restore functionality to a RAW disk

If the partition of the hard drive you are interested in is missing important files, then getting it back into operation will not be a problem. To do this you will need to do the following:
- Open “Control Panel”;
- Go to the “System and Security” section;
- Select “Create and format hard disk partitions”;
- In the window that opens, select the desired section;
- Right-click on it and click on “Format” in the drop-down menu;
- A window will open in which you need to select NTFS in the “File system” item;
- Click “Ok” and wait for the process to complete.
- After this, you can restart your computer (although this is not necessary).
However, if there is important information on the partition that has now become RAW, then it will need to be restored. Therefore, you will have to wait with formatting and perform a number of actions:

- Download the TestDisk program (it’s free) from the developer’s official website and unpack it anywhere;
- Go to the program folder and find the TestDisk.exe file;
- In the window that opens, select the “No Log” option;
- Select the damaged disk and click on Proceed;
- After this, you will need to specify the disk type, in our case – Intel/PC;
- Having done this, you will need to select Quick search and press P;
- After some time, a list of folders and files that the program found on the partition will be displayed;
- Select the ones you need and copy to your working partition.
After necessary files will be in a safe place, you can start formatting.
Know that after formatting (especially full formatting) you can restore files that were on damaged disk, it will be impossible. Therefore, be sure to make sure that you save all the important data that you found using the TestDisk program.
Fixing the message CHKDSK is not valid for RAW disks [video]
In contact with
RAW file system: how to recover NTFS or FAT32
Hard disk drives (HDDs), which for various reasons are not detected by the operating system, receive RAW status and access to them is no longer possible. When you try to open such a disk, Windows advises you to format it, but if you follow this recommendation, all recorded information will disappear. It is advisable to restore an acceptable format: NTFS or FAT32.
Why are discs not recognized?
The sources of problems with the HDD can be different, and before doing anything to restore the format, it is worth identifying them. Here are the most common:
- Connection failures. For example, the user incorrectly disconnected the disk or the power supply stopped and the file system became corrupted.
- The cable that connects the drive to the board is broken.
- Malware that violates the data structure.
- Errors that occurred when reinstalling or updating the OS.
- In the case of a flash drive, the reason for changing the format to RAW may also be a malfunction of the USB connectors.
- Malfunctions of the PC motherboard.
- Errors when working with Acronis Disk Director.
Format recovery
To restore NTFS format from RAW, try the following:
- Perform a reboot: It's likely that file system glitches are random and easy to fix.
- Be sure to check the reliability of the cables and connectors - these are the most vulnerable components of the connection. From frequent use they become loose and do not communicate properly.
- Try running the command line (Win+R, type cmd in the window that appears, then press Enter) and enter the following there: chkdsk I: /f (instead of I you will enter the name of the damaged disk). Thus, a start is given to checking the disk file system (especially if the NTFS information ordering method was initially selected) and correcting possible errors.

Running chkdsk command on Windows

Running sfc /scannow on Windows
Restoring format using special programs
If, when you try to check the HDD using the method described above, a message appears: “CHKDSK is not valid for RAW disks,” you can use programs that allow you to restore the NTFS format from RAW. Let's look at the most popular of them.
DMDE is a utility that looks for damaged partitions in the file system and helps restore the disk to NTFS status. After downloading and installing the program, you need to do the following:
- Launch the application.
- On the left, check the box next to the phrases “Physical devices” and “Show partitions”.
- Select the damaged drive and click OK. After this, the utility will find the RAW section and indicate it with a crossed out icon. If this does not happen, carry out full scan(the corresponding button is located at the bottom of the window).
- Now try to open the RAW volume and click “Recover” and then “Apply settings”.
- After this, as a rule, the HDD format changes to NTFS.

DMDE program window
Recuva
A simple and easy-to-use program that can fix RAW disks and flash drives. The procedure is as follows:
- Launch the application, select “Recover all files”, mark the damaged disk and click “Start”.
- The utility will detect files with a broken structure and correct the format to NTFS.
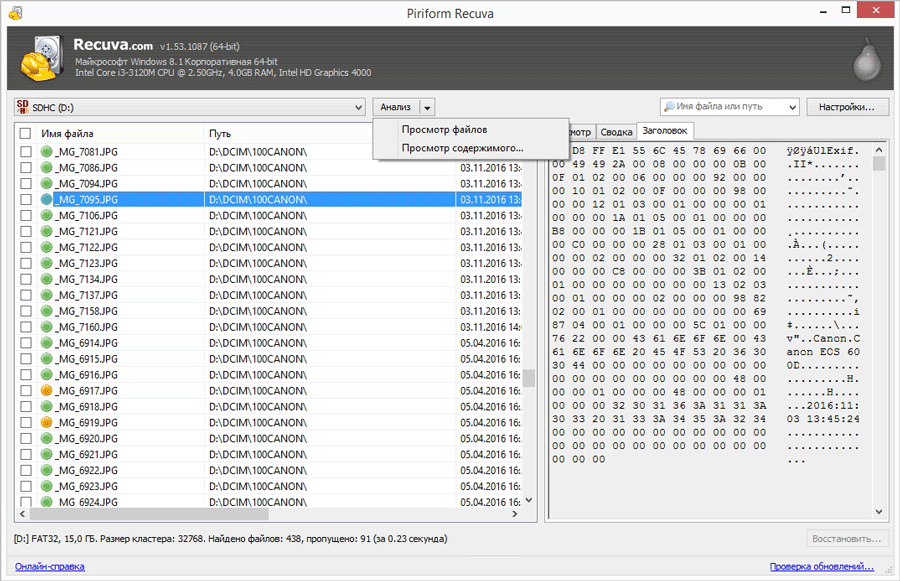
Piriform Recuva program window
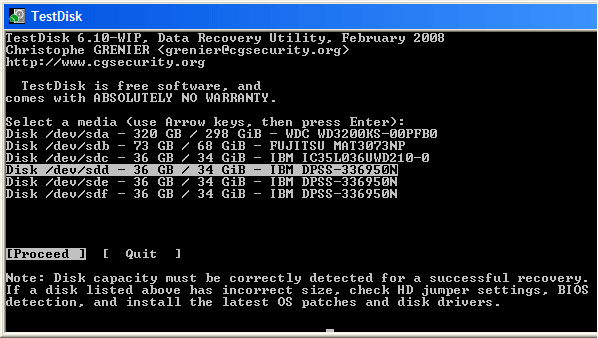
TestDisk
The third utility that restores the disk format. Just download and run it, and then:
- Select New, press Enter.
- Then click on the problematic HDD, then Enter again and select Analyze and Quick Search.
- After executing the command, select Write to restore the information structure.

TestDisk window
If all these manipulations lead to nothing, most likely the disk has mechanical damage or its components do not interact correctly and it would be more advisable to show it to a specialist.
Have you ever encountered a situation where the disc format turned into RAW? How did you deal with a problem like this? Write about it in the comments.
RAW file system and how to return NTFS, FAT32
A number of users may be unable to access their hard drive (or flash drive). In the operating system, such devices receive the “Raw” status, and their file structure becomes inaccessible to the user. In this article, I will examine this dysfunction in detail, tell you what to do in a situation where the file system is RAW, as well as how to return NTFS, FAT32, what tools will help us with this, and how to use them.
Recovering disk partitions
What is the RAW file system
To understand that this is a RAW file system and how to return the NTFS, FAT32 format, you need to determine the meaning of the term “RAW” itself. Translated from Shakespeare’s language, the lexeme “Raw” means “raw”, “raw material”. Accordingly, in our case, this term refers to disks that are either not yet formatted, or the data structure on them is damaged (errors in the MBR partition table and MFT file table, viruses, PC hardware problems, and so on.).
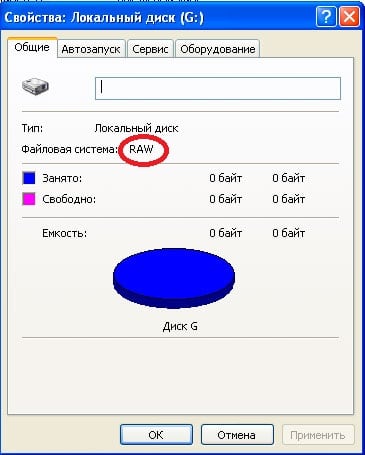
Disk property illustration
Simply put, RAW disks are disks that are not recognized by Windows for various reasons. Typically, in this case, Windows recommends formatting such a disk, which should not be done, since the data on the disk will be lost as a result of formatting.
Reasons why a disk from NTFS and FAT32 becomes RAW
The reasons for the appearance of RAW disks instead of the usual NTFS and FAT32 file systems are as follows:
- Sudden shutdown of such disks (loss of voltage in the network, physical disconnection by the user, problems with the power supply, etc.), as a result of which the integrity and structure of the data on the disk is disrupted;
- Problems with cables connecting motherboard and hard drive;
- Job virus programs, violating the integrity of the bootloader, partition table, file structure, and so on;
- Bad sectors on the hard drive, as a result of which the system structure on the hard drive is damaged;
- Error in installing or updating the operating system;
- Errors when working with various hard disk partition managers;
- Not a tight connection between the flash drive and the USB connector of the PC (in the case of a flash drive);
- Problems with the computer motherboard and so on.
How to return NTFS, FAT32 from RAW
- Just try restarting your computer, the problem may be random;
- Check the tightness of the cable connections to the hard drive, try using a different connector for connecting the hard drive on the motherboard, as well as a different USB connector on the computer when connecting an external flash drive;
- Use the built-in CHKDSK utility ( detailed instructions). Launch a command prompt as administrator and type
chkdsk X: /f (where X is the RAW drive letter)
The “f” parameter means correcting errors on the disk, that is, the CHKDSK utility not only looks for problems, but also fixes them.

Using the CHKDSK command
I will also note that this command is relevant, first of all, for those disks that were formatted in the NTFS file system. Moreover, if you cannot boot the operating system, then boot using a bootable system disk or flash drive (you can use various “Live CD” builds), select “System Restore” there, go to “Advanced options” and then to “Command Line” , and there type the above command.
If you cannot access the command line from your PC, then it is recommended to connect your hard drive to another computer and check your disk for errors from it.
- Use the possibilities of another system utility sfc created to check integrity system files. Also run the command line as administrator and write in it:

System utility sfc
- If you have access to the operating system, then it is worth checking your computer for viruses using special antivirus programs(For example, Web CureIt! or Malware-AntiMalware);
- If there is no important information on the problem disk (or it is not significant), then the problem disk (or flash drive) can be formatted. Click on the “Start” key and type diskmgmt.msc in the search bar, the Disk Control Panel will appear. Click right key mouse on the raw disk and select “Format” in the menu that appears.
If you have a RAW file system, return NTFS, FAT32 - using third-party programs
If you want to restore the NFTS and FAT32 file system, then you should use the functionality of special programs that will help us with this. I suggest programs such as Recuva and TestDisk.
Recuva
One of the popular recovery programs lost files– this is Recuva. Download, install and run this product, select the option to restore all files, indicate the problem disk, enable the in-depth analysis option and click on “Start”.
After the scan is completed, the program will display a list of found files, mark them with checkboxes and click on “Recover”.

TestDisk
The second program that can help with the issue of the RAW file system is TestDisk.
- Download and install this program, run it as administrator.
- Select the “Create” command and press enter, select the raw disk with the cursor and press “Enter”.
- After selection the right type partition table, click on enter, then select “Analyze” and “Quick Search” (will be carried out quick search problematic sections).
- After TestDisk finds the problematic volumes, click on “Write” to record the structure of the found partition.
TestDisk will help you return ntfs without data loss
How to change the file system of a flash drive [video]
Above I analyzed the problem when the file system is RAW. The most optimal tool for returning NTFS, FAT32 is to use system command CHKDSK, as well as special programs that can restore the file structure of a problematic disk. If none of the tips I offered turned out to be effective for you, then I recommend contacting service center– perhaps your hard drive has problems not of a software, but of a hardware nature, and it needs a thorough repair.
Recover RAW to NTFS or FAT32 on USB, SD, HDD without data loss
A disc that, for certain reasons, acquires RAW status is far from a new thing in the world. modern technologies and, fortunately, we have a solution to this issue. Don’t prematurely panic with the thought, “My USB drive is broken, on which I have an important presentation prepared for speaking at a corporate meeting.” There is a solution to the problem and it is very simple. You can not only restore important information from your disk, but also to revive it without any losses.
Step 1. Recovering data from media with the RAW file system
First of all, you need to recover all the valuable data on the storage device. To do this quickly and efficiently, use the instructions below.
1.
Connect your RAW device to your PC.
Run the recovery program Starus Partition Recovery
, point the program to the drive to scan and perform analysis.

2. The application will scan to find deleted materials. If you need more information, please swipe Full analysis.

3. You will see a list of all folders and files in them that are or have been present on the device since the last formatting. You can preview, find the information you need and, if there are several files, select it, then press the key Restore and export data in a format convenient for you.
Useful articles

After exporting the data, you can move on to step number two, which will help format the device from RAW to NTFS or FAT32.
Step-2. Convert RAW file system to NTFS and FAT32
The main way to format a drive by changing the file system is a utility built into the operating system. Use the instructions below to format the disk.
Method one. We use the Disk Management menu.
1. Click right click mouse by shortcut My computer or through the menu Start. Next, press the key Control.

2. Now select menu Disk management. In the list that appears, you need to find the RAW device and right-click on it. Everything is fine on our PC, but if yours has the problem in question, then in the column File system it will be written RAW.

2. In the drop-down window, select Format, reset the name, restore the NTFS file system and click OK to confirm the operation.

Be sure to wait for the formatting process to complete without interrupting it or disconnecting your computer from the network.
Method two. Restoring RAW to NTFS/FAT32 using the command line.
Command line being built in Windows tool, helps operating system users solve many issues related to their PCs. One of the problems that it can fix is the RAW file system. The system is not readable by Windows and therefore needs to be returned to its original format - NTFS or FAT32.
- 1) Dial cmd and by right-clicking on the program that appears, run the utility on behalf of administrator.
- 2) Dial diskpart, then press Enter.
- 3) Enter list disk and press Enter.
- 4) Write select disk 0 and then press Enter (Replace 0 to the number corresponding to your RAW drive).
- 5) Enter clean and press Enter.
- 6) Dial create partition primary and press Enter.
- 7) Write format fs=ntfs or format fs=fat32 to format to your desired file system and then press Enter.
- 8) Enter assign letter=S(The drive letter you just formatted will be replaced.)

Wait for the process to complete and close the Command Prompt. Your disk is now usable again.
Additional information to help you protect your drives from RAW.
If your device is healthy, fully functioning and you want to format it, then a sudden power outage may lead to an error in creating logical partitions, which in turn will change the NTFS/FAT32 system to RAW. By avoiding the situations described above, the chance of logical failures occurring is minimized.
%D0%A7%D1%82%D0%BE%20%D0%B4%D0%B5%D0%BB%D0%B0%D1%82%D1%8C%20%D0%BA%D0%BE%D0 %B3%D0%B4%D0%B0%20%D0%A4%D0%BE%D1%80%D0%BC%D0%B0%D1%82%D0%B8%D1%80%D0%BE%D0 %B2%D0%B0%D0%BD%D0%B8%D0%B5%20%D0%BD%D0%B5%20%D0%B8%D1%81%D0%BF%D1%80%D0%B0 %D0%B2%D0%BB%D1%8F%D0%B5%D1%82%20%D1%84%D0%B0%D0%B9%D0%BB%D0%BE%D0%B2%D1%83 %D1%8E%20%D1%81%D0%B8%D1%81%D1%82%D0%B5%D0%BC%D1%83%20RAW
%D0%9E%D0%B1%D1%8B%D1%87%D0%BD%D0%BE,%20%D1%84%D0%BE%D1%80%D0%BC%D0%B0%D1% 82%D0%B8%D1%80%D0%BE%D0%B2%D0%B0%D0%BD%D0%B8%D0%B5%20-%20%D0%BE%D0%B4%D0%BD %D0%BE%20%D0%B8%D0%B7%20%D0%BE%D1%81%D0%BD%D0%BE%D0%B2%D0%BD%D1%8B%D1%85%20 %D1%80%D0%B0%D0%B1%D0%BE%D1%87%D0%B8%D1%85%20%D1%80%D0%B5%D1%88%D0%B5%D0%BD %D0%B8%D0%B9%20%D0%B2%D0%BE%D1%81%D1%81%D1%82%D0%B0%D0%BD%D0%BE%D0%B2%D0%BB %D0%B5%D0%BD%D0%B8%D1%8F%20%D0%BB%D1%8E%D0%B1%D0%BE%D0%B3%D0%BE%20%D0%B4%D0 %B8%D1%81%D0%BA%D0%B0%20%D1%81%20%D1%84%D0%B0%D0%B9%D0%BB%D0%BE%D0%B2%E2%80 %A6
How to fix “CHKDSK is not valid for RAW drives” USB or SD cards
In case you don't know how to fix RAW error on your hard drive, USB or SD card, if you...
%D0%92%D0%BE%D1%81%D1%81%D1%82%D0%B0%D0%BD%D0%BE%D0%B2%D0%BB%D0%B5%D0%BD%D0 %B8%D0%B5%20%D0%B4%D0%B0%D0%BD%D0%BD%D1%8B%D1%85%20%D0%B8%D0%B7%20%D0%BF%D0 %BE%D0%B2%D1%80%D0%B5%D0%B6%D0%B4%D0%B5%D0%BD%D0%BD%D1%8B%D1%85%20-%20raw%20% D1%80%D0%B0%D0%B7%D0%B4%D0%B5%D0%BB%D0%BE%D0%B2
%0A%D0%A7%D1%82%D0%BE%20%D0%B4%D0%B5%D0%BB%D0%B0%D1%82%D1%8C,%20%D0%BA%D0%BE% D0%B3%D0%B4%D0%B0%20%D0%BE%D0%BF%D0%B5%D1%80%D0%B0%D1%86%D0%B8%D0%BE%D0%BD% D0%BD%D0%B0%D1%8F%20%D1%81%D0%B8%D1%81%D1%82%D0%B5%D0%BC%D0%B0%20Windows%20%D0%BD% D0%B5%20%D1%81%D0%BF%D0%BE%D1%81%D0%BE%D0%B1%D0%BD%D0%B0%20%D0%BE%D0%BF%D1% 80%D0%B5%D0%B4%D0%B5%D0%BB%D0%B8%D1%82%D1%8C%20%D1%82%D0%B8%D0%BF%20%D1%84% D0%B0%D0%B9%D0%BB%D0%BE%D0%B2%D0%BE%D0%B9%20%D1%81%D0%B8%D1%81%D1%82%D0%B5% D0%BC%D1%8B%20%D0%B8%D1%81%D0%BF%D0%BE%D1%80%D1%87%D0%B5%D0%BD%D0%BD%E2%80% A6
Similar articles about data recovery: %D0%92%D0%BE%D1%81%D1%81%D1%82%D0%B0%D0%BD%D0%BE%D0%B2%D0%BB%D0%B5%D0%BD%D0 %B8%D0%B5%20%D1%81%D0%B8%D1%81%D1%82%D0%B5%D0%BC%D0%BD%D1%8B%D1%85%20%D1%81 %D0%BA%D1%80%D1%8B%D1%82%D1%8B%D1%85%20%D0%BF%D0%B0%D0%BF%D0%BE%D0%BA%20%D0 %BD%D0%B0%20%D0%9F%D0%9A%20%D0%B8%D0%BB%D0%B8%20%D0%BD%D0%BE%D1%83%D1%82%D0 %B1%D1%83%D0%BA%D0%B5
%0A %D0%92%20%D1%8D%D1%82%D0%BE%D0%B9%20%D1%81%D1%82%D0%B0%D1%82%D1%8C%D0%B5%20 %D0%BC%D1%8B%20%D1%80%D0%B0%D1%81%D1%81%D0%BC%D0%BE%D1%82%D1%80%D0%B8%D0%BC %20%D1%87%D1%82%D0%BE%20%D1%81%D0%BE%D0%B1%D0%BE%D0%B9%20%D0%BF%D1%80%D0%B5 %D0%B4%D1%81%D1%82%D0%B0%D0%B2%D0%BB%D1%8F%D1%8E%D1%82%20%D1%81%D0%B8%D1%81 %D1%82%D0%B5%D0%BC%D0%BD%D1%8B%D0%B5%20%D0%BF%D0%B0%D0%BF%D0%BA%D0%B8,%20% D0%BA%D0%B0%D0%BA%20%D0%B8%D0%B7%D0%BC%D0%B5%D0%BD%D0%B8%D1%82%D1%8C%20%D0% BF%D1%80%D0%B0%D0%B2%D0%B0%20%D0%B4%D0%BE%D1%81%D1%82%D1%83%D0%BF%D0%B0%20% D0%BA%20%D0%BD%D0%B8%D0%BC.
Recovering folders deleted from HDD, memory card or flash drive
Recovering deleted folders or files from different types of media is a question that worries many.
%D0%9A%D0%B0%D0%BA%20%D0%B2%D0%BE%D1%81%D1%81%D1%82%D0%B0%D0%BD%D0%BE%D0%B2 %D0%B8%D1%82%D1%8C%20%D1%83%D0%B4%D0%B0%D0%BB%D0%B5%D0%BD%D0%BD%D1%8B%D0%B5 %20%D1%84%D0%BE%D1%80%D0%BC%D0%B0%D1%82%D0%B8%D1%80%D0%BE%D0%B2%D0%B0%D0%BD %D0%B8%D0%B5%D0%BC%20%D1%84%D0%B0%D0%B9%D0%BB%D1%8B?
%0A %D0%A4%D0%BE%D1%80%D0%BC%D0%B0%D1%82%D0%B8%D1%80%D0%BE%D0%B2%D0%B0%D0%BD%D0 %B8%D0%B5%20-%20%D0%B2%D0%B0%D0%B6%D0%BD%D1%8B%D0%B9%20%D0%BF%D1%80%D0%BE% D1%86%D0%B5%D1%81%D1%81%20%D0%BD%D0%B0%D1%81%D1%82%D1%80%D0%BE%D0%B9%D0%BA% D0%B8%20%D0%BD%D0%BE%D1%81%D0%B8%D1%82%D0%B5%D0%BB%D1%8F%20%D0%B4%D0%B0%D0% BD%D0%BD%D1%8B%D1%85.%20%D0%92%20%D0%BD%D0%B0%D1%88%20%D1%86%D0%B8%D1%84%D1 %80%D0%BE%D0%B2%D0%BE%D0%B9%20%D0%B2%D0%B5%D0%BA%20%D1%81%D1%83%D1%89%D0%B5 %D1%81%D1%82%D0%B2%D1%83%D0%B5%D1%82%20%D0%B1%D0%BE%D0%BB%D1%8C%D1%88%D0%BE %D0%B5%20%D0%BC%D0%BD%D0%BE.
RAW file system. How to return NTFS without losing files What is raw markup on hdd, memory card and usb flash drive. How to fix the error “chkdsk is not valid for raw disks” and return ntfs.
A fairly common problem: the contents of the memory card or hard drive are inaccessible, Windows OS (7 - 10) displays the message “chkdsk is not valid for the disk.” The file system format is RAW.
What is raw, is it scary and how to fix the error (returning the NTFS file system) - read here.
What is a "RAW file system"?
When you connect the device to the USB connector, you see in the properties of the file volume information that the flash card has a raw file system type and is not formatted in the standard NTFS or FAT file system.
Windows OS assigns a RAW label to a volume with an undefined file system. This occurs if none of the system drivers could recognize the file system. In the case of Windows OS, we are talking about FAT(32) and NTFS.
Thus, RAW is not a file system, but a sure sign of an error in work hard disk.
RAW disk: reasons for the error
Most often, RAW markup appears if:
- The disk or file volume is not formatted,
- Access to the file system/disk/memory card is prohibited or limited,
- There were reading errors, damage to the file system structure, and bad blocks.
A raw disk has some symptoms that definitely indicate problems with the disk. Among these symptoms:
- Incorrect media type when reading disc
- Windows displays "Cancel", "Retry", "Error" window
- File system appears as RAW in applications
- The error “chkdsk is not valid for raw disks” appears
- Windows asks you to format the disk
- File names contain non-standard characters
- The message “Sector not found” appears
When does the error chkdsk not valid for raw disks occur?
File system information is stored in two places:
- MBR partition Table
- Volumes boot sector
If one of these sectors is damaged or not found, chkdsk reports that the utility is not valid for raw disks.
Why raw markup is bad
If your device has raw markup, you cannot view its contents or perform file operations. Also, the disk cannot be checked for errors or defragmented.
As a result, files stored on the disk become inaccessible, although they are physically still there and can be restored by any recovery program.
Important! If your disk or partition has a raw file system type, your operating system Windows system prompts for formatting, displaying a warning “The disk is not formatted. Do you want to format it?" (Disk not formatted do you want to format it now?).
Don't settle for this: if you format the HDD, you will lose all the data on the raw disk!
How to fix raw without data loss in EaseUS Data Recovery Wizard
You can access files by correcting the MBR partition Table or converting raw to ntfs format. This can be done virtually without loss of data or formatting.
Since the raw disk still contains data, let's try to return it (if not completely, then at least the most valuable files).
We will need the EaseUS Data Recovery Wizard program. How to use it when recovering data from raw - read below.
Step 1. Recovering data from a RAW disk or partition
EaseUS Data Recovery Wizard is quite a suitable program:
- To recover data from raw disks,
- If the SD card or flash drive in raw format is not formatted
- To search for deleted hard drive partitions.
Data Recovery Wizard is a paid program when it comes to full-featured use.
Advice. Alternatively, you can try these free apps like Recuva or the ones we suggest in [this review].
1. First, download the program from the developer’s website:
The program is compatible with Windows 7/8/10, although it can be installed on earlier versions of the OS.
2. Launch EaseUS Data Recovery Wizard and in the window that appears, select file types for recovery (or activate the “All file types” option). Confirm the operation by pressing .

3. If a disk partition is deleted or detected in Explorer as RAW, use the Lost Disk Drives option.
Select the problematic disk with deleted data (Section “Lost disks”) and click the Scan button.

EaseUS Data Recovery Wizard will search for files available for recovery on the specified disk or SD card.
4. Once the scan is complete, a list of found files will be displayed. Check the required ones and click the Recover button to restore.

Important! Always save files to another drive to avoid overwriting.
Step 2. Convert RAW to NTFS file system without data loss
After recovering files, the raw disk needs to be formatted in order to be used further for storing files. How to do it correctly, read here.
By the way. Windows OS allows you to format a disk to NTFS using the built-in Diskpart formatting utility via the command line.
Thus, if you recover data from a raw disk in advance, you can safely return the NTFS partition and format it. If you first format the disk and then try to recover the data, the likelihood of recovery will be significantly reduced.
If you are unlucky and accidentally formatted a raw partition, losing data on it, use the Auslogics File Recovery program (it is useful to read the article at the link).
Other useful programs for raw disk recovery
In addition to the EaseUS Data Recovery Wizard, you may find other tools useful for recovering raw partitions.
TestDisk
The free console utility TestDisk allows you to find lost file volumes. This way you can return files from the raw partition.

You can return ntfs using TestDisk as follows:
- Run the TestDisk utility
- Select Create → recovery disk → file system type
- To start searching, select Analyze → Quick Search from the menu
- Press P to search for files and Write to write the results to a table on disk
Minitool Power Data Recovery
Power Data Recovery has tools for searching for deleted/lost partitions: Lost Partition Recovery. With this feature you can quickly recover a raw partition.

Unlike the TestDisk console utility, Power Data Recovery has a very clear interface. Thanks to this, you can recover files and then format the problem area of the disk in FAT or NTFS.
HDD Raw Copy
The Hdd Raw Copy program (developed by Toshiba) is designed for low-level and sector-by-sector creation of a disk image. It will be useful when creating a complete copy of a hard drive or SSD. Having created a duplicate disk, you can safely experiment with the RAW partition: restore files on it, format and convert to other file systems.

In addition, the HDD Raw Copy utility will be useful for Reserve copy, creating duplicates, restoring information and migrating data.
Question answer
The next time you turn on external HDD on USB OS “advised” to format the disk. I checked the controller itself, installing another HDD in it - it works. The problem is in the HDD itself. Please advise what to do.
Answer. If the OS advises you to format HDD There may be a partition table violation. Try restoring the raw disk system using the TestDisk console utility.
What is raw markup on hdd, memory card and usb flash drive. How to fix the error “chkdsk is not valid for raw disks” and return ntfs.
A fairly common problem: the contents of the memory card or hard drive are inaccessible, Windows OS (7 - 10) displays the message “chkdsk is not valid for the disk.” The file system format is RAW.
What is raw, is it scary and how to fix the error (returning the NTFS file system) - read here.
What is a "RAW file system"?
When you connect the device to the USB connector, you see in the properties of the file volume information that the flash card has a raw file system type and is not formatted in the standard NTFS or FAT file system.
Windows OS assigns a RAW label to a volume with an undefined file system. This occurs if none of the system drivers could recognize the file system. In the case of Windows OS, we are talking about FAT(32) and NTFS.
Thus, RAW is not a file system, but a sure sign of an error in work hard disk.
RAW disk: reasons for the error
Most often, RAW markup appears if:
- The disk or file volume is not formatted,
- Access to the file system/disk/memory card is prohibited or limited,
- There were reading errors, damage to the file system structure, and bad blocks.
A raw disk has some symptoms that definitely indicate problems with the disk. Among these symptoms:
- Incorrect media type when reading disc
- Windows displays "Cancel", "Retry", "Error" window
- File system appears as RAW in applications
- The error “chkdsk is not valid for raw disks” appears
- Windows asks you to format the disk
- File names contain non-standard characters
- The message “Sector not found” appears
When does the error chkdsk not valid for raw disks occur?
File system information is stored in two places:
- MBR partition Table
- Volumes boot sector
If one of these sectors is damaged or not found, chkdsk reports that the utility is not valid for raw disks.
Why raw markup is bad
If your device has raw markup, you cannot view its contents or perform file operations. Also, the disk cannot be checked for errors or defragmented.
As a result, files stored on the disk become inaccessible, although they are physically still there and can be restored by any recovery program.
Important! If your disk or partition has a raw file system type, your operating system Windows system prompts for formatting, displaying a warning “The disk is not formatted. Do you want to format it?" (Disk not formatted do you want to format it now?).
Don't settle for this: if you format the HDD, you will lose all the data on the raw disk!
How to fix raw without data loss in EaseUS Data Recovery Wizard
You can access files by correcting the MBR partition Table or converting raw to ntfs format. This can be done virtually without loss of data or formatting.
Since the raw disk still contains data, let's try to return it (if not completely, then at least the most valuable files).
We will need the EaseUS Data Recovery Wizard program. How to use it when recovering data from raw - read below.
Step 1. Recovering data from a RAW disk or partition
EaseUS Data Recovery Wizard is quite a suitable program:
- To recover data from raw disks,
- If the SD card or flash drive in raw format is not formatted
- To search for deleted hard drive partitions.
Data Recovery Wizard is a paid program when it comes to full-featured use.
Advice. Alternatively, you can try these free apps like Recuva or the ones we suggest in [this review].
1. First, download the program from the developer’s website:
The program is compatible with Windows 7/8/10, although it can be installed on earlier versions of the OS.
2. Launch EaseUS Data Recovery Wizard and in the window that appears, select file types for recovery (or activate the “All file types” option). Confirm the operation by pressing .
3. If a disk partition is deleted or detected in Explorer as RAW, use the Lost Disk Drives option.
Select the problematic disk with deleted data (Section “Lost disks”) and click the Scan button.
EaseUS Data Recovery Wizard will search for files available for recovery on the specified disk or SD card.
4. Once the scan is complete, a list of found files will be displayed. Check the required ones and click the Recover button to restore.
Important! Always save files to another drive to avoid overwriting.
Step 2. Convert RAW to NTFS file system without data loss
After recovering files, the raw disk needs to be formatted in order to be used further for storing files. How to do it correctly, read here.
By the way. Windows OS allows you to format a disk to NTFS using the built-in Diskpart formatting utility via the command line.
Thus, if you recover data from a raw disk in advance, you can safely return the NTFS partition and format it. If you first format the disk and then try to recover the data, the likelihood of recovery will be significantly reduced.
If you are unlucky and accidentally formatted a raw partition, losing data on it, use the Auslogics File Recovery program (it is useful to read the article at the link).
Other useful programs for raw disk recovery
In addition to the EaseUS Data Recovery Wizard, you may find other tools useful for recovering raw partitions.
TestDisk
The free console utility TestDisk allows you to find lost file volumes. This way you can return files from the raw partition.
You can return ntfs using TestDisk as follows:
- Run the TestDisk utility
- Select Create → recovery disk → file system type
- To start searching, select Analyze → Quick Search from the menu
- Press P to search for files and Write to write the results to a table on disk
Minitool Power Data Recovery
Power Data Recovery has tools for searching for deleted/lost partitions: Lost Partition Recovery. With this feature you can quickly recover a raw partition.
Unlike the TestDisk console utility, Power Data Recovery has a very clear interface. Thanks to this, you can recover files and then format the problem area of the disk in FAT or NTFS.
HDD Raw Copy
The Hdd Raw Copy program (developed by Toshiba) is designed for low-level and sector-by-sector creation of a disk image. It will be useful when creating a complete copy of a hard drive or SSD. Having created a duplicate disk, you can safely experiment with the RAW partition: restore files on it, format and convert to other file systems.
In addition, the HDD Raw Copy utility will be useful for Reserve copy, creating duplicates, restoring information and migrating data.
Question answer
The next time you turn on external HDD on USB OS “advised” to format the disk. I checked the controller itself, installing another HDD in it - it works. The problem is in the HDD itself. Please advise what to do.
Answer. If the OS advises you to format HDD There may be a partition table violation. Try restoring the raw disk system using the TestDisk console utility.
After connecting a flash drive to your computer, you suddenly find that it doesn’t work? The problem may be related to its corrupted RAW file system. Find out how to deal with this problem in our article.
First, let's understand the nature of the phenomenon. We are accustomed to the fact that the storage media we use operate in various formats, from NTFS to APFS. Many people mistakenly classify RAW as a full-fledged file system, but in most cases this is simply a signal of a malfunction in the file allocation table and, as a result, a malfunction of the disk.
What are the reasons?
A failure in the drive structure can occur due to many factors. For example:
- at the moment of reading the data, your lights were turned off;
- you pulled out the flash drive yourself without using safe removal;
- Finally, the computer could be attacked by a virus.
You need to solve the problem as quickly as possible if you want to recover your files.

Let's start with prevention
As mentioned above, one of the reasons for the malfunction of our carrier could be an ordinary virus. Antiviruses, unfortunately, are not the most advanced programs and can make mistakes even if you have heuristic modules enabled. You need to check if the cause of your troubles is still on your computer.

Repairing an empty drive
If the problem occurs when using an empty drive or if you are sure that there is no important data on it, you can safely restore it in the simplest and most reliable way - formatting.
- Despite the apparent simplicity of the operation, it is not recommended to use standard Explorer tools to format media in RAW. We will do this through the Computer Management console.
- Call the context menu of the “Computer” icon in the “Start” menu by right-clicking the mouse. Select the “Management” line from the menu.

- On the left side of the console that opens, find the Disk Management tool. It is located in the "Storage Devices" section.

- A list of all drives will open and virtual disks installed on your computer. Ignoring the “Good” status (the system gives this status if the device is detected at all), find your damaged drive and in the context menu caused by right-clicking on the disk, click “Format”.

- It is highly likely that you will see such a warning window. But, since there is no need to restore the data, we confirm readiness for the operation. Click “Yes”.

- In the next dialog box, enter the name of the new media, select its destination file system (NTFS is recommended for a hard drive, FAT for a flash drive). It is better to uncheck the line " Quick formatting" Click OK.

- During the operation, the device status will change to “Format”. After the process is completed, the status will switch back to “Good”, and “Explorer” will report to you that a new clean drive has been detected. Ready.

Restoration using standard means
You can try to fix the file system using the console application included with the operating system.
- From the Start menu, select All Programs and look for the Command Prompt icon. Click on this shortcut with the left mouse button and the console will launch.

- Then go to “Explorer” and see what label and letter the desired drive has. In this case it is "F:".

- In the console window, enter the following command: “chkdsk (disk label with colon) /f.” In this case, /f is the attribute of the operation, it stands for “fix” - the program will fix the problems found.

- After pressing the Enter button, the system will begin analyzing the allocation table of the selected media. This procedure, depending on the extent of damage and extent, can take from several minutes to several hours. The signal about the end of the operation will be the available input field for the next command, as in the screenshot below.

- Go to Explorer and check your disk. Access to files should appear, and in the properties that are called up by the corresponding link in the context menu, information about the file system and volume should be displayed. Ready.


Note! During the recovery process, you may see a message that “CHKDSK is not valid for the RAW system” - this means that the program cannot cope and a deeper analysis is needed.
DMDE
If the built-in system utility is not powerful enough, you can try using third-party offers. The team behind the DMDE program assures that their algorithms are the most advanced and that literally any lost data can be recovered.
- Download the application from its official website. To do this, set search engine request "Download DMDE".

- On the website, select the “Download for Windows, 32/64 bit” button. The site will automatically detect the system bit size and offer you the correct version. All you have to do is wait for the download to finish.

- The program is portable and does not require installation. Therefore, simply run its executable file by double-clicking on it with the left mouse button.

- In the dialog box that opens, select Russian and click OK.

- Accept the terms license agreement by checking the required line and clicking “Accept”.

- Under Physical Devices, find your damaged drive and click OK.

- The program will conduct a quick scan of the device and open a list of partitions. Your damaged partition can be shown either in the format it was in before the damage, or in RAW, it all depends on the degree of damage. Either way, check it and click "Full Scan".

- In the list provided, mark those file systems that could be on the device, then click “Scan”.

- At the bottom of the window, in the “Scanning” line, progress will be displayed as a percentage. Wait until the operation is completed.

- Just in case, save the logs by agreeing to the program’s request.

- Use the health indicator of the found partition to determine which volume is right for you. Usually the damaged partition comes first. Right-click on it, and then select “Open Volume...” from the menu.

- In the folder tree that opens, check the boxes for all the directories and files that you want to restore. Press "CTRL+U". This key combination will launch the recovery wizard.

- On the “Source and recording location” tab, select “Everywhere” as the source, in the “All marked from” field leave the value of the root folder “$Root”, and in the “Recover to” line indicate the path where the recovered files will be saved. Click OK.

- After the operation is completed, the program will show you a window with statistics on the number of processed files. Click OK. You will find your files in the directory you specified.

- To complete the recovery of the media, format it using the instructions from the section above. Ready.
Recovery in macOS environment
operating system Apple computers equipped special utility, allowing you to fully work with disks. Fixing file system errors is easy here.
- Open LaunchPad by selecting the appropriate icon in the dock.

- In the Other folder, find the Disk Utility icon and click on it.

- The Media Management console opens. In the side menu, find and select the option you want.

Note! As you can see, the list of disks is multi-level. The first level is the device itself, the second is its sections. You need to select the device itself from the first level of the list.
- After marking the disk, click the “First Aid” button in the top toolbar.

- The program will perform the necessary recovery operations, after which it will report on the completion of the operation.

Click “Finish”, your disk is good, you can open it through Finder.
- If you recovered files without formatting the media, be sure to copy them to your computer and format them. This is necessary to prevent the same errors from occurring in the future;
- get into the habit of doing backups important data from flash drives to a reliable internal drive about once every couple of months;
- check the disk for presence and defragment it at the same frequency;
- Never neglect to safely remove devices.
Video - How to fix a RAW disk and recover HDD data with RAW partitions
Imagine inserting a flash drive into your computer and seeing a message: “To use the drive in drive F:, first format it. Do you want to format it? If it's a new flash drive, no questions asked, but what if there was data on it? Then don’t rush to agree to formatting - perhaps there is a chance to save them.
First of all, you can try to take a chance and fix errors using Windows. To do this, open the console as administrator and write:
Chkdsk f: /f
Naturally, f: will need to be replaced with the current disk name. The /f option means error correction during scanning.
If the operation was successful, you can try opening files. But it may also happen that you will see the error “Chkdsk is not valid for RAW disks.” Don't despair, we have a couple more options in stock. Let's take advantage special program DMDE.
DMDE is a very cool program that is useful for searching, editing and restoring data on disks. The developer reports that it uses clever algorithms, thanks to which it can restore directory structures and files in difficult cases when other programs do not give the desired result.
DMDE has a disk editor, a simple partition manager, the ability to image and clone disks, rebuild RAID arrays, and so on. Paid editions support the recovery of files and directories without restrictions, but the free version is also very good and helps just as well in many situations.
After starting the program, select our media.

A partition window opens, where we double-click to select a full scan.

After a quick scan, you need to go one level higher to the “Found” folder and click “All found + reconstruction.” A dialog will open where we select “Rescan current file system” and wait for the end of the operation.

After scanning, DMDE will show a list of found files. We look through the folders and choose what to restore. Entire folders in free version Unfortunately, it cannot be restored. To restore one file at a time, right-click and select “Restore object”, then indicate where to restore and click OK.

It is worth noting that file names are generated automatically and often do not correspond to the original ones. Don't be surprised if some files come out broken or artifacts appear in your photos. By the way, sometimes images can be restored using one of the special utilities. For example, Recuva, R-Studio and “PhotoDOCTOR”. Much to my surprise, the latest program restored almost dead photos in very good condition. good quality and with a minimum of artifacts - many of its competitors failed to cope with this.
In general, good luck in your recovery! But it’s better, of course, to immediately rewrite all data from temporary media and make backups.
Good afternoon!. Not so long ago, you and I successfully solved two global problems in Microsoft operating systems, namely, they eliminated the black screen when loading Windows 10 and were able to defeat the endless update of Windows 8.1, for which I congratulate you. But Windows does not want to give up and periodically throws up interesting and not always pleasant situations. I have a 4 TB Seagate NAS HDD on which I store a collection of movies, one fine winter day HDD drive began to be defined in the form RAW file system and does not open regular means OS. Naturally, I would like to return it to working condition and fix RAW format without data loss, which is exactly what we will do in this article and, most importantly, we will learn to prevent such situations in the future.
What is RAW (file system)
Surely many of my readers, the overwhelming majority, know only the NTFS file system, since it is a standard in operating systems of the Windows family; those who are older and more technically savvy know FAT16 and FAT32. Who's watching latest news and industry trends, I have already read, and some have gotten acquainted with, the new ReFS, but few know about the “file system” ( HDD status) RAW, and this is not surprising, since if you met her, then in most cases you have problems.
RAW file system- This state of hard disk or other storage device that does not have a known Windows file system. Since there is no file system on the disk, there can be no files or folders on the disk, and it cannot be used to store data, that's what your Windows thinks and you shouldn't blame it for that.
You can read a little more about the RAW file system here https://ru.wikipedia.org/wiki/RAW_(file_system)
Reasons why RAW appears on hard drives
Here is a list of the main problems due to which your HDD may appear as RAW:
- MBR partition table corruption
- Corruption of boot blocks on the file system
- If you had NTFS, then the MFT main file table area may have been damaged
- Your disk initially has a different file system, for example, when it was previously part of a RAID array, since storage systems have their own file systems.
- There is a problem with the drivers, your system could not find the correct driver that could correctly identify the HDD.
- Incorrect or abnormal computer shutdown
- A problem with USB port ami on the motherboard
- Problem with docking stations external connection hard drives
- You do not correctly remove your flash drive or HDD, as a result of which you break its file system; unfortunately, NTFS is critical to this. Here, on the one hand, the user is illiterate, and on the other hand, he is slightly deceived operating system, a simple example, you copy a file to your flash drive. You logically have a slider with the copying status, it visually ends, but the problem is that the system continues copying it from the buffer, to background. The buffer is created to speed up copying, and if at this moment a person simply pulls out the flash drive, then the information on it will, at best, be damaged. For such things there is a safe removal of the device.
Methods for repairing a RAW file system disk
There is a lot written on the Internet about various methods, which supposedly help in restoring a hard drive or flash drive with RAW, but the problem with most sites is that they are run not by specialists who check everything from their own experience, but by stupid copywriters who simply rewrite other people’s articles with errors and mistakes, but on additional questions or errors, the authors of these articles simply make mistakes and do not answer. As a result, the user loses his data and is disappointed with everything and everyone. Among the methods I want to highlight:
- Checking the disk for errors via CHKDSK, whether it only applies to the system disk or not, and in system recovery mode
- AOMEI Partition Assistant is a chic processor with extensive tools, thanks to it we enlarged the C drive in Windows 10 or converted a GPT drive to MBR.
- DMDE utility - it allows you to find lost partitions
- TestDisk - The utility also allows you to find lost partitions
- Active Partition Recovery for Windows Professional - can also correct errors in the boot sector
- Minitool Power Data Recovery is another tool that allows you to scan your hard drive for other file systems and allows you to recover RAW.
What does a partition with a RAW file system look like?
And so, before I show you what to do when restoring your HDD or flash drive, I will show you what it all looks like. I have on home computer The Windows 8.1 operating system is installed, I am satisfied with it in all respects. Also, to store various information, I use regular hard disks 3.5 inch format. On them I have films, music and a huge number of video lessons and courses. To connect hard drives I use Agestar docking stations, they are shown in the photo below.

One fine day, when connecting the drives, autorun did not work on one of them. I go to “My Computer” and what I see is that the drive I need has the letter G, but it does not display information about its size and load. When I tried to open it, Windows Explorer simply froze and did not respond for about 5 minutes.

After about five minutes, instead of opening the disk, a window appeared:
To use a disk in drive G: format it first. Do you want to format it?

Naturally, this was not part of my plans, since the disk is full of information. Sometimes I encountered this and it was related to the fact that the connected disk through the docking station did not have enough voltage, I switched it to another one, the effect was the same. I connected it directly via SATA, it was still unavailable.
I opened the snap-in "(diskmgmt.msc)". The equipment itself also took about 5 minutes to open and become dull. As a result, I received a list of my hard drives, and what a surprise I was when I saw that my 4 terabyte drive had a RAW file system, and it had a letter assigned.

When I tried to open a RAW disk from Disk Management, I received the following error:
No access to G:\. The file or folder is damaged. Reading is impossible.

How to fix a disk with a RAW system
As I tell you many times, you always need to start with physical level. First, open your “Device Manager” and make sure that you don’t have any yellow warnings on your equipment, especially in the “USB Controllers” section if you connect a disk or flash drive through them and in the “Disk Devices” section.

Most often they are related to drivers. Therefore, I advise you to download and install the most fresh drivers on your computer hardware, focus on the motherboard, drives and processor. I have already told you how to update drivers on a Windows computer; if you don’t know how, I advise you to read it.
Also, be sure to check your physical wires after updating the drivers; if possible, try installing others. You can plug external docking stations or a flash drive into another USB port to eliminate this probable cause. If there are no problems at the level of physics and hardware, then we have no choice but to resort to software solutions.
Restoring a RAW disk using chkdsk (checking the disk for errors)
When I started looking for ways to fix the RAW file system on my devices, I very often came across articles that try checking your HDD for errors using the built-in Windows tools, the so-called chkdsk utility. I remind you that my operating system is Windows 8.1. There are two ways to run a disk error check: GUI or using the command line.
I'm trying to run from graphics mode, I remind you, this is done through the disk properties. I click in the “Disk Management” snap-in on my own and select its properties. On the general tab, my hard drive was displayed as empty, it had a capacity of 0 bytes. Go to the "Service" tab.

Select "Check for errors" and click check. Personally, I immediately got an error window:

Let's try to do the same thing, but from the command line. To do this, open a cmd shell as an administrator and enter the command:
chkdsk G: /f (Where G: is the letter of your RAW volume)
The scanning process will begin, if everything is fine, then you should have identified the old file system, in my case, it is NTFS, and the volume label has also been determined, in my case, it is HDD-48 (Movies). Now three stages of checks begin on bad sectors, search and recovery of non-indexed files and repair of the file table itself.

In my case, after half a minute this gave the result in the form of a restored HDD, now it was NTFS, not RAW type.

If chkdsk for RAW disks is not applicable on your system, then you will receive an error message:
Here, for some reason, the operating system was unable to install the previous one, and shows the wrong type. In such cases, the chkdsk utility with the /f key will not help you, but don’t worry, everything can be fixed, we’ll fix it below.

Recovering a RAW disk when the system does not boot
There are situations when you cannot run a disk error check because your Windows operating system does not boot. It goes a long way, the recent error 0xc0000098 or whea uncorrectable error can be listed for a very long time. In each of these cases, we have developed an algorithm:
- If you are my regular guest and subscriber, then you have probably seen my publication on how to return the “Last Known Good Configuration” item, from which it is easy to resuscitate the system, but by default this option is not enabled.
- The next step was to launch the command line, but from regime Windows recovery , which can be launched via F8 at startup or from a bootable USB flash drive, which you should have; if not, then do it in 5 minutes, if you have, of course, another computer. Don't forget to configure booting into the BIOS from a flash drive. When you see a window with a choice of language, press the combination Shift keys and F10 at the same time to open the command prompt.


Among the additional parameters, you can also find an item with command line.

First of all, we need to calculate the drive letter, since here it may differ


If everything is fine, then you will successfully restore system disk, if fate befell you in the form of the message “CHKDSK is not valid for RAW disks,” then do not rush to get upset and this can be fixed.
Before the next manipulations, I advise you to practice using future utilities by creating RAW disks in a test environment, in virtual machine I have already described how to do this
Easily format a disk or RAW partition when there is no important data on it
Before I move on to describing more advanced methods, I want to tell you that if you have a flash drive or hard drive that is in RAW state no important data, then you can generally quickly format everything and return it to a working state, since I remind you that the RAW state is most often that the system cannot find the previous file system on the media. Open the Disk Management snap-in, I remind you, press WIN and R at the same time and write diskmgmt.msc there. In the snap-in, find your RAW disk that needs to be fixed and converted to NTFS. Right-click on it and from context menu select "Format".

Specify the file type NTFS systems and correct the RAW format on your media.

We agree that all data will be destroyed, since in this case it is not significant for you.

As you can see this method the easiest to fix HDD RAW format.

If, when you try to format, the “Format” option is inactive, then in this case you will need to delete the partition.

When the partition is deleted, your disk will be in an unpartitioned state. Right-click and select "Create simple volume"

As a result, we received a corrected HDD or flash drive in the form of NTFS, and not the notorious RAW.


