Using a laptop in everyday life, users sometimes encounter a problem: a key on the keyboard has broken off. The reason could be any factor: cleaning the keyboard, using a vacuum cleaner for cleaning, a stray cat (yes, even this happens), a small child who is interested in everything around him and accidentally breaks a key, and much more. But not everyone knows that this small problem is quite easy to fix.
I'll tell you how to put the button back without loss.
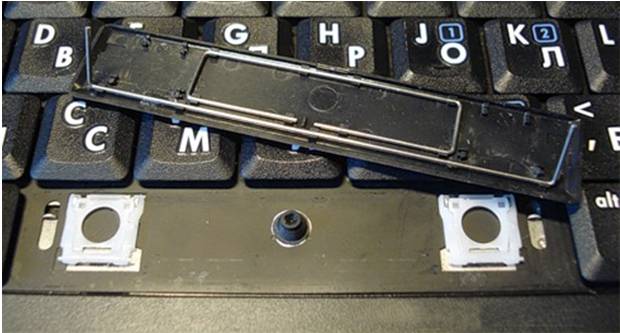
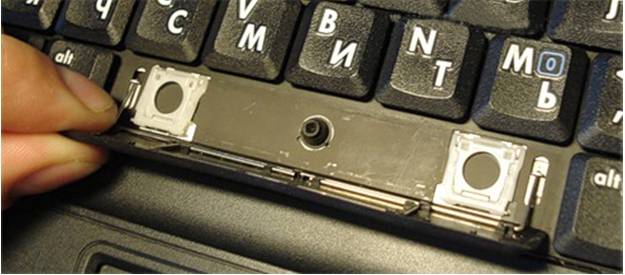
Trouble has struck and your laptop keyboard looks like this:

Laptops are all different, but most often their fastening is similar (fastening principle).
The key on the back side looks like this:

We see two pairs of fasteners:
- two latches;
- two grooves for the rocker ears.
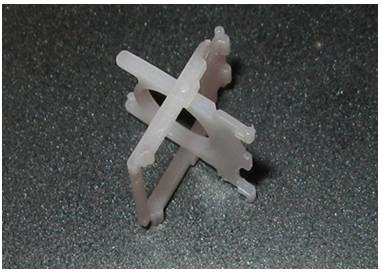
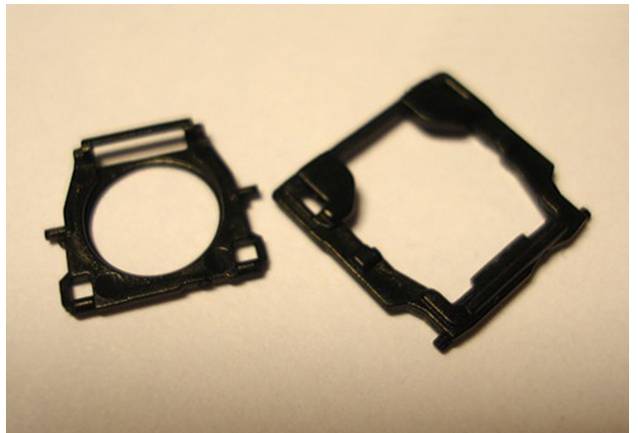
The key cover is attached to the keyboard using a special rocker (clamp), which consists of 2 parts connected by a hinge in the middle and forming the letter X (ha).

It often happens that the key “breaks out” along with the rocker. In this case, you must first disconnect the rocker from the key cap, install the rocker on the keyboard, and only then return the key to its rightful place.
To do this, take the key, unsnap the latch on one side of the key, and remove the antennae of the rocker and grooves on the other side:

We get 2 parts: a key cover and a rocker.
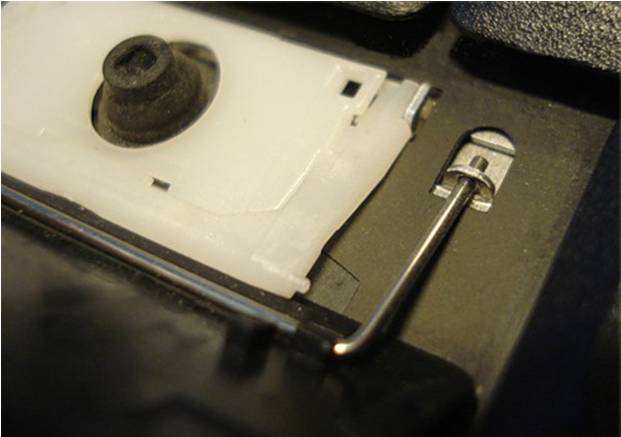
The keyboard has 3 lugs for fastening: one larger and two smaller.

If for some reason these fasteners are bent (for example, a heavy object fell on the keyboard, as a result of which a key jumped out), they need to be bent into the correct position. Be careful, you cannot bend these fasteners too much, because... They are made of aluminum and break off easily, after which repairs will become much more difficult.
Install the rocker on the keyboard:
- place it under the large mounting eye

Lightly press the rocker onto the 2 small mounts.

After installing the rocker, you can put the key cover back.
- insert the protrusions on the rocker into the grooves of the lid


Here you need to act carefully and not miss the mark :) .
Next, making sure that the ears are in the grooves, lightly press the top of the key and secure the key cover; a light click will be heard.

Ready! the key is in place.

Large keys (Tab, Shift, space, enter), in addition to a plastic rocker, can have a metal stabilizer for uniform pressing.

There are two additional tabs on the keyboard base to secure this stabilizer. Otherwise the design is the same as described above.

First we wind the ends of the stabilizer.

Then we insert the lower “antennae” of the rocker into the grooves and, with a light press, put the button in place.


The spacebar (and sometimes other long keys) is supported by two rockers and a stabilizer.

In principle, the installation is no different from the above-described installation of the Shift key.


It was discussed above internal organization Hewlett-Packard laptop keys.
I almost forgot. If a swing, consisting of two parts, turns out to be disassembled during an emergency, do not despair. Using a needle, toothpick or other suitable object, it is easy to assemble. We put one side into the groove, and to install the second side we use our auxiliary object.


For comparison, let's look at the key devices of the Asus laptop.
The key rocker is also made of white plastic (the color is not important, it can also be made of black), and the design is almost the same. The only difference is in the shape of the “antennae” at the points of attachment to the small “hooks” of the keyboard.


The reverse side of the key is similar in design, differing only slightly in size:

The “hooks” of the keyboard mounts are similar: 2 small, 1 large. The only significant difference is the location (the big one is at the top, not at the bottom).

The process of installing the rocker is the same as described above: first by the large hook, then by the small ones.

When installing the key, you should pay attention that the grooves for the “antennae” of the rocker are at the top, so you must first insert the upper part into the mount.

But this keyboard has some inconvenience with the space key: the rockers are rotated (it is not clear why) by 90 degrees, and it is somewhat more difficult to install the key in place.


We wind the ends of the metal stabilizer

And then we try to carefully press the key onto all the latches.

And finally, I’ll show you another type of mount using the example of an Apple Ibook G4 laptop.
The copy of the laptop that came to me had metal brackets instead of plastic rockers (although on ibooks there are also plastic “classic” rocker devices).


To install the key cover, first secure it to one bracket

And then with a light press we snap onto the second bracket


The disadvantages of a keyboard with metal brackets include higher noise when pressed.
Now, dear users, you will have no questions:
- How does a laptop keyboard work?
- how to fix a key on a laptop?
- How to replace the key cover?
- what to do if a cat tore out a key on a laptop?
and so on. :)
Having learned the structure of the button and a number of simple operations for removing and installing it, the user will be able to independently fix a minor breakdown or replace the faulty key with a new one.
Laptop, unlike personal computer, has a built-in dialing device, the cost of which is significantly higher due to its compact dimensions and integral design. That is why its repair, including independent repairs, is constantly in demand and economically justified.
With prolonged use and active use, parts of the keyboard fall out or break, requiring replacement, quite often.
However, before you run to service center, let's try to figure out whether it is possible to insert a button into the laptop keyboard yourself at home and, perhaps, save money and personal time.
Possible reasons
There can be many possible reasons for keys breaking or falling out:

To understand what this leads to and determine the probability self-repair, consider the following cases when one or more keys have fallen out or do not work:
- the upper part simply jumped out of the mounts, got stuck, the plastic mount broke, or the fixing lugs on the aluminum base of the keyboard were bent. - We install, repair or replace ourselves;
- there was a short circuit and/or destruction of the conductive paths due to a manufacturing defect, liquid ingress or other outside interference. - It is worth contacting the service if you do not have certain skills;
- damage to the connecting motherboard plume. - Replacement (preferably by a specialist) of the film or the entire device.
Taking into account the fact that the majority of users are amateurs, we will consider only the correction of breakdowns in the first case: mechanical damage.

To do this you may need:
- a regular needle or a syringe;
- paper clip;
- glue;
- knife, small screwdriver;
- wire cutters and pliers;
- thin soldering iron and lighter;
- small vice.
The first two positions of the list are enough to simply insert the dropped item, and the rest may be needed for minor repairs.
Important: Please note right away that all work must be carried out ONLY with the device disconnected from the network and the battery removed.
Photo: Parsing the assembly of keys
Button and its design
Before inserting a button into the laptop keyboard yourself, we recommend that you become familiar with its design. This will help you carry out repairs correctly, as well as make installation easy and simple. It should be remembered and taken into account that, unlike a stationary one, a laptop keyboard has a shorter stroke.
They consist of:
- directly the lid with latches - a rectangular piece of plastic that is pressed with your finger (hereinafter simply “lid”). On the inside there are two pairs of fasteners: latches and grooves, and on the long ones there is also a metal stiffness stabilizer;

- folding X-shaped mechanism with latches that hold the lid. It is commonly called a "swing", "lift" or "cot". Please note that each of the two parts of the folding mechanism is attached to the key in two places;
- a spring element that raises and lowers the key, and also directly closes the electrical contact - a rubber nipple cone (hereinafter simply “spring”);
- films containing contact conductive pads and tracks.
- At the first stage we install the stabilizer.

We insert the ends of the fastening into special holes and fix them in the grooves that are located directly on the keyboard body;

- on the second - we press and connect the lower part of the surface of the lid with the clamshell;
- at the third stage, lightly pressing and snapping the upper latches on the lid and the swing, we put it in place.
- put it back “as is”, without changes;
- purchase and install a new one (used is also possible);
- make minor repairs or replace parts from the “donor” and continue operation.
- assembly and installation of the popped-out parts of the mechanism into the grooves (quite often the clamshell “crumbles”);
- correction of bent lugs in the metal base of the keyboard (for example, when a heavy object falls on the keyboard);
- gluing cracks and broken fasteners.
A typical keyboard base in a laptop is an aluminum plate, stamped with ears for good fixation of the clamshell and the contact pad, under which there are three layers of film with conductive graphite tracks.

Reliable fastening of the swing ensures uniform movement and the absence of distortions when pressing the key.
Please note that various manufacturers There may be slight design differences in the shape and types of fasteners.
Therefore, if you need to disassemble it yourself for the first time, proceed carefully.
Disassembly procedure
There are often situations when it becomes necessary to completely remove and disassemble the button. For example, sinking, lack of response on the screen when it is pressed, or deformation of the folding bed mounting ears. Removing, disassembling and inserting a button into a laptop keyboard is quite easy.
To do this, you will need a thin, flat instrument, such as a dental hook. As you know from the previous section, the swing is attached to the lid in four places. You can’t just bend it and “rip it off” - this will deform the swing and lead to damage.
That's why:

Inserting a button on a laptop is very easy
First, we carefully inspect all the fasteners, ears, antennae and grooves again. If you have carefully studied the device and design, read the disassembly procedure, then putting the popped element back in place will not be difficult.
This process involves two simple steps:

Please note that sometimes the lid will fall out along with the swing. In such a case, you should disassemble it, carry out an inspection, and only then install it. Moreover, first we insert the folding mechanism, and then the lid itself.
The described process may seem complicated, but you just have to try it once and you will see for yourself that inserting a button into a laptop keyboard is very simple!

Installing large buttons
Function keys (space, register, tab, enter, etc.) are larger than the others. It is this property that requires a slightly different order of installation. The reason for this is the presence of a metal stabilizer, which ensures even pressure.

There are additional lugs on the keyboard backing for reliable fixation of the rigidity amplifier itself.
And although everything else is exactly the same as described above, we install long buttons on the folding bed in three stages:
Please note that some long keys (for example, the spacebar) are fixed by two folding mechanisms and a rigidity amplifier.


We repair keys
As a rule, it is better not to start complex and time-consuming repairs yourself.
Having disassembled a faulty, poorly functioning or torn out key, you will have to, based on its careful examination, make one of three decisions:
For the last point, you may find the tools we talked about above useful.
Minor mechanical repairs include:
It is not worth repairing the damage to the latches and hinge joint of the clamshell - it is better, if possible, to find a “donor” or replace the entire key. The smoothness, softness and quietness of its operation depends on this.

A rubber spring is usually glued to a film with conductive tracks. Sometimes it happens that it falls out. In this case, before inserting the button into the laptop keyboard, you should carefully install its wide part towards the bottom, strictly in the center. Displacement of the spring during installation is not allowed.
Having a problem with the keys? Try to solve it yourself if possible. It is not difficult! All you need is attentiveness, perseverance, accuracy and a little time.
Having acquired the necessary skills, you can, on occasion, save the life of your pet by promptly eliminating the consequences of moisture ingress or significantly extend it by performing a general cleaning of dust and crumbs.
Helpful advice: By the way, before completely disassembling the keyboard of your laptop, we strongly recommend taking a photo, just in case, of the order of the keys. This will help greatly simplify and speed up the reassembly process!
In the 21st century, it seems that the most indispensable element of life has become a computer or more portable laptop. Millions of people spend the whole day in front of a computer, diligently pressing buttons on the keyboard, and at the same time doing a bunch of important things. Very often, due to long or not very careful use, the buttons on the keyboard break, or, more simply put, fly out. If this happened to your computer, then you know first-hand that at that moment everything seems to freeze and stop. Several questions arise at once: “What to do? Where should I take it for repairs? How much will you have to pay? Don't be in a hurry to despair. Everything is very easily fixable; you can repair such a breakdown yourself at home. In our article you will read brief instructions for repairing a button on a keyboard.
Key device
First, look at the key that came off: There should be four special grooves on the inside of the button for attaching to the keyboard. And on the keyboard itself you will see a white plastic device in the form of a double frame, along the edges of which there are special protrusions for button grooves.
There are cases when the button flies out along with the fastening frame due to excessive pressing. Then you will see a slightly different picture. A frame will be attached to the inside of the button, and three fasteners will be visible on the keyboard: one large and two small. In general, the device is not at all complicated, you will quickly figure it out!
Larger keys - Shift, Enter - have, in addition, a metal spring element, for fixing which on the keyboard there are corresponding ears.
Simple repair
I must warn you right away: do not try to glue the button with “super glue”! This will not lead to anything good. In the best case, it will peel off very soon, and in the worst case, you will then have to take the entire keyboard for repairs.
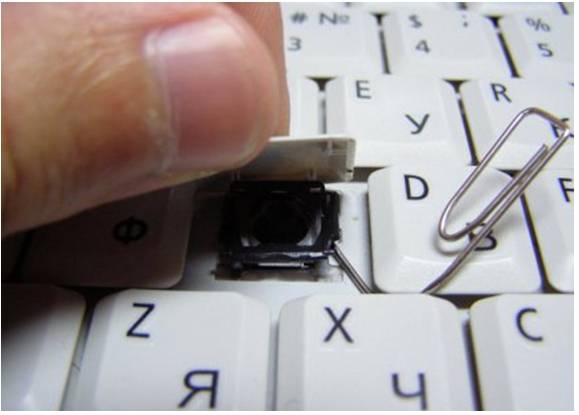
Let's get started! Repairing the button itself can hardly be called a repair. This is a very simple procedure for  which will need any handy tool: a large needle or toothpick, if available, it will be convenient to use a thin watch screwdriver. In the first option of tearing off the button, the only thing that is required of you is to first very accurately attach the button to the fastening protrusions from above, and then lightly press it from below, so that the button snaps onto the frame. If this button has a spring, then first insert the spring into the ears, and then begin attaching the button itself to the frame. But just calculate the force of pressure: it should not be excessive, otherwise the button may fly out again, but along with the frame. Then the work will become more complicated and take a little longer.
In the second case, when the frame still remains in the button itself, the repairman will have to tinker a little and perform the following algorithm of actions:
1) You need to detach the frame from the button:
To do this, use a needle to pry the frame from below, and then remove its ears from the grooves of the button from above. If suddenly the frame splits into two parts, do not be alarmed: they can be connected. Please note that on one part there are thin protrusions on the sides, and on the other there are two special recesses for them. You need to match them using a needle. The work, of course, is intricate and meticulous, but quite doable.
2) Install the frame on the keyboard:
first hook it to the wide mount, then to the two small ones. Make sure that the frame is hooked tightly and will not fly out again when the button is secured.
3) And finally, according to the method described above attach a button to the keyboard.
Video of removing and installing buttons
That's all! As you can see, anyone can fix a button on a keyboard. After which, you can again fully work at the computer, without spending a penny.
Laptop repair service centers are often contacted with problems such as a broken or dropped button. Even one key that fails can cause problems with the operation of the computer. How to fix a button on acer laptop, may differ from laptops from other manufacturers. This is due to the fact that different laptop models have different keyboard designs. Therefore, first you must, and then only you can look at ways to attach keys on the Internet. However, there are also general recommendations How to fix a key without resorting to the services of specialists.
Possible causes of failure
The keyboard on a laptop is usually quite thin, and its buttons have little travel. In this regard, this part on the laptop is very susceptible to mechanical stress. The most common cause of breakdown is spilled liquid. In this case, the conductive paths fail, and one or more buttons, and sometimes the entire keyboard, stops working.
In addition, the keys become clogged with dust, pet hair, dirt, etc. in this case, you need to do it correctly. When a user begins to clean the keyboard on their own, a button often falls out as a result of some incorrect action. Although this is unpleasant, it is completely fixable. And you can find out how to clean the keyboard without consequences for it from this. Well, then let's take a closer look at how to fix a button on an asus laptop or models from other manufacturers.
What to do if the button on your laptop is broken
Despite the fact that laptops differ from each other, the way they attach the buttons is usually the same. Essentially, the key is a rubber base with a built-in contact. When you press the button, the contact comes into contact with the circuit, resulting in the desired action. Therefore, it is necessary to restore contact and ensure that it is established correctly.

Before you fix the button on an HP laptop, as well as on other laptops, you should understand the cause of the breakdown. If the key is stuck, you need to try to pull it back or simply remove it. For this operation you will need a special screwdriver or a thick needle. Place the end of the tool under the button and gently pull up. You don’t need to apply a lot of force, the action is done smoothly, otherwise there is a risk of damaging the key, and finding a replacement part will be quite difficult. As a result of manipulations, the button should pop out.
Before you begin repairs, you should inspect the key. It may not work due to mechanical damage. If the button cannot be restored, then replacing it with a new one cannot be avoided. You can purchase a separate keyboard part from repair shops. In cases where the key can be glued together, you can use super glue. It is important that the contact ends up in the same place where it was, otherwise the button will still not work.
If the key falls out, you should perform the following actions. First you need to understand the design of the button mount, which is usually the same. On the back side of the key there are latches and grooves in which there are “ears” of the rocker, the purpose of which is to connect the entire keyboard with the cover separate button. If the key falls out along with this rocker, they should be separated. Next, install the rocker itself, on which the button cover will be placed. These two elements are connected to each other by grooves located on them. Before you begin manipulation, remove all dirt from the opened niche with a napkin; the surface you are working with must be clean.
As you can see, fixing the button yourself is not so difficult if you first understand the cause of the breakdown. However, if liquid is spilled, it is not always possible to handle it yourself, since it is quite difficult to restore blurred contacts. In this case, you will either need to contact the service center or you can. And replacing a fallen button is not difficult even for a beginner who is encountering this for the first time.
Hello dear readers. Sometimes a situation arises when something falls on a laptop and the keys become damaged or fly off. Like in the picture below :)
In this case, our task is to perform the correct laptop key repair on one's own. This procedure is quite simple, but without understanding how the keys on a laptop are arranged, you can easily make the situation worse.
Repairing laptop buttons
So let's look at the step-by-step repair of laptop keys. If a piece of a key breaks off, it is better not to try to glue something together and attach it all back. The buttons of any keyboard twitch frequently. This means that such a key will not last long.
Therefore, in order not to waste your energy and time, I recommend contacting the nearest service center, where these buttons should be in bulk :)
Depending on the model, laptop button repair may differ. But you can see the approximate principle of fastening with latches and rockers that you will have below.

As you can see, the key on the keyboard is secured by a special rocker (the ears of which you could see under the key). The rocker itself consists of several parts with a hinged connection principle.

In the event that the rocker flies off along with the key, you will first need to return the rocker back and only then begin to repair the laptop keys.

After successfully returning the rocker to its place, we begin to work on the keys. Carefully insert the protrusions on the rocker into the grooves of the lid.

After the ears fit into the grooves, apply light pressure to secure the button.

During repairs large buttons laptop, such as - "space". You can see a metal stabilizer under the button. It is necessary for uniform key press.

This stabilizer is additionally attached to the keyboard lining. In this regard, the principle of fastening will be slightly different. To start, insert the ends of the stabilizer into special holes.


