Probably, any person, like me, when they hear the word “photo for documents” immediately thinks in the direction of a photo salon. After all, there are special requirements for photographs for documents and they must be of very high quality, right? Moreover, let’s say, on your passport (where it will most likely hang for the rest of your life), you want to look decent, and not in such a state that you don’t want to open it again.
I also have a need for such pictures regularly. Passports, visas, electronic applications, student, travel, bank cards... But what can I say, photos for documents are now needed constantly and without exception, I’m not even talking about travelers!
Until I was 20 years old, when I really needed these pictures, 10 times I never thought about the fact that they could be taken outside of a salon. I came to a photo studio, where a tired granny snapped at me an equally tired of life NikonD200, and after a couple of days I took the result. He always suited me. However, the day came when I thought...
Navigation
Introduction
Why did I choose to take photos myself?
And so, when I had to collect the next package of documents for a Schengen visa, they demanded a photo from me. The usual studio was closed. I went to the next one, which is in the city center. He came, so he said to take a photo of me for a Schengen visa. I was asked to stand... in front of a shop window! Yes, there was no proper light or umbrellas. There was only a soap dish, so antediluvian that its price hardly exceeded 30 dollars. And they took a picture of me with this thing, lighting up half of my face with the flash. And then they offered to evaluate the footage on the same screen (smaller than on my phone). I looked from the woman to the camera for a long time... But I still restrained myself and simply left silently. I thought, what a weirdo, what to take from her.
A year has already passed. And I saw a similar situation three times. Every second person opens their own “ID photo salons” and tries to sell us our photos of frankly lousy quality for 2 - 3 bucks, despite the fact that its cost is a maximum of 0.2 cents.
I finally realized that I needed to “get involved” with this contingent when I needed it. For those who don’t know, let me explain, it is served in in electronic format. I came to the studio (normal, by the way) and said - I urgently need an electronic photo, can you put it on a flash drive? Do you think they answered me positively? Fuck you! I was told to wait 2 days for the printed photo to be ready, and only after that I could pick up the electronic one. The arguments that I will pay for printing, but I don’t need it, I need a photo now and didn’t help here. He spat and went home.
After these incidents, I realized that in the current conditions, you can take a good photo for documents at home, if only you had the desire and at least some ability to use a PC. The rest is a matter of technique. The relevance increases for those who travel, and even for entire families. I can’t say that there was a special saving in money... But the saving in nerves is significant.
What do we need?
So, you’ve decided to create your own ID photo for yourself or your loved ones. Let's figure out what you'll need...
- Camera (preferably DSLR)
- If possible, use a tripod or a hard surface to give the camera stability (at first I used a stack of books on the table)
- More or less functional computer
- Programs for processing (in the article I consider the option with Photoshop, since various specialized software costs money, and in terms of functionality it is only crammed with unnecessary tools)
- Color photo printer and high-quality photo paper (not necessary, you can print from friends or in a darkroom)
- White thick background (thick fabric or whatman paper). You can, of course, as a last resort, use another uniform background and then cut it out in Photoshop.
As you can see, there is nothing supernatural here, but many things, if necessary. You can exclude it from this list altogether. And once you have decided on the means at hand, you can start photography.
Taking photos for documents
Actually, this is the most difficult stage. If you overcome it, then everything will definitely work out. The fact is that the photo for documents must meet certain general standards. In particular, you must position the lighting correctly.
Lighting
In a professional studio, you will find at least a couple of umbrellas, a white backdrop, and a few lamps combined with a couple of strobes. All this creates the necessary, even lighting without glare (and even then, if the photographer has direct hands and the ability to actually use all this). And our task is to achieve the most similar result in home, one might say, “handicraft” conditions.
I believe that a combination of daylight, uniform light + camera flash can be an excellent option.
I did the following. During the day, I hung an even piece of white fabric against the background of the window. Although. as practice shows, you can get by with whatman paper against the background of an ordinary wall, but then you must make sure that the source of daylight is either behind you or in front. Any deviation will create unnecessary shadows, so if the window is on the side, curtain it. And turn off artificial light sources in the room.
Thus, in combination with a flash, you will be able to achieve the most correct lighting in a hurry.
Landing
Remember that to create a high-quality photo, you must be at a distance of 0.5 - 0.8 meters from the background, and the camera that will take pictures of you must be at a distance of 1 - 3 meters from you.
In this case, it is very desirable that the photographic equipment be placed on a stable tripod. As a last resort, you can replace it with a stack of books laid on the table.
The camera should be at eye level, and you should sit or stand, looking directly into the lens. The head is turned straight.
Different documents contain different requirements. Some places require a serious face (passport, visa), some places you can afford to smile (student or ISIC). Some do not allow you to wear a hat, and some (for example, a military ID) require a uniform. Remember these nuances and be sure to clarify them.
Camera settings
As you may have guessed, it would be ideal if someone helps you and presses the camera button, having previously composed the frame. LiveView mode will help with this. Although, if there is absolutely no one to help, use the rotating screen of the camera and remote control or a timer. But this is not the best option.
If possible, set the following values on the camera:
- ISO – minimum (100, 125, 200)
- Focusing - exactly to the eye of the person being photographed
- White balance – automatic (we’ll fix it later)
- File format – RAW
- Flash - On
- Red-eye reduction - enabled
If your camera does not allow you to successfully focus on the eyes or face, use the mode that is found in all point-and-shoot cameras - face detection. He will focus quite successfully.
Remember that the photo must be clear. Blurring the background is not allowed, and red-eye should be avoided.
Photo processing
When the photo has already been taken, we upload it to our computer. We can say that most of our work has already been done.
Open the photo. If you shot in RAW, develop it in JPEG. White balance can be easily set by white background or the whites of the eyes. After that, open the photo in Photoshop.
Initially, I decided to crop the images, that is, to “cut off” everything unnecessary. IN in this example I was preparing a photo for accreditation, and the organizers stated a requirement - 3 x 4 format. Ok, I take it into account and select the Frame tool (key C). In the tool settings, I set the Proportions item to Random, and set the ratio to 3 cm by 4 cm. After which I cropped the desired part of the photo according to the requirements.
In this example, the photo was taken without strict requirements, but when creating a photo for a passport or visa, you cannot do without rulers. You can call them with a keyboard shortcut Ctrl+R. From them, using a tower, we “pull out” the guide lines. However, note that your ruler units may be inches or pixels. If so, just click on one of them right key mouse and specify other units of measurement (for example, the usual millimeters).
Following the framing, I meticulously examined the background. It can be seen that it is not white, but has a bluish “gradient”. This shouldn't happen, so I painted the background white. You can do this using mask selection, which is demonstrated in the video on this page. It allows you to select everything up to the smallest details without “disfiguring” the hairstyle and the photograph in general.
If you needed electronic photography, then it is almost ready. It is enough to save it in .jpeg format with the desired compression level (according to the requirements of the service). To do this, call the “Save for Web...” dialog box by pressing the key combination Alt + Shift + Ctrl + S and set the required parameters (size and quality).
Preparing for printing
However, sometimes a photo is needed in printed form. Here you will have to work a little more. First, we determine the size of the photo itself. For example, they want a photo from us that is 3 centimeters by 4 centimeters. This is done, of course, after framing.
Call up the “Image Size” window ( Alt + Ctrl + I) and set it as 3 by 4, and the resolution as 600 dpi.

And now we go to the canvas size Alt + Ctrl + C. Here it is better to indicate the size of 15 by 10 centimeters (this is the most common photo paper format). And duplicating the layers with the photo, we place the required amount on the canvas. Make sure that they do not go end to end, otherwise they will be more difficult to cut. In addition, I recommend filling the background with some grayish color so that the photos themselves stand out clearly.
We save the results of our work in a format suitable for printing. I usually put .tiff. I won’t go into technical details, but it is most beneficial for sending photos for printing, although it takes up much more disk space.
Printing photos on documents
If you have your own photo printer with acceptable print quality and good photo paper, then the problem disappears by itself. Feel free to send your document for printing! You are no less lucky if your friends have such a printer.
But the worst option is to print in a salon. The fact is that many salon workers, realizing that their bread is being taken away from them and their “soap boxes” are undeservedly lying around idle, begin to become impudent. And they charge for printing 1 photo the same as for printing their own photographs for documents! Moreover, they are not able to say out loud the difference between this photo from the category “Me and the Tower” and “My face is repeated six times in a row.”

My advice is to just go print somewhere that only prints photos and doesn't have their own passport photo service. They simply do not “boil” for any reason or without reason, since they do not see any harm to themselves here.
The average price of printing one 10 x 15 card at the time of writing is about 90 kopecks, in the capital - up to 1.5 hryvnia (15 - 25 cents), which is disproportionately cheaper than printing photos for documents (2 - 5 dollars).
Conclusion
On some forums where an article (with a similar meaning) by another author was posted, he was “thrown with eggs” by the owners of photo salons. Let me try to explain my position again:
Document photos taken at home may be of lower quality in terms of lighting than those taken in professional studios. However, there are fewer and fewer such studios, and the fact that they “puff” a soap dish in your face “around the corner” will be even worse in quality.
Another thing is time. Not everyone wants to tinker with Photoshop at home. But, for me personally, this is preferable. I can take pictures of myself all day long and choose good pictures; I can calmly reject photos I don’t like for hours without the rudeness of the staff. And most importantly, I don’t need to beg for an hour and a half to dump the source onto a flash drive. And if you have a big family...
I need photos probably at least once a week. And always fresh. Sometimes very strict and official, sometimes less so. Therefore in Lately I prefer to take photographs for documents at home, on my own. I can't say they were significantly worse. The only difficulty is to comply with all the requirements for the photo, proportions, and placement of faces in it.
But in general, it’s up to you. The main thing is not to forget that a business photo remains a business photo. Otherwise, travel agency workers told me how they were sent pictures with a carpet in the background for a visa to the UAE.
What do you think of this “life hack”? Have you ever taken ID photos for yourself or your loved ones?
If you found my article helpful or liked, please share it on social media. It is very important for me. Thank you!
If you urgently need to take a photo for documents, the program will allow you to do it at home for free.
This way you will save time that would be needed to visit a photo salon and will not spend extra money.
So which software is better to use? The answer to this question depends on what operating system you are using.
We present to your attention best list applications for popular computer and mobile operating systems.
Online services
Photo Docs
The first site that will allow you to take a photo for a document as quickly and efficiently as possible is Photo Docs.
On the site, the user can select the appropriate photo format for more than 35 various types documents (all kinds of IDs, passports, visas to other countries, etc.).
To process a photo, select a format, upload the file from your PC to the service, enter the email address to which the final file will be sent.
Click on the “Process” button to go to the service editor window.
Users have the opportunity to independently adjust the photo frame. On the right side of the window you can find short tips and requirements for creating images of the selected format.


Doc Photo
Next free service It has a well-designed interface and a large database of various documents for which you can take photos - this is Doc Photo.
The principle of operation is that the user needs to select the country with which the document is associated. You can then select the type of visa, ID or passport.
Doc Photo will automatically determine how to crop the photo. To do this, you only need to put three points (on the bridge of the nose, the top of the head and in the center of the chin).

Idphoto4you
Idphoto4you is another convenient and simple site for quick creation photographs for documents. The service is free.
On home page There are short illustrated instructions for working with photographs, as well as a form for uploading your personal photo and indicating the initial data.

In the editor window, users can:
- Change the position of the picture;
- Adjust brightness and contrast;
- Select print size;
- Change countries and document type.
Windows software
Photo for documents Express
Document photos Express is a free version of a professional utility for creating highly targeted photographs.
In the public version of the application, the functionality is slightly reduced and the interface is simplified, however, this will not prevent you from quickly making a high-quality product of the required size.
In demon paid version Applications you can change photo size, adjust layout, colors, face recognition and work with the most common photo formats for documents.
In the paid version, you can remove the background and straighten the picture.

Adobe Photoshop
One of the most complete and multifunctional programs, which will help you take a professional approach to creating photographs for documents - this is the well-known Adobe Photoshop.
You will need Photoshop version CS4 or higher.
The program is paid, but for one-time use you can download the trial version (with a temporary 30-day license).
If you have not worked with this program before, before you start processing, watch the very detailed and good video instructions.
With its help, you can not only remove the background of the photo, but also even out the tone of your skin and hair and trim off unnecessary elements in the photo.
Rice. 8 - the process of creating a photo in Photoshop
Advice: Beware of downloading Photoshop from third-party resources; as a rule, such installers are infected with malware, have reduced functionality and settings that may be incompatible with your version of Windows.
Applications for Mac OS
Passport ID Photo Maker Studio - Simple free utility for your smartphone, with which you can create a photo for a visa, passport, ID different countries and organizations.
It should be noted that the program has proprietary content: some photo sizes may only be available for a fee (usually the cost of the service is up to $1).
The program is able to determine the boundaries of a person’s silhouette and remove all unnecessary background.

iOS apps
Passport photo
“Passport photo” – full version This program is paid (169 rubles), however, each user can download a 30-day trial version on their device to test the software.
The utility allows you to instantly format images according to the standards of all common documents, from passports to visas of individual countries.
You can send the resulting photos to a printer via Bluetooth or save the file to later open it on a personal computer.
Follow all the instructions that appear on the screen to make the picture as accurate and correct as possible.

My Photo about
“My Photo about” - another one popular app among iOS users, which will help you create your personal photos for your passport or other IDs.
Using this utility, you can independently improve the quality of the picture by increasing its resolution.
You can also set the number of pictures that will be displayed on the sheet, set the fields, change the brightness, contrast and color saturation.

The best programs for Windows Phone
Passport photo
Windows Phone users can download a simple Passport Photo utility to their device. With its help, you can quickly create the required number of pictures of appropriate sizes.
Templates integrated into the utility allow you to create images for passports and visas for more than 100 countries.
The program can be used on mobile devices Windows Phone or on PC under Windows control 10.
The functionality is optimized for a comfortable user experience.

As you can see, thanks to the specialized software You can take your own photographs for documents in just a few minutes.
Print the result on good printer and high-quality photographic paper, after which the photographs can be used for their intended purpose.
Thematic videos:
Every person has one or another set of documents that require a photograph. In every city there are a sufficient number of offices that provide shooting and printing of photographs for documents, however, the price for such a simple procedure is often unreasonably high. If you have a suitable photograph and a printer, then you can create a photo for documents at home.
Many documents have certain requirements for photography: the photograph can be color or black and white, have strictly defined dimensions and meet other parameters. Therefore, to make it easier to create document photos at home, you can turn to the help of special online services.
A few words about photography
Online services for creating photos for documents will allow you to take the required photo format (depending on the type of document), adjust the colors (or even make it black and white, if this is a requirement when preparing the document, and also, if necessary, improve the background.
But this does not mean that you can use any photo from your personal collection for document photos. The image for documents must meet the following requirements:
- The photo should be taken against a neutral background, preferably white or gray;
- The face should be shot strictly from the front, not from above or below;
- For ID photos, you must remove your glasses, use minimal makeup, and keep your hair out of your face. It is preferable that you remove the piercing (inconspicuous jewelry is allowed);
- Smiling is not allowed here;
- The photo must be good quality, that is, not taken with a 0.3 MP camera, and should also be shot in sufficient lighting to avoid an abundance of noise.
Online services for creating photos for documents
Having the correct photo, all that remains is to finish it, that is, edit the photo size, color and other parameters. Here, it’s just easier to use online services to create photos for documents.
Offnote.net
The first online service for creating photos for documents, which allows you to create the desired image for most existing types documents, and adjust the image to the most non-standard requirements.
Working with the online service includes three stages of creating photos for documents: marking, processing and printing. In the first case, you set the dimensions of the image and, if necessary, select the document for which the image is being prepared. If the photo is required in black and white, do not forget to check the appropriate box.
The second stage allows you to add a corner to the image, reflect, rotate, stretch, etc. Unfortunately, there is no color correction function here.
And finally, the final stage includes preparing the file for printing. Having selected the required sheet format, all you have to do is set the correct location of the photo on it, and then download the finished sheet, which can subsequently be printed at home on a laser or inkjet printer, and in any copy center.
Photodocs.ru
Next up is the next online service, which allows you to take a photo of your documents in a few minutes and print without leaving your home.
Unlike the previous online service, where creating photos for documents is done manually, here you only need to indicate the type of document for which the image is being created, and then upload the file and indicate the address Email. As soon as the service completes preparing your image, the result will be sent to the specified email address.
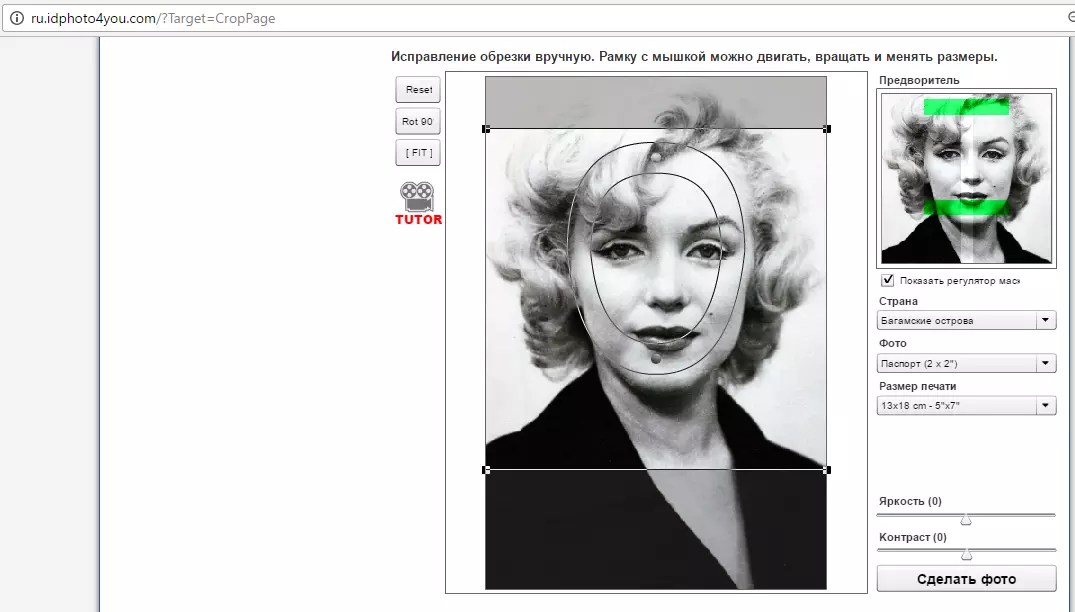
Idphoto4you.com
A simple online service for creating photos for documents, equipped with a manual editor. It’s worth noting right away that the service allows you to create a photo exclusively for a passport, but its uniqueness lies in the fact that it provides settings for passport photos from different countries of the world.
Thus, having selected the desired country and uploaded a photo, the service will display a simple editor page in which you need to set the location of your face in the photo, if necessary, adjust the brightness and contrast and set the size for printing.
Once you do this, your printable template will be prepared and available for download to your computer.
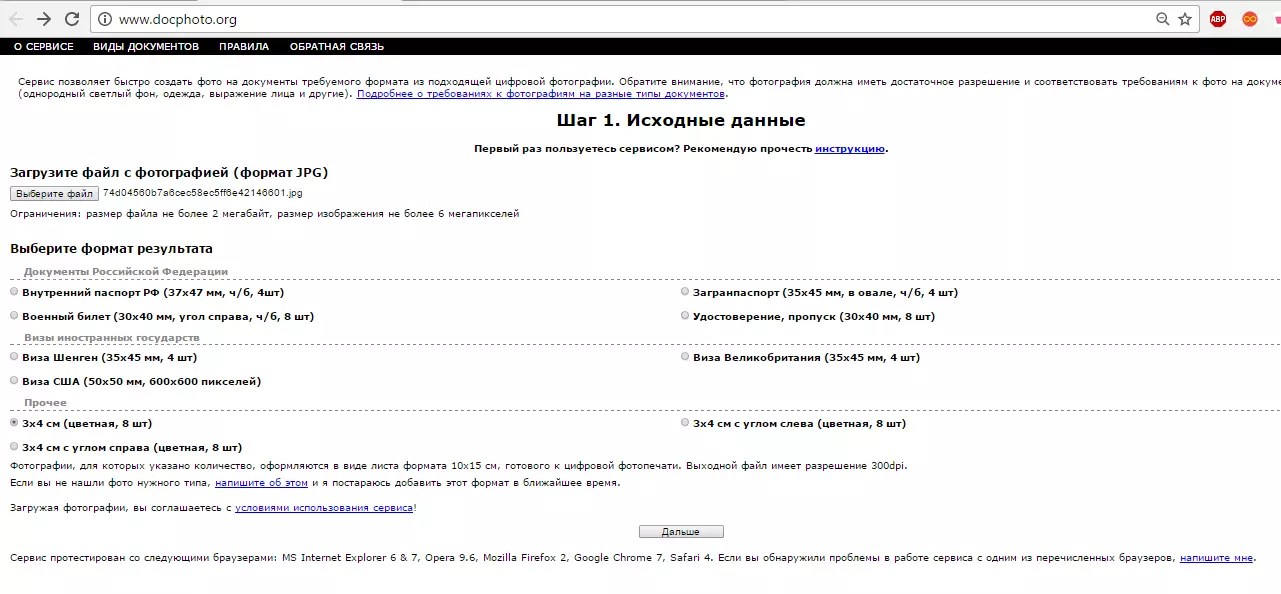
Docphoto.org
Another online service for creating photos for documents, which is deprived of a large arsenal of settings. Instead, on the main page of the service you will need to select the photo to be processed on your computer, and then specify the document for which the image will be created.
Next, in order to get a perfectly straight photo, you will need to specify three points: the point of the crown, bridge of the nose and chin. A preview window will be displayed in the right area, as well as a download button. finished image on computer.
Visafoto.com
The final online service in our review is unique in that it allows you to slightly adjust the background to make it more neutral. For example, if you took a photo against a white sheet, the service will remove traces of it.
The first stage of the service is selecting an image, and then specifying the document for which the image will be adjusted. Don't forget to expand the item « Additional options»
– here you can activate or disable some image correction settings. For example, the service will be able to correct the background (or not do so), remove red-eye, turn a color photo into black and white, and so on.
Actually, as soon as the service finishes processing, the result will be displayed on the screen. The nuance is that initially you will have access to a processed photo with watermarks. If you want to download photos without them, you will have to splurge quite a bit of money (today the service charges 197 rubles for its services).
This is not the entire list of online services that will allow you to almost automatically convert an ordinary photograph into a special image for the required document. Each of them has its own advantages and disadvantages, so it is difficult to recommend just one - be guided by your preferences and financial capabilities.
Photographs have become an integral part of our lives. They are stored on our smartphones, we post them on social media. They must be provided when processing documents, be it a passport, visa, or ID.
Many people find it difficult to find time to go to a specialized salon. But there is a simple solution - create a photo online. It's fast, affordable, economical.
Photos for documents using online services
There are many ways to create document photos. One of the simplest, at first glance, is contacting a photo studio. However, despite the fact that you will spend a lot of time and money on visiting her, you risk getting not quite the result that you expected.
Red eyes, a slanted face, an awkward hairstyle - this is clearly not what we want to see in a document that we will use for more than one day. Of course, specialists usually use Photoshop and other retouching programs, but still, cases of unsuccessful photographs still occur.
Have you ever caught yourself thinking that it would be nice to create a photo for documents based on one of the successful photographs you already have? Today, this can be done in two ways: using retouching programs and using online services.
Method 1: Photodocs
The Photodocs service is simple. Its advantages: bright and clear interface. A minor drawback is that you still have to pay for the work done, albeit a small amount.
Service for creating photos for documents Photodocs
- On the main page of the site you will see big button "Start now". Click on it.

- After this, you will see a form that you have to fill out.

- Press "Select format". A drop-down list will appear where you can check what you need. The example will show how a site works with the format "3x4 color".

- Now click on the button "Open file".

- The photo selection window will appear. Choose the one you like and click "Open".

- Enter your email address in the field left blank and click "Start processing".

- At the next stage, you will see the selected photo and the markings on it. Position it so that the center passes through the middle of the nose and lips, and the upper border is just above the head.

- On the right you will see a button "Further". If you are happy with everything, click on it to continue.

- A panel will appear on the right "Layout Settings", and on the left is the expected result. If the result is close to your expectations, feel free to click "Get photo".

- The site will prompt you to choose payment system, with which it will be convenient for you to pay for the work done. Click on it.

- Once the payment details are filled in, the finished photos will be sent to your inbox.
Method 2: Idphoto4you
Idphoto4you allows you to create a photo in just a couple of minutes absolutely free. However, it does not have such extensive functionality. If you need standard photo for a passport - this option will suit you.
Service for creating photos for documents Idphoto4you
- On the main page you can familiarize yourself with its functionality.

- Click on the country name to display a drop-down list. In it, find the one in which you live.

- Unfortunately, this service does not support many photo formats, so when you click on the format,
you will only see one option.
- Unfortunately, this service does not support many photo formats, so when you click on the format,

- Now you need to select the size of printer paper that you will use when printing.

- Click on the button "Select a file".

- In the window that opens, select the desired photo.

- Click "Download".

- Edit the photo in the window that opens. Click on "To make a photo".

- The trimming is finished. On the right you can see how the photos will look when printed.

- To download, click on the appropriate button.

Method 3: Docphoto
The advantages of this method include no fees and speed. The interface can be considered a disadvantage; it is as simplified as possible and does not look aesthetically pleasing.
Service for creating photos for documents Docphoto
- To get started, select a photo, format, click "Further".

- Indicate the main points of the face. This procedure will allow you to correct the photo. A prototype of the future photograph will be presented on the right. Click on the button “Download the finished photo”.

- A window will appear in which you should select the location where you want to save the photos. Click on the appropriate button.

There is no difficulty in creating photos for documents online. In addition, this can be done very cheaply or completely free.
Photo 3x4 is a program that will help you prepare a photo in the appropriate format. Typically, such images are used in various documents and evidence. In order to make them, people usually go to special studios. But thanks to this program, you can take a suitable photo at home. You can even print it if you have a printer connected to your computer and you have photo paper (on a regular photo it won’t look very “presentable”).
Usage
Working with the program is quite simple. You just need to upload a photo, then set up a “frame” responsible for “cropping” the image to required formats. By the way, the utility makes it possible to create both pictures with “corners” and without them. Please note that you don't even have to be photographed in formal wear. The software allows you to “overlay” it quite naturally on the photo, which further saves the user’s time. He is given a “collection” of several dozen suits for men and women to choose from.
If you do not have a single “portrait” photo, you can also upload a group photo into the program, and then select the face of the desired person in it using special markers. In addition, Photo 3x4 has a set of basic functions graphic editor, thanks to which you can “work” on the background and change the basic color parameters.
Seal
Before printing, the user can select the number of images to be placed on the page. A regular A4 sheet can hold up to 16 3x4 photos. There is also the option to print half a page of photos (8 pieces) or limit yourself to a single photo. The program uses a standard printer driver, so the available print options may vary depending on your device model.
Key Features
- makes it possible to easily create a 3x4 photo;
- allows you to “overlay” formal clothes on a photo;
- includes a basic set of graphics editor functions;
- helps bring out finished work for printing, indicating the number of pictures on one sheet;
- has a simple interface translated into Russian.


