If you want to see on our website answers to your questions about everything related to technology, programs and Apple services, iOS or Mac OS X, iTunes Store or App Store, write to us via .
We received the following question:
Hello, if you wouldn’t mind helping me with a solution, I’m trying to create an image of Windows 7 from under a Mac. I have a Mac mini mid-2010 with the core, but I’m interested in the flash image, I tried editing the code of the info.plist file, it didn’t help, for some reason I checked it many times, everything was correct and the inscription was like this and did not appear, there is a solution for Mountain Lion without third-party software, only using apple tools, I would be grateful.
Hello!
We’re not sure which manual you used, so we’ll tell you about the method, the functionality of which we just tested ourselves on OS X 10.8.4.
But first, let’s explain to other readers what we’re talking about. Boot Camp Assistant on Mac OS X knows how to create. But Apple has its own style - either due to fears of the spread of piracy, or for some other reason this feature is not available on every Mac. This is what the main Boot Camp Assistant screen looks like on a computer without an optical drive:

And this is how the same screen looks on a computer with a DVD drive:

The logic is strange: since there is a disk drive, then Windows must be installed from the disk, and if not, then it is possible to create bootable flash drive Windows.
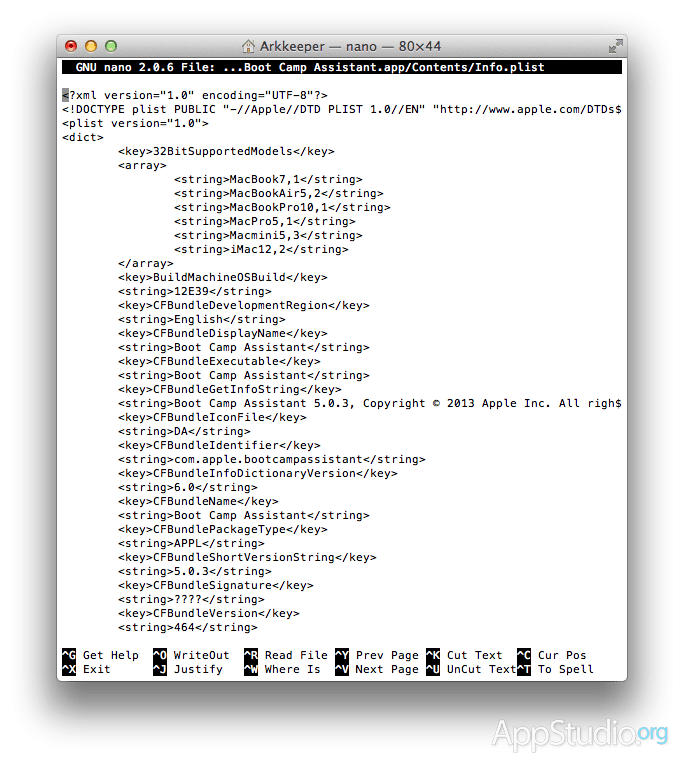
Boot Camp Assistant's attitude towards different models Macs are determined by the parameters specified in the Info.plist file inside it. To open this file, enter the following command in Terminal:
sudo nano /Applications/Utilities/Boot\ Camp\ Assistant.app/Contents/Info.plist
Then blindly enter your account password and press Enter. You will see the contents of the file, you can navigate through it using the arrows on the keyboard.
Scroll down to the “PreUSBBootSupportedModels” section. It lists the minimum required hardware identifiers for Mac models, starting from which system deployment on a flash drive is allowed:
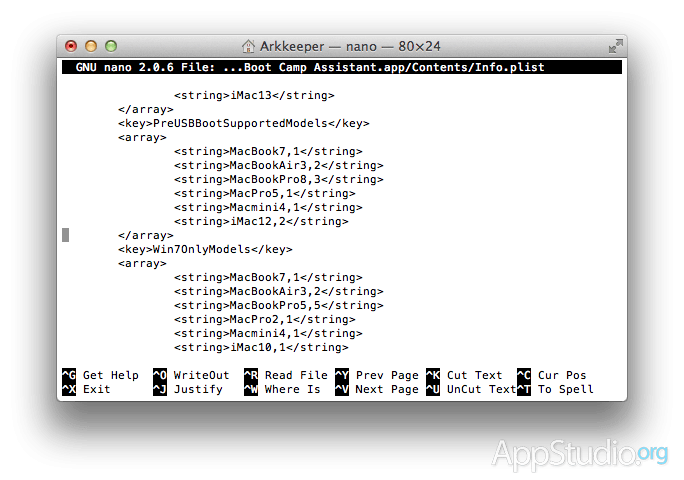
Fix Macmini4,1 to Macmini1,1 - and creating flash drives will work on any Mac mini. You can do the same with other types of Macs - replace the first digit in the index with 1.
It would be possible to deceive the system with a pre-made flash drive, if the DVD-ROM drive, simply throwing it in during installation, instead of a “blank”. The program must see installation disk and start marking! The task is this - to create the disk partition correctly, and without a working DVD-ROM it is not possible to do this. There is not a single program that can create on an existing partition mac disk GPT, an additional Hybrid MBR partition for Windows without data loss, except for one utility, the commands of which in several stages, almost no one knows - “gptfdisk” and its various names (gdisk, gptsync). But it would be nice to send this “wooden” utility “Assistant BootCamp” to the devil and get on with your business!
We would have to do everything in several stages:
- Perform mandatory defragmentation, for example in iDefrag.
- In Disk Utility, bite off a piece of the disk without losing data.
- Using "gptfdisk" create a "Hybrid MBR" in an unallocated area.
- Synchronize partitions (for example, rEFIt utility)
As you can see, it will not be easy for ordinary users without the built-in “Assistant” and a working Apple DVD drive.
Often many users Mac computer, or rather some models, encounter a problem when trying to install Windows on their iMac or MacBook.
We will talk about the "Assistant BootCamp" utility, which on "bad" models is not trained to support creating a Windows installer on a USB drive.
The point is, for this option to appear, you need to correct everything known file plist.info , but often after editing this file the program itself refuses to start.
This happens because the digital signature disappears.
The signature is restored with the command from the terminal:
sudo codesign -fs - /Applications/Utilities/Boot\ Camp\ Assistant.app, but again a new problem occurs.
Namely, you will need to download "Command Line Tools" in advance:
Part of macOS is its powerful interface command line, where a competent or even a novice programmer can use a number of tools to configure and configure the system, as well as create programs and scripts. While macOS comes with a number of common commands, it does not include by default those used to inspect, compile, and manage code for app development. So we need these tools, that is, three ways to install them on your Mac.
1. Installing XCode Developer Suite, which is available through the App Store for free. However, its installation will also include XCode itself and, despite its advantages, I do not recommend installing XCode in its entirety, not only because it “weighs” about 5 GB.
2. Download latest versions command line tools from the developer page. To do this, you simply need to log into the downloads section of the developer site using your Apple ID. Here you can search for "Command Line Tools" to view all versions of the tools from Lion to Sierra.
This particular window is located at https://developer.apple.com/download/more/
3. Perhaps this is the simplest option, which consists of using the system’s ability to install command line tools on demand. This is done using the application in " OS volume label=> System=> Library=> CoreServices"in a folder called " Install Command Line Developer Tools". However, this program cannot be run on its own. To run it, you must reference services or applications that call the use of developer tools. In most cases, standard developer commands such as "make," "gcc," "cc, " "svn," "git" or Apple-specific tools such as "xcode-select", "xcodebuild" or "xcrun" will require these tools, so running them in some form will stimulate the system to run the "Install Command Line Developer" program Tools". So to install these tools, simply open Terminal, type "make" or any desired general developer command and press Enter, and then when prompted you can install the development tools (approximately 100MB download from Apple servers) and get started work.
So, let's start editing the file
Press apple and open "About This Mac" => "System Report"
write in text file values from the item "Hardware"
Runs a file from sudo in nano editor, enter the following command in Terminal:
sudo nano /Applications/Utilities/Boot\ Camp\ Assistant.app/Contents/Info.plist
Scroll down to the section
- Fix Macmini4,1 to Macmini1,1 - and creating a USB drive will work on any Mac mini. You can do the same with other types of Macs - replace the first digit in the index with 1.
PreUSBBootSupportedModels
- Then to the section
DARequiredROMVersions you need to insert your version
- Next to the section
USBBootSupportedModels enter the first value from the Boot ROM
After this, all that remains is to save the file. Press Ctrl+X, then type Y and press Enter.
This is where the fun begins...
Starting with macOS El Capitan, global protection of system directories and SIP files was introduced, which can be disabled ( remember - before turning off the power!), after reading this. If this “protection” is not removed, then it is possible when saving the file Info.plist there will be a system warning.
After a liter of vodka, if the file is saved, we try to launch our “Assistant”.
If Boot Camp Assistant does not start, then restore the signature using the command described above.
It all started with the fact that I needed to install Windows 7 as a second system.
The options with Parallel and VMW were not suitable; a separate download was needed.
I won’t describe what pitfalls I encountered; I’ll get straight to the point. There are essentially two ways. Moreover, one of them will not suit everyone.
Disk partitioning.
But first, we need to partition the disk using Bootcamp Assistant. Moreover, on some models of Macs you simply cannot do this. The assistant will require an installation Windows disk. This is done as follows:1. Go to the Programs - Utilities folder.
2. Right-click on the Bootcamp Assistant and select Show package contents
3. Copy the Contents/Info.plist file somewhere and edit it
String
change to
4. Copy the file back, replacing the original (you will need a password)
Now in the Bootcamp Assistant we have the opportunity to make bootable USBs and partition the disk without installation disks. At your discretion, allocate a place for Windows partition(the data will not be lost anywhere, but it’s better to save the necessary data in a safe place just in case)
Method 1.
This method is the simplest. However, it is not available to everyone. I’ll say right away that I was not able to successfully use it on non-Air Macs older than 2012. But you can try if you have time. or go straight to method 2, it always works.For installation we will use bootable USB flash drive Windows 7. You can do it either on a PC using Windows 7 USB DVD Tool, or on a Mac using the Bootcamp Assistant.
Now all that remains is to boot from the flash drive and install Windows as usual. If a regular bootloader does not see your flash drive, you can try an alternative one - . If you can’t boot from it either (No Bootable Device errors or messages appear that the Mac’s firmware does not allow booting), then you should say goodbye to this method and not waste any more time.
Method 2.
So for this method we will use VMWare Fusion (enough free version) and an ISO image of the Windows installation disk.
The first thing we need to do is make sure that the disk will not be used during our operations. To do this, I temporarily moved from it custom folder(Settings - Users and groups - open the lock - right click on the user - Additional parameters - change the “User folder” field - reboot). I also installed VMWare on another drive. If there is no second disk, then you can use an external one - for example a flash drive. ISO image same way. After all these preparations, we will begin the installation.
First, you need to open Disk Utility, select the disk (the entire disk, not a separate partition) and look at its number in Info. In my case it's disk1.
Open a terminal and enter the commands:
cd "/Applications/VMware Fusion.app/Contents/Library/"
./vmware-rawdiskCreator create /dev/disk1 fullDevice ~/external-hdd ide
where /Applications/VMWare Fusion.app is the path to the installed VMWare, and disk1 is our future Windows disk.
Computers everyone knows Apple are very multifunctional and have a wide selection of specially designed software. But sometimes it happens that a Mac or iMac user wants to install the Windows operating system that is already so familiar to them. Sometimes OS Windows may be needed to install some programs so that you can play your favorite games, but there is no suitable alternative for Mac.
You can install the OS yourself. This can be done in several ways, for example, through a utility or using a flash drive. Let's look at the example of applications from Apple, which are called Bootcamp, Parallels Desktop and Virtual Box.
Preparing and installing Bootcamp
This option allows you to install an additional OS on Mac and iMac in a separately created partition on your hard drive. You can choose which system to boot into during startup. The advantage of this utility is that by installing the program through it, all the resources of your PC will be available to Windows, this will allow you to use the Mac’s performance to the maximum. The computer will easily play the latest games and perform complex tasks.
Before installing an additional OS, keep in mind that it will take up a lot of space on your hard drive. Make sure it has the required gigabytes. On average, you may need about 30 Gb.
Before you begin installation operating system on your iMac or Mac, check and prepare Boot camp. First, make sure that all updates from Apple are installed on it. To do this you need to do the following:
When you launch the utility, you will have the opportunity to select the location where OS Windows will be installed. Before starting the software, you should close all open applications and programs.
Once the utility and flash drives for copying information are ready, you can proceed to the first steps:


Once all files have been copied, the iMac will automatically begin rebooting. Next, to display the boot manager, press and hold the Alt key. On the Mac, the disk menu will open, mark the partition with the name of the operating system. This will be followed by launching the OS and setting the parameters.
To install Windows 8 you need to do the same. Only in the window Selecting Actions"You should check the boxes next to the items " Download latest software" And " Create a disk to install Windows 7 or new».
Installing Windows on a Mac, or rather, setting up the program, begins with choosing a language. Select the correct language right away, otherwise you will have to do all the steps again. Having selected all the parameters in this window, click the Next button, which is located in the lower right corner.
To install an operating room Windows systems On a Mac, carefully follow all instructions provided. Do not restart or turn off your computer during the process. The procedure cannot be interrupted in any way.
After your iMac restarts a second time, you can begin installation. necessary drivers. To do this, download them back from the flash drive, install and run the installation program.
Installing Windows via Bootcamp using a USB flash drive
Installation can be carried out either using a disk with the operating system or via a USB drive. To load a program from a flash drive onto a Mac, you must first download it. If we are talking about Windows 8, then the version of this system must be in iso format.
This installation option on Mac and iMac is no different from the previous one. Before you begin, you should also check bootcamp for updates and save all the necessary data. The following instructions will help you complete the task:

But it happens that when the installation media is a flash drive, the utility requires you to insert a disk with the program and refuses to continue downloading the software to the iMac. In this case, you can download the driver Daemon Tools Lite iMac. With its help we install Windows iso image, he will serve virtual drive and then Bootcamp will complete the installation process of our OS without any problems.
Installing Windows on Mac and iMac via Parallels Desktop
In addition to Boot Camp, there are several other options for installing an additional operating system. For example, you can use the program Parallels Desktop, which is virtual machine for installing Windows. You will be able to run Windows programs without rebooting the PC.
Installing Windows using VirtualBox
VirtualBox is one of the popular virtualization programs. With its help, your PC will easily run two operating systems at once. Installing an additional OS via VirtualBox is quite simple.
To get started, enter the query VirtualBox into the search engine, go to the official website and download the program. Once installation is complete, click on the program icon and select “Create”. After this, you can begin installing Windows.

Sometimes it happens that after installing an additional operating system, problems with sound or video playback appear on the iMac. To solve this problem, you need to install on your Mac all the drivers that were previously saved to an additional storage device (disk or flash drive).
After all the actions taken Windows installation on Mac is completely finished. Restart the program and everything will definitely work.
Video on the topic


