Overheating of the engine threatens with serious consequences: the piston will jam, it will break, which will lead to a major overhaul of the power unit. Therefore, the cooling fan is an important element that protects the power unit from extreme heating.
Changing the fuse
Changing the fan relay
Checking for an open circuit
Changing the coolant temperature sensor
Video about replacing the fan switch sensor
Checking the functionality of the cooling fan motor
The easiest way to check the operation of the fan is to put two straight wires on it: minus and plus.
The plus is taken from the battery, the minus from the car body. If it doesn’t work when the circuit is closed, then that’s where the problem lies. When starting the blades, we look for the problem elsewhere.
Cooling fan operation diagram
Basically, when a non-working fan is detected, several reasons are identified:
- The electric motor is burnt out, there is a break in the winding;
- Wear of carbon brushes;
- The bearing has jammed or fallen apart.
If in the last two cases the problem is solved with little effort, so to speak, the first involves replacing the electric motor.
Important! When installing wires, the main power supply to the electric motor must be disconnected.
Procedure for checking
The operation of the fan on the VAZ-2114 is connected through 2 fuses. One of them is also responsible for sound signal. You can check it by pressing the horn. If there is no sound, replace it with a whole one. It is located in the mounting block, it is 20 ampere, marked F5.
Check and, if necessary, change fuses
The second one is located under the dashboard, on the passenger side. Under the casing there are 3 relays with a fuse for each. The middle pair is responsible for the operation of the cooling fan. Replace the blown element with a new one (the fuse can be “ringed” with a multimeter or limited to a visual inspection. To check the functionality of the relay, you will need an ohmmeter). While checking their condition, at the same time make sure that in good condition contacts, if oxide is detected, clean them.
Important! If you find a blown fuse, you should not limit yourself to replacing it with a new one. It is imperative to find the cause of the break, since in the near future the new one will burn out again.
Checking the fan switch sensor
If no reason is found, next step there should be a check of the functionality of the fan switch sensor. It's not difficult to do this. Disconnect it and turn on the ignition, while paying attention to the fan. The rotation of the blades indicates that the cause of the problem is in the sensor.
Checking the cooling system fan switch sensor
Due to the fact that it is very Often the sensor starts to malfunction, giving erroneous signals, it is recommended to check it in another way. To do this you will need a container, a thermometer and a multi-mert. Wires from the measuring device are connected to the sensor terminals, the threaded part of the sensor is immersed in the liquid. Heat the contents of the container to the temperature at which the fan operates (on a VAZ 2114 - 92 degrees). When the contacts close, the multimert will sound a sound signal. This means the sensor is working, if this does not happen, you can safely throw it away and buy a new one.
Healthy! Before installation, it is advisable to check the functionality of the purchased sensor in the same way.
Video about checking the cooling fan switch sensor
Final check
Having eliminated the problem, start the car engine. The fan motor should start after about 5 minutes of idling.. If this does not happen, and the temperature has reached the desired level, diagnose the faults again.
Video about the reasons why the cooling fan on the VAZ-2114 does not turn on
In this article I will give several quick and not-so-quick ways to check your computer’s fans for functionality. If the cooler does not work, for what reason, and can it be restored if something happens? A cooling fan, also known as a cooler, is the simplest and most durable mechanism in the belly of a computer. I don’t know what caused it to stop, but there are very few reasons for it.
Cooler not working? Come on …
Just because a fan isn't spinning doesn't mean it's not working. More precisely, it is inoperative. High-quality products are able to perform their function even after many months of inactivity, being clogged with dust, but with power supplied (under load), and without burning out. But also for the old woman, as they say...
Let's check it out
In the article I will use available tools that the most obvious humanist can afford to use. If the house contains measuring instruments, such as, you will not find anything new in the text below.
So the cooler doesn't work. What options?
Well, miracles don't happen. Here either:
- the mechanism is locked, something physically interferes with the blades
- should not spin, because there is no control signal for rotation (the system believes that the temperature threshold has not been reached)
- lack of electrical signal to the fan itself
How to disassemble the cooler?
What for? Cheap and expensive coolers are disassembled up to a certain stage: I'm talking about removing the impeller. But most likely you will encounter a situation where the radio elements themselves are simply inaccessible: the structure is soldered or glued for stability, so YES - the cooler is often a non-repairable device. But this is not the topic of our article.
Where can you find the widest selection of fans for your computer or laptop? AliExpress offers the widest selection of coolers, including for any video card and a single radiator. With this choice, you can put ANY device inside your PC under cooling. For what overpay “selling”, if the same thing can be purchased right now, just by waiting a little?
Clean and lubricate.
What can prevent the fan blades from spinning? Chunks of dust or dangling wires. If the first reason is easy to get rid of by cleaning, purging and subsequent lubrication, then the second option is often accompanied by a characteristic sound. In any case, you should look at the fan directly. Debris can also get inside the mechanism, jamming the mover. We diagnose it easily - use your finger to rub the blades, giving them rotation. If there is no resistance to your fingers, the blades rotate easily, skip the paragraph. For now we just clean (with a brush or compressed air). Lubricate if necessary.
We tear off the sticker in the part where the power wires enter and take out the rubber plug in the center that protects the mechanism:

Immediately pay attention to the places where the wires are soldered to the board. If you are the owner of a 4-wire cooler, it is better to immediately clean this area with an unnecessary toothbrush or toothpick - often the contacts are simply too tight there:

it's called "making more expensive"
We put screwdrivers, toothpicks, etc. on the tip. oil (any technical oil will do; vegetable oil from the kitchen dries quickly, leaving behind dirt) and blot the mechanism in the center, rotating the blades with your finger. Do this several times:

well, I’ve had an oil can for a long time for these purposes
It is better to return the plug and sticker to their place so that dust does not get in here.
Checking the fan: method one.
For owners of more “advanced” coolers (or if no resistance to rotation is detected), I would immediately advise you to check the cooler for functionality. To do this, it does not need to be removed from its installed position. If possible, disconnect the connector from the board. If not, we leave it in place, however, we immediately notice the color of the wires. And to test for functionality we only need two of them.
Whether the connector is in your hands or not, inspect the fan markings. We are looking for voltage:


For further testing we need an appropriate power supply. Battery. It, of course, should not exceed the voltage parameter indicated on the cooler. I have both fans on 12 Q. So a regular one will do. 9 -voltaic “crown”. Better new, not worn out. Let's mount a pair of conductors on the knee to its contacts:

It’s better not to connect them with each other for a long time: nothing will explode, of course, but you may still need a power source.
Let's go back to the cooler. On the connector black the wire - " – ", usually red– “+ ” (yellow is not needed, it reads the speed; if you have a fourth one, let’s leave it alone, its purpose is to adjust the cooler speed, which should be supported motherboard). Read more about the device and operating principle in the article .
We connect the negative wire of the improvised battery to the black contact of the cooler jack, and the positive wire to the red one:

For clarity, I cut off the connector from the cooler and connect it directly to the battery in the video:
Red for “plus”, black for “minus” (there is always a black wire on the cooler). This cooler is working.
Checking the fan: method two or very skillful hands.
And with this option, you can both check the functionality and use a working but unused cooler as a fan from power sources that have a 12 V output (for example, in a car). And it, the cooler, will be connected via a USB cable. To do this you will need:
- a used USB cable from any unnecessary device (a good cable, of course, should not be damaged on purpose)
- working cooler
Everything is simple here. We cut off the connector from the cable to another device, leaving the USB connector itself.We need wires with the color markings familiar to you: black and red. We connect to the corresponding cooler wires. We isolate and connect:

red to red, black to black
This is roughly how the most inexpensive USB fans are designed. It won’t blow you away, but it’s just the right time to play around or check it out. Absolutely any female USB connector is suitable for testing. This simple trick will allow you, by the way, to check four-pin coolers: first connect the “black” contacts of the cooler and the cable, and then connect the red wire one by one USB cable to all contacts on the cooler connector. Doesn't spin? In the trash.
I'm warning you. Do not leave the fan spinning for a long time, powered in this way! The method is indicated only for testing functionality.
Sometimes the noise comes from system unit makes it difficult to enjoy silence or concentrate. In this article I will tell you how to regulate cooler speed using a special program for Windows XP/7/8/10, and at the end I will show the whole process in more detail on a video.
Why are fans noisy and what are the ways to fix it?
With the exception of special fanless modifications, each computer has: in the power supply, on the processor, video card, in the case, and others. And everyone makes noise in their own way, and that's bad news. Many people are simply accustomed to the noise of their system unit and believe that this is how it should be. Maybe it should, but it doesn't have to! In 99% of cases, computer noise can be reduced by 10%-90%, which is good news.
As you already understand, quietness is achieved by reducing the noise from coolers. This is possible by using coolers that are quieter by nature, or by reducing the speed of existing ones. Naturally, you can reduce the speed to non-threatening levels! This article will discuss exactly this method. Programs for will help reduce noise even further.
So, to reduce the cooler rotation speed, you can use one of the options:
- Program for controlling the rotation speed of coolers
- “Intelligent” speed control system built into the BIOS
- Utilities from the manufacturer motherboard, laptop or video card
- Use a special device - reobass
- Artificially lower the fan supply voltage
Those who have normal control from the BIOS may not read further. But often the BIOS only superficially regulates the speed, without lowering it to silent, and at the same time still acceptable, values. Utilities from the manufacturer are sometimes the only way to influence fans because third party programs often do not work on unusual motherboards and laptops. Let's look at the most optimal - the first method.
SpeedFan cooler management software
This is a multifunctional and completely free program. I’ll probably upset you a little right away by saying that this program does not work on all laptops, but you can try, and it will not regulate the speed of those fans that the motherboard cannot control from the BIOS. For example, from my BIOS I can enable the SmartFan cooler control feature for the CPU only. Although you can look at the current revolutions for two more. For .
Attention: before using the program, disable cooler management from the BIOS!
Otherwise, the following situation may occur. When the SpeedFan program is loaded, the current speed is read and taken as the maximum. Accordingly, if by this time the BIOS does not spin the fan to maximum speed, then the program will not be able to do this.
It happened to me once that when the program was loading, the cooler on the processor was spinning at a speed of 1100 rpm, and SpeedFan could not set a higher value. As a result, the processor heated up to 86 degrees! I noticed this by accident when, at a moment of heavy load, I did not hear any noise from the fan. Fortunately, nothing burned, but the computer could
Launch and appearance of the program
Download and install the application from the official website.
When you first start it, a regular window will appear offering help on the program’s functions. You can check the box so that it does not appear again and close it. Next, SpeedFan reads the parameters of the microcircuits on the motherboard and the values of the sensors. Sign successful implementation there will be a list with the current values of fan speeds and component temperatures. If the fans are not detected, then the program cannot help you. Immediately go to “Configure -> Options” and change the language to “Russian”.

As you can see, the processor load and information from voltage sensors are also shown here.
Block “1” contains a list of detected cooler rotation speed sensors with names Fan1, Fan2..., and their number may be greater than it actually is (as in the picture). Pay attention to the values, for example, Fan2 and the second Fan1 have real indicators of 2837 and 3358 RPM (revolutions per minute), and the rest are zero or with garbage (in the picture 12 RPM is garbage). We'll remove the extra ones later.
Block “2” shows detected temperature sensors. GPU- this is a graphics chipset, HD0 – HDD, CPU – CPU(instead of the CPU in the Temp3 picture), and the rest is garbage (cannot be 17 or 127 degrees). This is the drawback of the program, that you need to guess where everything is (but then we ourselves will rename the sensors as needed). True, you can download well-known configurations on the site, but the procedure is not simple and is complicated by the English language.
If it is not clear which parameter is responsible for what, then you can look at the values in some other program to determine the parameters of the computer and sensors, for example, and compare with those determined by the SpeedFan program in order to know exactly where what speed and temperature readings are (in the video under the article everything I'll show you).
And in block “3” we have speed adjustments Speed01, Speed02..., with which you can set the rotation speed as a percentage (can be shown as Pwm1, Pwm2..., see the video for more details). For now, we need to determine which Speed01-06 affects which FanX. To do this, change the values of each from 100% to 80-50% and see if the speed of any Fan has changed. We remember which Speed influenced which Fan.
I repeat that not all fans will be regulated, but only those that the motherboard can control from the BIOS.
Setting up SpeedFan
Now we get to the settings. Click the “Configuration” button and first of all, let’s call all the sensors with clear names. Using my example, I will programmatically control the processor cooler.
On the “Temperatures” tab, we find the processor temperature sensor defined in the previous step (I have Temp3) and click on it first once, and then a second later again - now you can enter any name, for example “CPU Temp”. In the settings below, enter the desired temperature that the program will maintain with the minimum possible cooler rotation speed, and the alarm temperature at which the maximum speed is activated.
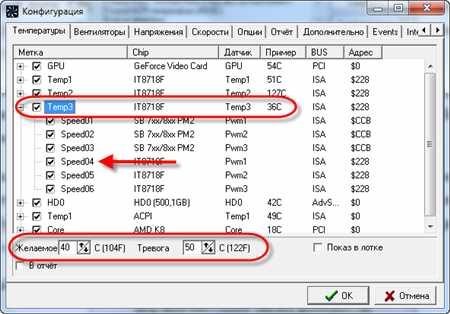
I set it to 55 and 65 degrees respectively, but this is different for everyone, experiment. At very low set temperature, the fans will always spin at maximum speed.
Next, expand the branch and uncheck all the boxes, except for the Speed0X one, which regulates the FanX of the processor (we have already defined this earlier). In my example it is Speed04. And we also uncheck all other temperatures that we do not want to see in the main program window.
On the fans tab, we simply find the fans we need, name them as we want, and turn off the unnecessary ones.

- Minimum – the minimum percentage of maximum speed that the program can set
- Maximum – respectively, the maximum percentage.
For me the minimum is 55%, and the maximum is 80%. It’s okay that the program will not be able to set the value to 100%, because on the “Temperature” tab, we set an alarm threshold value at which the speed will be forced to 100%. Also, for automatic adjustment, do not forget to check the “Auto change” box.

In principle, that's all. Now go to the main SpeedFan window and check the box “Auto speed fan” and enjoy automatic adjustment rotation speed 🙂 You won’t be able to optimally configure it for yourself the first time, experiment and leave the appropriate parameters, it’s worth it!
Extra options
The SpeedFan program has a bunch of other functions and parameters, but I won’t delve into them, because... this is the topic of a separate article. Let's check a few more necessary boxes on the “Configuration -> Options” tab
- Launch minimized– so that SpeedFan starts immediately in minimized form. If not installed, then at startup Windows main the program window will hang on the desktop. If the program does not start with Windows, then simply add its shortcut to startup.
- Static icon– I prefer to set the system tray to display just the program icon instead of numbers
- Collapse when closing– set so that when you click on the “cross” the program does not close, but is minimized to the system tray (near the clock)
- Full fan speed at exit– if not set, then after exiting the program the cooler speed will remain in the state it was in at the time of closing. And since there will be no one else to manage them, the computer may overheat.
And now the video from detailed settings SpeedFan. Note: There was a slight glitch in the video. After manually adjusting the processor fan Fan1, its value did not return to 3400 RPM, but for some reason remained at 2200 RPM. After restarting the program everything returned to normal. IN latest versions SpeedFan did not have this on my computer.
When actively using any laptop, especially in the summer, their users may often encounter the problem of overheating. Such “embarrassment” can lead not only to minor slowdowns operating system, but also to damage to the main parts of the system unit - the processor (read our article about that), video card and motherboard. In order to lower the temperature inside the laptop, you can force the fan to turn on as needed. Read our article on how to do this.
Please note that before performing any manipulations with the laptop, you must first make sure that the cooler as a whole is working. Also, do not forget to check the fan for dirt, because due to excess accumulated dust, debris can interfere operational work blades.
So, let's start by considering the issue of forcing the fan to start using the BIOS system. In practice, when starting a device, regardless of its model or brand, the cooling process first starts, which can be easily confirmed by the presence of corresponding noise.

It is worth noting that in some cases the fan may be installed incorrectly due to polarity connection problems. This can be checked again by starting the cooling system when turning on the laptop. Hold a thread or piece of paper near the vent and watch for the object to vibrate. In this case, the system works correctly. Otherwise, the object will stick to the hole, which will confirm cooling problems.
The ability to control fan functions using commands in the BIOS is quite common.


Obviously, for better cooling of the laptop you will need to enable Turbo mode. However, you should also understand that the wear resistance of the fan itself will be significantly reduced during constant operation and can lead to failure.
On a note! Not all laptops have the ability to configure the fan using the BIOS, so in some cases you have to use special programs, which will be discussed below.
Starting the fan using the SpeedFan program
So, if your laptop does not support setting the fan speed and operating time through the BIOS, you can use free program SpeedFan. To set the ventilation speed using this software you will need:
- Download SpeedFan from the developer's website or other reliable source.


- Install SpeedFan on your laptop following the installer's instructions.


- Launch the program via a shortcut on the desktop.

- Go to the “Indicators” section. In this section you will be given the opportunity to set the percentage of fan power.

- In addition, this program allows you to configure the operating criteria of other components of the laptop. In the “Configuration” section you can specify the operating temperature hard drive, processor and motherboard, and also specify the temperature parameters at which the system will notify you of overheating.

Note! It is worth noting that in addition to SpeedFan, you can find other similar programs on the Internet. Eg, AMD utility OverDrive will allow you to configure any system operation criteria if your laptop has an AMD chipset installed. There is also specially developed software for Intel processors - Riva Tunes.
Starting a fan on a laptop using Windows commands
Operating Windows systems, starting from version 7, also have built-in utilities for managing the power criteria of the laptop. To configure them you will need:
- Open “Control Panel” and select the “Power Options” section.


- Select any power plan and you will be taken to the settings section, where you will need to find the “Change advanced power settings” option.


- In the list of settings, select “Processor power management”.

- In it, select the “System cooling policy” sub-item.

- Set all settings to Active. Click Apply, then OK.

Now the fan will be constantly on, which will allow you to avoid unnecessary overcooling of the system and various “slowdowns”.
Video - How to set up automatic cooling on a computer or laptop?
If you suspect that the internal parts of a laptop or computer are constantly heating up, then you need to think about the health of the fan (or cooler). If it does not cool the heated elements well, they can quickly fail.
Let's look at how to check the cooler.
Checking the functionality of the cooler
There are several ways to check whether the cooler of a computer or laptop is working:
- check on another device;
- special applications.
Testing on another device
If you see that the cooler remains motionless while the computer is running, you can check it by connecting it to another device. If it doesn’t work there either, then it needs to be cleaned and repaired or replaced with a new one. This option applies to both computers and laptops.
Special Applications
Those who do not want to spend a long time looking for the cause of the breakdown can be advised to install a special application that can itself determine the functionality of the cooler. As an example, you can use the program SpeedFan. After downloading and installing, change the language in this program by selecting Configure → Options → Language.
After this, launch the main menu. In the window that opens, you can analyze the status of the fans and the temperature of all devices connected to them.
If the temperature readings are too high, there will be a fire icon next to the device name. To make adjustments at the bottom, select the appropriate fan and press the “Up” button.
If temperature conditions have not normalized, then you need to remove the cooler, blow it out and clean it.


