Today we'll talk about how to reset BIOS password on the motherboard of a laptop or computer. If you suddenly forget your password, logging in will be problematic.
In this case, you might think that the motherboard needs to be replaced, but this is not the case. Developers have long deliberately introduced ways to quickly and easily disable the password in the BIOS. Absolutely anyone can find themselves in this situation, for example, if you set the password yourself, there is a backup code, or the protection was already turned on when you bought the computer second-hand.
A command prompt will open, where you can see what commands are available in this utility. To do this, we introduce the following - cmospwd_win.exe /?.

To reset the BIOS password, you must enter the following command:
cmospwd_win.exe /k
To confirm the clear CMOS action enter number 1 and press Enter.
The program can be easily used not only in Windows, but also with bootable flash drive DOS. Initially, it needs to be placed in the image.
Using the debug.exe tool on Windows
At using Windows XP you can use special utility. This debugger can be found in the following path − WINDOWS\system32\debug.exe. You can copy this address and launch the debugger using the Run window, which is opened by pressing Win+R.
The Run window is also located along the path: Start -> Run.
To reset the BIOS password, you must enter commands for different versions of I/O systems:
AMI BIOS:
- -o 70 10
- -o 71 0
- -o 70 11
- -o 71 0
AWARD BIOS:
- -o 70 17
- -o 71 17
Phoenix BIOS:
- -o 70 ff
- -o 71 17
After each line entered, press Enter. Also, the designation of these codes is as follows:
- q – output;
- the first number is the port;
- the second number is the number of bytes.
There is more than one utility to remove the Bios password. Now I will explain how to use PC CMOS Cleaner tool, which can easily reset CMOS BIOS password, restore settings to factory state.
The brand of motherboard or laptop is not at all important, since the program supports almost all BIOS versions. There is also support for 32x and 64x processors.

This method works well on modern motherboards and laptops. To implement this method, you will need a smartphone or other computer with Internet access.
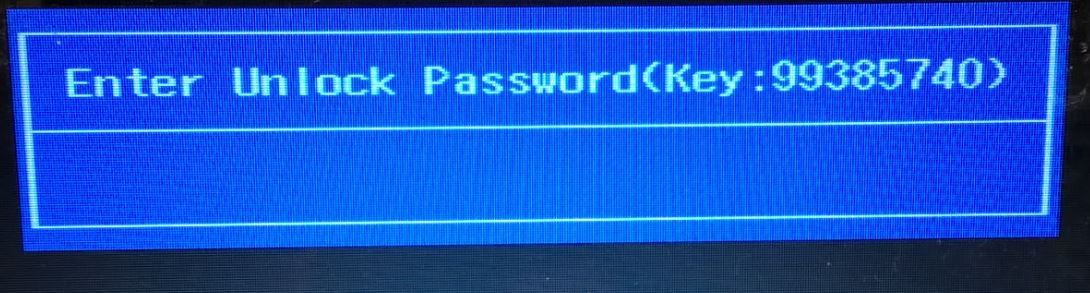
So, all you have to do is enter the password incorrectly three times. After this, a message will appear on the screen that the system is disabled, as well as a special code.

![]()
If you have an Acer laptop and access to the operating system, then you can easily remove the BIOS password using the built-in utility Acer eSettings Management. If you have it, great, but if not, then download from the official site + Acer Empowering.
- Launch the Acer eSettings Management tool from the Start menu or desktop. The program is usually located in the path “Start - All Programs - Empowerment Technology - Manage Acer eSettings”.
- Find the “BIOS Passwords” item.
- Click on the “Remove password” item to restore access to the BIOS. You can also create one.

Contact the motherboard or laptop manufacturer
If the above methods did not help you remove the password from the BIOS, then the only option left is to write a request to the device manufacturer. After all, only they know how to properly clear CMOS memory and return the BIOS to its default state.
In addition, you can also contact service center, but you will have to pay for the services. The service has special tools to reset the BIOS password. It is possible not only to clear the password, but also to replace the BIOS chip with a similar one.
I hope these methods helped you and you reset your BIOS password on your computer or laptop. Be careful the next time you set a new password.
There are many options to protect data on your computer or laptop. You can password protect your computer using account and lock the laptop using the BIOS password. Most users prefer to add a strong password to their user accounts to prevent others from accessing the data. The windows login password is a good idea, but it may not prevent you from booting to the login screen and using workarounds, special programs to find out the password. Even more important is if anyone manages to boot from a Linux Live CD or bootable Windows disk and instantly copy all data to external drive.
Since all of the above passwords can be reset and found out using workarounds, some users prefer to use the BIOS password. The BIOS password is relatively safer than the user account password, since no one will be able to boot from the boot disk or before booting the login Windows system without entering the correct BIOS password.
Again, the BIOS password can be reset by removing the CMOS battery on the motherboard in your computer, but then it won't simple work, especially on laptops and tablets from hp, dell, acer, asus, lenovo, samsung, toshiba. Therefore, we will look at how to find out or reset the BIOS password on laptops and tablets if you have forgotten it and don’t remember it. I wonder how it works? A unique master password is set in the BIOS from the OEM. Using this master password, you can reset the password and gain access to the BIOS.
Reset BIOS password
Method 1. This method should work on most modern laptops and computers. I tried it on an Acer laptop and it worked fine.
- Turn on your laptop, computer and enter the BIOS password several times until you are locked out.
- Now you should immediately see a technical code or number, as in the figure below, or select Enter Unlock Password (enter a password to unlock). In other versions of BIOS, the code may be designated differently (System Disbled Service Tag), but the essence does not change.
- Write down all the codes on a piece of paper or on your mobile phone.
- On your smartphone or other laptop, visit BIOS password website , enter the code you saw on BIOS screen, and then click the Get password button. Knowing the laptop manufacturer, write down the password, if there are several of them, then write down several one after the other.

- Now log in again before entering the password in the BIOS and enter the code that you wrote down from the site. Next you can go to BIOS settings and remove or change the password by entering the same code.

Method 2. I recently password-protected my old laptop from 2005. The BenQ brand, which is already very difficult to find on the Internet and information about it, especially about the BIOS. I used one method that helped me.
You need to launch the command line, but how to do this if there is a password? What do you need?
- If you can boot to your desktop, then run Command Prompt as an administrator.
- You can create an installation Windows flash drive and run CMD.
- You can install FreeDOS on the flash drive itself.
We use the command debug, which will damage some bytes of the protected checksum CMOS RAM areas. This is a risky method, but there was no way out and I didn’t mind the laptop, but everything went well. The next time you boot, CMOS will usually reset to its default settings. Don't forget to change the time, date and year if they go wrong.
Enter the command, where o is a letter.
- debug
- o 70 2E
- o 71 FF
- quit
Bought Asus laptop, I wanted to boot from the boot disk to reinstall Windows 8, on Windows 7, I can’t boot from the disk, what should I do?
You need to disable the so-called mode - Secure Boot
We just find the image with our BIOS and watch how UEFI is disabled in it.
Secure Boot is a security feature created in 2012 by Microsoft as a result of which it cannot be delivered in priority BIOS boot on CD / DVD disc, which means you can't boot the drive and you can't prioritize booting to USB, whether it's a USB flash drive or an external hard drive. Access I.e. completely closed, but you can disable this protection provided.
Depending on the method to disable manufacturers, they may differ from those described here, but in general, the essence remains the same. The main thing to understand is that the purpose of Secure Boot is official keys, which the user must purchase at his own expense. Here are the 3 most common BIOS (and instructions on how to disable UEFI):
In older BIOS versions, disabling Secure Boot was quite easy:


In new BIOS versions, Secure Boot is much more difficult to disable. We just find our image (or images) and look at them as this very Secure Boot is disabled.


2nd option:
Select Security Boot Parameters
For OS type, select Windows 8 UEFI. (Even if you want to install a different OS)
Click on key management
Set the default Provisioning key to Disable.
Then, click on secure key download to remove all old keys
Then insert your boot disk or flash drive


Third option:
Red window appears, press F10 (Ascept)
Then start from the bottom:
Owership key select custom
Existing Support Select Enabled
then look at the boot order (if necessary, disable UEFI sources for loading the operating system by pressing F5) and save the settings


A little explanation:
1) Uninstalling Windows 8 s hard drive does not affect secure boot, because this function is built into the BIOS, as well as the BIOS on the motherboard. So even if you are in command line commands through DiskPart, list of disks and clear, delete all partitions, then ultimately when you start you only see this message here:

2) Make sure to switch to the custom control keys, otherwise you will see the result of a message like (pressing the combination listed 2948 + Enter will not help you in response to the reaction you will not see):

User question
Hello.
Tell me, I've encountered a problem. In general, I wanted to reinstall Windows, went into the BIOS settings and changed them. And now my computer won’t boot: I can’t new system install or download the old one. How can I now return the settings in the BIOS to factory settings, how can I reset them?
Good day.
This question is not uncommon; quite often, inexperienced users, having changed some parameters in the BIOS, are faced with “problematic” operation of the PC, and the need to return everything to its previous state. In some cases, resetting the settings to factory settings is quite simple, in others (when, for example, a password is set to enter the BIOS) it is very difficult to do!
In this article I will try to consider several typical cases for solving a similar problem...
In general, you most often have to reset BIOS settings in the following cases:
- if the computer has stopped working stably and the nature of the reason is not clear;
- if you cannot enter the BIOS because it asks you to enter the super-administrator password;
- if Windows OS does not boot (often happens after setting up the boot queue);
- if you have been overclocking the processor and want to return the frequencies to optimal and safe ones.
Using the menu in BIOS // Load Defaults BIOS
The simplest and quick way Resetting BIOS settings means using a special menu in BIOS settings (sorry for the tautology). This menu is available in absolutely all versions of BIOS, most often in the section Exit. I'll look at the issue step by step.
1) First you need to enter the BIOS.
Usually, the button to enter BIOS menu write when you turn on your computer/laptop (try restarting your computer to see the first welcome screen). Most often, this is one of the following buttons: F2, F10, Esc, Del(99% of devices support these keys).
You may find my article with buttons for entering the BIOS and Boot Menu from different PC and laptop manufacturers -
By the way, the buttons for entering the BIOS settings are usually always indicated in the documentation that came with your PC.
2) Load secure settings(default/factory settings)
In general, give universal settings, where in which BIOS the required tab for resetting the settings is located is impossible. But in most cases (99%), the required tab is either on the first screen (the main one that you see when you log in) or in the section Exit.
For example, the screenshot below shows Award Bios (one of the most popular), in which there are two tabs for resetting BIOS settings: Load Optimized Defaults, Load Fail-Safe Defaults. You can use any one. After you reset the settings, do not forget to save the settings - F10 button.

The photo below shows an excellent BIOS version - here is the required tab "Load Defaults BIOS" is in the section Exit. After factory reset - click on another tab - "Save Changes and Exit" (save changes and exit).


In most cases, this method can quickly and easily reset the BIOS settings, but in some cases this method will not work (most often when a password is set for changing BIOS settings, but you have forgotten it or don’t know it).
Note!
Many laptop users, after resetting the settings, are faced with the fact that the device does not boot (most often, an error like "Operating System Not Found").
This is due to the fact that the boot mode has been changed Boot Mode, was Legacy, but became UEFI. To fix this, in the BIOS settings you need to change UEFI to Legacy, and also disable Fast Boot mode (usually this is done in the BOOT(boot settings)).
An example is shown in the screenshot below: on the left (it was after the reset), on the right (it was after the settings).

Using a jumper on the motherboard
An example for laptops will be shown at the bottom of the article...
Almost any PC motherboard has special jumpers for resetting BIOS settings. This jumper is located next to the battery that powers the CMOS memory. Usually, by default, it is in mode 1-2. To reset the BIOS settings, set the jumper to mode 2-3 for a couple of minutes (see photo below).
Important! This operation must be performed with the computer completely turned off. From system unit disconnect all wires and plugs!
The photo below shows the jumper used to reset the BIOS settings.
Note: The jumper may be called by different names. For example, CLRMOS1 (as in the photo above), CLRTC, Clear CMOS, CCMOS, Clear RTC, CRTC...
If there is no jumper...
Some motherboards may not have a jumper at all. But then, usually, there is either a special button for resetting the parameters (called CLR CMOS), or there will simply be two contacts that need to be closed with a screwdriver or any other metal conductor (the contacts are located near the Clear CMOS inscription).
Important! Close the contacts or press the CLR CMOS button with the PC completely turned off (and the cord unplugged from the outlet)!
The photo below shows what the CLR CMOS button on the mat looks like. PC board.

Addition! If you still have documentation for your PC/laptop, it almost always contains this information (look for the reset section BIOS Setup). Perhaps only cheap Chinese devices may not have this information...
Using a battery on the mat. board
A little higher, when talking about the jumper, I mentioned that it is easiest to find by battery. It resembles an ordinary coin (in size, perhaps 2-3 times thicker), on which you can usually see the word "battery". As a rule, it is light and iridescent; when you look at the motherboard from above, it immediately catches your eye.
So, thanks to this battery, when you turn off the computer, it still remembers the settings in the BIOS, knows the time, year, month, etc. Those. This all happens and is maintained thanks to this small battery - it provides independent power. As a rule, its energy is enough for 10-15 years of PC operation (sometimes even more). Thus, changing it while using the computer is practically not necessary (in 10-15 years your PC becomes obsolete, and you change it to a newer one) ...
To reset BIOS settings - you can simply remove this battery and wait 15-20 minutes (preferably half an hour for reliability). This is such a simple and fast way!
The photo below shows 2 examples of what the battery looks like on a mat. board

Note! Please note that both the date and time and other settings that you will need to set will be reset after turning on the PC
Important! The battery must be removed with the PC completely turned off and disconnected from the power supply.
Resetting password and BIOS settings on laptops // step-by-step analysis
In principle, all of the above is also relevant for laptops, albeit with some reservations.
Firstly, the laptop is not so easy to disassemble, especially some models (but often the necessary reset jumpers are located under the cover that protects RAM, easily opened from the back of the laptop).
Secondly, after removing the battery, the laptop does not always “forget” old passwords (some models have another non-volatile memory, which in principle cannot be turned off in the usual ways). In some cases, you cannot do without a service center.
I will consider some points below.
The photo below shows the message that appears on the laptop after turning it on. Without entering the password, the laptop will not turn on...

Method 1 - contacts/jumper
In general, it is unrealistic to give universal advice for every laptop model! In the article below, I will analyze a typical Acer laptop and show with an example how you can reset its BIOS. In principle, the key difference can only be in how to disassemble the laptop, and where the jumper and battery will be located on the mat. board
So, let's get started...
1) First, turn off the laptop and disconnect all cords from it: power, network, mouse, etc.
2) Turn it over and remove the protective covers: from RAM, hard drive. You also shoot battery(see photo below).
By the way, pay attention to the fact that the battery on laptops is usually held and secured by a pair of latches. To remove the battery, simply pull them apart.
3) Next, remove the RAM sticks and HDD(since usually under them or next to them there will be treasured contacts or a jumper). Usually, the contacts that need to be closed are labeled as JCMOS (or Clear Cmos or something like that).
Note! Before removing RAM on a laptop, open the “tendrils” that secure the strips. Many people don’t know this and are in a hurry to remove the bar.
Note! If you closed the contacts and then reassembled everything and the BIOS was not reset, you need to do the following. Close the contacts and do not release them: parallel connect the power cord to the laptop and turn it on (for 20-30 seconds). Then turn it off and open the contacts.

Method 2 - battery
1) By analogy with the previous method: turn off the laptop, disconnect all cords, and turn the laptop over. Remove the battery and protective caps. Then you should see (or not see - depending on the configuration of your laptop) a small round battery (in the photo below it is shown with a green arrow).
2) Carefully remove it using a small straight screwdriver. Wait 15-20 minutes, then put it in place and assemble the laptop.

3) Turn on and check. In 98% of cases the BIOS will be reset!
By the way, in some cases you have to completely disassemble the laptop to get to the battery. In general, there is nothing complicated about this, but this operation requires great care, because There are a lot of thin wires that can be easily damaged. For example, the photo below shows ACER laptop, the password reset battery is located under the keyboard...
Method 3 - special. utilities
For laptops, there is another effective way to reset the BIOS, including the one with the password. This is about special utilities to reset the password, they are often done by various enthusiasts (Of course, there is no official support, so using them is at your own risk!) .
For example, there is a special one for Acer laptops. utility CLNPWD (the developer is not Russian speaking, unfortunately). This is where I will show you how to work with such software.
You will also need one more utility - HP USB DISK STORAGE FORMAT TOOL (she's quite popular).
1) The first thing you do is insert a USB flash drive into the USB port and run the utility HP USB DISK STORAGE FORMAT TOOL.
2) Then you need to select the inserted flash drive, specify file system(FAT 32), enable quick formatting(Quick Format), check the box next to using a DOS startup disk and indicate the folder with the DOS version that you want to record (it is recommended by the developer CLNPWD).

3) Then copy the file itself to the USB flash drive (i.e. clnpwd.exe).
4) Restart the laptop and open the Boot Menu (in the example below, the F12 button). Typically, a button to enter the Boot Menu is displayed on the first screen after turning on the PC.

5) Select the flash drive from which we want to boot.

6) Actually, the last step is to launch the utility clnpwd: just enter clnpwd and press Enter. Next, the utility will ask you what to reset:
The number "1" means deleting the user password;
The number "2" means deleting the super-administrator password.

Note! For different brands laptops (and even models) - you must use your own utility. Also, I’ll warn you again that you use them at your own peril and risk. No one has officially tested them, and the manufacturer does not provide a guarantee (by the way, if your device is under warranty, this method may cause it to be rejected).
In general, that's all for me. Good luck and fast reset!
Instructions
Try the most trivial way to access BIOS settings first. Start by selecting "Restart" from the main menu of your computer's operating system. When the OS is completed and the screen displays information messages to check computer hardware, press the key assigned to the command to enter the BIOS settings panel. In most cases this should be Delete key or F2, but sometimes manufacturers use their imagination and create entire combinations - for example, Ctrl + Alt + Esc, Ctrl + Alt, Ctrl + Alt + Ins. You can see the exact value for your version in the information label in the lower left corner of the screen - it will appear briefly after passing POST requests.
You won't be able to open all the settings in the BIOS panel at once - there are too many of them for one screen. Therefore, you will have to select one of the sections and look at them in groups, and sometimes even go into subsections, which may also contain nested sections.
If, after pressing the panel entry key, a prompt appears on the screen to enter a password, do so. If it is missing, you will have to reset the BIOS settings to the values to reset set password. To do this, turn off the computer and unplug the power cord. Remove from body sidebar and find a jumper on the motherboard with the words CLR_CMOS or CCMOS etched next to it. By removing the jumper from the pins and moving it to another position, you will reset the password along with all BIOS settings. You can not touch the jumper, but remove it from motherboard The battery is a “button” battery that should be placed close to this jumper. Pull it out of the slot and after 10 minutes put it back in place.
If some of the settings are locked in your computer's underlying I/O system and you want to remove the lock, weigh the possible benefits and losses. Firstly, this operation requires certain qualifications, and secondly, it is possible that these settings are blocked because the installed version of the motherboard is designed only for fixed - unadjustable - values of these parameters. These two risk factors can lead to failure of the processor, memory chips or motherboard chipset.
Use software from the manufacturer installed in computer BIOS, if you decide to unblock it anyway unavailable settings. With its help you need to make changes to source(“patch”) by first making a copy, and then replacing the original version with a modernized one (“upgrade”). Required programs and it is best to look for their descriptions on the manufacturers’ websites on the Internet. Can help determine installed version and selecting the right editors for its applets installed on the website http://wimsbios.com.


