Every System Administrator should know how boot computer from USB flash drive. Most often, this skill is needed when installing an operating system. After all Windows distribution does not have to be on a CD. And, for example, it won’t even be possible to install Windows on a netbook any other way, because... it usually does not have a disk drive.
Today I will tell you how to set boot from a flash drive in BIOS various manufacturers. Regardless of which version you have, the procedure will be as follows:
1. We insert our bootable USB flash drive into the USB connector of the computer. It is advisable to insert it into a port located directly on the motherboard, i.e. from the back system unit.
2. Turn on the computer and press the key Delete(or F2) to get into the BIOS. Depending on the manufacturer and BIOS version, other keys (Esc, F1, Tab) may be used, so you need to carefully watch the prompts on the screen.
In Bios, we can navigate through tabs and lines only using the keyboard.
Next I will describe in detail this process For example different versions BIOS.
Setting up Award Bios to boot from a flash drive
Award Bios: First, let's check if the USB controller is enabled. Let's go to “Integrated Peripherals”. Use the arrow on the keyboard to move down to the “USB Controller” item. Press the “Enter” key and select “Enable” in the window that appears (also using “Enter”). Opposite “USB Controller 2.0” there should also be “Enable”.
  Exit this tab by pressing “Esc”.
Then go to “Advanced BIOS Features” – “Hard Disk Boot Priority" Now in my example the hard drive comes first, but the flash drive should be there.  We stand on the line with the name of our flash drive (Patriot Memory) and raise it to the very top using the “+” key on the keyboard.
  We leave here by pressing “Esc”.
Now on the line “First Boot Device” press “Enter”. We selected “CD-ROM”, but we need to set “USB-HDD” (if suddenly loading from a flash drive does not work, come back here and try setting “USB-FDD”). Let the second device be “Hard Disk”.  Exit this tab by pressing Esc.
Now exit the BIOS, saving the changes. To do this, click “Save & Exit Setup” – press the “Y” – “Enter” key. 
Setting up AMI Bios to boot from a flash drive
If, after entering Bios, you see such a screen, it means you have AMI Bios: First, let's check if the USB controller is enabled. Go to the “Advanced” – “USB Configuration” tab.
  Opposite the items “USB Function” and “USB 2.0 Controller” should be “Enabled”.
  If this is not the case, go to this line and press the “Enter” key. From the list that appears, select “Enabled” (also using “Enter”).
Then exit this tab by pressing “Esc”.
Go to the “Boot” – “Hard Disk Drives” tab.  Now my hard drive is in first place, but I need to put a flash drive here. We go to the first line, press “Enter” and in the window that appears, select our Patriot Memory flash drive.
  It should be like this:
  We leave here via “Esc”.
Select “Boot Device Priority”. Here, the first boot device must be a flash drive.  Press Esc.
Then we exit the Bios, saving all the settings made. To do this, go to “Exit” – “Exit & Save Changes” – “OK”. 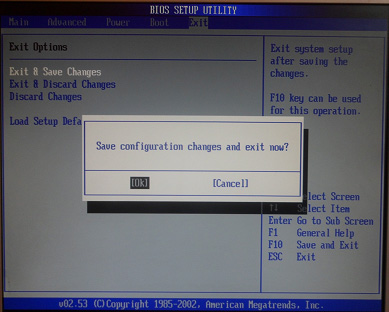
Setting up Phoenix-Award Bios to boot from a flash drive
If, after entering Bios, you see such a screen, it means you have Phoenix-Award BIOS: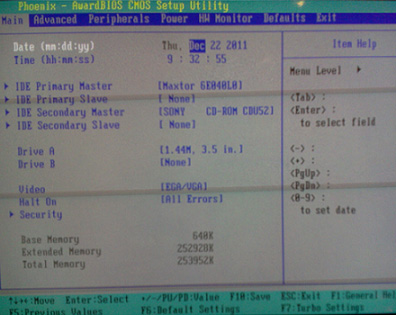 First, let's check if the USB controller is enabled. Go to the “Peripherals” tab – opposite the “USB Controller” and “USB 2.0 Controller” items there should be “Enabled”.
  Then go to the “Advanced” tab and opposite “First Boot Device” set “USB-HDD”.
  After that, exit the Bios, saving the changes. To do this, go to “Exit” – “Save & Exit Setup” – press the “Y” – “Enter” key
 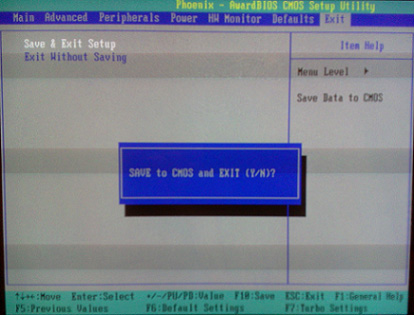 That's practically everything you need to know in order to boot from a flash drive. In my article, I described the process of setting up the BIOS of the most popular versions: Award And AMI. The third example presents Phoenix-Award Bios, which is much less common.
The described procedure may differ slightly in different BIOS versions. But the main thing is that you understand the principle of setting itself.
By the way, I would also like to add: in order to choose which device to boot your computer from, it is not necessary to change the settings in the BIOS. You can immediately call up a special menu after turning on the computer to select boot devices (this can be done by pressing the F8, F10, F11, F12 or Esc key). In order not to guess with the keys, look carefully at the monitor immediately after turning it on. We need to have time to see an inscription like this: “Press Esc to selest boot device.” In my case, it was necessary to press “Esc”.  If on your computer BIOS UEFI, and you need to boot from a flash drive - you can check it out.
If you need reset forgotten password user using a bootable USB flash drive - how to do it.
If the computer does not see the flash drive after rebooting the computer, then the first thing to do is check - is the flash drive really bootable? To make something out of the ordinary USB storage A bootable USB flash drive is not enough to simply copy data from your computer into it.
Also, even if you have previously used this drive and can confirm that it can be used to install the operating system, this does not solve the problem. Today there is Various types downloads, so even if there is a flash drive and it worked on one computer, it is not at all a fact that it will work on another. For everything to be successful, the data needs to be rewritten according to a different principle, using different software.
Is there a function to support a bootable USB flash drive in the BIOS? Is it configured correctly?
In some cases, problems arise not with the flash drive, but with the BIOS system itself. There are different boot types in different versions: USB_CDRom, USB_FDD, USB_HDD, etc.

After entering the BIOS, you need to go to the boot partition present in each version. The names of the section may vary, but one way or another the word “BOOT” will be present. The line that is important to us is: “Boot priotity order,” that is, the boot order.
You need to keep in mind that the hard drive is loaded first, that is, what is located after it no longer matters - in this case it is a USB HDD, which does not reach the turn after loading hard drive. So you just need to swap these values.

Interestingly, if you turn on the computer after a flash drive has been inserted, it will appear in the BIOS with a name.

When exiting the BIOS, be sure to save all changes made.
The note! Some older devices do not initially have the option to select USB. This only means that the BIOS simply does not support such technology. This issue is resolved by firmware.
How to create a bootable USB flash drive for installing Windows
First of all, in order to create an installation disk with the operating system, you need to use a flash drive with a total memory size of 8 gigabytes or more. Why is this volume necessary for installation disk? Simply because today the volume installation files for operating systems varies between two and four gigabytes.

- Windows Seven;
- Windows 8 (8.1);
- Windows 10;
- Ubuntu 15.
Windows 7

Properly preparing a USB drive for use as a Windows 7 installation source will take 15 to 30 minutes, depending on the speed of your computer.
First, download a licensed ISO image of the operating system.
After that, download Microsoft program Windows USB/DVD Download Tool.

Once downloaded, execute the file and follow the installation wizard.
This free program from Microsoft that works on Windows 7, Winsows 8, Windows 10, Windows Vista and Windows XP. You will first need to format the USB drive and then copy the contents of your Windows 7 ISO file to the flash drive.
Step 1. Run the program Windows boot 7 USB DVD Tool, which is most likely located in the Start menu or on the desktop. You will need to choose iso file: Click "Next". Find and select the Windows 7 ISO file. Then open it.

Note! Download image Windows is better directly from the official Microsoft website.
Step 2. Click "Next" , returning to the first screen. After this you will be taken to the next window. Click on the "USB Device" button , after which you will be transferred to the USB drive (flash drive) selection screen.

Step 3. When the device is selected, click on the “Begin copying” button. The installation files will start copying to the media. Confirm "Empty USB device" if the "Not enough free space" dialog box pops up ». After this, all files from the drive will be deleted permanently.

Step 4. Then confirm “Yes” to move to the next window.
Step 5. Having selected the required flash drive, click the “Begin copying” button. The process of copying the installation files to the USB flash drive will begin. Also be careful, as all previously stored files on the USB drive will be erased. A notification that formatting has begun will appear for a few seconds, and then files will begin copying. This part can take up to 30 minutes, or even longer, depending on which version of Windows 7 the ISO file belongs to, as well as the power of the computer and the USB drive itself.

On this screen you will see Status: Backup completed, which means the bootable USB device was successfully created.

Windows 8 (8.1)

In the case of Windows 8, you will need another utility - it is called Media Creation Tool, and can be downloaded from the official Microsoft website.
Step 1. When you launch this program, a window will open in which you will need to select operating system, its language, version, and architecture.


Step 4. Moving to the next window, you will come across a loading screen and a notification that a file is being downloaded. Loading files onto a flash drive can take a long time, and of course the flash drive will be formatted.

Step 5. When the boot is complete, a screen will appear indicating that the bootable USB flash drive is ready. Close the window using the “Done” button.

Windows 10

If you are having problems with your drive in Windows system 10, then its solution will be similar to the solution with Windows 8/8.1: first download the Media Creation Tool program from the official Microsoft website and carry out the entire above sequence of actions. If you first run the program on Windows Seven or Eight, you will be offered two options: update or create bootable media. Choose the second one.

Create installation media using the same principles as for the G8.
Ubuntu 15

Unlike the same interface of different Windows versions, Ubuntu 15 is a completely different operating system, so it uses completely different methods for creating bootable flash drives.
In the case of Ubuntu, you need to download from Github free program UNetbootin.


Methods for booting from a flash drive to UEFI
Now let's see how to boot devices in the UEFI_BIOS system from a USB drive. The test object will be an ordinary average motherboard MSI-A58M-E33, on which the latter is present existing version UEFI_BIOS.


After rebooting, the computer will automatically boot exactly the specified device. However, if the flash drive is not recognized by the computer even after this, then the problem may be as follows:
- the image was written to the flash drive with errors;
- mode works secure boot“Safe boot” (below we will show you how to disable this mode);
- there is also the possibility that the problem is in the flash drive itself - for example, that since the image was written to it, it has been somehow damaged.
Booting a flash drive on older BIOS versions
Users using older computers can boot from a flash drive in the same way, although the rules may differ.


Save and reboot your laptop. From now on, downloading will be carried out from the specified device. This model BIOS is installed on most older laptops, so it will fit 90% of models.
USB flash drive for UEFI computer
All the latest personal computers support latest versions UEFI_BIOS. This system has a huge number of advantages, so when buying a flash drive, make sure that it is UEFI compatible.
When you create a Windows Seven, 8, or 8.1 installation flash drive using the Media Creation Tool, you can be sure that it will be UEFI compatible. And here Windows program The USB/DVD Download Tool, designed for the “seven”, no longer has such guarantees.
How to create a guaranteed boot drive option for Windows Seven


Rufus is universal program, so it is also applicable for older BIOS versions. Distinctive feature this utility is enough high speed copying and burning ISO files to storage devices.
So you can create boot disks for any operating systems. Most of the problems will disappear as soon as you correctly load the image onto the USB flash drive.
To disable “Safe boot” you need to do the following:


Most often, the computer stops seeing the bootable USB flash drive due to a lack of synchronization between the flash drive and BIOS (UEFI), due to the specifics of their boot modes.
Almost all modern personal computers have basically two boot modes: UEFI (the mode that is usually the default on most machines) and Legacy.

If you try to create a bootable drive for Legacy mode (Windows Seven) when the BIOS only has UEFI boot, the resulting drive will not be detected by the computer and you will not be able to select it in the BIOS.
To solve this problem, you can enable the appropriate boot mode in the BIOS. In most cases, you need to enable Legacy mode. This can be done by entering the BIOS, the corresponding boot menu (Boot), and turning on/switching to “Enabled” mode one of the following items:

Also, if you are using an Only Legacy boot drive, you need to turn off “Secure Boot”.
Further, if the image that is written to the flash drive can be loaded in both UEFI and Legacy modes, then it makes sense to write it without changing the BIOS settings (although this does not mean that you will not need to disable “Secure Boot”).
The already mentioned Rufus program is the most convenient device to download in this case. In the settings, you can also select boot types: MBR for machines with BIOS or UEFI_CSM _Legacy, or GPT for machines with UEFI.

Video - BIOS does not see bootable USB flash drive
Quite often, when working on a computer, it becomes necessary to use a bootable USB flash drive. The average user, as a rule, uses it to install the OS and run any programs from DOS.
Due to the prevalence of bootable flash drives, many users experience problems with them. A frequently encountered difficulty is that . This entails the inaccessibility of its functionality to the user.
You may find it useful:
Hardware faults
The problem of the absence of a bootable flash drive in the BIOS occurs when certain hardware malfunctions of the computer or flash drive occur. When faced with this problem, you need to check:
- Flash drive performance;
- The computer's USB port and card reader or extension cord are in good working order if the flash drive is connected through it.
If the flash drive is equipped with an indicator light, but it does not blink when connected, this may indicate a hardware failure. Errors at the hardware level of a flash drive are diagnosed using specialized software(eg Victoria).
Victoria HDD is an excellent program for diagnosing drive failures
Troubleshooting hardware problems is often difficult to accomplish. In some cases, it is easier, faster and cheaper to simply replace the equipment. If the BIOS does not see the bootable USB flash drive due to hardware faults, it can help:
- Using another flash drive and/or another USB port;
- Connecting a flash drive to a computer directly without using adapters;
- Using the rear panel USB port;
- Connecting the USB port to power if it is not connected to it.
If the above methods for solving the problem do not lead to positive result, the fault is software related.
Software problems
Due to problems at the software level, most situations arise with the absence of a bootable flash drive in the BIOS. Its software malfunctions almost always arise due to incorrect creation of the bootable USB flash drive.
User inattention during the process of creating a bootable drive, errors in the operating system and BIOS microcode - all this leads to various software problems with the flash drive. In particular, the BIOS does not see the bootable USB flash drive. This problem can be solved in the following ways:
- By re-creating a bootable flash drive with strict adherence to the instructions and/or using special software for this. So, if a bootable USB flash drive is created manually, you need to format it in file system FAT32;
- Eliminating problems with the operating system or BIOS microcode by updating, reinstalling or flashing them;
- By enabling the USB controller option in the BIOS settings. To do this, you need to find the “USB Controller” function and move it to the “Enabled” position.

Even the most experienced user at some point may encounter an unpleasant moment when trying to start the system from a bootable USB flash drive (for Windows reinstallation, for example) ends in nothing, since the BIOS simply does not see the flash drive. There is a logical explanation for this phenomenon. In this manual you will find a couple of tips that will help solve the problem.
What to do if the BIOS does not see the bootable USB flash drive
First, make sure your USB port is working. Try connecting to a port on the motherboard itself. If you try to solve this problem by rewriting bootable media, but inserting it into a port that is not working in the BIOS or in principle will be of little use from your efforts, to put it mildly. If the port is working, move on to the next solution.
More often bootable flash drives are not shown in BIOS or Boot Menu due to the fact that the image recorded on it does not support booting in the mode installed on the motherboard (by the user or the manufacturer). For example, an image for UEFI is recorded on a flash drive, and the motherboard operates in Legacy mode or vice versa. On many motherboards Hybrid mode is supported, which allows you to boot from both UEFI drives and Legacy. You need to go into the BIOS (UEFI) and find the desired item.
For example, on my motherboard from Gigabyte it is called BootModeSelection and allows you to select two modes at once. It is because of the hybrid mode that when entering the Boot Menu, one drive is displayed twice - one Legacy and one UEFI (if an image is recorded for both systems at once), which allows you to select your preferred boot mode without overwriting the image or changing BIOS settings. On other motherboards, selecting the boot mode may be called differently. Eg, Legacy Support or Compatibility Support Mode(it may be abbreviated CSM). IN in some cases it is also called the name of the operating system, like Windows 10 / 8 for UEFI, and for Legacy Windows 7 or Other OS.
If your motherboard only supports one of the boot types, you will need to either switch the BIOS to Legacy / UEFI, or reset it. An error with the image most often occurs among users who have not figured out how to correctly write Windows to a flash drive. Many people simply copy the contents of the image to removable storage, and then try to boot from it. This method will work on a UEFI system, but will not work on Legacy. And yes, you need to copy content image, not the image itself separate file. Copying the image itself will not work even on UEFI. If the BIOS does not see the flash drive, we recommend overwriting the drive, because when you try to install Windows from a Legacy drive to UEFI system You may also need to disable Secure Boot.

It is also worth considering that on some motherboards the flash drive must be inserted into the USB port before the computer starts booting. In other words, it will not appear in the boot menu list if you insert the USB flash drive into the port after entering the same Boot Menu. Insert the drive into the port, restart the computer, go to the Boot Menu and boot from the flash drive.
If all else fails, try recording Windows on another flash drive and boot from it. Alternatively, connect the drive to a USB 2.0 port, not USB 3.0.
On older BIOSes, USB flash drives are not displayed as a separate boot menu item at all (USB-HDD does not work). In this case, you need to go into the BIOS and find the priority settings hard drives. Your flash drive with the recorded system should be displayed in the list of connected drives. Install it in the first place, save, reboot, and then in the boot menu select start from HDD. The BIOS will select the flash drive first and start booting from it, which in turn will allow you to install the system.
If all attempts are in vain, you will have to burn Windows to another type of media. If the computer you are trying to install Windows on has a DVD drive, try burning the system to a DVD and booting from it. This advice will cause ridicule for many, but if all else fails (this primarily applies to older computers), booting from a DVD should help solve the situation. You can burn the image to disk in the same Media Creation Tool, but select the target drive not as a USB drive, but as a DVD drive.
As a rule, problems of this kind are detected when trying to boot from a specific Flash drive. If your computing device does not see the flash drive in the BIOS, then most likely you have not made the necessary changes to basic system computer or your removable storage device is simply not bootable. However, let's take a closer look at this confusing situation: “the flash drive is inserted into the PC, but does not work properly.”
Is your USB Flash drive working?
Of course, you can suffer for a long time and conduct unsuccessful experiments in the BIOS system itself, which will ultimately turn out to be a waste of your valuable time. Because the flash drive may simply be inoperable. To verify the opposite, try enlisting the help of a testing device - insert the “capricious” flash drive into another PC.

And in general, check whether the (seemingly faulty when you boot the PC) storage device is visible in Windows environment. That is, is it determined USB memory in the operating system itself. If not, then the Flash Drive needs to be repaired. Perhaps everything will be resolved after using a special software tool, for example, a proprietary flash drive recovery utility from its manufacturer.
Priority BIOS settings or what, where and how...
- Insert the flash drive into the USB connector of your PC.
- Restart your computer.
- Enter the BIOS using the corresponding button on the keyboard (for those who don’t know how to do this -).
- Depending on the version of the basic microsystem, the name of the section in which the connected flash drive is displayed may be different from the “BOOT” tab discussed below. And yet, be guided by the abbreviation “USB” when searching for the required partition in the BIOS.

- Set to boot from a flash drive.
- Also check if the USB hardware controller is disabled.

- Save and reboot the computer.

Great if USB Flash Drive was detected and the PC switched to boot mode from the flash drive. Otherwise, move on to the next section of this article.
Boot properties of USB flash drive
Let's say you want to install an operating system whose distribution is stored on a removable storage device. However, in order for a flash drive to be defined as a bootable drive, it must be configured as such. In other words, in the process of recording installation Windows files necessary use special utility, for example, “Rufus” (to download, click here ). Only in this case the flash drive will truly become bootable.
Storage device hardware incompatibility
In some situations system BIOS does not see the flash drive due to the outdated interface of the memory device itself. Make sure your USB drive is not an "ancient" 1.1 drive. However, new flash drives with 3.0 technological characteristics may also not be perceived by outdated computer systems.

So, detailed characteristics your storage device can be found on the official website technical support- enter the model of the flash drive and read the information you are interested in. By the way, this action can help in solving problematic situations related to any malfunction of your USB devices(meaning the presence of a specific recovery utility on the site).
Updating the system BIOS - as a solution to the “invisible” USB problem
Sometimes it is advisable to carry out the process of software upgrading the BIOS of a microsystem. How to do this is described in detail here. However, in modern computers this operation produced by a fairly simple method.
- Visit your motherboard's technical support site.
- Download new version BIOS(a).

- Using a special flasher, flash the BIOS of your computer.
However, before you begin the albeit not difficult, but still very responsible operation of “upgrading the version of the basic PC microsystem,” carefully and in detail study background information about a properly implemented update process (this may be an invaluable help for you - go to ).
Bootable USB incompatibility of outdated computer systems - there is a solution!
Let's call these computing machines"exotic". However, if you need to give your old computer the “boot from USB drive” properties, then follow the instructions below.
- Use this link - https://www.plop.at/en/bootmanager/download.html.
- After you have downloaded “Plop Boot Manager”, burn it to a CD.
- Set the BIOS to prioritize booting from the optical drive.

- Next, after the “Plop” work area of the utility is displayed on the screen, insert the USB drive into the appropriate connector (preferably the main one, which is located behind the PC system unit).

- Select USB in the bootloader window.
Now your “old man” can use a flash drive as a boot drive.
Summing up
So, the author of this article is confident that after you have read the material in the presented article, you will certainly succeed. And yet, I would like to note one important fact: most users make mistakes only because they misunderstand the problem and resort to sometimes meaningless advice from “kind Internet GURU”. At the same time, exposing your car to the critical danger of “complete failure.” Be wise when choosing one or another solution to your computer problems and your experience will always be productive!


