Updates in Windows 10 constantly cause inconvenience to users, forcing them to waste time searching for the causes of problems and fixing them. Many people, having rebooted their computer after installing the next batch of unknown updates, were faced with the fact that the button did not work Windows start 10.
The menu does not open by clicking on the Start icon and does not respond to the Win key (with the window logo). Sometimes, in addition to this, the “Options” menu may not open and other graphical menus may not function. To fix the problem, read this article to the end and follow the instructions contained in it.
Interestingly, in the summer of 2016, Microsoft deigned to release an application for finding and getting rid of factors blocking the appearance of Start.
Restarting the process responsible for the Windows GUI
Explorer.exe is a file that is a graphical shell for Windows. Thanks to it, Explorer, all windows and menus work operating system. During its operation, a problem may occur (for example, conflicts with addresses random access memory). If startup does not work in Windows 10, the first thing you should do is restart the “explorer.exe” process.
1. Call the “Task Manager” using the keyboard shortcut Ctrl+Shift+Esc or context menu taskbar.
2. Go to the “Processes” tab if the window opens in a different one.
If the dispatcher is launched in a simplified window, click on the “Details” button.
3. Find the “Explorer” or “Explorer” process and call the “Restart” command.

4. We confirm our intentions to interfere with the functioning of the system process.
The method does not always work, so you should not rely on its success.
Changing the value of one of the system registry keys
The next step that should be taken in order to get Start to work is to change the value of one of the parameters responsible for the operation of the menu (if there is no key, you will need to create it).
- Call the registry editor integrated into the top ten (run “regedit” in search bar or command interpreter).
- Go to the parameters section current user– HKCU.
- Go to the path Software\Microsoft\Windows\CurrentVersion\Explorer.
- Find the “EnableXAMLStartMenu” key and change its value to “zero”. If there is no parameter, we create a DWORD key with a marked name and value.
- We restart the “explorer.exe” process to enter new configuration by virtue of.

Other quick methods to get Start to work
Some users noticed the problem appeared after creating a new account, the path to which contains Cyrillic characters (the username was in Russian). In this case, you need to use the Computer Management tool and change the path to the user directory (rename the folder in which the account information is stored).
The automatic maintenance function of the operating system also sometimes helps. To activate it, go to the “Properties” of the system, where in the menu located on the left, click on the “Maintenance and Security” link located at the very bottom. Expand the “Maintenance” item and click on the “Run” button. In the near future (the more free resources, the faster) Windows 10 will search for and fix all problems on your computer. This option also rarely helps, but it is necessary to look for the right solution.
Create a new account
It happens that the above options do not give the expected results, in particular, renaming the user directory. Try creating a new user whose name should not contain Russian characters.
- Call up the “Run” window (press Win + R).
- Enter “control” and execute the command.
- After opening the applet, create a new account and log into Windows from under it.
Basically, Start and all other graphical elements work fine. If this is the case, import all the settings and transfer the files from the old account directory and delete it.
Let's use PowerShell
In the end there was less safe way make Start function. However, using PowerShell (Advanced Command Prompt) may cause problems with the app store.
Before following the steps in these instructions, it is recommended to create a system rollback point.
To run the tool, go to the “\System32\WindowsPowerShell\v1.0” directory located in the OS folder and run the powershell.exe file as an administrator.

No less simple option call extended command line is to run the “powershell” command in a command line running with administrator privileges.
Insert the following command into the text line of the PowerShell window that opens and run it:
Get-appxpackage -all *shellexperience* -packagetype bundle |% (add-appxpackage -register -disabledevelopmentmode ($_.installlocation + “\appxmetadata\appxbundlemanifest.xml”))
The operations will take a matter of seconds, after which check if Start opens. If we fail again, we move on.
Let's use the official utility from Microsoft, called to solve a problem with the Start menu
The tiny program works on the same principle as the troubleshooting tool, but regarding graphical elements, in particular the Start.
- We go to the Microsoft website and download the application.
- We launch it and click “Next”, having familiarized ourselves with the work being performed.

Any problems found will be automatically corrected, and the user will be notified about this in a window with the results of the program. You can disable this option in advance in order to fix the problem(s) yourself. Also, a message may appear in the final window that the tool has not detected any abnormalities in the system.

To get acquainted with the details of how the utility works, click on the “View additional information” link.

The latest version of the application performs the following checks:
- availability and normal functioning of ShellExperienceHost and Kartana;
- checks if you have given user rights to access the registry branch in which the data necessary for the operation of the Windows 10 graphical shell is stored;
- will check the integrity of the database in which program tiles are stored;
- scans the application manifest for corruption.
You can download the utility via the direct link http://aka.ms/diag_StartMenu. Don't worry that the URL doesn't have the word "Microsoft" in it; it's just a shortened version of where the program file is stored.
Nothing helped
Even if none of the points in the article helped to return Start, you should not despair. Most users have the checkpointing feature enabled in Windows 10, which makes it possible to roll back the system to an earlier state. These same points are necessarily created before updating the OS, which becomes the main reason for the Start inoperability.
As a last resort, it is not prohibited to reset the “ten” or roll back to its original state.
If on your Windows computer 10 the right mouse button does not work, and you don’t know what to do, then we have prepared some tips to solve this problem. In some cases, the right mouse button behaves erratically: sometimes it responds to clicks, and sometimes it doesn’t.
In fact, there are many reasons why the right mouse button does not work, but we will look at two of the most popular cases.
Turn off tablet mode
It is possible that your right mouse button is not working due to tablet mode being enabled. This mode limits most operations to right-clicking. There are several ways you can try to turn off tablet mode.
Turn off tablet mode in action center
1. Press the key combination Win+A(or click on the Action Center icon, which is usually located with right side taskbar).
2. Here click on the option “ Tablet mode" to turn it off. After that, check if the right mouse button works.

Turn off tablet mode from Settings menu
1. Open the menu " Settings" and select the section " System».
2. On the left side, you will see a category called “Tablet Mode”. Go to it.
3. Click on the first option " When you log in", and select " Use desktop mode» from the drop-down menu.

Turn off tablet mode through the system registry editor (for advanced users)
1. Press the key combination Win+R to open the window Execute».
2. Enter the command regedit.exe(or simply regedit) and press Enter. The Registry Editor will open.
3. Go to the following folder:
HKEY_CURRENT_USER\SOFTWARE\Microsoft\Windows\CurrentVersion\ImmersiveShell
4. In the ImmersiveShell folder you will see a file called TabletMode. Open it and enter the value 0 to turn off tablet mode.

Shell Extension Manager for Windows
The problem with the right mouse button may be caused by third-party extensions in the context menu. Special utility may help get rid of these extensions.
1. Download the utility from this link and save it on your computer.
2. Run the utility as an administrator using the keyboard. The utility does not require installation.
3. In the menu that appears, select " Options"(Options).
4. Click " Filter by extension type" (Filter by Extension Type), then select " Context menu"(Context Menu).
5. You will be presented with a list. Pay attention to the items that are highlighted with a pink background. These are recordings from third party software.
6.. Press and hold CTRL key, then select all entries with a pink background. In the left corner, click the red button to turn them off.
7.. Open the section “ Options" (Options), and select " Restart Explorer"(Restart Explorer).
Click right click mouse on the desktop to check if it works. If yes, then you can enable third-party extensions one by one until you figure out which one is interfering with the right mouse button. Once you find out, simply uninstall the program.
WARNING: You may lose your desktop while performing the above steps. If this happens to you, click Ctrl-Alt-Del. In Task Manager, select the file tab, start a new task and enter explorer.exe. Your desktop will return immediately.
Ready! Your right mouse button is probably not working for these two reasons. Disabling tablet mode and third-party extensions in the context menu should fix the problem.
Requirements.
To perform the actions specified in this article, you must have local administrator rights on the computer.
The article is applicable for Windows 2000/XP/Vista
When working with your computer's registry, be very careful because some changes may cause the system to crash.
Information
When you right-click on a folder or file, the computer may freeze indefinitely. Sometimes this leads to a complete freeze, so to speak “tight”. This usually occurs due to a context menu item or items that link to something other than existing program or network resource, for a program that does not work stably or a frozen program. There are two ways to solve this problem, we recommend doing both.
Fixes computer freezing when you right-click a folder or file.
Method number 1.
Execute";
regedit and click "OK";
ContextMenuHandlers";
HKEY_CLASSES_ROOT\ *\shellex\ ContextMenuHandlers
4. Expand the subsection " ContextMenuHandlers" by clicking on the "+" icon;
5. Look carefully to see if there is a program in the expanded list that you have already deleted long ago, check everything specified programs I work stably and do not freeze;
6. If such a program is found, then right-click on the subsection with its name and select the menu item " Delete";
7. When asked to confirm deletion, click “Yes”;
Method number 2. 1. From the "Start" menu, select " Execute";
2. In the "Open" field, enter the command regedit and click "OK";
3. In the "Registry Editor" window, on the left side, sequentially expand the specified registry sections to the subsection " Applications";
HKEY_CLASSES_ROOT\ Applications
4. Expand the subsection " Applications" by clicking on the "+" icon;
5. Many subsections will be displayed, with names like "name_programm.dll" and "name_programm.exe";
6. Alternately click the left mouse button on the subsections:
- If the section does not expand (does not have a “+” sign or arrow), then on the right side of the window there should be a parameter “ NoOpenWith". If not, then create it. To do this, you need to perform the following steps:
6.1. Right-click on the subsection with the program name;
6.2. Select menu item " Create" and in the drop-down list, select " String parameter";
6.3. Name new parameter NoOpenWith;
6.4. Leave the parameter value empty;
If the section can be expanded, then expand it to a subsection" command";
7. Left-click on the subsection " command" and on the right side of the window, find the option " (Default)";
8. Look at its value, the path to an existing program or network resource should be written there;
9. If you find an entry that refers to a non-existent program or network resource, then delete the entire section that begins with the name of the program.
For example.
name_programm.exe\shell\open\command or name_programm.exe\shell\read\command
10. To remove, right-click on the subsection with its program name and select the menu item " Delete";
11. When asked to confirm deletion, click “Yes”;
Operation of all devices. In the event of failures or breakdowns, it is not always necessary to call specialists, sometimes paying for their services at fairly high prices. Many shortcomings and errors can be corrected yourself. These types of failures and errors include when the right mouse button does not open the context menu. What to do in such cases?
First, you should find out why the work is malfunctioning, why the contextual Windows menu 10. There are several possible reasons for this:
- registry clutter with outdated files;
- lack of programs included in the context menu, their unstable operation.
Let's consider what to do in these cases, how to change the situation when the right-click context menu does not open.
If the right-click context menu does not appear due to the registry being cluttered with outdated files, we recommend using a cleaning utility, for example, Glary Utilities. Glary Utilities is a set of system tweakers, utilities that help protect, fine tuning, increasing PC performance. Using the set, you can remove unnecessary files that clog the system, registry entries that are long outdated, optimize RAM, manage startup, optimize memory and other functions useful for the good functioning of your computer. Glary Utilities can be downloaded for free.

After setting the settings, clear your device from unnecessary files Using the same utility, clean the registry, thereby increasing the performance of your computer.
Freezing Error Fix
If, when you right-click on a file or folder, the context menu on the desktop does not work, the computer freezes, the key does not respond to commands, you can fix this freeze in two ways, we recommend doing both sequentially. Before you begin any of these, you must have administrator rights. You will have to work with the registry, you need to be careful here; if you do it incorrectly, the system may fail. Therefore, when starting the process of fixing failures, be sure to create a system restore point before deleting anything.
A “silent” freeze is usually caused by an unstable program, a frozen program, or when a link in the context menu points to a non-existent resource.
Method one
Follow the steps sequentially:


- Check the list that appears for the presence of programs you have already deleted.
- If there is a program in the list that you removed, remove it from the registry. Before deleting any registry key, we recommend creating an archive copy of it to save in case you need to restore it.
Method two
The algorithm for the second method, when the Windows 10 context menu does not open, will be as follows.
- Open the registry editor as described in steps 1–2 of the previous method.
- Open the HKEY_CLASSES_ROOT subkey,
- In it you will see several subsections with names like “name_programm.exe”, “name_programm.dll”. Check each one in turn by clicking LMB until the “command” subsection. All subsections should open. If it does not open, look on the right side of the window for the presence of the “NoOpenWith” parameter. There is no such parameter - create it. To do this, follow these steps:

- Having found the “command” subsection, click LMB and check for the presence of the “(Default)” parameter on the right side. The parameter must be specified for an application or network resource that exists on the computer.
- If the parameter refers to a resource that is already missing, the entire section starting with the name of this resource or program should be deleted. Before deleting, do not forget to create an archive copy for restoration if necessary. Delete by clicking on the name of the RMB section, then clicking “Delete” - “Yes”.
After completing two methods, the context menu should open, the PC will no longer freeze when right-clicking on a file.
Procedures to customize the desktop context menu in Windows 10 - When we perform a right-click on an unallocated space on the desktop, it brings up a group of options in a rectangular menu. This is a rectangular menu and there is a context menu that contains many various parameters. The desktop context menu is very useful for quick access to settings and display/hidden icons on the desktop, to sort desktop items, and to create a new folder on the desktop.
Since the release of Windows 10, some users have complained about the context menu being slow on the desktop. According to users who have encountered this issue, when right-clicking on an empty area of the desktop, the context menu does not appear instantly. The context appears slowly after about 4 seconds.
If you are also facing the problem of the context menu opening slowly on your desktop in Windows 10, you will be happy to know that the problem can be fixed in a few minutes. In most cases, the desktop context menu takes longer than usual due to built-in third-party elements such as graphics properties Intel cards and NIVIDIA control panels.
How to fix slow opening of desktop context menu in Windows 10
The following article provides instructions to remove third-party entries from the desktop context menu and fix the slow context menu opening issue in Windows 10.
Method 1 of 2
Step 1: In the Start box or taskbar search bar, type "Regedit" and then press the Enter key to open the Registry Editor. If you see the User Account Control dialog box, click Yes.

Step 2: After launching Registry Editor, navigate to the following key:
HKEY_CLASSES_ROOT\Directory\Background\shellex\ContextMenuHandlers
Step 3: Several folders Under, ContextMenuHandlers will appear.

Step 4: To delete entries Intel Graphics Properties and Graphics Options, you need to delete the igfxcui and igfxDTCM folders. To delete a folder, simply right-click on it and select Delete. Click Yes when you see a confirmation dialog.

Likewise, if your PC has NVIDIA graphics hardware, you will see NvCplDesktopContext under ContextMenuHandlers. Just right-click on it and then click Delete.

You can now close the Registry Editor.
Step 5: After this, the desktop context menu should appear instantly without any delay. If not, restart your computer once.
Method 2 of 2
Those of you who don't want to go into the registry can use free utility ShellExView to remove these entries from the desktop context menu. Here's how to download and use ShellExView on Windows 10.
Step 1: Visit this page and download latest version ShellExView. Please note that the download link is displayed at the end of the page.
Step 2: Extract the zip file and then run the shellexview.exe file by double clicking on it. Click Yes when the User Account Control prompt appears.
Step 3: The tool will take a few seconds to scan your computer for entries in the context menu.
Step 4: Finally, find the entry named NVIDIA CPL Context Menu Extension, right-click on it and select Disable.
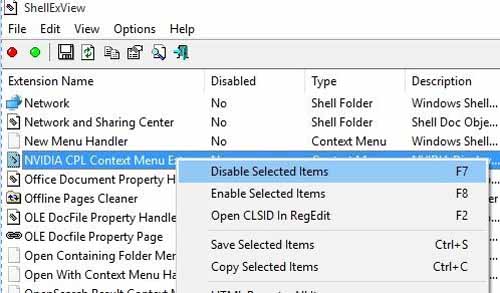
Likewise, if you have Intel graphics, under Extensions, find two entries named TheDesktopContextMenu Class and TheDesktopContextMenu Class and disable them by right-clicking on them and then clicking Disable.

You may need to restart Windows Explorer once or reboot to see the changes made.


