annotation
This article describes the procedures for enabling and disabling Server Message Block (SMB) version 1, SMB version 2 (SMBv2), and SMB version 3 (SMBv3) on SMB client and server components.
Warning. It is not recommended to disable SMB version 2 or 3. Disabling SMB version 2 or 3 should only be used as a temporary troubleshooting measure. Do not leave SMB version 2 or 3 disabled.
In Windows 7 and Windows Server 2008 R2, disabling SMB version 2 will disable the following: functionality.
- Request Combination, which allows multiple SMB 2 requests to be sent as a single network request.
- High volumes of read and write operations allowing optimal use of fast networks.
- Caching properties of files and folders in which clients save local copies of files and folders.
- Long-lasting handles that allow you to transparently reconnect to the server in the event of a temporary outage.
- Improved message signatures, where the HMAC SHA-256 hashing algorithm replaces MD5.
- Improved scaling for sharing files (the number of users, shared resources and open files to the server).
- Support for symbolic links.
- A soft locking client lease model that limits the amount of data transferred between the client and server, improving the performance of high-latency networks and increasing SMB server scalability.
- Large MTU support for full use of 10 Gigabit Ethernet.
- Reduced power consumption—Clients that have files open to the server can be in sleep mode.
- Transparent failover where clients fail over to cluster nodes during maintenance or failure without disrupting service.
- Scaling - providing parallel access to shared data on all cluster nodes.
- Multichannel enables bandwidth aggregation network channel and network resiliency across the various channels available between the client and server.
- SMB Direct - Provides support for RDMA networks to provide very high performance, low latency and low CPU utilization.
- Encryption - provides end-to-end encryption data and protects it from interception on untrusted networks.
- Directory rentals reduce application response times in branch offices through caching.
- Optimizing the performance of random reads and writes of small amounts of data.
Additional Information
How to enable and disable SMB protocols on an SMB server
Windows 8 and Windows Server 2012
New cmdlet introduced in Windows 8 and Windows Server 2012 Windows PowerShell Set-SMBServerConfiguration. It allows you to enable or disable SMB protocol versions 1, 2, and 3 on the server.Notes. When you enable or disable SMB version 2 in Windows 8 or Windows Server 2012, you also enable or disable SMB version 3. This is due to the use of a common stack for these protocols.
After running the cmdlet
- To get the current state of the SMB server protocol configuration, run the following cmdlet:
Get-SmbServerConfiguration | Select EnableSMB1Protocol, EnableSMB2Protocol
Set-SmbServerConfiguration -EnableSMB1Protocol $false
Set-SmbServerConfiguration -EnableSMB2Protocol $false
Set-SmbServerConfiguration -EnableSMB1Protocol $true
Set-SmbServerConfiguration -EnableSMB2Protocol $true
Windows 7, Windows Server 2008 R2, Windows Vista and Windows Server 2008
To enable or disable SMB protocols on an SMB server running Windows 7, Windows Server 2008 R2, Windows Vista or Windows Server 2008, use Windows PowerShell or Registry Editor.Windows PowerShell 2.0 or later PowerShell
- To disable SMB version 1 on the SMB server, run the following cmdlet:
Set-ItemProperty -Path "HKLM:\SYSTEM\CurrentControlSet\Serv ices\LanmanServer\Parameters" SMB1 -Type DWORD -Value 0 -Force
- To disable SMB version 2 and 3 protocols on the SMB server, run the following cmdlet:
Set-ItemProperty -Path "HKLM:\SYSTEM\CurrentControlSet\Serv ices\LanmanServer\Parameters" SMB2 -Type DWORD -Value 0 -Force
- To enable SMB version 1 on the SMB server, run the following cmdlet:
Set-ItemProperty -Path "HKLM:\SYSTEM\CurrentControlSet\Serv ices\LanmanServer\Parameters" SMB1 -Type DWORD -Value 1 -Force
- To enable SMB version 2 and 3 protocols on the SMB server, run the following cmdlet:
Set-ItemProperty -Path "HKLM:\SYSTEM\CurrentControlSet\Serv ices\LanmanServer\Parameters" SMB2 -Type DWORD -Value 1 -Force
Registry Editor
Attention ! This article contains information about modifying the registry. Before making changes, it is recommended to create backup copy registry and learn the procedure for restoring it in case a problem arises. additional information For information about backing up, restoring, and modifying the registry, see the following Microsoft Knowledge Base article.To enable or disable SMB version 1 on an SMB server, configure the following registry key:Registry Subkey: Registry Entry: SMB1
REG_DWORD: 0 = disabled
REG_DWORD: 1 = enabled
Default: 1 = enabled
Registry subkey: HKEY_LOCAL_MACHINE\SYSTEM\CurrentControl Set\Services\LanmanServer\Parameters Registry Entry: SMB2
REG_DWORD: 0 = disabled
REG_DWORD: 1 = enabled
Default: 1 = enabled
sc.exe config lanmanworkstation depend=bowser/mrxsmb20/nsi
sc.exe config mrxsmb10 start= disabled
- To enable SMB version 1 on the SMB client, run the following commands:
sc.exe config mrxsmb10 start=auto
- To disable SMB version 2 and 3 protocols on the SMB client, run the following commands:
sc.exe config lanmanworkstation depend=bowser/mrxsmb10/nsi
sc.exe config mrxsmb20 start= disabled
- To enable SMB version 2 and 3 protocols on the SMB client, run the following commands:
sc.exe config lanmanworkstation depend=bowser/mrxsmb10/mrxsmb20/nsi
sc.exe config mrxsmb20 start=auto
- These commands should be entered in command line with elevated privileges.
- After making these changes, you must restart your computer.
Hello! For those who are not in the know, I’ll start from afar. On computers and laptops with installed Windows There is a separate "Network" tab in Explorer. This tab displays devices from the network environment. That is, by opening the “Network” tab we can see computers, network storage (NAS), multimedia devices (DLNA), flash drives and external drives, which are connected to the router and to which it is configured general access. Simply put, those devices that are connected through one router (located on the same network) and on which network discovery is enabled (devices that can be detected in local network) . Our router may also be displayed there (section "Network infrastructure") and other devices.
Now I’ll explain what and how, and why I decided to write this article. I have an ASUS router to which I connected USB flash drive, and configured shared access to this flash drive for all devices on the network. And what do you think, this network drive appeared in the “Network” section on all computers (it is displayed there as "Computer"), but it didn’t show up on my computer. That is, my computer did not see the flash drive connected to the router, nor other computers on this network. But the DLNA server was displayed running on the same router. But this does not change anything, since I need the usual network access to the drive.
Also, I could not access the flash drive when I typed its address //192.168.1.1 in Explorer. This address was immediately opened through a browser. And I was unable to connect this drive as network drive. It simply was not in the list of available devices in the network environment.
Such a problem when Windows 7, Windows 8, or Windows 10 does not see network devices is not uncommon. It doesn't have to be a flash drive, or external HDD, which you connected to your router, as in my case. Most often, shared access is configured between computers on a local network. And they face the same problem when computers are connected to the same network (to one router), the sharing settings are set correctly, but the "Network" tab is empty. Or only the router and your computer are displayed.
Since there can be many reasons and, accordingly, solutions, I’ll probably start with the simplest ones (which didn't help me) and at the end of this article I will share the solution that helped in my case. As a result, my laptop still saw all the devices on the network. Including a network storage device and another computer that is also connected to this network.

But this does not mean that you have the same case. Therefore, I advise you to check all the settings in order.
Checking sharing settings
We will consider two cases:
- When computers do not see each other on the local network.
- Sharing network storage. This could be a flash drive, or HDD which is connected to the router, or a separate drive (aka NAS).
First case
For computers to be able to see each other and appear in the Network section in Explorer, they must be connected through the same router. Or connected directly (cable or via Wi-Fi). Simply put, they must be on the same local network.
Next, on all computers (I don’t know how many of them you have there), it is advisable to assign the network status to “Home” (private). I wrote in the article how to do this in Windows 10. In Windows 7, just go to the Network and Sharing Center and change the status of the current connection there.

If after this the computer still does not detect other computers (or vice versa), then let's also check the sharing settings.
To do this, in the “Network and Sharing Center” window (if you don’t know how to open it in Windows 10, then see the article), click on the “Change advanced sharing settings” item.

And for the current profile (usually “Private”) we set the parameters as in the screenshot below.

Let's do it on all computers on the local network.
Articles on this topic:
As a rule, these tips solve all problems with detecting computers on a local network.
Second case
When you have problems accessing your network storage. As in my case. I haven't seen Windows 10 USB drive, which was connected to the ASUS router. Now many routers have a USB port for connecting drives and other devices, so the topic is relevant.
You need to make sure that this drive is defined in the router settings and that sharing is enabled. It is clear that this is done differently on different routers. On ASUS routers, for example, it looks like this:

Related articles:
Do not confuse sharing settings with FTP settings. The FTP server settings on the router have nothing to do with this.
Well, if other devices see the network storage and have access to it, but on a particular computer there is no access to it, then the problem is not on the router’s side. Go through the settings of the “problem” PC using this article.
An antivirus or firewall may be blocking network devices
If your antivirus or firewall (firewall) that is installed on your computer doesn’t like something, then it can easily make it so that neither you can see other devices in the network environment, nor can anyone detect you.
True, after disabling the firewall built into my antivirus, the problem was not solved (which means the problem is most likely not there), but it still seems to me that in my case it could not have happened without the participation of the antivirus.
Therefore, try to completely stop the antivirus for a while, or at least disable the firewall built into it (firewall). In NOD 32 this is done like this:

To check this you need to do on all computers, which will participate in the local network.
It is quite possible that you have some other programs installed that can monitor the network and manage network connections.
If it turns out that the problem is in the antivirus, then you need to add your network to the exceptions. Prevent the firewall from blocking the network itself or network devices.
If you don’t have an antivirus, you can experiment with disabling/enabling the firewall built into Windows.
Working group
The workgroup must be the same on all devices. As a rule, this is true. But it is advisable to check. To do this, open the computer properties "System" and go to "Advanced system settings".
"Working Group" will be indicated there. To change it, you need to click on the "Change" button.

Once again: the workgroup name must be the same on all computers.
If you have a problem accessing your network storage (to flash drive via router), then in the sharing settings on the same ASUS router the work group is also indicated. You can look at the screenshot above in the article. It should be the same as on the computer.
Problem accessing a shared network folder via SMB1 in Windows 10 (my solution)
Let's return specifically to my problem. Everything I described above has been checked and rechecked 10 times already. I did it a couple of times, but Windows 10 never saw other computers on the network and, most importantly, the shared folder in the form of a flash drive connected to the router never appeared in Explorer. And on other devices on the network everything was detected without problems. Including my laptop.
I read somewhere that you can try opening a shared folder through the Run window. Pressed the Win + R key combination and entered the network folder address //192.168.1.1 (aka router address).
I did not gain access to the drive, but an interesting error appeared:
You cannot connect to the shared folder because it is not secure. This shared folder runs on the legacy SMB1 protocol, which is insecure and may expose your system to attack.
Your system needs to use SMB2 or later.

This is already interesting. At least something.
SMB (Server Message Block) – network protocol, which is responsible for sharing files, printers and other network devices.
I started looking. And it turns out that Windows 10 abandoned the SMB1 protocol. Because of safety. And the Samba software package installed on my router seems to work using the SMB1 protocol. That's why Windows 10 doesn't see it. But other computers that also run Windows 10 were also not displayed on the “Network” tab.
Since I couldn’t update the protocol for SMB2 in the router settings, I decided that I needed to somehow enable SMB1 support in Windows 10. And as it turned out, this can be done without any problems. As a result, after connecting the “SMB Client 1.0/CIFS” component, everything worked for me. The system saw shared folders on computers on the network and a network folder configured on the router itself.
How to enable SMB1 in Windows 10?
Through the search, find and open the old “Control Panel”.

Switch to Small Icons and open Programs and Features.

Open "Turn Windows features on or off". Find the item “Support for SMB 1.0/CIFS file sharing”. Open it and check the box next to "SMB Client 1.0/CIFS". Click Ok.

If your computer prompts you to restart, restart it. If there is no prompt window, reboot manually.
After the reboot, all available devices on your network should appear on the “Network” – “Computer” tab.
I will be glad if this article is useful to someone and helps solve the problem that has arisen. Don't forget to write in the comments about the results. Or ask the question, where would we be without them :)
Recent large-scale virus attacks have spread using holes and shortcomings of the old SMB1 protocol. For one of the unimportant reasons, the operating room Windows system still allows it to work by default. This old version protocol is used for sharing files on a local network. Its newer versions 2 and 3 are more secure and worth leaving enabled. So, as you are using the new operating system number 10 or the previous one - 8 or even the already outdated one - 7, you must disable this protocol on your PC.
It is only included because there are still some users using older applications that were not updated in time to work with SMB2 or SMB3. Microsoft has compiled a list of them. If necessary, find and view it on the Internet.
If you keep all your programs installed on your computer in good condition (updated on time), you most likely need to disable this protocol. This will increase the security of your operating system and confidential data one step further. By the way, even specialists from the corporation itself recommend turning it off, if necessary.
Are you ready to make changes? Then let's continue.
SMB1
Open Control Panel, go to “Programs” and select “Turn Windows features on/off”.
In the list, find the “Support for SMB 1.0/CIFS file sharing” option, uncheck it and click “OK”.

Reboot the operating system, after saving all your previously edited files, such as documents, etc.

FOR WINDOWS 7
This is where editing comes in handy. system registry. It is a powerful system tool and if incorrect data is entered into it, it can lead to unstable work OS. Use it with caution and be sure to create a backup for rollback before doing so.
Open the editor by pressing the Win + R key combination on your keyboard and typing “regedit” in the input field. Next, follow the following path:
HKEY_LOCAL_MACHINE\SYSTEM\CurrentControlSet\Services\LanmanServer\Parameters
Create a new 32-bit DWORD value and name it “SMB1” with the value “0”. Reboot your system.
Attention! These methods work to disable the protocol only on one PC, but not on the entire network. Refer to the official Microsoft documentation for the information you are interested in.
Today we will tell you how to open a folder on a local network (popularly “share”) and give other computers access to your files. Instructions using Windows 10 as an example.
Shared folder
1. Settings on the tab General access
To create a network resource on a computer with Windows 10, create a folder or select an existing one, click on it right click and call Properties:

Go to the tab General access.
Select Advanced setup:

Check the box Share this folder.
Click the button Permissions:

Configure permissions for different users or groups. In most cases here you will need read permission for the group All. In our example we allowed full access To network folder: both for reading and writing.
After setting, click OK:

2. Settings on the tab Safety
Go to the tab Safety.
Click the button Change:

Here you need to specify which users are allowed access at the NTFS rights level. Again, in most cases you should allow it for everyone. To do this, click the button Add:

Enter the word “Everyone” with a capital letter in the field and click OK:

Now the group All appeared on the list. Click Save:

Now, in order to have access not only to the folder itself, but also to subfolders and files, you need to change the NTFS settings.
Click Additionally:

Check the box Replace all permission entries of a child object with those inherited from this object.
Click OK:

Click Yes:

Wait until the rights are applied to all nested objects. How more files and folders inside this directory, the longer the application process may take.
Attention! An error may occur while applying the parameters:

If you encounter it, read about how to fix it.
3. Configure sharing options
On Windows 10, click Start - Options and select Network and Internet:

Select an item Change advanced sharing options:

In Windows 7 and 8.1, it is best to right-click on the network icon near the clock, select Network and Sharing Center:


Expand section Private.
Enable file and printer sharing:

Now expand the section All networks.
Set the switch to position Disable password protected sharing.

4. Setting up a firewall
In order to connect to your PC over the network, you must allow incoming connections in the Windows Firewall.
Here you have two options:
- disable it completely (which is NOT recommended);
- create a rule allowing network traffic (in a separate article)
If you are from Windows 10 and cannot open network folders on other network devices (NAS, Samba Linux servers) or on computers with older versions of Windows (Windows 7/ XP /2003), most likely the problem is due to the fact that in your new version Windows 10 has disabled support for outdated and insecure versions of the SMB protocol (used in Windows to access shared network folders and files). So, starting with Windows 10 1709, the SMBv1 protocol and anonymous (guest) access to network folders using the SMBv2 protocol were disabled.
Microsoft is systematically disabling old and insecure versions of the SMB protocol in all latest versions Windows. Starting with Windows 10 1709 and Windows Server 2019 (both Datacenter and Standard) in operating system by default (remember the attack, which was precisely implemented through a hole in SMBv1).
The specific actions that need to be taken depend on the error that appears in Windows 10 when accessing a shared folder and on the settings of the remote SMB server on which the shared folders are stored.
You can't access a shared folder as a guest without authentication
Starting with Windows 10 version 1709 (Fall Creators Update) Enterprise and Education users began to complain that when they tried to open a network folder on a neighboring computer, an error began to appear:
You can't access this shared folder because your organization's security policies block unauthenticated guest access. These policies help protect your computer from unsafe or malicious devices on your network. An error occurred while reconnecting Y: to \\nas1\share Microsoft Windows Network: You can’t access this shared folder because your organization’s security policies block unauthenticated guest access. These policies help protect your PC from unsafe or malicious devices on the network.

However, on other computers with older versions of Windows 8.1/7 or on Windows 10 with build before 1709, the same network directories open normally. This problem is due to the fact that in modern Windows versions 10 (starting from 1709) by default network access to network folders under the guest is prohibited account via SMBv2 protocol (and lower). Guest (anonymous) access implies access to a network folder without authentication. When accessing under a guest account via the SMBv1/v2 protocol, traffic protection methods such as SMB signing and are not applied, which makes your session vulnerable to MiTM (man-in-the-middle) attacks.
When you try to open a network folder under a guest using the SMB2 protocol, an error is recorded in the SMB client log (Microsoft-Windows-SMBClient):
Source: Microsoft-Windows-SMBClient Event ID: 31017 Rejected an insecure guest logon.
In most cases, this problem can be encountered when using older versions of NAS (they usually include guest access for ease of setup) or when accessing network folders on older versions of Windows 7/2008 R2 or Windows XP/2003 with configured (guest) access ( see in different versions Windows).
In this case, Microsoft recommends changing the settings to remote computer or a NAS device that distributes network folders. It is advisable to switch network resource to SMBv3 mode. And if only the SMBv2 protocol is supported, configure access with authentication. This is the most correct and safe way fix the problem.
Depending on the device on which the network folders are stored, you must disable guest access on them.

There is another way - change the settings of your SMB client and allow access from it to network folders under a guest account.
To allow guest access from your computer, open the editor group policies(gpedit.msc) and go to: Computer Configuration -> Administrative Templates -> Network -> Lanman Workstation ( Computer Configuration ->Administrative templates -> Network -> Lanman Workstation). Enable Policy Enable insecure guest logons.

Those. The error message clearly shows that the network folder only supports the SMBv1 access protocol. In this case, you should try to reconfigure the remote SMB device to support at least SMBv2 (the correct and secure path).
If network folders are distributed by Samba on Linux, you can specify the minimum supported version of SMB in the smb.conf file like this:
Server min protocol = SMB2_10 client max protocol = SMB3 client min protocol = SMB2_10 encrypt passwords = true restrict anonymous = 2
On Windows 7/Windows Server 2008 R2, you can disable SMBv1 and enable SMBv2 like this:
Set-ItemProperty -Path "HKLM:\SYSTEM\CurrentControlSet\Services\LanmanServer\Parameters" SMB1 -Type DWORD -Value 0 –Force
Disable-WindowsOptionalFeature -Online -FeatureName "SMB1Protocol"
Set-SmbServerConfiguration –EnableSMB2Protocol $true
If your network device(NAS, Windows XP, Windows Server 2003), supports only SMB1 protocol, in Windows 10 you can enable a separate SMB1Protocol-Client component. But this is not recommended!!!
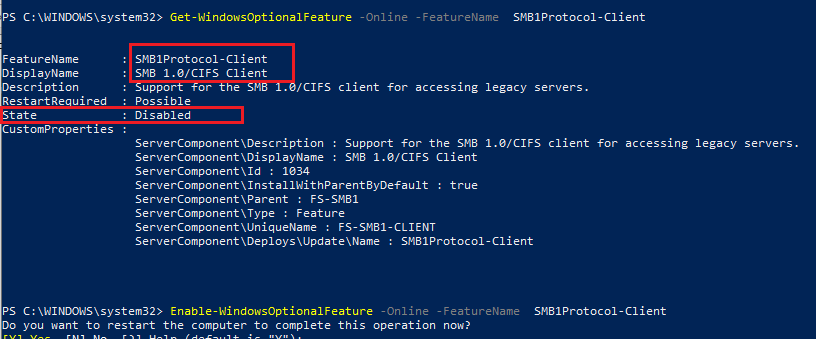
Launch the PowerShell console and check that SMB1Protocol-Client is disabled (State: Disabled):
Get-WindowsOptionalFeature -Online -FeatureName SMB1Protocol-Client
Enable SMBv1 protocol support (reboot required):
Enable-WindowsOptionalFeature -Online -FeatureName SMB1Protocol-Client
You can also enable/disable additional Windows components 10 (including SMBv1) from the menu optionalfeatures.exe -> SMB 1.0/CIFS File Sharing Support

In Windows 10 1709 and higher, the SMBv1 client is automatically removed if it has not been used for more than 15 days (the SMB 1.0/CIFS Automatic Removal component is responsible for this).
In this example, I only enabled the SMBv1 client. Do not enable the SMB1Protocol-Server feature unless your computer is used by legacy clients as a public folder server.
After installing the SMBv1 client, you should be able to connect to a network folder or printer without any problems. However, you need to understand that using this workaround is not recommended, because... puts your system at risk.


