Hello, dear readers! The other day I finally completed one long-running task, namely converting my old printer into a network one. In this article I will tell you everything in order - how it all began and how it all ended.
The need to convert the printer to a network one arose in connection with a change of computer. And in general, I wanted to make it possible to print via Wi-Fi from any device that supports such a function.
The printer is quite old, but made to last. It has already been discussed.
The printer could simply be connected to a new desktop computer via a USB port using an lpt-usb adapter, but we are not looking for easy ways.
How to make a printer network
The first step to create a network printer was the purchase of a special thing called the Tp-Link TL-PS110P lpt print server.

This print server allows you to make any printer with an lpt port network using the “printer - print server - router” scheme. It has a connector on one side for connecting to a printer, on the other side an RJ-45 connector for connecting to a router.
I bought a print server, but in my case it wasn’t so simple. The fact is that my HP LaserJet 1100 printer has a non-standard lpt connector (microcentronics-36), so in order to connect the print server to the printer, I needed a centronics-36 - microcentronics-36 adapter. I was too lazy to order from Ketai abroad, so I bought the components from radio spare parts and made it myself.
I took the contact connection diagram. Thanks to the author!
After I finally completed the adapter with great difficulty, I immediately ran to connect the entire system together and test it.
So, after assembling the system, all that was left was to install the print server distribution kit (as it turned out, not necessary) and add a new printer.
I show an example on Windows 7.
Click Start - Devices and Printers - Add a Printer

Select “Add a network, wireless, or Bluetooth printer”

The search for printers will begin, but we need to click on the “ The printer you need not on the list."


Enter the IP address of the printer, that is, the print server (by default it is 192.168.0.10).

IN additional information select the appropriate parameters. In my case it is an HP LaserJet printer with a parallel port.

We leave the device port unchanged - Parallel 1.

The driver model is determined.

After which a list of all printers will appear, from which you need to select yours.

Deny/allow shared access to the printer.

Finally, a window will appear indicating the successful installation of the new printer.

Without leaving the Setup Wizard, you can print a test page to make sure it's done correctly.
If the printer printed everything correctly, then everything was done correctly.
We add a printer in exactly the same way on other devices running Windows.
In the next lesson, I will write about how to connect an Android device to a network printer and print from it. Do not miss!
Also watch the video on printing from Android over Wi-Fi using the app Printer Share Premium:
In office buildings, there are often several workstations in one office, equipped with computer equipment that allows you to perform multiple production tasks. However, the printer for printing is often installed only in a single copy. Therefore, you have to use portable flash drives in order to be able to print various documents. Now there are many practical ideas on how to connect a printer via local network. Focusing on one of the proposed methods, it is possible to provide comfortable and fast printing of documents to each user whose computer equipment is connected to the printing machine via a local network.
In large offices there is no point in using separate printers for each PC
So that everyone has the opportunity to use the same peripheral device, you need to make some changes to your print settings.
Setting up a printer over a network begins with the fact that on the main page personal computer, to which a single printing machine is connected, changes are made to provide unhindered access via the network to all other office employees.
Adding a Local Device
When faced with the serious task of connecting a printing device to a local network so that every user has free access to printing, you must first determine which PC the printer will be connected to.
It is important to consider that such a computer must have acceptable technical resources to ensure efficient operation and prevent freezes. Next, you need to connect the device to your computer via a USB cable. The computer itself will detect the newly detected device and offer to install the appropriate drivers. Once you have completed installing the drivers and printing a test page, you can follow the further recommendations on how to set up your printer over the network.

It is very important to allow shared access to the specified printing machine over the created network. Initially, go to the Control Panel, after which you go to the “Printers and Faxes” tab. All detected devices located on the local network will be displayed there. You should indicate exactly the one to which you plan to provide public access.

You need to click on the required icon right click mouse and go to the “Properties” tab. In the dialog box that opens, select “Access”. It is there that the function is located that provides access for the peripheral device to all other computers, and it is also at this stage that the network name is assigned.

On the “Security” tab, permission is set for all local users. This completes setting up the printer via a local network from the main computer, but it is extremely important to configure all other computers located in the local space without errors.

Setting up other local computers
The number of computers that can be involved in a local network is not limited. It all depends on production tasks or private interests. Each PC can use printing resources if it is configured correctly in advance.
Setting up network printing
It's important to remember that main computer and the printing machine itself must be turned on, otherwise printing will be impossible. It is this parameter that one also pays close attention to when choosing a computer to which peripheral equipment is connected.
In order to connect a network device to make printouts, you need to go to the Control Panel, go to “Devices and Printers”, then find the “Add” tab on the horizontal taskbar. By clicking on it, the PC will automatically start searching for an available printing device, and after a while a list of all found peripheral equipment will appear.

In most cases, one available printer will be found, although multiple devices may be found. The user is obliged to select only the device from which it is intended to print documents in the future.

Fortunately, modern operating systems are designed in such a way that they are able to independently find the required drivers, so no special user interaction is required here, other than confirming the desired selection of peripheral equipment. The operating system itself will detect the drivers and carry out the installation itself, so you just need to wait for the process to complete successfully.

Only in extremely rare cases can it happen that the search for drivers fails; they simply will not be detected. This happens when there is no access to the Internet and the drivers are not saved on the PC hard drive. In this case, the user must either download the drivers from another PC that has access to the global web, or use the disks that came with the device for printing. Unfortunately, there is no other way out, otherwise it will simply not be possible to connect printing peripheral equipment.
Another important point: the “Default device” parameter must be set on the network equipment so that you can immediately start the printing process, without having to select the network name in the device selection window each time.

Installing affordable printing peripherals in the office or home is easy. It is very important to follow the recommendations of specialists, thanks to which printing documents from any PC will be carried out without problems.
When working on a home or corporate local network, the advantage of a properly configured remote printer is that each participant can use it without using special effort. You will not need to go to the computer to which the printing equipment is connected, since all actions are performed from your PC. Next, we will talk about how to connect and configure the device to work via a local network.
I would like to immediately note that the main operations are performed on the main PC, with which the printer is connected. We've broken the process down into several steps to make it easier for you to follow the instructions. Let's start the connection procedure with the first step.
Step 1: Connecting the Printer and Installing Drivers
It is logical that the first step will be connecting the equipment to the PC and installing drivers. You will find guidance on this topic in our other article at the link below.
Driver installation is carried out using one of five available methods. Each of them differs in its algorithm and will be most suitable in certain situations. You just need to choose the option that seems most convenient. Check them out in the following material:

Step 2: Create a local network
A mandatory point is the creation and correct setting local network. It doesn’t matter what type it will be - united network cables or Wi-Fi - the configuration procedure is almost identical for all types.

Regarding adding a homegroup to different versions operating room Windows systems, here you need to perform slightly different steps. You can find detailed instructions on this topic in the article from our author at the link below.

Step 3: Share
All network participants will be able to interact with the connected printer if its owner turns on the function public access. By the way, it is required not only for peripherals, but also applies to files and folders. Therefore, you can immediately share all the necessary data. Read more about this below.

One of the most common mistakes with sharing is considered 0x000006D9. It appears when you try to save new settings. In most situations, it is associated with problems in the operation of Windows Defender, and therefore can be solved by activating it. However, sometimes the problem occurs due to problems in the registry. Then it will have to be checked for errors, cleaned of debris and restored. You will find guidance on how to solve this problem in the following article.


You need to understand what we are talking about
To make it easier to navigate the settings, you need to understand the existing printer interfaces - what they are, what they look like and what they are needed for.
- Wired USB port. The high-speed bus allows you to connect the printer directly to the device. By default, this is a computer, laptop and router. The interface cable is unique - on one side there is a rectangular connector for connecting to a PC, on the other side there is a trapezoidal port for connecting to a printer. It is the owners of USB devices who are primarily interested in how to make a network printer in order to print not only from a computer, but also from other mobile devices.
- Ethernet network port. It is present only in expensive devices and is designed to connect the printer to a network hub. This technology satisfies the printing needs of all owners of such devices.
- Wireless Wi-Fi technology. Most modern printers are equipped with such a module, but full functionality is not always possible. After all, printing requires proprietary software, which does not always work readily on smartphones and tablets.

Friendship with the router
We have to figure out how to make a USB printer network. Availability USB port on a network router without a built-in Print Server module will not give positive connection results. Therefore, it is first recommended to study the instructions supplied with the network equipment and make sure that the printer can be connected, down to the model. And if possible, you can safely perform the following actions:
- Connect the printer and router to power.
- Having connected the printer to the USB connector of the router, you need to make sure that it has become friends with the device. To do this, you need to open the web interface of the network device in a browser. The router's address, login and password can be found in the instructions, but if the wireless point was set up by the provider, then all issues with connecting the printer directly depend on the person who configured the router.
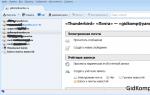
- After authorization, the name of the connected printer should appear in the Print Server section.

Correctly setting up a USB connection to the router
- On your personal computer, you need to go to the control panel and select the “Devices and Printers” tab. Next, everything follows the algorithm: “Add a local printer” - “Create new port Standard TCP/IP".
- After clicking the “Next” button, you must enter the router’s IP address (default 192.168.1.1) and be sure to uncheck the box next to “Select driver automatically.”
- After finding the printer, you need to select the device type “Generic Network Card” and click “Next”.
- The driver is installed manually from the disk using the menu of the same name.
- Going back to “Devices and Printers”, you need to select “Printer Properties” by clicking the alternative mouse button on the newly installed device. Going to the “Ports” tab, you need to go to the settings, install the LPR protocol and set a name.
Having studied a simple description of how to make a network printer by connecting it to a router, it will not be difficult for the user to make all the settings independently. It would not be superfluous to open the instructions for the router and read them in detail - very often the manufacturer offers its own algorithm for connecting a printer via USB.

Solving Wi-Fi problems
Office equipment has recently been equipped Wi-Fi module, offering the user a quick and easy way to make the printer network-ready. Windows 8, 10 and later Android versions installed on smartphones and tablets may not always work correctly with the printer. wireless network. The problem lies in the compatibility of the software with the operating system. Very often, users in the post-Soviet space do not have the opportunity to fully use Wi-Fi printing, the module of which is built into the printer.
In such cases, there are two solutions:
- Connect the printer to the router with via USB according to the previously described instructions.
- Connect the printer via a WPS wireless connection. Naturally, the router must have a Print Server, support the existing printer model, and a fast WPS connection must be linked to the print server.
Wired network - a way out of a difficult situation
If you were unable to connect your printer to a wireless network using the methods described above due to the lack of technical support for the equipment, do not be upset. There is a very easy way to make a regular printer network via a wired interface. To connect, the user needs to purchase a device called Print Server, which can be found in any computer store at a price of 200-300 rubles apiece.
In most cases, a certified print server has factory settings, which the manufacturer indicates in the instructions or on a sticker placed on the device body. It is enough to connect the printer via USB to the print server, which, in turn, is connected to the router hub with an Ethernet cable.
The network address of the printer can be found in the router settings or found from a PC using a special software. Next, proceed with the usual installation of the printing device according to the instructions described above.

Expensive solution
Many users wondering how to make a network printer from a local one are not deterred by the cost of the issue, so a wireless print server created specifically for such purposes should not be overlooked. The only thing that can confuse me is the price - it is higher than most worthy routers with great capabilities. You will have to pay from 4,000 to 8,000 rubles for the miracle device. Setting up a wireless Print Server is no different from a wired print server. All information on fine-tuning is present in the instructions for the network equipment.
The main feature that attracts buyers to such a device is support mobile technology from Apple. For some reason, many manufacturers of wireless printers and routers forget about this brand. Therefore, for owners of iPhone, MacBook and iPad, purchasing a wireless print server will be the only solution to the problem associated with printing to a printer.

Printer sharing
The simplest, but no less effective way To solve the problem of how to make a printer network, is to provide shared access to the local computer. The algorithm is quite simple and even a schoolchild can master it.
- Having gone into the properties of the printer installed in the Windows system, go to the “Access” tab and check the boxes next to the “Sharing” and “Drawing jobs” fields.
- By going to the system properties and going to the “Computer name” tab, make sure that the “Workgroup” is registered the same for all computers on the local network.
- To make the printer network, Windows 7, 8 and 10 require additional settings network adapter. To do this, you need to go to the “Network Sharing Center” and change the additional sharing settings by checking the boxes next to all the fields starting with the word “Enable”.
- It is recommended to set encryption to 128-bit and disable password protection.
Remotely connect to an available printer
Having completed the first step in deciding how to make the printer network-ready, you can begin connecting the publicly accessible device to other computers on the local network. There are only two options - they are different, but the result is the same. The first option is described above, because for the settings there is not much difference what type of connection is used - the main thing is to know the IP address of the printer.
But the second method is suitable for people who are looking for easy ways. Essentially, these are instructions on how to make a network printer local. Going to " Network connections", which can be found in the control panel, you must select the "Network Neighborhood" item. An alternative is to launch the “Network Neighborhood” shortcut from the desktop, if the user has not previously deleted it as unnecessary. Here you need to display the computers that are part of the workgroup - there is a corresponding button for this. Having found the right computer, go into it. The printer will also be displayed in the list of available resources. If you double-click on the device name and agree to all warnings, the printer connects easily.

Finally
Having asked the question “how to make a network printer,” the user can always find any solution he needs. After all, there are countless options - if only there was money and desire. However, for some reason, many people forget about security when using an unsecured Wi-Fi communication channel. The printer will be visible to all users within the working radius wireless router. Judging by numerous reviews from IT professionals, it is not recommended to share computer access over a wireless network, because the safety of personal information always trumps any convenience.
In order not to run from computer to computer with documents on a flash drive or to upload files for printing to the cloud once again, Microsoft has built in Windows opportunity use a shared network printer and shared network folders. In this guide, we will tell you how to make your printer networked so that you can print from it from another computer that is not directly connected to the printer.
What is a network printer
A network printer is also called a shared printer. This is a printer that can be accessed by computers that are not directly connected to it. The printer is connected to only one computer, but other computers that are on the same network with the “main” computer can print on it. This is a very convenient feature as it eliminates the need for the user to transfer files or use the main computer for printing.
Until recently, the HomeGroup feature was responsible for shared network printers. It is no longer supported in Windows 10 1803 and will slowly disappear from the system. Fortunately, the ability to use a network printer is still here. Users can still set up a shared printer and access it from other computers.
For reference: Many modern printers support remote (or “server”) printing. If your printer has this feature, use it, as it works more efficiently and conveniently (such a printer will be accessible remotely even if the computer to which it is directly connected is turned off). Read the user manual or check the specifications on the official website. For cheaper or older printers, you will have to use the capabilities built into Windows 10.
How to connect and configure a network printer
Setting up a printer over a local network begins with the computer to which the printer is connected physically, that is, a USB cable. Make sure everything is installed necessary drivers, the printer is turned on and working.
Important: Network printing will not work if the computer has physical connection to the printer is disabled.
- Press Win + I and go to section. Click on your printer and then click Control. I don’t use a printer, so the article is written using the example of “printer” Send to OneNote 2016. Don’t be confused by the strange name. The procedure will be exactly the same for traditional printers.
- Click Printer properties, after which a new window will appear on the screen.

- Go to the tab Access and check the box next to Share this printer. Give your printer a name that is convenient for you (you can leave the default one) and click OK.

- After this, the printer will be accessible from the network environment of other computers. An icon with two users will be displayed next to it in the control panel. This is a designation for shared devices with network access.
- Now you need to proceed to setting up the PC from which you will perform remote access to the printer.
- Click Win+I and open the section Devices – Printers and scanners.
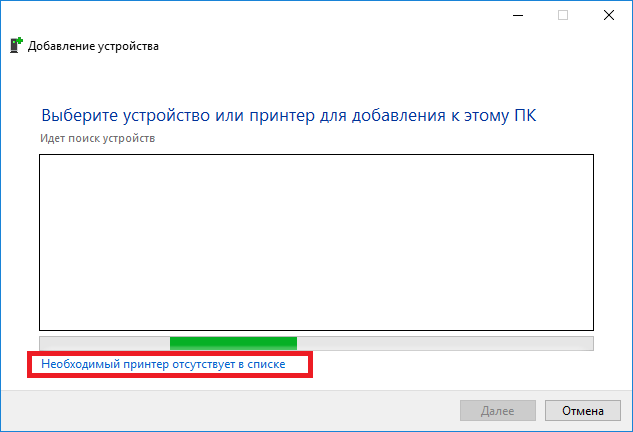
- Click on the button Add a printer and wait while the system scans the environment. The printer will not be detected, so you will need to click .
- Please note that a network printer configured on a Windows 10 computer will also work on previous versions systems. On Windows 8.1/7 or Windows 10 older than 1803, you need to open Control Panel ( Win+ R– Control). Go to section Hardware and Sound – Devices and Printers and then click Adding a Printer.

- On the new window, click The printer you need is not listed.
- A new window will appear where you need to select Select shared printer by name.

- In the name field, enter MAIN PC NAME\PRINTER NAME. Eg, Taras-PC\Test printer. Alternatively, you can click on the button Review, select the host computer from the network environment (you may need to enter account and password for this PC) and select a shared printer.
- Click Further. The system will connect the printer and inform you that everything is ready for use. To check if your network printer is working, you can send a test page to it to print.

After this, your network printer will be listed in the list of all devices and you will be able to send your documents to it from applications.
Can't set up a network printer
Happens. If you encounter difficulties setting up a printer over a local network, here are a few tips that may help you. In general, the system for setting up and operating shared printers is quite simple. If the printer works on the main PC, then it will work on other computers on the network. The main thing is that nothing prevents devices from communicating with each other on this very network.
Both computers must be on the same private network, and network discovery must be enabled in the settings. On both computers, do the following:

The problem may also be caused by translating the PC name into an IP address when specifying the path to the printer.

If you're using third-party firewall apps, the process for enabling sharing will be different, but the principle is the same.