The new generation of technical devices amazes with their diversity. For example, have you ever thought that charging cords various devices there are so many that you can’t count your fingers? And each device only needs its own charging. But there are also universal chargers that can charge any piece of equipment, be it a phone or a camera. This article will discuss the universal “frog” charger.
"Frog", but not an amphibian
A frog is not only a useful animal, but also a colloquial name for a charger. It is very simple and easy to use. Operates using an electrical power source with a voltage of 220 Volts.
Advantages of charging-clothes
Charging "frog" has the following advantages:
- Versatility. The type of charger in question is suitable for all batteries mobile phones, cameras, video cameras, pocket computers, MP3 player and other small-sized equipment that operates using a lithium battery.

- Easy to use. To use the charger, you do not need any additional knowledge, skills or experience. However, before using the “frog” to charge the battery, you need to be familiar with the markings and clearly understand which indicator says what. Read more about labeling below.
- Ease of use. The "frog" for charging batteries is suitable for use wherever you need it. The main condition is the presence of an outlet.
- Compactness. The overall dimensions of the charger are minimal, which allows you to carry it with you in a backpack, bag or even pocket.
What is a "frog"?
The frog charger looks like a small box that is shaped like a frog, with an attached plug for the outlet. The body has two antennae-shaped contacts designed for connecting and charging lithium batteries. A feature of the device that provides it with versatility is that the contacts are movable. That is why you can charge batteries of a wide variety of configurations.

Types of "frogs"
Depending on the type of connection, frog charging can be:
- connected to a USB cable and then to a PC - five-volt;
- automobile - twelve-volt;
- operating from a standard socket - 220-volt.
The classic option is a “frog” for charging batteries, designed for a voltage of 220 Volts. On the back of the device cover there are two sliding pins, which are located parallel to each other. They must be separated to a distance that corresponds to the distance between the contact areas of the lithium battery.
Universal charging"frog" has polarity "+" and "-". Depending on the charging-clothes-clip model, it is adjusted either automatic mode, or manually by pressing special buttons.
Explanation of markings
The “frog” charger is marked on the case. Ignorance of the designations excludes the possibility of correct operation of the charger in general.
“TE” is an indicator that the connection is working properly.
“CON” - the LED is active in case correct connection battery when pressing "TE".
“PW” - indicates the presence of a network connection. Can become active when the battery is fully charged.
“CH” - is in a flashing state throughout the entire time that charging is in progress battery.
“FUL” - indicates the battery is fully charged.
“CO” indicates that “+” and “-” are mixed up.
Charging "frog": how to use?
Using a frog charger is nothing complicated or supernatural; however, to ensure its proper and efficient operation, you must follow the operating instructions.
How to use the frog to charge the battery? Step-by-step instruction is given below:
1. Turn off the mobile device and remove the battery from it.
2. Open the frog charger by pressing the clothespin.

3. Insert the battery into the frog so that the two terminals match. In the case where the charging device is equipped with four terminals, two side ones are used.

4. Press the “TE” button. As a rule, it is located on the left side of the charger.
5. Check that the connection is correct by looking at the corresponding indicator (“CON”). It should be noted that the indicator LED may not light up not only as a result of incorrect connection of the terminals, but also due to the fact that the battery is completely discharged. If the latter option occurs, then the “frog” for charging the phone and the device’s battery are connected for about 5-7 minutes to an electrical power source - an outlet.
6. Connect to the network. Accompanied by an active “CH” indicator.
7. Disconnect the terminals after the “FUL” indicator on the left lights up.
How to check functionality
There is a verification algorithm that will help make sure that the frog charger is working properly. Let's look at how to use it.

The key to proper functioning of the device is the correct polarity. To check it, you need to click on the button located on the left. If the lights near the “CON” and “FUL” indicators light up, the connection to the terminals is correct. Inactive indicators indicate a connection error. In this case, click on the button located on the right.
Be extremely careful, since the indicator lights may not light up not only for the above-mentioned reason. For example, the tablet battery will move and the pins of the clothespin will not touch the correct pads.
If the test was successful and everything that was needed blinked, then the “frog” for charging the battery is safely connected to the outlet. “PW” and “CH” should light up. When the charging process is complete, the LED next to the “FUL” indicator is activated.
The total time required to fully charge the battery of a phone, camera, player, set-top box or other technical device depends on the battery capacity. On average - from 2 to 5 hours. Moreover, if it takes, say, 3 hours to fully charge the battery of your device, and the “frog” was connected to the network for, for example, 5 hours, there is no reason to worry: the clip-on charger automatically stops charging the battery when the last maximum possible charge level is reached .
Do it yourself!
Doing frog exercises with your own hands from scratch is quite difficult and problematic, and many people are not able to do it at all. But converting an old-style non-universal charger is quite possible.
First, let's decide what devices, materials and tools should be on hand.
Source materials:
- an old charger designed to charge just one model of removable battery;
- a piece of plastic;
- spring from a regular clothespin;
- two paper clips;
- wire.
Tools:
- pliers;
- hacksaw;
- stationery knife;
- drill;
- drill;
- glue "Moment".
Work technology:

Voila! The miracle device is made!
This “frog” is suitable for charging a phone of absolutely any brand, model and modification.
If your mobile phone is dead and you don’t have a charger at hand, don’t despair. In such a situation, a “frog” for charging batteries will be a real godsend. Its main advantage is its versatility, ease of operation, prevalence and low cost. It is suitable for batteries with different connectors. Let's consider the principle of operation and rules for using the frog.
The frog is a simple device designed to charge the batteries of mobile phones of various models and manufacturers. Read more about how to charge your phone battery without a phone →
In addition, the “toad” can charge a lithium battery from cameras and other small equipment.
Outwardly, it looks simple and is a plastic box with a plug on one side and a special clamp for contact with the battery on the other side. The “toad” design allows it to be used for batteries with connectors different sizes thanks to movable contact terminals.
The universal device does not require any special technical knowledge or skills. To use the frog, there is no need to think about how to correctly insert the battery into it. She herself will determine its polarity.
Types of universal chargers
Today, you can find several types of devices of this type on sale, designed for lithium batteries of mobile phones and other small-sized equipment that differ in power source:
- from car cigarette lighter;
- from USB port;
- from an electrical outlet.

Also, universal charging can be automatic or semi-automatic. The main difference is the number of indicator lights. Automatic machines have three, and semi-automatic machines have four. An automatic “toad” will automatically determine the correct polarity, while a semi-automatic one will require additional control of the correct connection using buttons.
How to use the frog?
How to use a universal device? The algorithm for its application is simple and the same for everyone. You can charge a lithium battery of a phone, camera, camera, or navigator with a frog, provided that it has the following characteristics:
- capacity no more than 2000 mAh;
- current 200 mA;
- output voltage 3.5-4.6 V.
It will not be possible to charge a battery with a frog if it does not meet these characteristics.
First, you need to disconnect the battery from technical device. Then it is installed in the “toad” so that the terminals (+ and -) coincide with the contacts of the device. Most chargers of this type have up to 4 terminals, but, as a rule, the two outer ones are used.
The next step is to check the polarity if the model is semi-automatic. To do this, click on the Te button (located on the left). If the green indicator lights up, the battery is connected correctly. If the connection is incorrect, use the CO polarity change button (located on the right), and then TE again. IN automatic model There is no need to determine the polarity yourself.
During operation, the PW and CH network indicator will be active, and upon completion of the process - FUL, indicating that the battery can be used further. 2.5-5 hours after placing the battery in the device (the time depends on the battery model), it can be removed. It is fully charged and ready for use.
Important! The frog is only suitable for charging lithium batteries. Batteries of another type will become unsuitable for further use after an attempt to restore them with a “toad”.

What to do in an unusual situation
When using a universal charger, atypical situations may arise, for example, the battery is charged too quickly or the indicators are not backlit.
How to charge the battery of cellular terminals if no indicator of the working device lights up? In such a situation, it is recommended to press the CO button.
If no changes occur after this, most likely:
- there is an error with the contacts, you need to change the polarity;
- Battery is inoperative;
- "toad" is broken.
The device will help in a situation where the phone’s battery is completely dead and has not been used for a long time. In this case, it must be placed in the frog for 10 minutes, and then charged with the terminal’s native device.
If during operation the device signals that it is fully charged 10-15 minutes after connection, then it has failed. And the FUL indicator active when connected to the network indicates that the battery is unusable.
If the FUL and PW indicators light up at the same time, then there is no contact between the charger and the battery.
“Zhabka” can be easily bought in online stores, it is inexpensive. This makes it even more attractive to users. It is extremely simple, so if necessary, you can make it yourself from scrap materials. To make it, you will need a clothespin, an unnecessary charger from any phone, several pins, a wooden block, pliers, a glue gun and a soldering iron.
A clothespin is attached to the block using superglue or a glue gun. Place two pins side by side at a distance of 0.5 cm from each other. The ears of the pins need to be removed and the point driven into the piece of wood half a centimeter. The end of the pin where the eye was located is bent forward slightly. The plug cut off from the charging is attached to the pins, having previously determined the plus and minus. It is advisable to mark the polarity on the board so that there are no difficulties with this later. The fastening of pins and wires should also be strengthened with glue so that they do not become loose during operation. When using such a frog, the battery is connected to pins (homemade contacts) and secured with a clothespin.
There are a lot of descriptions of this process and video tutorials on the Internet; making it will not be difficult. It will really help out in situations where it is impossible to use “native” charging for small equipment for some reason.
Many people have heard about a charger called a “battery charging frog”.
It is considered universal because it charges absolutely all devices: computers and mobile cameras and cameras. How does he manage to do this, given that to charge electronic devices do they have different connectors? The frog for charging batteries, it turns out, has a special connector - two springy contacts located on the top cover, which can be moved apart to the desired distance.

Thanks to this, you can connect the “frog” to any battery. Recharging occurs after removing the battery from mobile device and installation in the “toad”. After the process is completed, the charged battery is returned to its place.

The user does not even need to think about which side to connect the device to, since it determines the polarity independently. The LED will light up to indicate that it is installed correctly. Using a microchip, the device also determines the state of charge: if the battery is fully charged, the device turns off. The entire process is initiated using three LEDs.
The device is compact and lightweight, since the material used for its manufacture is high-quality plastic. It is also simple to use: just insert the battery, connect to the outlet and check that the LED glows red. When the indicator color changes to green, charging has reached the desired level.
Types of "Frogs"
There are three known options for universal chargers:
- automobile - powered from the cigarette lighter;
- from USB port;
- from the network 220 volts (standard).
They are also divided into automatic and semi-automatic. The main difference is the number of LEDs: the “automatic” has 3, the semi-automatic has 4.


Semi-automatic
This universal device is also called a “toad” and “clothespin”. Its purpose is to charge lithium batteries installed in mobile phones, GPS navigators, cameras, cameras, PDAs, the capacity of which is up to 2000 mAh, the current is 200 mA, and the output voltage is 3.5-4.8 V. Other batteries cannot be charged on it. Standard charging lasts up to 1.5 hours.
The type of “battery charging frogs” from different manufacturers may vary greatly, but the charging process is the same for all.

To start using the “clothespin”, the battery is installed in the charger so that its negative and positive terminals coincide with the contacts of the charger.
Regardless of how many terminals the battery has - 3 or 4, two (usually the outer ones) are used. After connecting the battery, check the polarity by pressing the TE (test) button located on the left. The green indicator lights up to indicate that the connection is correct. If the diode does not light up, a “reversal” is needed, for which there is a button (CO). After pressing it, use the TE button again.

In some models, you don’t even need to do this for the button to light up indicating correct polarity - CON, because the polarity is determined automatically. These “frogs” do not have a “reverse” button.
If the polarity is correct, the green LED lights up. The “frog” can be plugged into a power outlet to begin the battery charging process. Be sure to check that the network indicator - PW and CH - lights up, indicating that charging is in progress. When it reaches the required value, the FUL LED (full charge) will light up on the right.
Features of charging a completely discharged battery

It happens that CON does not light up, which indicates that the battery is completely discharged. In this case, the frog for charging batteries with a discharged battery inserted into it is connected to the network in any polarity for five minutes. A flashing CH indicator indicates that everything is done correctly and charging is taking place. If not, you should change the polarity and observe CH.
It is important to know that a mobile phone may not show any signs of life at all if its nominal battery voltage of 3.6 volts drops below 3.2. In this case, the controller does not see the battery, so it does not turn on the charge. A frog is simply indispensable here: it is plugged in for 2 minutes in any polarity to give the battery a boost to charge. After such actions, it will be charged in the “native” charger.
The third contact on the battery is a signal from the controller (thermistor) located inside, which is responsible for preventing overcharging and overheating. It signals to the cell phone that it is time to turn off the current altogether or limit it. There is no such control in a frog, so it is considered that charging with it is worse than with the included charger.
The charge control found inside the phones prevents the battery from overcharging and causing the owners to set off fireworks. However, it is not recommended to leave the frog unattended for a long time, especially if the battery being charged gets hot. It is not advisable to charge the frog in a place where there are flammable materials or paper nearby.
Cost of models supplied Chinese manufacturers, ranges from 120 to 200 rubles.
Video: Charger frog. How to charge your phone with a frog
Basic malfunctions and methods for their elimination

Device malfunctions are judged by incorrect operation device:
- If FUL and PW light up immediately after connecting the device, most likely there is no contact between the frog and the battery. You need to move the battery closer to the contacts;
- It happens that when it is still far from being fully charged, the “clothes clip” shows that the battery is fully charged – “FULL” is lit. This happens when the battery is faulty - charging current does not flow.
The design of the “Toad” is not complicated, so it is not difficult to make it yourself.
Homemade “toad”
For production you will need:
- spring (suitable from a regular clothespin);
- a piece of plastic;
- wire – 2 pieces;
- probes for contact with the battery – 2 pcs. You can use stationery
- paperclip;
- stationery knife;
- hacksaw;
- glue gun and soldering iron;
- sandpaper;
- Super glue.
Three holes are made on the plastic for installing springs, having previously marked the locations for the holes with a marker. To make the pressure stronger, we glue two “stumps” that work on the principle of a swing.

Having inserted the lower part of the spring into the hole, we secure it to the base using ordinary wire, twisting it with pliers from below.

We cut out a pressure plate from plastic according to size: we make cutout 1 for the spring, 2 for the probes.

For better clamping, we glue the plastic from below.

We also make holes for two wires.

We bring the soldered wires out.

To prevent the probes from bending when lowering, we make a window in the charging housing.

Both paper clips and copper wire are suitable for probes.

Having secured the plate in place and pressed it with a spring, we remove the wires. The probes can be secured with a glue gun. Now we solder the wires.

All that remains is to drill a hole to view the charge indication.

The battery charging frog is ready to go!
Video: Making a toad from scrap materials
Decoding of the designations “Zhabki”
All such devices have an indication with letter designation, helping to carry out the process:
- the full charge is indicated by the glowing full, ful indicator;
- about ongoing charging - charge, ch;
- that the polarity is correctly determined – con;
- on the definition of polarity – te.
Where to buy in Moscow

You can buy such a wonderful assistant in an online store, for example, on the sites:
Charging for mobile people- a real salvation. At any time, it allows you to charge a dead battery, which means you can stay in touch.
The “frog” is very useful for phones for which it is difficult to find a charger:
- varieties of Chinese clones of original popular models;
- if the original memory is lost;
- If the connector is broken, the battery can be charged using a frog.
The inconvenience is that you need to use the charger carefully, fix the battery in it well so that the contacts of the “toad” and the battery are in good contact.
The universal “frog” for charging phones is also suitable for cameras, smartphones, etc.
Video: “Frog” or universal charger for phone batteries
How to use a frog to charge your battery
FUL- the battery is fully charged
CO- polarity change if + and - are mixed up
Now I’ll tell you how to do everything correctly so that the charger (toad) starts charging your battery.
We connect the battery plus and minus to the two contacts of the toad (it’s the same). A battery can have more than two contacts, but only two are needed (+ and -). Then press the left button THOSE, if + and - coincide, it will light up CON(first LED).

Also, if the battery is charged, it may light up. FUL and will constantly burn PW.
If the battery is low, when you press THOSE will only burn CON. In this case, plug it into the socket and it will start flashing. CH. We are waiting for it to light up FUL(no less than 1 hour), then that’s it - the battery is charged.


If you have connected the battery to the charger, press THOSE and nothing lights up, you need to press the right button CO, then it should work. If nothing lights up anyway, it means the battery is not connected to the charger with plus and minus, or the charger is faulty or the battery is faulty. There may also be an option that the battery is maximally discharged (to zero), then plug it into the socket, it should blink CH, if not, press CO. If nothing happens anyway, then read above.
There is no need to exclude the possibility of various glitches, after all, it’s a Chinese work 😆
fikc.info
“Frog” for charging batteries: how to use it
If your mobile phone is dead and you don’t have a charger at hand, don’t despair. In such a situation, a “frog” for charging batteries will be a real godsend. Its main advantage is its versatility, ease of operation, prevalence and low cost. It is suitable for batteries with different connectors. Let's consider the principle of operation and rules for using the frog.
General information about the device
The frog is a simple device designed to charge the batteries of mobile phones of various models and manufacturers. Read more about how to charge your phone battery without a phone →
In addition, the “toad” can charge a lithium battery from cameras and other small equipment.
Outwardly, it looks simple and is a plastic box with a plug on one side and a special clamp for contact with the battery on the other side. The “toad” design allows it to be used for batteries with connectors of different sizes thanks to movable contact terminals.
The universal device does not require any special technical knowledge or skills. To use the frog, there is no need to think about how to correctly insert the battery into it. She herself will determine its polarity.
Types of universal chargers
Today, you can find several types of devices of this type on sale, designed for lithium batteries of mobile phones and other small-sized equipment that differ in power source:
- from car cigarette lighter;
- from USB port;
- from an electrical outlet.

Also, universal charging can be automatic or semi-automatic. The main difference is the number of indicator lights. Automatic machines have three, and semi-automatic machines have four. An automatic “toad” will automatically determine the correct polarity, while a semi-automatic one will require additional control of the correct connection using buttons.
How to use the frog?
How to use a universal device? The algorithm for its application is simple and the same for everyone. You can charge a lithium battery of a phone, camera, camera, or navigator with a frog, provided that it has the following characteristics:
- capacity no more than 2000 mAh;
- current 200 mA;
- output voltage 3.5-4.6 V .
It will not be possible to charge a battery with a frog if it does not meet these characteristics.
First, you need to disconnect the battery from the technical device. Then it is installed in the “toad” so that the terminals (+ and -) coincide with the contacts of the device. Most chargers of this type have up to 4 terminals, but, as a rule, the two outer ones are used.
The next step is to check the polarity if the model is semi-automatic. To do this, click on the Te button (located on the left). If the green indicator lights up, the battery is connected correctly. If the connection is incorrect, use the CO polarity change button (located on the right), and then TE again. In the automatic model, you do not need to determine the polarity yourself.
During operation, the PW and CH network indicator will be active, and upon completion of the process - FUL, indicating that the battery can be used further. 2.5-5 hours after placing the battery in the device (the time depends on the battery model), it can be removed. It is fully charged and ready for use.
If you lose your original mobile phone or smartphone charger, inexpensive universal chargers for 3.7 volt lithium batteries, the so-called frogs(or toads). They have adjustable contacts to which the battery, previously removed from the phone, is directly connected. Of course, this creates some inconvenience (you need to constantly remove the cover, the time gets lost), but sometimes this is the only way out when charging from a rare Chinese phone lost.Instructions for using the charger
The "frog" charger is designed for charging Li-Ion batteries that are used in cell phones, GPS receivers and cameras. It operates from a 110-220 V network. Output voltage is 4.2 volts, current is 200 mA. The charge occurs automatically and is controlled by the microcircuit, and it automatically turns off when the required level is reached. Standard charging time is 1.5 hours.It is necessary to clamp the battery into the frog so that the contacts of the charger are on the + and – terminals of the battery. If the battery has 3 or 4 contacts, you usually need to use the outer 2. If the connection polarity is correct, then when you press the button T.E.(left) the first green LED will light up CON. If it is not lit, press the right button CO(reversal) and press the first button again. On some frogs CON may light up when connected without pressing the button - also the correct polarity. There are also models that will automatically determine the polarity. Accordingly, there is no right polarity reversal button.
If everything is fine - CON lights up green, plug into a 220V socket. Lights up PW and starts to light up or flash CH(charge - charge). When charging is complete, the right LED lights up FUL(full – complete). If CON Doesn't light up at all, maybe the battery is dead. Then connect randomly in any polarity and plug it into the network for 5 minutes (not for long - it’s not scary). If CH will blink, then the charge is on and everything is correct, otherwise change the polarity right click and see how it behaves then CH. If it lights up immediately PW And FUL then most likely the battery in the frog is not connecting (so the LED lights up without the battery at all) - move it towards the contacts.
Repair instructions for the frog charger
As for a completely non-functional charger, just look for a burnt part. But sometimes you come across low-quality chargers, when when you connect the battery to the frog, the charge current is less than specified. Not 200 ± 50 mA, but several times less. Thus, the battery is simply undercharged. As the charging current at the output decreases, the final voltage on a “fully charged” battery also decreases. Hence the short battery life when installed in a phone. When the charger light signaled the end of the charge, the battery voltage was only 3.9V. Why is this happening? Most likely it's a matter of variation in parameters. A small deviation in resistor values will result in a change general characteristics devices.Schematic diagram of the frog charger
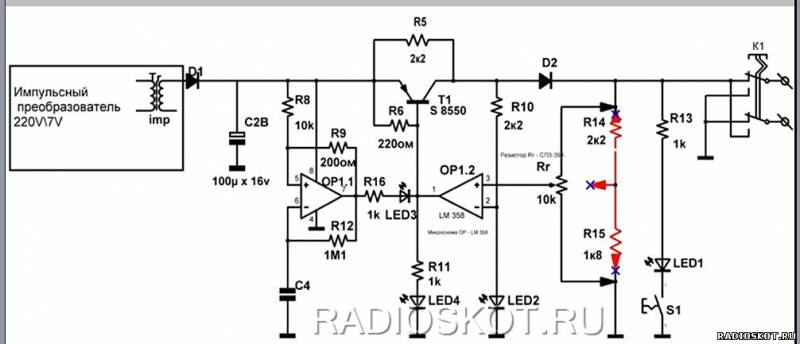
Replacing the fixed resistors R14 and R15 (the numbering of parts in the diagram corresponds to the numbering of parts on printed circuit board) to a multi-turn trimmer resistor brand SP3-39A with a nominal value of 10 Kom, it becomes possible to accurately set the output current. After the replacement, I set the current to 250 mA, which approximately corresponds to the specified parameter on the charger body. You can, of course, set the charging current using the trimmer at will and another. When the device's light alarm turns on, indicating the end of the charge, the charging current is reduced to 70 mA, and the voltage on the battery is set within 4.15V. The full charging process lasts about two hours, that is, the same as when charging in the device with its original charger. Full version Download instructions from the forum.

Homemade toad
After analyzing several Frog memory schemes, I settled on one of them. I decided to make it as an attachment for charging NOKIA (I think many people have them, and I have a few of them lying around) to charge a Li-ion battery 18650
. In the NOKIA charger itself, the output from the transformer is almost 7V, which should be enough for a set-top box.

For the battery itself, you will need a battery compartment to mount it on the side of the case. On the lid there is an output of four LEDs and a microswitch. In the meantime, a signet on CMD and simple radio elements has been developed for the circuit, installed on top of the board. Download it.

The enclosed signet has already been mirrored; please send it for printing immediately. The photo simply shows the arrangement of the elements as it should be.

Next, I soldered a separate memory card and tested it - it works great! With the specified details, the charger output is 4.2V. I put a used battery on charge - the charge rises. The LM358 chip was installed soldered, taken from God knows where. I used a power supply with a 6V 0.45A output.
I drew and checked the circuit diagram - Igoran.
Discuss the article CHARGER FROG


