Hello admin! I read your article and it became interesting, because in fact, Yandex. The disk is given 10 GB of disk space for free, in Google Drive 15 GB, in Dropbox, which is popular abroad, 3 GB, in, and in the Mail.ru Cloud all 100 GB!
Accordingly, you might be wondering whether it’s worth using Yandex Disk at all? And then I thought and decided that even 10GB for free from Yandex Disk could be useful, especially since “Yasha” will most likely not sit and watch his clients being taken away from him, most likely he will take some steps in the future, for example, he will take 1TB as a gift to his users .
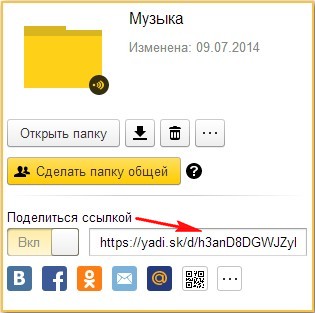
What do you think, Admin, which of all the clouds listed is still more convenient to use? It is clear that the size of the mail.ru cloud matters, but still, Yandex Disk has a very convenient function - Copy public link!
How to use Yandex Disk
Roman through your mouth! For example, I have long chosen the Yandex Disk service and adapted it to store all the necessary computer stuff that I might need during the day at work: driver assemblies, antiviruses, programs, LiveCDs, free operating systems, and so on, because my portable hard drive does not infinite.
But naturally, the free 10GB on Yandex Disk was not enough for me and I had to purchase an additional 100GB of disk space for 150 rubles per month. But they also began to be missed as soon as I adapted Yandex Disk for storing operating system backups, because in many data backup programs you can configure backup directly to the Yandex Disk cloud and I began to think about 1TB of Yandex Disk for 900 rubles per month, but here the Mail.ru cloud appeared with 100GB and I decided to use it for now.
Well, God be with him, with Mail.ru, we have an article about it and whoever is interested will read it, today we are talking about Yandex Disk, because many users have long chosen this service from Yandex and are still interested in the intricacies of its work.
Yandex Disk
Friends, use Yandex Disk It's very simple, first you need to register.
and register
We indicate the First Name, Last Name, Login, Password, repeat the password, and also indicate our number mobile phone. Click Get code

We receive a code on our phone, enter it in the input field and click Confirm,

Now we click Register and 10GB is ours.

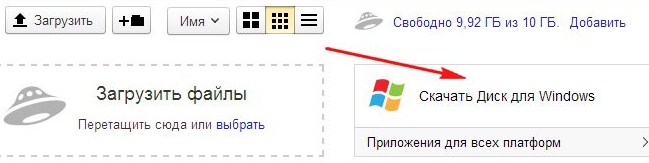
This will open an offer to download Yandex. Disk for our precious Windows.

In other words, we will install Yandex Disk as a program in our operating system and a folder will be created in our Windows that will be synchronized with Yandex Disk. Everything that we copy into this folder will automatically be sent to the Yandex Disk cloud. I suggest installing this application a little later, since many users may not want to install an unfamiliar application on their computer. So let's see how to use Yandex Diskdirectly online.
To upload the files you need to Yandex Disk you just need to drag them from your computer into this window.
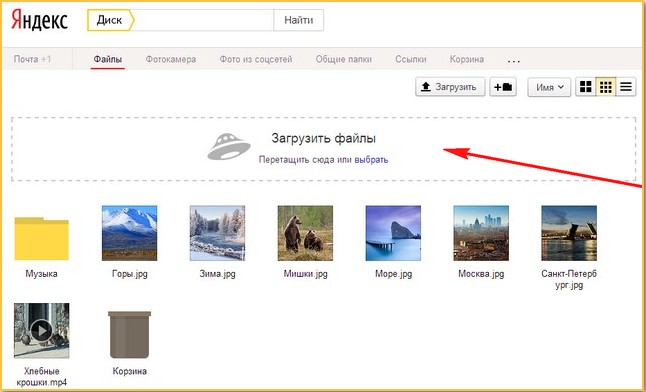
For example, I will drag several photos from the Images folder to Yandex Disk. I select the photos with the left mouse and drag them into the Upload files window.

That's all, my files are on Yandex Disk.

Or click Download or Select

And an explorer window will open, select the files you need in it and click Open, the selected files will be sent to Yandex Disk.

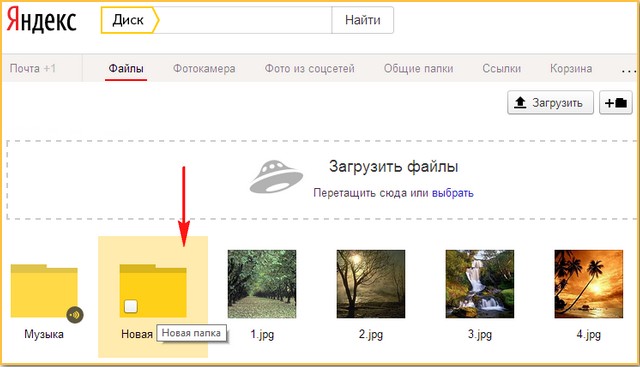
You can create new folder and call it whatever you want

Click double click left mouse on the desired photo and viewing will open.


To download the photo or file we need from Yandex Disk, we need to tick the desired object and select Download.

Mark the desired photo with a checkmark and share it on social networks.

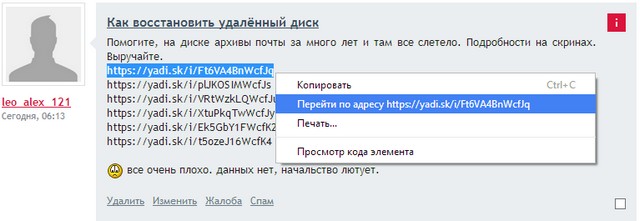
For example, users constantly send me links from Yandex Disk to screenshots of their computer problems so that I can look and give my advice.
How to share your files with friends on Yandex Disk
Check required file check the box and click the Enable button,


For example, let's let our friends download the Music folder containing music files. Mark the folder with a tick,

To download a folder, just paste the link into the address bar of any browser and press Enter, in the window that opens, select the required files and click Download.

We can also make any of our folders public and all invitees will be able to view this folder and add files to it, a shared folder will appear on Yandex Disk of each participant.

You can also delete unnecessary files, mark it with a checkmark and click Delete.

How to use the Yandex Disk application
Click Download Disk for Windows.
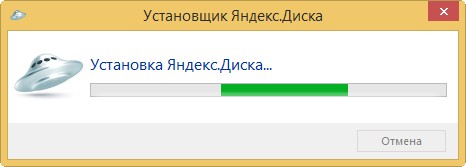
We start the installation of the downloaded application.

You can uncheck the boxes and click Finish.

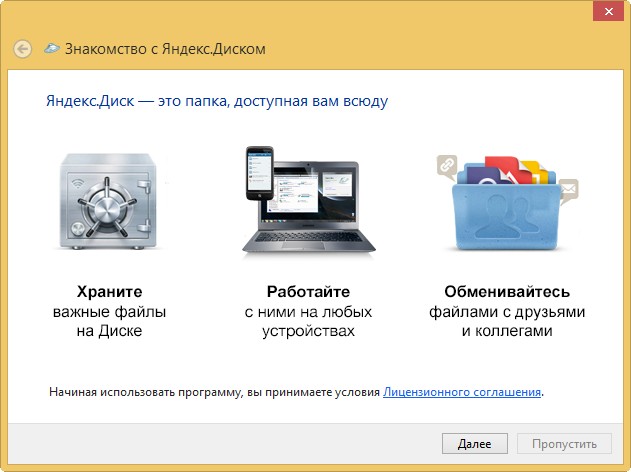
If you want to take the young fighter course, click Next, otherwise Skip.

The Yandex Disk icon appears in the tray.

Enter your username and password and Login.

If the Yandex Disk icon is green, it means we can work, synchronization has occurred.

Everything would be fine, friends, but the default Yandex Disk folder is located on our C: drive,

The full path to the folder is C:\Users\Username

change the location of the Yandex Disk synchronization folder to any other partition of the hard drive.
Right-click on the Yandex Disk icon in the tray and select Settings,

We indicate the new location of the Yandex Disk folder, for example, I will place it on the D: drive, I have a lot of free space there. I click the Change button

I indicate drive D: ( You can’t stupidly specify drive D:) and click Create Folder
The cloud is a service where you can store data and easily manage it. That is, you can upload your files to it, work with them directly on the Internet, download them at any time, and also transfer them to another person.
Any user can get such a service at their disposal completely free of charge. In fact it's your own HDD in the Internet.
You could say it's something like Local disk computer, but only with the ability to use it on any device with Internet access. Plus, you can transfer files to other users by simply sending them a download link.
So, the cloud is needed to:
- Store files and folders with files
- Work with them on any computer or smartphone that has the Internet
- Easily and quickly transfer files to other people
Thus, it replaces flash drives, disks and other devices for transferring information.
That is, I can upload the files I need to such a service and work with them on any other computer where there is Internet. These can be documents, books, music, videos - in general, any files.
Initially, they are available only to me, but if I wish, I can make some of them public. Then they can be downloaded.
That is, a special Internet address (link) will be generated where the file can be saved to your computer. I can send this address to any person (for example, on Skype or via mail), and the person will be able to download my file.
Where and how to get the cloud
There are sites that provide clouds to users. It's like with mail: there are sites where you can get it. We go to such a site, register and receive cloud service for data storage.

We are allocated a certain free volume. On some services it is a very decent 50-100 GB. If you want more, it's for money.
Or you can register several times and, accordingly, receive several free volumes. Everything is free, everything is legal!
The easiest way to get a cloud is to do it where you have your mail. The fact is that the largest email sites (Yandex, Mail, Gmail) distribute such services for free. You just need to want it.

That is, you don’t even need to register. Just open your mail and indicate that you want to receive the cloud. They give it to you right away.
Sites that give away clouds for free
Yandex.Disk is a cloud service from Yandex. If you have mail there, then you also have such a disk. 10 GB is given free of charge and forever.
To receive Yandex.Disk, you need to open the website yandex.ru and go to your mail. Then open the “Disk” tab (at the top).

They will greet you and offer to download special program to computer for comfortable work with Yandex.Disk.

It’s better not to do this right away - you can always install it later. I recommend closing this window and first learning how to use Yandex.Disk without the program.
That's all! Upload files, sort them, share, delete. In general, you already have a cloud. There are even some files and folders with files already loaded onto it for example.

To further access Yandex.Disk, you need to follow all the same steps: open the yandex.ru website, open your email, go to the “Disk” tab.
Or you can install and configure a special program “Disk for Windows” and use the cloud directly from your computer - without going to the website yandex.ru
Cloud Mail.ru is a service from the mail site mail.ru. 25 GB is given free of charge.
To receive this goodness you just need to have a mail.ru mailbox. If you have it, then you also have a cloud.
To enter it, you need to open the mail.ru website and open your mail. Then click on the “Cloud” button at the top.

Your personal cloud service will open. Some example files are already loaded into it. You can remove them, or you can leave them. In general, your cloud is already ready to go.
You can use it directly, via email, or you can download and install a special application (program). Then the cloud will be accessible directly from the computer - a shortcut will appear on the Desktop to instantly open it.
Google Drive is a service that is “attached” to gmail.com. 15 GB is allocated for free.

To get into it, you need to go to your email account on the website gmail.com. Then click on the picture with small squares next to your name (top right) and click on the “Disk” item.

Perhaps after this Google will ask you a couple of questions. Below, in the pictures, it is shown what he should answer in this case.

After this, your personal cloud will load. It will already have a folder with several files. You can delete this folder with all its contents, or you can leave it - as you wish.
So, the disk is ready for use. You can start downloading!
It opens in exactly the same way - through mail. Or you can install a special program. Then it will be accessible from your computer.
![]()
It seemed to me that this cloud is much more difficult to use than all the others. Not everyone will understand. But there are certain advantages that other services do not have. For example, you can create a document, presentation, table, form or drawing right in it.

That is, a program for creating a file will open directly on the Internet the right type. It is quite simple and allows you to both create a file and save it to Google Drive, and also download to your computer in the required format.
Such programs can be used instead of Word, Excel, Power Point. It is very convenient when you have to work on a computer on which they are not installed.
Which service is better
As various tests have shown, the “mail” clouds that I just talked about are superior in quality, convenience and free opportunities all other similar services.

I won’t go into details, but the places were distributed as follows:
Therefore, I recommend that you still use one of these services. If you don't have email box none of them, you just need to register. You will have new mail (which, by the way, you don’t have to use at all) and a cloud.

Of course, there are other sites where you can get a cloud service for free. But most of them have free versions There are various unpleasant restrictions.
But there is one that compares favorably with all the others (including the “postal” ones). It is best suited for transferring files to other people. His address: mega.co.nz
Mega - this service makes sense for those who host files for downloading. The fact is that through special downloader programs such as MiPony, they can be saved to your computer very quickly and easily. Much easier and faster than with other cloud services. 50 GB is allocated for free.

Initially the site opens on English language. To switch to the Russian version, click on the Menu button (top right), select Language from the list, then click on Russian and the Save button.
Just in case, I’ll give you two more good cloud services:
Dropbox - 2 GB free.
One Drive - 7 GB free.
How to manage the cloud
You can manage it on the very site where you received it. Log in there with your username and password, go to a certain section and get access to the cloud.

And you can do this even easier, more conveniently and, most importantly, much faster: with the help of a small application (program).
Each service has its own, that is, you need to download it from the site where you have the cloud.
This application allows you to quickly and easily upload, watch, download files and folders with files from your cloud service. It takes up very little space, and you can install such a program on any computer or smartphone (not just yours).

How to install the application. Open your cloud and there will be a download link or button in a prominent place. The pictures below show where such a button is in “mail” cloud services.

Download the program file and open it. The installation will begin. Below are illustrated instructions for each “mail” service. Do everything as in the pictures and the application will install.
Yandex.Disk:

Cloud Mail.ru:


How to use the application
After installing the application, a program shortcut appears on the Desktop. With the help of it we will work with the cloud.

When you first launch the program, you will be asked to enter data from the cloud. Type your email address and password. Then agree to the terms of service and click “Login”.

Now, when you open the program icon, your cloud will open directly on your computer - in a regular folder.

Also, when an application is opened, its icon appears in the tray.
This is where the computer clock is - in the lower right corner of the screen (on the taskbar, where the other icons are).

This icon may be hidden under a small arrow next to the alphabet.

Using it you can control the application. To do this, you need to left-click on it or right click mice.

File/folder synchronization. This is the most difficult part to understand, but it is absolutely necessary to understand it in order to successfully work with the application.
The point of synchronization is that the computer or smartphone on which the application is installed must connect to your cloud and download files from or to it.

This process must be completed, otherwise we will not be able to use the downloaded data. Synchronization occurs via the Internet. That is, without the Internet it is simply impossible.
Consider the following situation. My cloud already has downloaded files and folders with files.

By the way, initially, when you receive the cloud, it already has some information. So if you didn’t specifically delete it, then there are several files there.
I installed the application on my computer, opened it, entered my username and password. A folder with a cloud has opened. So, all the data that was on it initially should be uploaded to this folder. That is, my cloud and computer must be synchronized.

It turns out that all the files that are on the cloud are downloaded to my computer in this very folder. And if there are few of them and they small size, then this process will happen quickly - I may not even notice it.
But if the files are large and my Internet is not very fast, then synchronization will take some time.
In practice, it looks like this: I open an application shortcut and see an empty folder, although I know for sure that there are files on my cloud.

Usually in this case, users begin to get nervous - they worry that their files have been deleted. In fact, they are all there. But we don’t see them because the synchronization procedure has not yet been completed.
And this can be verified. When synchronization is in progress, the application icon (the one in the tray) seems to move.
And if we click on it, then in the menu that opens there will be an item indicating the progress of the process.

In fact, at this moment, files are downloaded from the Internet. That is, the Internet itself may work slower because of this.
If necessary, synchronization can be turned off. To do this, click on the application icon in the tray and select the appropriate item from the menu. By the way, you can completely exit the program there.
In general, while synchronization is in progress, the files will not be accessible. The same thing happens when transferring information from a computer to the cloud.
How to upload a file (folder with files) to the cloud. To do this, you just need to copy the necessary files and then paste them into the application folder.

Copying/pasting occurs as usual, but after this all transferred files should be synchronized. Otherwise, they will not be uploaded to the Internet on your cloud.
In the Cloud Mail.ru application, this process occurs instantly. Moreover, even for large files (from 1 GB).
In the Yandex.Disk program, synchronization takes some time, but it still happens quickly.
For me, on a fairly slow Internet, a 1 GB file downloaded in just a few minutes. If directly uploaded to the cloud (without an application), this process would take more than an hour.
But Google Drive lags behind in this regard. Apparently this application works using a different technology, and synchronization takes the same amount of time as a regular file download.

My results may differ from yours. Perhaps your synchronization process will be faster or, on the contrary, slower than mine.
How to download a file (folder with files) from the cloud. All files that you want to download to your computer or phone from the application must be fully synchronized.

You can transfer them to your computer by simply copying them. That is, open the application, copy the necessary files and paste them into the computer folder of your choice. That's all! A couple of seconds - and the files are downloaded.
Cons of cloud services
Everything has both pros and cons. And cloud services also have them. I will list the main ones:
1. Memory consumption. In other words, the work of cloud services “stresses” the computer. In the case of Yandex.Disk and Cloud.Mail.ru, the load is insignificant, but Google Drive is quite voracious. Modern computers This may not be noticed, but the old ones will have to puff.

2. Security. Since the cloud is an Internet service, there is always a certain chance that your files could fall into the wrong hands. Certainly, modern technologies Data protection minimizes this probability, but there is always a risk. Moreover, the service is public.

3. Internet required. Without the Internet, you will not be able to use any cloud service.

Additional Information
In case the information provided in this lesson is not enough for you.
Each cloud service has detailed instructions by use. Users don’t particularly like it, but it does contain a lot of useful and interesting information.
Computer users who now have high-speed unlimited Internet, began to think about storing files not on their hard drive, but on the global network.
Yandex came to the rescue, providing free space on its disks. Of course, Google and other famous companies have the same opportunity, but we will show the principle of use using the example of a service from a Russian search engine, since it seemed to us the most convenient and nice design and opportunities.
After all, storing files on Yandex disk has several significant advantages:
- we free up space on our computer from files that we rarely use and open, for example, photos, program archives, and more;
- we can share the link to the file and open up folders of files so that others can download them if we don't mind;
- we can use Yandex disk not only from our computer, but also from any other - it is enough to have access to the Internet and a password for your email, as well as using a mobile phone or tablet.
Where to begin? Let's register a mailbox

AND we go through a simple registration, in which you will need to enter:

How to log into your Yandex Disk
There are several ways to get there, but first you need to log into your mailbox using your username and password.
Then there are several options:

When we log in, we are usually offered to download a program for Windows onto our computer so that we can use the disk without logging into our account on the site. We'll talk about this a little later, and for now just close the window without downloading anything.

How to upload files and share links without installing the program
If we did not install an application on our phone, or a program on our computer, then, while in personal account Yandex disk, you can upload files by clicking on one of the buttons:

You can also simply drag and drop files from your computer into your personal account window:

After downloading the file, we can close the window or download more files:


How to upload files to Yandex disk using a program for Windows without going to the site
While in your personal account, you can see the link “Download Disk for Windows”. Downloading this program, you get the opportunity not to go to the Yandex website to upload files, but do it using a special folder on your computer.

After installation, downloaded earlier installation file can be deleted.

After entering, you can finish here, or additionally click on the link “Customize folder location and synchronization” and slightly adjust the settings to suit you:


After completing the settings, we will have a separate folder for storing files on Yandex disk.

By default it is synchronized, i.e. when you copy some files to this folder, they are automatically uploaded to the Internet on your Yandex account disk, this is indicated to us by the green “bird” above the file.
Also when you right-click on a file, you can get a public link, the same as we received on the site.

A nice bonus is a program for creating and editing screenshots
When downloading and installing a program for Yandex disk, we, as a nice bonus, install a program for convenient creation screenshots

It also has the necessary set of tools for editing: various arrows, figures, writing text, cropping a picture to the desired size.

Computer literacy requires, first of all, familiarity with with terminology.
File sharing is a service where a user can place his file (or several files) on the Internet, and in return receive a link (they also say -) to his file on the Internet, through which this file will be available around the clock to everyone to whom you send this link. You can send a link to your file via e-mail, post it on a social network, on a forum, on a website, in general, where it is permitted and appropriate.
Instead of the words “post a file on a file hosting service” you can often find the following expressions:
- upload to a file hosting service,
- upload to a file hosting service,
- upload to a file hosting service,
- upload to a file hosting service,
- transfer a large file.
Rules for using file hosting services– why is it useful to know them?
File hosting services have their own rules for posting files on them. In particular, these rules relate to the storage periods of files on a file hosting service. You should always pay attention to these rules so that your files are available for downloading from a file hosting service.
File sharing services and additional income - what does it mean?
File hosting services like Depositfiles, Letitbit (etc.) make money by displaying advertising, as well as selling VIP accounts (or premium accounts) and others paid services. Therefore, there is an artificial pause so that the user watches the advertisement and comes to the idea of purchasing a VIP account.
On the other hand, it should be noted that it is possible Additional income on the Internet for users using the file hosting services listed above. I will not dwell on this, I will only note that if using your link the file is downloaded by other users approximately 1000 times, then the file hosting service will pay you for this from 2 dollars.
I need to transfer a large file. For free!
In this article I will talk in more detail about the free file hosting service Yandex. The adjective “free” means that you place your file on the Yandex file hosting service for free, and whoever downloads this file using your link will also do it for free.
Attention! In January 2013, Yandex People (that is, the Yandex file sharing service) was closed, it no longer exists! Now there is a new cloud service - Yandex.Disk. If you have an account (mail) on Yandex, you can use Yandex.Disk. This is a new convenient Yandex service for storing and sharing files: you can upload files up to 10 Gigabytes, the storage period of files is now UNlimited.
So, Yandex file sharing ( former Yandex People) is closed. Instead of him now Yandex Disk. To find out more about Yandex, Disk, click on the following link:
Below are instructions on how to use the Yandex File Sharing Service, which, alas, is no longer relevant. Because, I repeat once again: The Yandex File Sharing Service now exists only for those users (more precisely, for the files of these users) who once (before January 2013) uploaded their files there and still store them there. All other users can now use only Yandex.Disk (the link “How to upload files to Yandex.Disk and how to download?” is one paragraph higher).
To use the Yandex file hosting service, you need to have (or create) your own mail on Yandex, that is, you need to “have your own account” on Yandex. How to do this is described in detail in the article “”.
Sim-sim, open up: or How to access the Yandex file hosting service?
So, you have an account on Yandex. You can get to the Yandex file hosting service in one of the following ways (the most common):
1) Go to your Yandex mail, click on the People link:
After which the People will offer us two options for further action:
- Site management
- Upload files: one at a time, or many at once.
We are interested in the 2nd option - upload files, which will be discussed below.
2) The second way to get to the file hosting service. IN search bar browser, type the phrase: Yandex file hosting service. One of the first links will be as follows: “Yandex.People” – hosting and file storage. We click on the link and go to People, where we will be offered two options similar to those described above:
- Create your website
- Share files
3) Finally, the third way to access the file hosting service. In the address bar of the browser we type narod.yandex.ru and then everything is as described in the paragraph above.
So, in the 2nd and 3rd options you will see the following picture:

- Unlimited space for your files.
- Files are stored for at least 3 months. The storage time can be extended independently as many times as you like, or it is extended automatically if the file is downloaded.
- The maximum file size is up to 5 GB.
- If your provider supports the Yandex program " The local network", your traffic is calculated at the local rate.
It's time to upload your file to the Internet, that is, to a file hosting service.
- enter your e-mail on Yandex and
- password for it.
After this, you will be taken to a file hosting service, where you will be asked to upload files:

Select “one at a time” (number 1 above), then click on the “Browse” button (number 2 in the screenshot above). A window opens to search for a file on your computer “Upload file”.
We find the required file there, click on it once with the mouse, after which the file name will be placed in the “File name” window (number 1 in the screenshot below). All you have to do is click on the “Open” button (number 2 in the screenshot below):

This link can then be inserted where it is needed, for example, in the comments of the Computer Literacy group. To do this, go to the group, click the mouse in the comment window and press the hot keys Ctrl+V (which means paste).

If you want to practice computer literacy, you can start by sending a letter to yourself. To do this, enter your own e-mail address in the “To” field. Open this letter, check the link to the file.
That's probably all I wanted to say about the Yandex file sharing service. Ask or write in the comments whether this information was useful to you, what else could be added or corrected.
Watch my video tutorial to make everything clear and understandable:
I would like to add that when the storage period for files on Yandex-people expires, the following message is sent to the mail:
“Hello, Nadezhda.
We inform you that the storage period for your files on the Yandex.People service is ending.
In order to extend the storage period of files by 45 days, follow the links:
file “5_Winamp.7z” – http://narod.yandex.ru/disk/prolongate/26065729001/5_Winamp.7z.html – storage period until March 1, 2012.
file “7_Setup.7z” – http://narod.yandex.ru/disk/prolongate/26065921001/7_Setup.7z.html – storage period until March 1, 2012.
You can also monitor the storage period of your files using a widget for the Yandex home page.
Add widget to home page
—
Yandex.People – free hosting and file storage"
Simply click on the links provided in the letter and the storage period will be extended by 45 days.
P.S. The article is over, but you can still read:
Receive the latest computer literacy articles directly to your inbox.
Already more 3,000 subscribers
Everyone good day! Today we are talking about a very convenient service that I have been using in my work for a long time - Yandex Disk. What kind of “beast” is this? - you might ask. I will talk about this in detail in the article below. If you have any questions, ask them in the comments, we will figure it out and look for answers! Well, for now let’s get acquainted with one of the most convenient file storages from the developers of the popular Russian search engine Yandex.
1. Yandex Disk: what is it
Yandex.Disk is a popular cloud storage that allows users to store various information (photos, videos, audio, texts and other files) in the so-called “cloud”, i.e. on a server on the network. Data stored on Yandex.Disk can be shared with other users, and also accessed from various devices– other computers, tablets and smartphones. Basic version Yandex.Disk is completely free and available to everyone. I remember that in 2012, registration was by invitation only, and I used an alternative service - Dropbox. But now I have completely switched to Yandex Disk Cloud. After all, free, and even accessible from everywhere, 10 GB is never superfluous.

2. Yandex Disk: how to use - step-by-step instructions
So, I convinced you, and you decided to install Yandex Disk on your computer. Now let's look in detail at how to use Yandex Cloud (also called Yandex.Disk, since it is cloud storage data).
2.1. How to create Yandex Disk (registration in Yandex Cloud)
In order to start using Yandex.Disk, you need register and create a mailbox from Yandex(if you already have one, go straight to the second point).

After you have selected the operating system that you have installed, the download of the distribution will begin.
3. How to install Yandex Disk on a computer. Open the downloaded file, the program will launch further installation which will end with this message:

Personally, I always uncheck the boxes and don’t check any additional applications, but you can leave it. Click the “Finish” button. Congratulations, you are amazing :)
The installation of Yandex Cloud on your computer has completed. Now in the settings you need to specify your email login and password, after which you can safely use all the functions of the cloud storage.
After installation, a Yandex.Disk shortcut will appear on the desktop:

The folder is also available when you go to My Computer:

On the Internet, you can go to Yandex.Disk from your email or via the link - https://disk.yandex.ru/client/disk
4. Installing Yandex.Disk on a smartphone. Free apps available for iOS and Android, so you can download them without any problems App Store And Google Play. The application for iOS does not have a very high rating, there are some shortcomings, all of which can be seen in the reviews.

2.3. Yandex Disk: how much free space?
Immediately after registering and installing Yandex.Disk, you can access 10 free GB of space in the Cloud. This is quite enough for a start; it lasted me about six months. What to do if there is not enough space?
- Additional free 10 GB for inviting friends. You can get 512 MB of free cloud space for each friend you invite. Go here - https://disk.yandex.ru/invites and you will see your referral link, which you need to copy and send to your friends. After each user registers using your link, you will receive additional disk space, and the invited friend will receive an additional 1 GB.

- Additional up to 250 GB as a gift from Yandex partners. Various promotions are regularly held that will allow you to get additional gigabytes of free space. You can track current promotions on this page.
And of course, as you can expect from Yandex, additional space can be purchased. However, the pleasure does not come cheap:

If you need a lot of space in the Cloud, but don’t want to pay, you can have several mailboxes and create Yandex.Disk for each of them.
2.3. Login to Yandex Disk
Registration has been completed, the available space has been sorted out, the question arises -?
You can view downloaded files in several ways:
1. Open the Yandex.Disk folder shortcut on the Desktop, if you did not delete it after installation.
2. Open Yandex.Disk in the My Computer folder.
3. Click on the Yandex.Disk icon in the taskbar, located in the far right corner of the screen.

4. Log in to your Yandex mail through any browser and at the top there will be a link to the Cloud:
6. Go to home page Yandex, being logged in to the mail. In the upper right corner there will be a link to Yandex.Disk:

2.4. How to upload files to Yandex Disk - 7 easy ways
Let us now consider the most main point, because of which we performed all these actions - . Again, there are several ways to do this:
1. Through context menu . Select the file that needs to be uploaded to the Cloud, right-click on it and select the item: “Yandex.Disk: Copy public link”:

2. Copy the file to the Yandex.Disk folder(I wrote above how to enter it). By default, this folder is synchronized automatically, so when you copy there, all files will be immediately added to your Disk.
3. Upload files via mobile app iOS or Android. I can consider this method in a separate article, if you leave such a wish in the comments.
4. Upload a file to the Cloud via browser. To do this, simply drag and drop the selected files into a browser window with Yandex.Disk open:

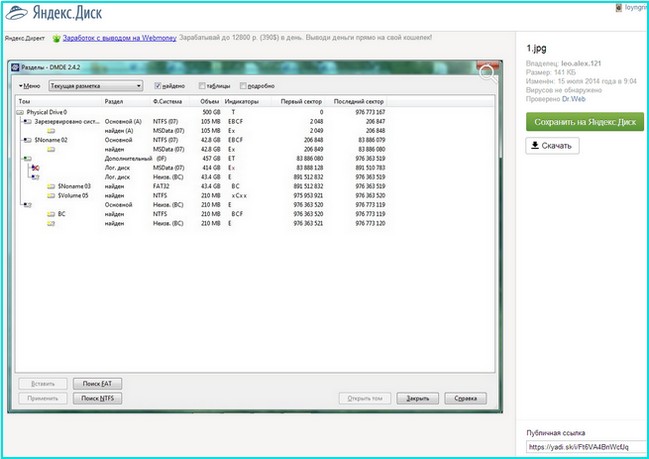
5. Copying other people's files. If someone shared with you a link to a file that is stored on Yandex.Disk, you can easily save it to your Cloud. To do this, you need to follow the sent link like https://yadi.sk/*** and click on the “Save to Yandex.Disk” button on the right.


They also often ask - how to upload a folder to Yandex Disk. The principle is the same as stated above in the files section. But there is one more additional advantage - you can assign a folder General access. This way, other users to whom you grant access rights will be able to view and download files in this folder, as well as upload their own files there.

How to upload a video to Yandex Disk?– is also a very popular question from Cloud users. This is due to the fact that video files are usually large, and many people worry that they simply won’t “fit” and cannot be stored there. This is not true, video files, just like photos, can be uploaded and stored on Yandex.Disk.
2.5. Yandex Disk: how to transfer files to another user

You can also remove access to the file by clicking the mouse and switching it to the OFF position.
If for some reason you need to remove Yandex.Disk from your computer, then you should do the same as with a regular application - use standard means operating system.
Let's move on: Start -> Control Panel -> Programs and Features
In the window that appears, select Yandex.Disk (usually it is the last one in the list) and click the “Delete” button. The downloaded files will remain in your account; only the application will be deleted from your computer.


