Instructions
Text editor Microsoft Word provides its users with maximum opportunities. IN this editor You can type texts, select the most suitable fonts and sizes for its design. Separate options allow you to create frames, highlight text, add images to the document, change styles, select and much more. For large documents, it is possible to number pages. This process It’s quite simple and will be accessible even to a beginner just learning the basics of Microsoft Word.
The Microsoft Word text editor provides its users with maximum possibilities. In this editor you can type texts and select the most suitable fonts and sizes for its design. Separate options allow you to create frames for text, highlight text, add images to a document, change styles, select synonyms, and much more. For large documents, it is possible to number pages. This process is quite simple and will be accessible even to a beginner who is just learning the basics of Microsoft Word.
Download the Microsoft Word text editor to your computer. This program possible (and safest) from the official website Microsoft, located at http://microsoft-office.biz/. Download one of the versions of the program offered on the site and install it on your computer, following the prompts of the installation wizard.
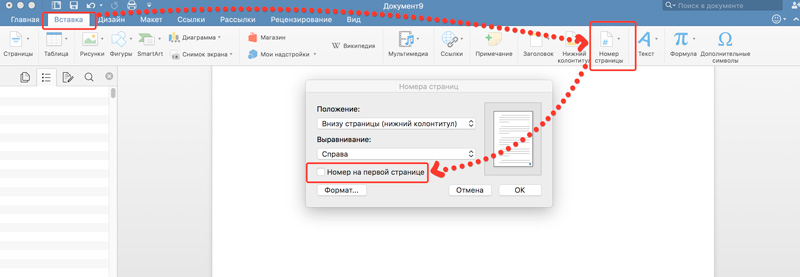
Any version of the program starting from 2003 is suitable for operation. On the top menu bar working panel Find the "Insert" tab. A list will appear before your eyes with numerous functions for inserting various objects. Find and click on “Page Numbers”. A small window will appear called “Page Numbers”.
Decide in which part of the page the future number will be located. To do this, select the desired item in the “Position” and “Alignment” columns with the arrow. Also check the box next to “Number on the first page” if you want it to be there. If the first page does not require numbering, leave the corresponding field blank.
At the bottom of the window, click the “Format” button. A new Page Number Format window will open, where you can take advantage of additional features for numbering pages in Word. You can choose a wide variety of number formats, from standard Arabic numerals to Latin letters and Roman numerals. If you want to additionally include the chapter number, then check the box next to it and use the arrows to adjust the heading style. The very last column is the “Page Numbering” column, where you need to indicate from which page the sheets of the document will be numbered.
Also in Microsoft versions Office Word 2003 and 2007 pagination can also be enabled via headers and footers. Headers and footers are areas of a page located in its margins. Headers and footers are located on the sides, as well as at the bottom and top of the page. They are often used for logos or other images, titles, stamps, document headers, footnotes, document titles, and date placement. You can also set page numbering in headers and footers. In this case, document pages will be determined automatically, increasing by one with each page.
To set page numbering through headers and footers, on the top toolbar of an open document Microsoft Office In Word, find the View menu. Click this button and in the drop-down menu click “Header and Footers”. After this, a header and footer panel will open on the program’s working field, and an area for entering text will appear at the top of the page. From the "Header/Footer" menu, move to the bottom of the page by clicking the "Header/Footer" button if you want to place page numbers at the bottom. On the same panel there is a “Page Number” button. Click this button and its serial number will appear on the page.
You can open the “Header and Footer” menu in another, simpler way. To do this, double-click on the bottom of the page - on its bottom margin. Then enter the line number in the field. Here you can also select other values for the header and line numbering. When you open a header and footer in the document working panel, an additional window will open. In the left part of the panel, find the “Page Number” section, click the button and in the drop-down window, specify the value you need for placing the page number (at the top of the page, at the bottom, in the page margins) and the page numbering format. This can be a numeric value, alphabetic, alphabetic, numeric - symbolic. In addition, from the menu that appears when opening the header and footer, you can specify other values for the header and footer by selecting and ticking one of the settings items: a special header for the first page or different header and footer for even and odd pages.
You can also open the header and footer panel by opening the Design menu. Further actions are carried out in accordance with the steps described above.
IN Microsoft package Office Word 2010 pages are numbered in the document as follows. In the top panel, select “Insert” and in the “Header and Footers” subsection, find the “Page Number” icon. Click on it and select the position of the numbering (top, bottom, in the margins, current position), after which the program will offer you a whole list of examples of numbering design. Select the one you like and left click on it. The numbering will be placed on all pages of the document in the footer.
To number pages in Microsoft Office Word 2013, open the document you want to number and find the “Insert” tab on the work toolbar. Click this button and open the expanded full “Inserts” menu. Find the “Page Number” item, move your mouse to this inscription, click the button and select the numbering format in the drop-down window. That is, you need to indicate how the numbers will be located on the pages of the document: at the top of the page, at the bottom of the page, in the margins of the page, the current position. Select the number format and numbering format (numeric, alphabetic, etc.).
Numbering in Microsoft Office Word is much richer than in other versions of the program. So, if you open the full “Insert” menu and click the “Page Number” button, you will see typical variations in the placement of signatures on sheets. Click again on the lines with arrows and select a template that will help you enter page numbers automatically. When you click on a number, a small panel opens in which you can change the font and color of the number.
The Word text editor is one of the most popular typing programs. It is difficult to find a Windows-based computer that does not have this program installed. The popularity of this program is confirmed by the number of questions about it that users ask on this and other sites on the Internet.
In this article we will look at one of the most requested features in the Microsoft program. Here you can learn how to put page numbers in Word.
How to put page numbers in Word 2007, 2010 or 2013
In 2007, Microsoft Word switched to the so-called ribbon interface. Main feature This interface is that all program functions are distributed across different tabs. In order to activate a particular function, the user needs to go to the desired tab and find the button there that is responsible for needed by the user function.
For example, in order to put page numbers, you need to go to the “Insert” tab and click on the “Page Number” button.
After clicking on the “Page Number” button, a drop-down menu will appear in which you can choose how to place the page number: at the top of the page, at the bottom of the page, or in the margins.
Here you can also. To do this, click on the “Page Number” button and select “Delete Page Numbers”.

How to put page numbers in Word 2003
If you use Word program 2003, then in order to put page numbers you need to open the “Insert” menu and select “Page Numbers”.

This will open a small window called “Page Numbers”. Here you can select where you want the page number to appear (top of page, bottom of page, right, left, or middle).

After selecting the appropriate location, click on the “OK” button and numbering will appear on the pages of your document. If you want to start numbering from a different number or change the number format on the page, then you need to click on the “Format” button in the “Page Numbers” window.

After this, a small window called “Page Number Format” will appear. Here you can change the number format, enable chapter numbering, and also select the number from which the numbering should begin.
In order to remove page numbering in Word 2003, you need to open the “View” menu and select “Header and Footers”. After this, you need to manually erase the page number on any page of the document and close the “Header and Footer” editing mode.
In the process of writing an essay, diploma or book, we all use the text editor for Microsoft Word documents. Proper formatting should generally include page numbering within the document. Many people have difficulties and do not know how to number pages in Word, although it is quite simple to do.
This article describes in detail how to number pages in Word, choose the numbering location, format, and also exclude numbering of any document page.
Page numbering in Word 2007, 2010, 2013 and 2016
In all versions older than Word 2003, numbering is the same. The screenshots below are based on Word 2017, but they will also work for older versions.
To add numbering to open document go to the “Insert” tab. In the “Header and Footer” section, click “Page Number” and select a numbering position. In the screenshot below, I have chosen the footer location with centered placement.
After this action, numbering will appear at the end of each page, as well as displaying a header and footer. To close the display of headers and footers, click the “Close Header and Footers Window” button.
If desired, you can change the numbering format, for example, by making the numbers not Arabic, but Roman. To do this, again go to the “Insert” tab and in the “Page Numbers” item open “Page Number Format”.
Here you can choose appearance, as well as what number the numbering will begin with. Why this may be required you will find out in the next paragraph.

Removing numbering from the title page
In most educational institutions, one of the requirements for document formatting is the absence of numbering on the title (first) page. If you simply enable page numbering, as shown above, then the numbering will be on the first sheet. To start numbering from the first page, but not display it on the title page, you must do the following.
Go to the “Layout” tab and click on the “Page Setup” link, as shown in the picture below.
Go to the “Paper Sources” tab and check the “Distinguish between first page headers and footers” checkbox. After that, click OK.

Now numbering is carried out as before, but its number is not displayed on the first page, in our case number 1.
When you want the numbering not to be displayed on the first page (title page), but on the second so that it starts with the number 1, you need to set the numbering from 0 in the menu “Insert” - “Page Number” - “Page Number Format”. the first page will start with number 0 without display, and the second page will start with number 1, the third page with number 2 and so on.
Numbering from the third page
Let's complicate the task a little. We need the numbering to be present, but not displayed on the first and second pages. After all, the first page is usually the title page, the second can be a table of contents, where numbering is also not required.
To number from the third page you will need to do an operation called “Page Break”. First, return all numbering settings to default if you have hidden the numbering display on the cover page. Let's assume that on this moment you have numbering enabled from the first page and the number 1 is displayed on the title page, the number 2 on the second page and so on.
For convenience, turn on the display of all characters in Word. To do this, on the “Home” tab, click on the “Display all signs” button.
Now that you have all the characters in your documents displayed, including spaces and empty lines, left-click on last character on the first page of the document. Then on the “Layout” tab, click “Breaks” - “Next Page”.
Do the same steps with the second page of the document. If you did everything correctly, then the enabled display of all characters function will show you break lines at the end of the first and second pages. In the picture below they are shown with red arrows.
Now the third page is numbered 1. If you want it to be numbered 3, then in the menu “Insert” - “Page Number” - “Page Number Format” set the value to “Start from 3”.
There is only one problem left, on the first two pages we have page numbers displayed. To remove them, select the first page, go to the “Layout” tab - “Page Options”. Next, in the “Paper Source” tab, check the box next to “Distinguish between first page headers and footers.”
Do the same on the next page of your document.
Thus, we were able to make sure that the numbering on the first two pages was not displayed and started from the third, and from the number we wanted.
By the way, this method with a break, allows you to start numbering not only from the third page, but from absolutely any one.
To remove numbering, double-click on any page number and press the DEL key. All numbers will be removed from the document.
Page numbering in Word 2003
There are still quite a few people who use the outdated Word 2003. In it, page numbering is done in a slightly different order than for newer versions of the program.
IN open file Word 2003 click in top menu“Insert” - “Page numbers”.

Set the position of the numbers (for example, at the bottom of the page) and alignment (for example, to the right). By unchecking the “Number on the first page” item, you can disable numbering on the title page of the document.

Click on the "Format" button. Specify the numbering format (for example, Roman numerals), and also specify which digit to start page numbering with.

After making changes, click OK and all pages will become numbered.

To number from the third or any other page in Word 2003, first turn on the display of all characters. After that, move the cursor to the last character on the first page and click on horizontal menu“Insert” - “Page Break”. Do the same on the second one. From now on, numbering will start from the third page.
When creating a series of text documents, all users working in text editor Microsoft Word, it will be beneficial to know how to put page numbers. This knowledge is especially necessary when working with large texts.
You will need
- Microsoft Word text editor
Instructions
1. The Microsoft Word text editor provides its users with maximum possibilities. In this editor you can type texts and select especially suitable fonts and sizes for its design. Separate options allow you to create frames for text, highlight text, add images to a document, change genres, select synonyms, and much more. For huge documents there is a possibility of page numbering. This process is quite primitive and will be accessible even to a beginner who is just learning the basics of Microsoft Word.
2. The Microsoft Word text editor provides its users with maximum possibilities. In this editor you can type texts and select especially suitable fonts and sizes for its design. Separate options allow you to create frames for text, highlight text, add images to a document, change genres, select synonyms, and much more. For large documents there is a possibility of page numbering. This process is quite primitive and will be accessible even to a beginner who is just learning the basics of Microsoft Word.
3. Download the Microsoft Word text editor to your computer. This program can be downloaded (and is safer than anyone else) from the official Microsoft website located at http://microsoft-office.biz/. Download one of the versions of the program offered on the site and install it on your computer, following the prompts of the installation wizard.
4. Any version of the program starting from 2003 is suitable for operation. In the top menu bar on the work panel, find the “Insert” tab. A list will appear before your eyes with numerous functions for inserting different objects. Find and click on “Page Numbers”. A small window will appear called “Page Numbers”.
5. Decide on which part of the page the upcoming issue will be located. To do this, select the required item in the “Location” and “Alignment” columns with the arrow. Also check the box next to “Number on the first page” if you want it to be there. If the document format does not require numbering the first page, leave the corresponding field blank.
6. At the bottom of the window, click the “Format” button. A new “Page Number Format” window will open, where you can take advantage of additional features on how to set page numbers in Word. You can choose the most varied number format, ranging from standard Arabic numerals to Latin letters and Roman numerals. If you want to additionally include the chapter number, then tick the required box and use the arrows to adjust the title genre. The very last column is the “Page Numbering” column, where you need to indicate from which page the sheets of the document will be numbered.
7. Also, in versions of Microsoft Office Word 2003 and 2007, page numbering can also be included through headers and footers. Headers and footers are areas of a page located in its margins. Headers and footers are located on the sides, as well as at the bottom and top of the page. They are often used for logos or other images, names, stamps, document headers, footnotes, document titles, and date placement. You can also set page numbering in headers and footers. In this case, the pages of the documents will be determined mechanically, increasing by one with each page.
8. To set page numbering through headers and footers, find the “View” menu on the top toolbar of an open Microsoft Office Word document. Click this button and in the drop-down menu click “Header and Footers”. Later, a header and footer panel will open on the program’s working field, and an area for entering text will appear at the top of the page. From the "Header/Footer" menu, move to the bottom of the page by clicking the "Header/Footer" button if you want to place page numbers at the bottom. On the same panel there is a “Page Number” button. Click this button and its serial number will appear on the page.
9. You can also open the “Header and Footer” menu using another, more simple, method. To do this, double-click on the bottom of the page - on its bottom margin. Then put the line number in the field. Here you can also prefer other values for the header and line numbering. When you open a header and footer in the document working panel, an additional window will open. In the left part of the panel, find the “Page Number” section, click the button and in the drop-down window, specify the value you need for placing the page number (at the top of the page, at the bottom, in the page margins) and the page numbering format. This can be a numeric value, alphabetic, alphabetic, numeric - symbolic. In addition, from the menu that appears when opening the header and footer, you can specify other values for the header and footer by selecting and ticking one of the settings items: a special header for the first page or different header and footer for even and odd pages.
10. You can also open the header and footer panel by opening the “Design” menu. Subsequent actions are carried out in accordance with the steps described above.
11. In the Microsoft Office Word 2010 package, page numbering in the document is indicated in the following way. In the top panel, select “Insert” and in the “Header and Footers” subsection, find the “Page Number” icon. Click on it and select the location of the numbering (top, bottom, in the margins, current location), after which the program will offer you a whole list of examples of numbering design. Select the one you like and left-click on it. The numbering will be placed on all pages of the document in the footer.
12. To number pages in Microsoft Office Word 2013, open the document that needs to be numbered and find the “Insert” tab on the working toolbar. Click this button and open the expanded full “Inserts” menu. Find the “Page Number” item, move your mouse to this inscription, click the button and select the numbering format in the drop-down window. That is, you need to indicate how the numbers will be located on the pages of the document: at the top of the page, at the bottom of the page, in the margins of the page, the current location. Select the number format and numbering format (numeric, alphabetic, etc.).
13. Numbering in Microsoft Office Word is much richer than in other versions of the program. So, if you open the full “Insert” menu and click the “Page Number” button, you will see typical variations in the placement of signatures on sheets. Click again on the lines with arrows and select a sample that will help you enter page numbers mechanically. When you click on a number, a tiny panel opens in which you can change the font and color of the number.
Page numbering is necessary for proper organization of the document. Numbering is especially important when you need to print a voluminous document with content. Numbering will make it easy to find the pages you need and navigate topics where the text is divided. In the Microsoft Word text editor, you can set page numbering using several methods.

Instructions
1. For Microsoft Office Word 2003 and 2007 editions, the method of enabling numbering through headers and footers is suitable. At the top line in Word select "View" and click "Header and Footer" from the drop-down menu. A header/footer panel will appear on the program's workspace, and an area for entering text will appear at the top of the entire page. In the "Header/Footer" panel, you can move to the bottom of the pages by clicking the "Header/Footer" button if you need to place page numbers at the bottom. On the same panel you will find the “Page Number” button. By clicking on it, its serial number will appear on the page.
2. Another method that allows you to insert page numbers into a document in MS Word 2003 and 2007 editions is to enable numbering via insertion. In the top menu, select “Insert” – “Page Numbers”. A dialog box will appear on the screen. In it you will be able to prefer the location of the page number on the sheet (top/bottom) and set the alignment of the page number. If you do not want to have its number on the main page, uncheck the corresponding box in the dialog box.
3. In the Microsoft Office Word 2010 package, page numbering in the document is indicated in the following way. In the top panel, select “Insert” and in the “Header and Footers” subsection, find the “Page Number” icon. Click on it and select the location of the numbering (top/bottom/in the margins/current location), after which the program will offer you a whole list of examples of numbering design. Select the one you like and left-click on it. The numbering will be placed on all pages of the document in the footer.
Note!
Microsoft Office Word is a paid office suite. If you are not likely to use it, install a free analogue of Open Office.
Page numbering is an indispensable condition for the positive design of a report, coursework or thesis. Even in ordinary works that do not have strict design requirements, page numbering can be very useful - with its help you can quickly find any necessary information. The page numbering function is provided in every version of MS Word.

Instructions
1. MS Word 2003 First, you need to open the “Insert” menu, and then select the “Page Numbers” item.
3. In this window, you can prefer the format of numbers or letters, the one that will be used in the numbering on your page. You can also use the “Start with:” function, which allows you to change the number from which numbering begins.
4. MS Word 2007In this version of MS Word, numbering pages is even easier. First you need to select the “Insert” category, and then click on the “Page Numbers” list. In it you will be able to prefer the location of numbers on the page and their format.
Video on the topic
Note!
For those who want to protect their Microsoft Word and Excel documents from viewing and editing, there is a chance to put a password on them. We put a password on the metamorphosis of the Word and Excel document. Often there is a need to make important documents available to everyone in Word or Excel, which contain information necessary for the work of employees, which can change many times during the day.
Helpful advice
Ultimately, the situation is not very nice, but occasionally it happens that you yourself “mess up” a document, be it a resume or a letter from a loved one, or something else very important that you don’t want to show to anyone, for this there is a need to set a password on Word document. So let’s start, in an open Word 2007 document you need to click the button in the upper left corner, then select “Prepare” from the drop-down list, and then “Encrypt document”
A text document on a computer appears clear and orderly, with pages arranged in a clear sequence. However, when printing a document on paper, you can get confused in the text if the pages are not pre-numbered.

Instructions
1. When printing important text documents and preparing them for checking, you need to be careful and responsible. Often, a positive assessment of an activity depends on its correct execution on paper in compliance with all established rules of printed documents. Since the computer is now a necessary assistant in work and typing texts, and standard programs are used for this, a certain set of requirements is established for all documents. Standard collations of printed text include font size and type, line spacing, text alignment, and page numbering, ensuring comfortable work with a printed text document.
2. You can finally number the pages of a Word document manually - simply by typing the required number in the desired place, but if you need to organize a lot of pages of text, then use the settings of the Microsoft Word program.
3. If you are using the 2003 version of Microsoft Office, open a Word document and find the Insert menu in the top toolbar. Click on this workspace and select the Page Numbers service. The numbering settings window will open in front of you. Hover your cursor over the “Location” column and select where the numbering will be located on the sheet: at the top or bottom of the page.
4. The “Alignment” column will adjust the position of the numbering relative to the text. Choose whether the number will be in the middle of the line, to the right or left of the text, inside or outside. Depending on your preferences, check or uncheck the “Number on the first page” option. Please note that the title page is never given a page number, but the subsequent sheet is signed with the number “2”.
5. Click on the "Format" button inside the numbering settings window and choose how the page layout will look. Scroll through the examples and left-click on the view you like. In the “Format” window, pay attention to the likelihood of chapters and headings being formatted.
6. Once you have configured your page numbering options, click OK.
Video on the topic
Page numbering is performed mechanically in documents in the Microsoft Word office application and does not require additional actions on the part of the user. This option may not be necessary in a certain category of documents being created. In this case, the reverse operation is required - canceling page numbering.

You will need
- – Microsoft Word 2003, 2007.
Instructions
1. Launch the Microsoft Word office application to perform the operation of canceling page numbering in the selected document and select the “Header and Footer” item in the “View” menu in the top toolbar of the program window. The result will be the opening of the “Header and Footer” toolbar with the area for entering the desired text, limited by a dotted line, at the top of the document and control buttons (for Microsoft Word 2003).
2. Select the header and footer that contains page numbers and specify the page number (for Microsoft Word 2003).
3. Click Delete button and finish the Header and Footer panel (for Microsoft Word 2003).
4. Repeat the above procedure in any of the existing sections of the document if there are several sections in the selected document and it is not feasible to mechanically remove page numbering in all sections (for Microsoft Word 2003).
5. Left-click on the page number when using the “Page Numbers” command in the “Insert” menu to select specified number into the frame and repeat clicking on the border line of the frame itself. The cursor should take the form of a cross-shaped arrow (for Microsoft Word 2003).
6. Press the Del softkey to delete the page number of the selected Microsoft Word document (for Microsoft Word 2003).
7. Select the "Header and Footer" item in the "View" menu in the top bar of the program tool window and go to the "Insert" tab of the dialog box that opens to perform the operation of removing page numbering in the selected Microsoft document Word (for Microsoft Word 2007).
8. Click the "Page Number" button and specify the "Remove Page Numbers" command in the drop-down list of commands to complete the cleaning process (for Microsoft Word 2007).
Helpful advice
To remove part of the numbers, you should divide the document into sections in advance.
Often, when writing long materials in Word, you need to quickly number pages. For diplomas, abstracts, books, articles. In this article you will learn how to automatically number pages in the Microsoft Word text editor. How to number from the first, second or third sheet, and exclude some pages.
I have itWord 2016. Also tested in versions 2007 and 2010.In other versions, the interface is slightly different, but the actions are very similar.
Numbering from the first page
Let's start with the standard task - number all pages in order, without exception.
In the top panel in Word, select the “Insert” tab → “Page Number” → “Page Number”.
A window will appear allowing you to choose where to display the number (top or bottom) and alignment. Some versions will instead have a drop-down window to select a footer template.

Changing the numbering format
When setting numbering, there is a “Format” button. With its help you can change the display and numbering order. For example, make numbering in letters, Roman numerals, start counting numbering from an arbitrary number.

Double clicking on the page number opens the footer designer. You can also change the format using the Page Number button.

Numbering from the second page
To avoid putting the first page number, follow the steps from the previous paragraph: on the insert tab, click “Page Number” and in the window that appears, uncheck the “Number on the first page” checkbox.
A similar result can be obtained by double-clicking on the numbering, and on the tab that opens with the header and footer designer, click the “Special header and footer for the first page” checkbox.
The countdown starts from the first page, but the number will not be displayed on it.
To exit the header and footer designer, its tab has a special button: “Close header and footer window.”
Change starting digit
If you need to start counting from the second page from the number 1, you need to set 0 as the starting number. To do this, double-click on the page number, in the tab that appears, open “Page number” → “Page number format” → “Start from” → specify 0.

At the same time, do not forget to click the “Special footer for the first page” checkbox so that the zero is not shown.

If you want to start numbering from 3, 4, 5 or another page other than the second, you won’t be able to simply add a special header and footer; it only works for the first page. In such cases, go to the first page, place the cursor on the last line of the first page and click on the Layout tab → Breaks → Next Page.

Then double-click on the number of this page and check the box “Special footer for the first page” (as in the previous paragraphs). Repeat this step for each page that does not need a number.

Using the “Numbering Format”, specify the number from which to start counting. As a result, you can make sure that there are no numberings on the first five pages, and then on the sixth the countdown starts from 1 or 6.
Exclude pages from numbering
You can ignore some pages in the numbering, that is, skip them.

After you have numbered, click on the bottom line on the page you want to exclude. On the Layout tab, click Breaks → Next Page. After this action, there will be one number on this and the next page. Now you can hide one of the numbers: double-click on it and click the “Special footer” checkbox.
As you can see, in Word it is very flexible settings page numbering. You can enter numbers in just a minute.
Video on page numbering in Word 2010:


