The process of updating the configuration of programs such as 1C can take quite a lot of time, so it is better to turn to professionals for this and undergo 1C training. It is easy to lose concentration at any stage. Which leads to the appearance serious mistakes. Let's look at some of them that are encountered most often. For example, why is 1c not updated?
Description of the simplest options
Most often, the program itself compiles a report, where it writes about why it was not possible to carry out this or that action. For example, the user entered logins and passwords incorrectly when registering. You just need to read the message, follow the links and correct the current situation.
What other errors have become widespread?
- The administrator of this program must take care to create an archive before proceeding with any updates. And you need to separately check whether this action was actually completed. The lack of backups is a problem that literally every second user faces. And this is related to the answer to the question why 1s 8.2 is not updated.
- Non-standard configurations often confused with standard ones when updating. Because of this, any changes that were previously made may disappear.
- Be sure to familiarize yourself with the history of changes after completing the process. There is a good chance that the configuration will work differently. Or that it will require the use of additional settings to work.
- Sometimes the properties of dialog form controls are simply not displayed when working with the program. The reason for this is the carelessness of the user himself. After this, the question becomes even more confusing as to why 1s 8 3 is not updated.
- Sometimes after an update the program simply does not allow you to switch to new configuration. For example, due to the fact that codes and document numbers become non-unique. Errors also appear when updating information registers. In this situation, record sets are no longer unique. From possible solutions- enumerating codes, changing length or content, disabling uniqueness control, changing properties.
- Users may not update the database consistently across all releases. And they immediately apply the latest version. This may result in important information simply disappearing from the database. Built-in update processing must be run after each release. Then there is a high probability that the program itself will fill in the empty lines with the information of interest. And it will correct the situation when the 1C release is not updated.
- Instant installation on the base after preliminary work is a mistake that almost all users make. But first you need to conduct tests using backup copies. Then there is a greater chance of finding out whether the actions were sufficiently correct.
1C company constantly releases new releases of its configurations: adding new features, updating reporting forms.
Therefore, the configurations of your infobases also need to be constantly updated. The 1C program itself even reminds you of this and offers to update. You can update 1C 8.3 yourself in two ways: through the configurator or via the Internet. Let's consider step by step instructions on updating 1c and what needs to be done after this procedure using an example.
Updating the 1C 8 program via the Internet
To update 1C 8.3 over the Internet, go to the “Administration” menu and find the “Updating the program version” section:
First, let’s go to the “Setting up program updates via the Internet” section:

In this window, the most important thing is to enter the user code and password; without them, you will not be able to connect to the site with updates. You should have received them along with . If for some reason you do not have them, there is a link nearby that will take you to your Personal Area on the support site, and all the data will be there.
Here you can disable automatic checking for updates, set up a scheduled check or every time you log into the program.

Leave the switch on " Automatic update" and click "Next". If a newer program release than the current one is found, the corresponding information will appear.

A newer version was found for my configuration, and now I’ll try to update 1C. Pay attention to the size of the update, as it is downloaded and unpacked into the user's directory, which is located on the "C:" drive. Accordingly, there should be enough free space on it. By the way, here you can read what changes and innovations are in the update. Click “Next”.
Oddly enough, the program was unable to connect to its server the first time due to the fact that it used my old code and password, although I specified everything correctly in the settings:

I click “OK”, enter the correct data and click “Next”. I hope you don't see such a window.
The program will start receiving the update file. Depending on your internet speed, this can be a rather lengthy process. Took me a few minutes. In the next window we have to choose whether to update immediately or after finishing work. If you decide to update immediately, make sure that no one else is in the database. The update occurs in exclusive mode.
Get 267 video lessons on 1C for free:
Here you will be asked to do backup copy before the update. I advice NECESSARILY make a backup copy of the 1C database, I was convinced own experience. Moreover, I recommend selecting the last item “Create a backup copy and save to a directory.” In this case, if something goes wrong during the update, the program itself will return everything to its place.
The update went smoothly for me and took about 45 minutes.
Important note! After installing the configuration update, the program may require you to update the 1C platform. You can read how to do this in or see in our video:
Self-updating 1C 8.3 via the configurator
To update via the configurator, you first need to download the 1C update file from the official website or from the ITS disk. I described how to do this in the article ““. Only the row in the table, of course, you need to select another (1C Accounting):

One point should be noted here. Not all latest versions releases may be suitable for your current configuration. Therefore, if you have not updated for a long time, you may have to download several versions. In the list of releases you can see which one fits which.
In my case, the latest release of 1C is suitable, and I downloaded it. Unlike the platform update file, configuration updates are located in archives. It is also advisable to place it in a clean directory and run it. After it is unpacked, run the setup.exe file:

The update will be installed in specified directory. Typically this is the default directory, but you can specify a different one.
Now let's go to the configurator:

Naturally, you need to log in as a user with administrative rights.
Let's make a backup copy right away!

Now you need to go to the menu “Configuration – Support – Configuration Update”. A window will appear:


If one or more 1C 8.3 configuration updates are found, a window will appear asking you to select the one you need:

If several available updates are found, the program will highlight the latest one in bold.
Click “Finish”. Two more information windows will appear, there you just need to click “Continue”.
The 1C update process will begin. After a while, a configuration comparison window may appear. If you are not an expert, then it is better not to touch anything there. Click “Run”:
After some time, the message “Configuration merging complete” will appear. Click "OK".
Now you also need to update the configuration information base. To do this, go to the menu “Configuration – Update database configuration”.
If the system asks you for something else, you need to click “Yes” or “Accept”.
When finished, you can close the configurator. When you first start the program in normal mode You may receive a message that the platform you are using is outdated for this configuration and working on the system is not recommended.

This update is complete.
Watch also our video on updating 1C through the configurator:
I recently updated a program on one of my work computers. 1C:Enterprise. After starting the program, an error occurred during the update process: “The update failed. An error occurred when updating the program version: The value is not a value of the object type (Code).” Restarting the program did not help - the error window appeared again:
Decide this problem The tool built into 1C:Enterprise helped me: Testing and correcting the information base.
1. So, first of all, close the program 1C, and make a copy of the database just in case. To do this, go to the folder where the database is stored and copy it somewhere file 1Cv8.1CD:
2. Now run the program again 1C:Enterprise. In the start window, go to “ Configurator”:
3. Then in the menu bar, go to the “ tab Administration” – “Testing and fixing”:
4. In the window that opens, check the boxes and markers just like in my screenshot, and then click the “Run” button: 
5. At the end of the testing process, information with the results of this testing will be displayed below: 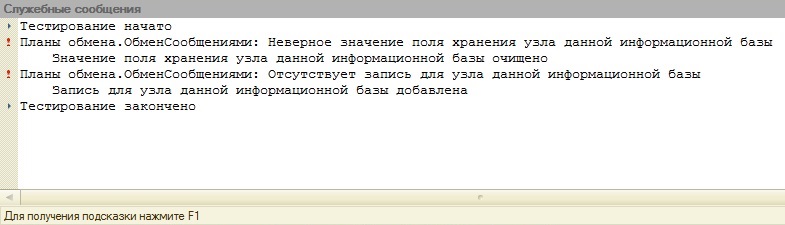 Close the program 1C. Then we launch it again. After launching the error: “ The update failed. The value is not an object type value” must not be repeated.
One of the most popular accounting programs, 1C: Accounting 8, requires constant updating due to the development of new platform capabilities. We offer detailed instructions on updating the 1C platform, which will help you easily switch to a newer version.
To work, you will need the Internet with access to the 1 C site and 20 minutes of free time. So let's begin.
Make sure the release is correct
Before upgrading the platform, you should ensure that the configuration you are using supports running in new version platforms.
How to find out the release number of the 1C platform and configuration? To do this, open the “Help” section in the main menu and select “About the program”.
A window will appear on the screen where the platform release number will be indicated in the first (top) block, and the configuration release number will be indicated in the “Configurations” section (in the main block).

You can also find out the release number by clicking on the yellow icon with the letter “i” inscribed in it - it is located in the upper right corner of the main program window.

Download the update from the official website
We will not consider updating the 1C platform in user mode, and let's do the installation manually. You need to download the update on the official website using the following link: https://releases.1c.ru/total (authorization required!)

Updating the program version is available only to registered users, so enter the login and password that were issued at the registration stage in the form provided. If you are not registered, do so now.


Attention! If, after downloading and checking the platform version, as described in the first paragraph, old version, most likely, the incorrect installer option was selected (for example, “thin client”).
Find and run the installer
The developers packaged the updates in a RAR archive, so you will need an archiver program that supports this format. Find the downloaded platform update, unpack it into a separate folder and run the setup.exe file.


Wait while the installation preparations complete. Then, in the installer welcome window, click Next to proceed to select your options.

Select the required components and interface language
Before you update the platform, you must select the components to work with. If you not System Administrator, leave those that the system offers by default, and click the “Next” button.

In the previous paragraph, the system will suggest a folder for installation - by default it is Program Files. If the main program files are located in a different directory, install it using the “Change” button. This is important for the program to work correctly.
On the next window, select the appropriate interface language (Russian is suggested by default) and click the “Next” button.

Start the update installation process
In the new window, click on the “Install” button - after this, the installation of the update files into the system will begin.

The procedure takes several minutes and directly depends on the performance of the computer and the operation of other applications running at that moment.
If the User Account Control window appears during the installation process, agree that you really want to install this software to your computer - click the “Yes” button.

After copying is completed and settings are made to the system, the program will prompt you to install the protection driver.

If you are using a USB key that provides protection at the hardware level, uncheck the box - required driver already on your system. Proceed similarly if you have linked the 1C application to a specific computer on program level- in this case there is also no need for a driver. Go to the next window by clicking the “Next” button.
Attention! If you missed the checkbox and the driver is installed again, this will not affect your further work in any way.
Complete the update installation
At the end of the installation, a window will appear on the screen with a “Finish” button - click it.

We have described in detail how to update the platform through the configurator - if the process was successful, the program will work stably on your computer. To verify this, use its capabilities for several days.
After that delete previous versions"1C:Enterprise 8.3" so that they do not take up space on your hard drive. To do this, go to the “Control Panel”, select the appropriate item in the list and click “Delete”.

If you continue to work with configurations created for the version 8.2 platform, do not delete it.
Leave two platforms on your computer different versions(in our case 8.2 and 8.3) - they will start automatically when you select the appropriate configuration.
On this page I will describe the most common errors when using my program " ".
The first and easiest option
The essence of the error and instructions for correcting it are indicated directly in the report. Well, for example, we specified the wrong login and password for the database, and then the report will contain the following lines:
The second and most difficult option
An error occurred on the 1c side and the updater directly tells us about it with this line in the report:
In this case, look at the report a little higher and look for green lines there starting with the characters.
These lines were transmitted to the updater by the 1c platform itself and they are the ones that need to be analyzed.
Below I have prepared a list of the most common mistakes from the 1c platform (those in green) and ways to eliminate them:
Error "Name predefined element not unique"
2. Get somewhere the configuration file (.cf) of the database version - the one we see in the "About" window. This is the most difficult stage and here I won’t give ready-made solutions. You can pull this file from another database of this version, or you can ask your colleagues for it. I’ll say right away that it’s useless to ask me for it - I won’t be able to provide it to you.
3. Having in hand the configuration file (with the .cf extension) of the desired version (the one you have in the “About the program” window) in the database configurator, open the item:

We will specify the update file ourselves:


Click the "Run" button.
After the update, check the vendor configuration version again - now it should match the version in the "About" window. After this, the database will be updated by the updater without any problems.
What other problems are there?
Faulty module name: frame.dll
(how to run or google).
- If the updater is not installed on the 1c server itself, then you need to make sure that the PORT_NUMBER port on the SERVER_IP server is really open. You can check this using telnet commands SERVER_IP PORT_NUMBER. If the connection occurs, then the port is open.
- Next, you need to make sure that on the computer where the updater is launched, nothing is blocking its connection to PORT_NUMBER on SERVER_IP. To do this, you need to temporarily disable your antivirus, firewall, firewall and other similar programs (this must be done on the computer where the updater is installed). If this step helps, then you need to register the appropriate exceptions in the blocking program.
- If this does not help, then you need to register the database address in the updater not through the server name, but directly through its IP (its IP will be indicated in the SERVER_IP error message). This is necessary to rule out a DNS problem.
The program cannot be launched because api-ms-crt-conio-l1 is missing on the computer. 1-0.dll
If everything is ok according to the requirements, then go to the properties of the shortcut through which you launch the updater and go to the “Compatibility” tab. You need to uncheck all the checkboxes on this tab. Most likely, you mistakenly set the updater to be compatible with another OS - hence the problems with the platform (since when external connection 1C platform code is loaded inside the updater process).
The updater takes a very long time to start
And in the “Agent Port” field, the agent port is indicated (default 1540), which can be found in the properties of the central 1c server in the 1c cluster management console (how to launch or google).
After the update, the "Collapse Date" field is hidden in the "Infobase Rollup" processing for the "Trade Management" configuration
In this case, the updater will be able to work with the database because it will not attempt to connect to it.
But because of this, some updater operations on the database will not be performed automatically and will be unavailable.
Error: connection not established because... the destination computer rejected the connection request
If you still need to upload to dt, do it in 1 thread, if possible with pauses between operations. Periodically reboot the 1c server for prevention.
WITH the specified error I encountered this with users on almost all versions of 1c server and in all cases they decided to switch to archiving using DBMS.
Error: Failed to remove the installed block on new sessions with the database
If this fails, then it is possible:
- you made a mistake in writing your ITS login and/or password
- you have not paid for access to ITS
- you are not registered basic version configurations on the 1C website to receive updates
3. Let’s assume that everything is ok with access to updates via the website. It remains to rule out problems in the environment on your computer and problems with the 1C update server.
To do this, try downloading new updates to your configuration through the configurator (this is the method the updater uses in its work).
3.1 Go to your database configurator and select the menu item "Configuration" - "Open configuration".


3.5 Finally, enter your ITS login and password ( be sure to copy them from notepad):

And try downloading one of the updates that the configurator will offer you for your database.
If this fails, then it is possible:
- you have problems with the environment on your computer
- The 1C company's update server is temporarily not working properly (although updates via the website may continue to be downloaded)
- you do not have access to updates for this particular configuration (you have not paid for an ITS subscription to it; or you have a basic version that you have not registered on the site)
4. Let's assume that the configurator has successfully downloaded the update. In this case, you should copy the ITS login and password from notepad into the updater settings and check if the problem has gone away.
Otherwise, there is some nuance on the updater side. In this case, please write to the support service at [email protected] and we will continue to look into your case in detail.
DBMS Error: Microsoft SQL Server Native Client 11.0: Invalid object name "SchemaStorage"
5. If the problem is in some way a specific update (for example, it is not found or an error occurs when loading it into the database) -compress it into an archive and attach it to the letter. How to upload a large archive to the Internet is described (from point 5) using the 1c database as an example.
Here... I ask, of course, for a lot of information, and for novice users it may not be so easy to collect and send it to me. But in this case, I ask you to turn to more experienced comrades so that they can help you.
If you work hard, then I can work hard to help you.


