Thanks for reading.
Problem installing Windows 7 x64 MSDN on Aspire E1-510.
In Acer's UEFI there is no option to select Legacy Bios mode. GPT disk(although I tried installing MBR as well).
So, here comes the second day, what I have already tried:
1. Install from a licensed one Windows disk 7 (Red bar during "Starting Windows")
2. Install from a multiboot flash drive (Win7All) (Doesn’t even allow you to select a boot option)
3. Install the recorded UltraISO and rufus-1.4.6 from the MSDN flash drive (I tried all 3 MBR-GPT-UEFI modes and two different flash drives - no results)
4. Start installation from under Windows 8 installed (An item appeared in the boot menu, but did not load)
5. Install from a flash drive according to the instructions provided by the user veremi1 (When loading, it cannot find the BCD file, although it is there)
6. About the same manual, but with bootsect at the end (same result)
7. Copy the image to the root of the disk (Wouldn’t let you boot from it)
8. Format from GPT to MBR and try step 3 again.
9. Start the installation on one computer, and after rebooting put it back (Will not boot)
10. The same thing, but after the second reboot (Also nothing comforting)
11. Insert a disk with Windows 7 already installed (Does not allow it to boot)
12. Format the disk back from MBR to GPT and try to boot (also no use)
Almost every item was checked as in the mode Secure Boot: Enable and Disable.
- Every time in UEFI, in Secure Boot: Enable mode, I marked all found UFI files as trusted.
This brought visible results only in point 5. And then, it only allowed it to boot and give a BCD error.
- UEFI Screenshots:


Good afternoon.
I encountered this problem on my laptop. Acer Aspire E1-510, no support for Legacy boot mode.
And so, after surfing the vastness of the RUNet, I found an article by one guy. In it he described a way to flash the BIOS, and an archive with the BIOS was attached. True, it weighs ~181 MB, which is not particularly desirable to download such a volume. And I thought the method itself was murky, but that’s not the point.
In general, if you have BIOS firmware version 2.02 (I had one), then you will need to flash it.
What do we need for this?
The laptop itself with a startup OS, that is, Windows would start.
The second is the firmware files, we will not download the ~181 MB archive from where =), but we will go to the official website and there we will download the firmware files and the flasher itself for the Acer Aspire E1-510. Download a direct link to the file.
The archive contains PDF file on English language, open it and follow the instructions.
I briefly describe:
1. Press the Windows Checkbox and X keys at the same time.
2. Select the command line with administrator rights.
3. Unpack the archive and drag two files (one Z5WE3211W.exe is possible) to the root of the C:\ drive, but I recommend two Z5WE3211W.exe and UpdateTXE1089.exe.
4. IN command line we write 2 commands. 1. CD C:\ is a command to move to the root of the disk. 2. C:\Z5WE3211W.exe - Launch the BIOS flasher.
5. A window pops up checking which BIOS you currently have and which one will be installed. We confirm. And we are waiting for a reboot. And everything is OK!
P.S.: Run the flasher only from the command line and with administrator rights, otherwise the BIOS will not be flashed and an error will occur, but roll back to previous version. But it's not worth the risk here =).
And so, we flashed the BIOS on the Acer Aspire E1-510 laptop , and we now have the opportunity to select Legacy mode, which will allow us to boot from a flash drive or drive for Window installation or testing.
To boot from a flash drive or drive, we just need to configure the BIOS, and so first we need to enter the BIOS.
To do this, turn on the laptop and immediately press the F2 key until this window appears.
Here we already see the flashed BIOS version 2.11.
Go to the "BOOT" tab.
And switch the mode from UEFI to Legacy, as shown in the pictures.

After you have changed the mode, press the F10 and Enter key to save the settings.

The laptop reboots, but we don’t let the operating system load; we immediately go into the BIOS.
Again, go to the "BOOT" tab. And we choose what we will boot from. For example, I set up a flash drive for loading.
The priority is set using the keys F5 - lower and F6 - increase priority.
P.S.: You can also turn on the BOOT MENU on the F12 key, it is turned on in the Main tab (if I’m not mistaken =))

Again, we save the settings with the F10 key and the laptop boots from the selected device, be it a bootable flash drive or disk.
This is how we flashed the BIOS of the Acer Aspire E1-510 laptop and configured the BIOS to boot from a flash drive or drive.
How to install Windows 7 on Acer laptop with UEFI BIOS! Hello friends, a friend of mine bought an Acer Aspire ES1-511 laptop without an operating system. The laptop is inexpensive and is not designed for games, but only for work.
The BIOS of the Acer ES1-511 laptop is common for all Acer laptops with UEFI elements with all the ensuing consequences, and my friend could not install Windows 7 on it. Having spent two weekends on this matter, on Monday he called me and asked me to install it for him. operating system.

How to install Windows 7 on an Acer laptop
A friend of mine lives outside the city and it took a long time to get there, and then I was almost eaten by his dog.

Then we take our laptop out of the box,

we connect ours to it bootable USB flash drive. We connect the flash drive to USB port 2.0, since Windows 7 does not support USB 3.0 (ports are usually colored blue).


Turn on the laptop and press F2, enter the BIOS and immediately go to the Main tab.

Main Tab
We enable the ability to call the laptop boot menu when booting using the key F12. Set option F12 Boot Menu to the Enabled position, then go to the tab Boot.

Boot tab
Naturally, this tab does not contain our Kingston installation flash drive, but it would be there if we made it a special UEFI flash drive. Set the option Boot Mode to position Legacy

We agree with the warning. OK


Click F10, by doing this we save the changes made to the UEFI BIOS parameters and reboot.

Click when loading F12(call the laptop boot menu)

and please our Kingston bootable flash drive is present in Boot Menu, select it using the arrows on the keyboard and press Enter.

Note: If for some reason you are unable to open the laptop boot menu using the key F12, then enter the UEFI BIOS on Boot tab and using the keys F6(raise up) place the flash drive in the first position, then press F10(save the settings and reboot),

As I already noted, after successfully installing Windows 7 on an Acer laptop with UEFI BIOS, we will face problems with drivers and we will successfully solve them.
What to do if Windows 8.1 is already installed on the Acer Aspire ES1-511 laptop, how to install it thenWindows 7 on this laptop
When the message “Press any key to boot from CD or DVD” appears on the screen, press any key on the keyboard, by doing this we agree to boot from installation disk.


Install.

We accept the terms of the agreement. Select the full installation.

Friends, to install Windows 7, you need to delete all existing partitions on your GPT hard drive and install Windows 7 directly into the unallocated space. Click on the “Disk Setup” button and delete all existing partitions,

then install Windows 7 directly into the unallocated space.
Windows 7 automatically converts the hard drive to the MBR standard during installation. Click on the Next button.

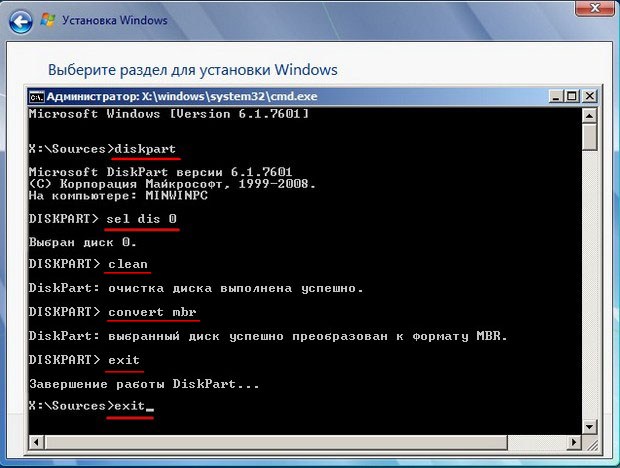
If the Next button is inactive or an error occurs (which is unlikely), then we call the command line, press Shift + F10 on the keyboard and convert our hard drive to the MBR standard in the command line, all partitions and data on the disk will also be deleted.
Press Shift + F10 on the keyboard. On the command line, enter the commands sequentially:
diskpartseldis 0
clean
convert mbr
exit
exit
Click Update.

Question: Windows 7 does not work after installation usb ports, touchpad, internet
after buying a laptop x540lj, which had Windows 10. I decided to install Windows 7. and now after installing Windows 7, the usb ports, touchpad, and Internet do not work. what to do?
Answer:
efjifwe, installing Windows is an incomplete matter. To do this, you need to install drivers, which can be downloaded from the official website of your laptop manufacturer.
If there really are no drivers for Windows 7, then you need to return the one Windows version, which stood originally.
And, by the way, if you still have a warranty, then you reinstalled Windows in vain, since this will simply void your warranty.
Question: Installing Windows 7 on Acer Aspire E15
Hello! I purchased an Acer Aspire E15 laptop with Linux pre-installed. I want to reinstall the system by downloading 7.
In the BIOS I set boot from disk first, here is a screenshot
Just in case, I give a screenshot of the Security tab
However, when you turn on the laptop, the disk is ignored for some reason, the reinstallation does not start, the Linux loading window appears again - this window,
which after a few seconds gives way to this
Then the system does not respond to keypresses, the same line is repeated - # and that’s it. Question: what am I doing wrong?
Answer:
Quote:
and if it’s not a secret how to do this?? and then what next, what about the usual installation?
Question: Installing Windows 7
Initial data:
", press Enter, then
1. We see the inscription
Install"
Format"
Further"
and continue installation
Answer:
How to burn discs correctly
FAQ on creating a bootable USB flash drive
1. Click the item " Disk setup"
Create
3. In the field " SizeApply"
we don't touch it
Format")
Unused disk space", press item " CreateApply"
Unused disk space"
Question: Installing Windows 8 on a USB flash drive
Microsoft Company provided the ability to install Windows 8 not only on an SSD or HDD, but also on regular USB flash drives. The feature is called Portable Workspace, and thanks to it, users will have the opportunity to create a Portable version of the OS that will always be with them. A video has already appeared on YouTube demonstrating the installation of the system on a USB drive.
To create a bootable flash drive, you will need the Windows 8 Enterprise Edition (or Ultimate) distribution. In addition, the storage capacity must be appropriate - at least 16 GB.
Answer:
1.
Download the utility Windows 7 USB/DVD Download Tool 1.0
(Windows 7 USB/DVD Download Tool allows you to install the operating system Windows system 7\8 s USB storage, not with optical disk, as usual. This utility works great with both Windows 7 and Windows 8).
If you don’t know which version of Windows 8 to use, I recommend installing the 64-bit build (especially if your computer is relatively new).
64-bit Windows 8 differs from 32-bit in that it requires 1GB more random access memory and 4GB more disk space, which is insignificant for most users.
Create a bootable USB flash drive with Windows 8.
To create a bootable USB flash drive, you need to insert it into your computer. Next we install Windows utility 7 USB/DVD and launch. In the utility, select the downloaded ISO image from Windows 8 and the desired flash drive.
Remember, everything on your flash drive will be erased! So copy all important data from it in advance, or it’s better to use a new flash drive.

If completed successfully, a message like “Backup completed” will appear.
Installing Windows 8
It is worth noting that before performing the installation you should do backups all important data. If you want to upgrade or rewrite your installed Windows XP, Vista or 7, open in Windows Explorer root directory of your USB flash drive, and then run the Setup.exe file.

You will see a choice prompt that will allow you to save settings, personal files, etc., save only personal files, or save nothing:

Windows 7 users can choose the first option - after all, upgrading to Windows 8 is less painful for them - all of them Windows settings, programs, accounts and files are imported. However, programs from Vista and programs and settings from Windows XP will not be saved.
If you want to create a two-boot system from Windows 8 and your current operating system, you will have to install an additional drive on your computer or create it on the current drive new section.
The first case does not require additional explanation: we simply connect another drive to the computer and select it when installing Windows 8.
The second case is more complicated and requires additional effort. Vista and 7 users can create a new partition using the built-in disk management tool (Click the Start button and search for diskmgmt.msc). After launching the application, you should see the disk of your operating system. We do the following:
- Click right click mouse over the disk on which we want to install Windows 8 and select the “Shrink Volume” option. Remember that 64-bit Windows 8 requires at least 20GB of space, so shrink your partition accordingly;
- Right-click on the new “Unallocated” location and create a “New Simple Volume”;
- Select the next available drive letter and format it to NTFS (you can choose any drive name, but the recommended one: Windows 8 RP x64).

In turn, Windows XP users will have to resort to third utilities, such as Partition Logic, to create a new partition. But, in essence, they need to do the same thing: compress one of their volumes and create another.
After that, simply boot from your USB flash drive with Windows 8, select manual installation and indicate the newly created section. If you can’t boot from a flash drive, you need to specify booting from it in the BIOS.
If you want to remove Windows 8, load your main operating system and run the partition program again (for Vista and 7 users, this is the aforementioned disk management tool). Delete the Windows 8 volume and expand your primary volume to take up the newly freed space.
Uninstalling Windows 8 can corrupt the bootloader and prevent the main operating system from loading. But don't panic. To fix the problem, users Windows Vista and 7 can use automatic recovery (from the installation disk), while XP users will have to boot into the recovery console and then enter the commands fixmbr, fixboot, exit.
2. If application Microsoft Windows 7 USB/DVD Download Tool seems too complicated, you can use more simple option- program Windows 8 USB Installer Maker.
The sequence of steps to create a bootable USB flash drive with Windows 8 using the program is as follows:
We are preparing a flash drive with a capacity of at least 4GB.
Download the Windows 8 distribution
Download the Windows 8 USB Installer Maker program itself (or take it)
Launch the program Windows 8 USB Installer Maker with administrator rights:

To start recording, you just need to select the previously downloaded Windows image 8 via button Search ISO, tick Format drive and press the button Create.
Next, the program will perform three actions:
- Format the disk to NTFS format;
- Copies all Windows 8 distribution files to a USB flash drive. Please note that this step will take a long time depending on the power of the computer - maybe even one to two hours;
- Will create on USB partition boot area (MBR).
Then we go into the BIOS and configure boot from USB.
Reboot the PC. After this, when you boot, the installation of Windows 8 from the USB flash drive should automatically begin.
Question: Installing Windows 7
This topic is dedicated to those who have not encountered installing Windows 7
So, it was decided to install Windows 7 OS
Initial data:
Installation disk with windows 7 distribution
PC with 4 GB RAM and 20 GB hard drive (clean install to new drive)
Set the BIOS to boot from CD/DVD, save the settings by pressing the F10 key
We reboot the PC and after booting from the installation disk we see the message " Press any key to boot from CD or DVD", press Enter, then
1. We see the inscription
4. On next step, press the button " Install"
5. We see the inscription " Start installation" and then you need to read the terms of the license, if you agree, then you need to check the box next to " I accept the license terms" and press the button " Further"
10. And now the bootloader has been created, select our disk and press the item " Format"
We further agree that the data will be lost
After formatting, press the button " Further"
11. Windows installation has begun, wait patiently for the reboot
12. During the reboot, we return the boot priority from the hdd to the BIOS, then we see
and continue installation
13. So, it’s done, enter the user name, it’s also better to change the computer name so that there are no Russian letters
15. We will not enter the key yet and uncheck the box
Do not forget to activate windows within 30 days; the key can be on a sticker that is pasted on the case or with the key that was purchased when purchasing the OS.
Answer:
If you do not have an installation disk, but have an image of it
Do you want to burn the image to disk?
Want to create a bootable USB flash drive -
How to split a disk into several during installation
So we have HDD, which needs to be divided into several local
1. Click the item " Disk setup"
2. In the next step, you must click " Create" and after that additional settings will be available
3. In the field " Size" you must enter digital information about the size of the disk being created, in in this example drive C will occupy 20 GB, after entering digital information, you must press the " button Apply"
4. The result was a partition with a bootloader ( we don't touch it
) and local drive C (it needs to be formatted; to do this, you need to select the drive and click " Format")
5. To create other local disks, you need to select the partition " Unused disk space", press item " Create", then enter the digital information of the disk being created, in this example it will be 40 GB and press the button " Apply"
6. As a result, another local disk will appear, which can be immediately formatted
7. Next, another local disk is created in the same way from the " Unused disk space"
Important - to continue installing windows, you must allocate drive C, in this case it is Partition 2
Create additional local disks, it is possible after installing Windows (steps 5,6,7 are not needed for this). Disks are created using the Disk Management utility.
So, there is a need to install Windows 7 or Windows 8 on an Acer Aspire ES1-511 laptop from a flash drive. We need to configure the BIOS on our laptop.
Turn on the laptop and press the F2 key to enter the BIOS. After clicking, we will see the Acer logo, and then we will actually get into the BIOS.
Let us immediately draw your attention to the fact that the flash drive, with which we will then install the operating system, must be placed in the black USB connector of the laptop.
Go to the “Boot” menu tab.
In this window, go to the first line – “Boot Mode” using the up/down arrow keys (“?” and “?”).
By default, the "UEFI" value is active. Select this line using the Enter key. A new small window will appear.
In the small window that appears, you need to select the “Legacy” value. The computer may ask you something a couple of times, we press Enter all the time.

After that, go to the “Exit” menu tab.
We have the first line “Exit Saving Changes” active. Press the Enter key. The computer will ask us to save the changes and exit further.
We make sure that after pressing the Enter key for the first time, the Yes value is active in the window that appears. We confirm our exit and saving of changes by pressing the Enter key again.

The laptop should reboot. After the reboot is complete, press the F2 key.
We find ourselves in the BIOS again.
We go to the already familiar “Boot” tab. We see in the window that we already have a download sequence available. That is, in what place in turn the computer will look for our operating system to boot.
We find it and use the cursor keys to go to our flash drive. The title should look something like this. "USB HDD: model of our flash drive" In the picture the name of our flash drive is Generic Flash Disc.

Go to the “Exit” menu tab. Press the Enter key. The computer will ask us in a new window if we need to save the changes made. Make sure that Yes is active and press Enter.


