Almost all laptop models produced today come without a built-in CD/DVD drive. Lenovo laptops are no exception. A bootable USB drive in this case is a useful tool for diagnosing and restoring the operating system or for installing a new OS.
There are several ways to boot Lenovo laptops from a bootable USB drive.
Booting from a USB drive (flash drive) by changing the priority is the best option when you need to unlock your PC using a recovery tool Windows password or fix a loading issue such as blue screen, failure to start the OS, etc.
To download you need:

BIOS Boot
- When the BIOS menu appears, go to the “Boot” section using the left-right arrows on the keyboard.

- Using the up and down buttons, select the “USB HDD” drive and use the “F6” and “F5” buttons to install it in the “Legacy” list above “SATA HDD”.

- In addition to Legacy boot, the BIOS can support EFI boot. If there is an MBR table on the HDD, use the arrows to highlight “ Boot Priority", press "Enter" and instead of "UEFI First" set the arrows to "Legacy First" by pressing "Enter".

Reference! If there is an MBR partition table on the hard drive (an old version of HDD partitioning that works with partitions of no more than 2 TB), then the “Boot Priority” set to “UEFI First” may lead to a Windows installation error.
- Press the “Esc” button to exit to the main page BIOS menu, and press the “F10” button to save the BIOS exit parameters. After restarting the laptop, it will start booting from the USB drive.


Phoenix – Award BIOS
If the Phoenix – Award BIOS is installed on the laptop, after entering the BIOS as standard, you must:

To boot Lenovo from a USB drive, you do not need to do so through BIOS Setup. Lenovo laptops have a special boot menu for this “ Boot Menu».
To enter the boot menu, you must:

If you cannot enter the “Boot Manager” boot menu using the “F12” key, in this case on Lenovo laptops there is a special arrow button next to the power button or on their side panel. This button is present on many Lenovo laptops and is called “Novo Button”.
To activate downloading using the “Novo Button” button:

Sometimes the laptop boots so quickly that you cannot enter the BIOS by pressing the “F1”, “F2+Fn”, or “F12” button. If the laptop does not have a “Novo Button” button, but it can normally boot the operating system from hard drive, then you can enter the UEFI BIOS boot menu directly from Windows 8/8.1/10.
How to enter the UEFI menu
For Windows 8/8.1
- Move the mouse pointer to the upper or lower right corner of the display, and move the mouse up or down. The “Charm” panel will appear, where you need to click “Options” (gear icon).

- In place of the “Charm” panel, the “Settings” panel will appear, at the bottom of which you need to select “Change computer settings”.

- In the “PC Settings” window that appears, select “Update and Recovery.”

- In the next window, select “Recovery” – “Restart now”.

For Windows 10

The last steps are the same for Windows 8/8.1 and 10:

As you can see, download options Lenovo laptop There are quite a lot of options from a USB drive, and each option offers its own solution, which is most suitable for the user in a particular case.
Read more detailed information with instructions in our new article -
Lenovo IdeaPad Z580 laptop: a home machine at the right price
If you're planning on purchasing a laptop that combines style and entertainment at an affordable price, Lenovo IdeaPad The Z580 is a great choice for this. Attractive appearance, good ergonomics, durable body, excellent performance - a laptop from Lenovo has all these qualities.
The build quality of the Z580 is also good, and despite some give in the plastic panels (the laptop is manufactured in both aluminum and plastic case), the model's chassis is quite durable. The laptop offers bold, glossy lines and is one of the brightest budget laptops on the market.

Hidden under the attractive appearance of the IdeaPad Z580 are:
- CPU: Intel Core i3/i5/i7, 2200–2900 MHz;
- core: Ivy Bridge/Sandy Bridge;
- RAM: 2-8 GB RAM;
- HDD: 320-1000 Gb;
- video HD Graphics 4000 plus GeForce GT 630M–645M.
Lenovo's glossy display is also impressive. With a screen diagonal of 15.6″, the matrix resolution is standard and is 1366×768 pixels. The brightness of the monitor is also average, but the contrast reaches an impressive 260:1, which, along with good color reproduction, provides vibrant colors and makes it one of best displays in its price category.
The laptop, while not lightweight, is 33mm thick and weighs about 2.5kg. Battery life – 5 hours.
Important! Based on real-world gaming tests, this is one of the fastest budget laptops around. If the buyer needs fast laptop For daily tasks without extra investment, the Lenovo IdeaPad Z580 will not disappoint.
Lenovo S920 smartphone, characteristics of the fast IdeaPhone
Another interesting solution from Lenovo - Lenovo smartphone IdeaPhone S920.

Phone characteristics:
- screen: IPS 5.3″, 16 million colors, 1280×720, touch, capacitive, multi-touch;
- Processor: 4-core MTK 6589, 1.2 GHz, PowerVR Series5XT video;
- memory: 1 GB RAM, 4 GB built-in + 32 GB microSDHC, microSD;
- phone type: monoblock, 159 g, 154×77.7×7.9 mm;
- phone charging connector: micro-USB;
- communication type: GSM 900/1800/1900, 3G;
- navigation: GPS, A-GPS;
- interfaces: Wi-Fi, Bluetooth, USB;
- platform: Android 4.2 with ideaDesktop proprietary shell;
- Battery: Li-Pol 2250 mAh, 25 h rpm. (GSM), 12 h up. (WCDMA);
- camera: front 2 MP, rear 8 MP, flash, face and smile detector.
The IdeaPhone S920 boasts two SIM cards, but it is equipped with one radio module, which, for example, does not allow it to download a file on the Internet during a telephone conversation.

The S920's photo quality is very good, but the ideaDesktop doesn't shine with its design. The battery allows the smartphone to work intensively for a day on one charge, which is a very good indicator. The speaker of the phone is high quality and loud.
Lenovo IdeaPhone The S920 isn't an outright bestseller, but it's a good choice for an all-in-one device, highlighted by its good camera, long battery life and dual-SIM capabilities.
Video - How to boot from a flash drive or disk on a Lenovo laptop
If necessary, use a flash drive or external HDD. So as not to change several times BIOS settings’a, you can simply boot into the Boot Menu one time, without changing any settings, select the disk to boot, perform all the necessary operations, and then simply reboot the PC and work on it as usual. In today's article we will discuss in detail, how to enter the Boot Menu on laptops and desktop PCs from all kinds of manufacturers and a huge variety of brands.
What is the boot menu? In fact, this is one of the built-in features of UEFI or BIOS, which makes it possible to quickly make a choice from which external device data storage to boot the PC this time. The presented feature can come in handy if you have to boot from a bootable flash drive or LiveCD. On a number of laptop models, the same menu provides access to the device reconstruction category.
How to access the Boot Menu on a laptop or desktop computer? Similar to calling the BIOS, this is done using one of the hot keys (most likely F12, F11 or Esc, but there may be other options). It may happen that the data on the corresponding hotkey to call the Boot Menu appear on the screen immediately when you turn on the PC, but this does not always happen.
When is it worth using the Boot Menu, and when is it better to change it? BIOS settings? If you need to boot from a flash drive once (for example, check your computer for viruses using a special disk, or install new version OS), it would be more logical to use the Boot Menu, but if you need to change the boot priority of devices (for example, set boot from DVD first), and not just once, but permanently, then, of course, it would be more advisable to change BIOS settings.
In the boot menu you can see a list of all devices connected to the PC from which currently you can boot the computer (these can be laser drives, external HDDs, flash drives), as well as, potentially, the option of network booting a PC from a backup partition.

What to do if you can’t enter the Boot Menu?
For laptops or PCs that originally shipped with Win 8.1/8/10, it may not be possible to activate the boot menu using the mentioned hot buttons. The thing is that workstations based on this OS actually do not even turn off, but only enter hibernation status. Therefore, the Boot Menu may not be activated after pressing F12, F11, Esc and other keys.
Under these circumstances, you have the right to resort to one of the following methods:
1. While selecting the “Shutdown” menu item in Win 8/8.1, hold down the Shift button. In this case, the PC will completely shut down and the next time it is turned on, the buttons to activate the boot menu will be active.
2. Instead of turning off and on the PC again, use a reboot by pressing the appropriate button.
3. Deactivate Express Start. To do this, open the control panel, select the option “System and Security” -> “Power Options” -> “Actions of the Power Buttons”.


One of the above methods should certainly help in solving the problem of activating the boot menu, if you carried out all the other iterations correctly.
How to enter the Boot Menu on an Asus device (for motherboards and laptops from the represented brand)
Essentially, if you own a desktop PC based on an Asus motherboard, you can enter the Boot Menu on it by pressing the F8 button after the computer is turned on.

But in the situation with a laptop, some nuances may arise. To activate the boot menu on an ASUS laptop of a certain modification, when turning on the device, press:
Esc – relevant for most current and not very current models;
F8 – for those types of ASUS devices, capital letter whose name contains the letters x or k (for example, k601 or x502c).
Be that as it may, the variability here is not that great, so if necessary, you can use any of the proposed options.
How to enter the Boot Menu on a Lenovo laptop?
For almost all laptops and desktop computers Lenovo brand, to activate the boot menu, you can use the F12 button when turning on the power.
Moreover, assisted boot methods for Lenovo devices can be found by using the miniature button with an arrow on it, located near the power button.
How to enable Boot Menu on an Acer device
Another very popular type of desktop PCs and laptops is Acer. To enter the boot menu on this device trademark, requires pressing F12 during startup.
However, with regard to laptops, such a trick is not always effective, and to this method became possible, you must first enter the BIOS by pressing F2, and then in the parameters set the “F12 Boot Menu” setting to Enabled, and only after that save all the changes made and leave the BIOS mode.

Other devices based on components from other brands
For other brands, the situation with using the Boot Menu is slightly different. Below I will provide a detailed list of devices and their corresponding buttons for activating the menu:
- ASRock - F11
— MSI motherboards – F11
— ASUS motherboards – F8
— Intel motherboards – Esc
— Gigabyte motherboards – F12
— Toshiba laptops – F12
— Samsung laptops – Esc
— Dell laptops – F12
— HP laptops and desktop PCs – F9 or Esc.
Here are all the common devices and descriptions with which you can find out how to enter the Boot menu. We hope this article will serve you well and you will be able to quickly, easily and painlessly perform all the necessary operations on your PC that the boot menu requires. With that, let me take my leave.
Do you want to know how to enter the special boot BOOT menu of a computer or laptop?
To boot from a flash drive or CD - DVD drive?
In this article you will learn how to do it correctly.
When we do a clean installation of Windows, we need to boot from another medium rather than the hard drive.
This is either a CD - DVD disc or a flash drive.
Typically, this is done by entering Computer BIOS or laptop.
This is exactly what we did in previous lessons.
We went into the BIOS and changed the boot order of the devices.
It is at this step that approximately 90% of users who want to reinstall Windows stop.
They cannot enter the BIOS and make the necessary settings there.
Exists alternative way select boot device.
This is the BOOT menu. The BOOT menu is simpler and more convenient than entering the BIOS.
The essence of the BOOTH menu is to press a certain key when booting a computer or laptop.
A menu like this appears:
In this menu we can select any device and immediately boot from it.
Let's look at this in more detail.
I connected a bootable USB flash drive to the laptop. On my laptop, the Escape key is responsible for entering the Boot menu.
I pressed the Escape button, hold it down and, at the same time, turn on the laptop with the button. The Boot menu opened in front of me.
Using the cursor keys, up and down, I select the desired device. In this case it is a flash drive.
Once the desired device is selected, press the Enter key.
Ready! I booted from the flash drive and now I can start installing Windows.
So, to enter the BOOT menu, you need to press one key when you boot your computer or laptop.
As with the BIOS, the BOOT menu keys differ depending on the manufacturer and brand of your laptop or computer.
The most common keys are:
F12, Esc, F11, F9 and F8
Boot menu has significant advantages over BIOS.
1. Boot menu is simpler and faster to use.
2. You don't need to understand complex settings BIOS and change them. Let me remind you that there are settings in the BIOS that, if you change them, your computer or laptop will stop booting completely. Using the Boot menu you will avoid this.
3. There is no need to return the BIOS settings back to their original state.
Of course, the Boot menu also has its own characteristics.
If you have Windows 10 or Windows 8.1, then to enter the BOOT menu, I recommend using restarting the computer instead of shutting down. The point is that in these operating systems ah, by default the so-called Quick start.
Fast startup makes sure that when you shut down the computer does not turn off, in the usual sense of the word. He falls asleep, or rather enters hibernation.
So when you enable it, it will not give you the option to enter the Boot menu. It will simply wake up and show you the state it was in when you clicked the shutdown button.
The solution is very simple: use a reboot instead of shutting down.
Let's see how it's done:
So, my laptop is turned on, Windows is loaded, the bootable flash drive is connected. Now I enable reboot.

I just click on the Start button, click the Shut down button and click Restart.
Once the BOOT menu is in front of us, we can start installing Windows.
Quick startup can be disabled completely. And then you can use the Boot menu as usual when you turn on the computer.

The setup is very simple, I will now show you how it is done. Quick Start is disabled via the classic Control Panel. On Windows you can open it via search. Just enter the word “panel” into the search. As soon as the Control Panel icon appears in the search results, I simply press the Enter key.

In Control Panel, you can switch from categories to icons. Or you can simply search for Power Supply.
On the left we have Power Supplies. Click on it.

Here we need a button Actions of the power buttons. Click on it. To unlock settings that are not active, you need to click as shown in the picture. Changing parameters that are currently unavailable.

Now we can disable Quick Launch (Fast Boot), just uncheck the box. Then we save the changes.
After this, the Boot menu will be available to you upon boot.
In Windows 8.1, the setup is done in a similar way.
One more feature.
In some sophisticated BIOS and not so sophisticated ones, there is a menu item that disables the BOOT menu.
More details about this in the video.
If your BIOS has such an item, then you will have to go into the BIOS and enable the BOOT menu once. That is, activate this item.
After this, the BOOT menu will be available to you upon boot.
From the table, you can find out which keys you need to press on your PC or laptop to enter the BOOT menu.
| Manufacturer | Model (if not specified - all models) | Key to enter BOOT menu |
| Asus | Desktop computers | F8 |
| k25f, k34u, k35, k43u, k46cb, k52f, k53e, k55a, k60ij, k70ab, k72f, k73, k84l, k93, k95vb, k501, k601, R503C | Esc | |
| x32a, x35u, x54c, x61g, x64, x75a, x83, x90, x93sv, x95gl, x101ch, x102ba, x200ca, x202e, x301a, x401a, x401u, x501a, x502c, x750ja | F8 | |
| VivoBook f200ca, f202e, q200e, s200e, s400ca, s500ca, u38n, v500ca, v550ca, v551, x200ca, x202e, x550ca, z202e | Esc | |
| N550, N750JV, g750, Infinity ux301la, Prime ux31a, Prime ux32vd, R509C, Taichi 21, Touch u500vz, Transformer Book TX300 | ||
| Compaq | Presario | ESC, F9 |
| Dell | F12 | |
| eMachines | F12 | |
| Fujitsu | F12 | |
| HP | Pavilion Media Center a1477, Pavilion 23 All In One, Pavilion g4, g6 and g7, Probook 4520s, 4525s, 4540s, 4545s, 5220m, 5310m, 5330m, 5660b, 5670b, Pavilion a410n | Esc |
| Pavilion Elite e9000, e9120y, e9150t, e9220y, e9280t | ESC, F9 | |
| Pavilion HPE PC, h8-1287c, Pavilion PC, p6 2317c, Pavilion PC, p7 1297cb, TouchSmart 520 PC, ENVY x2, m4, m4-1015dx, m4-1115dx, sleekbook m6, m6-1105dx, m6-1205dx, m6- k015dx, m6-k025dx, touchsmart m7, Envy, dv6 and dv7 PC, dv9700, Specter 14, Specter 13, 2000 - 2a20nr, 2a53ca, 2b16nr, 2b89wm, 2c29wm, 2d29wm | Esc (Then press F9 to enter “Boot Menu”) | |
| Other models | ESC, F9 | |
| Intel | F10 | |
| Lenovo | Desktop computers | F12, F8, F10 |
| IdeaPad P500 | F12 or Fn + F11 | |
| IdeaPad s300, u110, u310 Touch, u410, u510, y500, y510, yoga 11, yoga 13, z500 | Novo Button (next after the power button), F12 | |
| ThinkPad edge, e431, e531, e545, helix, l440, l540, s431, t440s, t540p, twist, w510, w520, w530, w540, x140, x220, x230, x240, X1 carbon, IdeaPad S10-3, g460, g470 , g475, g480, g485 and other models | F12 | |
| NEC | F5 | |
| Packard Bell | F8 | |
| Samsung | NC10, np300e5c, np300e5e, np350v5c, np355v5c, np365e5c, np550p5c | Esc |
| Series 5 Ultra, Series 7 Chronos, Series 9 Ultrabook | Esc (You need to disable "Fast boot" in BIOS) | |
| Ativ Book 2, 8, 9 | F2 (You need to disable "Fast boot" in BIOS) | |
| Other models | F12, ESC | |
| Sony | VAIO Duo, Pro, Flip, Tap, Fit | Assist button (Press the Assist button when the computer is turned off, not when booting) |
| VAIO, PCG, VGN | F11 | |
| VGN | ESC, F10 | |
| Toshiba | F12 | |
Good day everyone.
When installing Windows (for example), very often you need to select bootable media, other than the hard drive. This can be done in two ways:
1) Go into the BIOS and change the boot queue (i.e. put the flash drive in the boot queue before the HDD - this way the PC will first check the flash drive for boot records, and only then the hard drive);
2) Call the Boot Menu and select the specific media to boot into this moment. In my opinion, this option is even better than the first: faster and no need to go back and forth into the BIOS to change the boot queue.
To enter the BIOS (call Boot Menu) in most cases the following keys are used: F2, Del, Esc, F12 (depending on the device manufacturer). The button must be pressed immediately after turning on the computer (you can do it several times so as not to miss the right moment.
By the way, if you look closely at the first screen, which is visible immediately after turning on the computer, there is often a button written on it to enter the necessary settings (call up the menu). An example in the screenshot below.
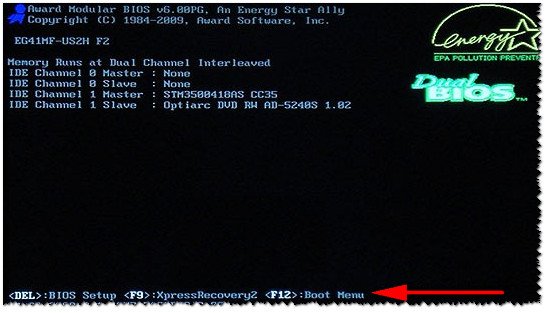
Rice. 1. Dual Bios. DEL button - enters BIOS settings, F12 button - Calls Boot Menu.
Table No. 1: hot keys for computers
To use the table, you need to know what motherboard you have and the BIOS version. There are several ways to find out, here are the fastest:
![]()
Simple free program, which will tell you quite a lot about your hardware. For example, you can find out information about: processor (CPU), random access memory(Ram), motherboard (Motherboard), video card (Graphics), HDD drives, SSD (Storage), etc. In addition, you can find out and control online the temperature of the main components: hard drive, video card, processor.
A screenshot of the operation of this utility is shown in Fig. 2.
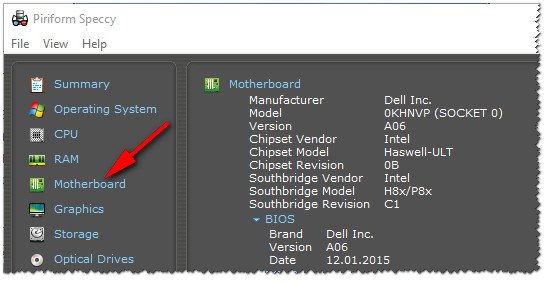
Rice. 2. Speccy - obtaining information about the motherboard
Table No. 1
| Motherboard | BIOS version | Hotkey | Which menu will be open |
|---|---|---|---|
| Acer | Del | Enter Setup | |
| F12 | Boot Menu | ||
| ASRock | AMI | F2 or DEL | run Setup |
| F6 | Instant Flash | ||
| F11 | Boot Menu | ||
| TAB | switch Screen | ||
| Asus | Phoenix Award | DEL | BIOS Setup |
| TAB | Display BIOS POST Message | ||
| F8 | Boot Menu | ||
| Alt+F2 | Asus EZ Flash 2 | ||
| F4 | Asus Core Unlocker | ||
| BioStar | Phoenix Award | F8 | Enable System Configuration |
| F9 | Select Booting Device after POST | ||
| DEL | Enter SETUP | ||
| ChainTech | Award | DEL | Enter SETUP |
| ALT+F2 | Enter AWDFLASH | ||
| ECS (Elite Group) | AMI | DEL | Enter SETUP |
| F11 | BBS POPUP | ||
| FoxConn (WinFast) | TAB | POST Screen | |
| DEL | SETUP | ||
| ESC | Boot Menu | ||
| GigaByte | Award | ESC | Skip memory test |
| DEL | Enter SETUP/Q-Flash | ||
| F9 | Xpress Recovery Xpress Recovery 2 | ||
| F12 | Boot Menu | ||
| Intel | AMI | F2 | Enter SETUP |
Table No. 2: hot keys (Bios/Boot Menu, etc.) for laptops
Note: on modern laptops The key combination works the same way in Windows: hold down the SHIFT button + select the restart button with the mouse.
The Boot Menu is a small window in which, using the mouse (arrow keys on the keyboard), you can select the device from which to boot. An example of such a menu is shown in Fig. 3.
Depending on the manufacturer of your device, the menu may differ slightly, but the principle of operation is the same everywhere.

Table No. 2
| Laptop manufacturer | BIOS version | Hotkey | Function/menu call |
|---|---|---|---|
| Acer | Phoenix | F2 | Enter Setup |
| F12 | Boot Menu (Change Boot Device,Multi Boot Selection Menu) | ||
| Alt+F10 | D2D Recovery (disk-to-disk system recovery) | ||
| Asus | AMI | F2 | Enter Setup |
| ESC | Popup Menu | ||
| F4 | Easy Flash | ||
| Phoenix Award | DEL | BIOS Setup | |
| F8 | Boot Menu | ||
| Benq | Phoenix | F2 | BIOS Setup |
| Dell | Phoenix,Aptio | F2 | Setup |
| F12 | Boot Menu | ||
| eMachines (Acer) | Phoenix | F12 | Boot Menu |
| Fujitsu Siemens | AMI | F2 | BIOS Setup |
| F12 | Boot Menu | ||
| Gateway (Acer) | Phoenix | Click mouse or Enter | Menu |
| F2 | BIOS Settings | ||
| F10 | Boot Menu | ||
| F12 | PXE Boot | ||
| HP (Hewlett-Packard)/Compaq | Insyde | ESC | Startup Menu |
| F1 | System Information | ||
| F2 | System Diagnostics | ||
| F9 | Boot Device Options | ||
| F10 | BIOS Setup | ||
| F11 | System Recovery | ||
| Enter | Continue Startup | ||
| Next | F1 | Calling Boot Menu | |
| F2 | BIOS setup | ||
| Lenovo (IBM) | Phoenix SecureCore Tiano | F2 | Setup |
| F12 | MultiBoot Menu | ||
| MSI (Micro Star) | *** | DEL | Setup |
| F11 | Boot Menu | ||
| TAB | Show POST screen | ||
| F3 | Recovery | ||
| Packard Bell (Acer) | Phoenix | F2 | Setup |
| F12 | Boot Menu | ||
| Toshiba | Phoenix | Esc,F1,F2 | Enter Setup |
| Toshiba Satellite A300 | F12 | Bios |
Table No. 3: recovery from a hidden partition (for laptops)
Most modern laptops have a built-in hidden section with the ability to restore Windows OS using a “pair” of keys (no need to prepare a bootable USB flash drive, download ISO images with Windows, etc.).
As a rule, to launch the recovery function, after turning on the laptop, just press one key (F9, for example, on Asus laptops). Next, a window will appear in which you need to follow the instructions of the recovery wizard.
Note: when restoring information, system disk"C:\" is often formatted and all information from it is deleted. Make a copy of important data from it in advance.

Rice. 4. ACER laptop - recovery service utility
Table No. 3
| Laptop manufacturer | Button combination | Note |
|---|---|---|
| Acer | Alt+F10 | First you need to log in Laptop Bios, and enable the D2D Recovery function. The default password in the recovery system is 000000 or AIM1R8. |
| Asus | F9 | |
| Dell Inspiron | Ctrl+F11 | |
| Fujitsu Siemens | F8 | |
| HP | F10, F11 | |
| LG | F11 | |
| Lenovo ThinkPad | F11 | |
| MSI | F3 | |
| Packard Bell | F10 | |
| RoverBook | Alt | |
| Samsung | F4 | |
| Sony VAIO | F10 | |
| Toshiba | F8, F11 |
PS
The tables will be updated (over time). For additions on the topic of the article - thank you very much in advance. Good luck to all!
The Boot Menu can be called up when turned on on most laptops and computers; this menu is a BIOS or UEFI option and allows you to quickly select which drive to boot the computer from this time. In this instruction we will show you how to enter the Boot Menu on popular laptop models and PC motherboards.
The described feature may be useful if you need to boot from a Live CD or bootable flash drive to install Windows and more - it is not necessary to change the boot order in the BIOS; as a rule, a single selection is enough desired device boot to Boot Menu. On some laptops, the same menu also gives access to the recovery partition of the laptop.
First we'll write general information by entering the Boot Menu, nuances for laptops with pre-installed Windows 8, 8.1, and soon Windows 10. And then - specifically for each brand: for laptops Asus, Lenovo, Samsung and others, motherboards Gigabyte, MSI, Intel, etc. Below there is also a video that shows and explains the entrance to such a menu.
General information on entering the BIOS boot menu
Just as to enter the BIOS (or configure the UEFI software) when you turn on the computer, you need to press a certain key, usually Del or F2, so there is a similar key to call the Boot Menu. In most cases, these are F12, F11, Esc, but there are other options, which I will write about below (sometimes information about what you need to press to call up the Boot Menu appears immediately on the screen when you turn on the computer, but not always).
Moreover, if all you need is to change the loading order and you need to do this for some one-time action ( Windows installation, checking for viruses), then it is better to use the Boot Menu rather than setting, for example, booting from a flash drive in the BIOS settings.

In the Boot Menu you will see a list of all devices connected to the computer from which it is currently possible to boot ( hard disks, flash drives, DVDs and CD), and also, possibly, the option of network booting the computer and starting to restore the laptop or computer from the backup partition.
Features of logging into the Boot Menu in Windows 8, 8.1 and Windows 10

For laptops and computers that originally came with Windows 8 or 8.1, and soon with Windows 10, you may not be able to enter the Boot Menu using the specified keys. This is due to the fact that shutdown for these operating systems is not a shutdown in the full sense of the word. This is more like hibernation, and therefore the boot menu may not open when you press F12, Esc, F11 and other keys.
In this case, you can do one of the following:
One of these methods should definitely help with entering the boot menu, provided that everything else is done correctly.
Login to Boot Menu on Asus (for laptops and motherboards)
For almost everyone desktop computers With motherboards Asus, the boot menu is entered by pressing the F8 key after turning on the computer (the same time when we press Del or F9 to enter the BIOS or UEFI).

But there is some confusion with laptops. To enter the Boot Menu on ASUS laptops, depending on the model, you need to press when turning on:
- Esc - for most (but not all) modern and not so modern models.
- F8 - for those Asus laptop models whose name begins with x or k, for example x502c or k601 (but not always, there are models on x, where you enter the Boot Menu using the Esc key).
In any case, there are not many options, so you can try each of them if necessary.
How to enter the Boot Menu on Lenovo laptops
For almost all Lenovo laptops and all-in-ones, you can use the F12 key to enter the Boot Menu when turning it on.

You can also select additional boot options for Lenovo laptops by pressing the small arrow button next to the power button.
Acer
The next most popular model of laptops and all-in-one PCs in our country is Acer. Login to the Boot Menu on them for different versions BIOS is done by pressing the F12 key at startup.
However, on Acer laptops there is one feature - often, entering the Boot Menu using F12 does not work on them by default and in order for the key to work, you must first enter the BIOS by pressing the F2 key, and then switch the “F12 Boot Menu” parameter to the Enabled state, then save the settings and exit the BIOS.

Other models of laptops and motherboards
For other laptop models, as well as PCs with different motherboards, there are fewer features, so I’ll simply list the Boot Menu entry keys for them in the form of a list:
- HP all-in-one PCs and laptops - F9 or Esc key, and then F9
- Dell Laptops - F12
- Samsung laptops - Esc
- Laptops Toshiba - F12
- Gigabyte motherboards - F12
- Intel Motherboards - Esc
- Maternal Asus boards- F8
- Maternal MSI boards- F11
- AsRock - F11
It seems that all the most common options have been taken into account, and possible nuances have also been described.
Video on how to enter the boot device menu
Well, in addition to everything written above, video instructions on how to enter the Boot Menu may be useful to someone.


