For execution Reserve copy servers on Windows 2012 the built-in component is quite sufficient" ". First add the service via " Add Roles and Features Wizard".

2. In the first step, just click " Further".

3. In the archiving configuration, select " Customizable".

4. Check the box next to " System states"This will be quite enough for recovery.

5. Set an archiving schedule.

6. The most convenient and reliable destination is to make a remote network folder, for example, a second domain controller, and in turn back it up to the first one.

7. Next, specify the exact path to network folder.

8. Before completing the wizard, check again that all settings are correct and click " Ready".

9. The created archiving task can be found in the task scheduler along the path: " Task Scheduler Library -> Microsoft -> Windows -> Backup".

10. Also, do not forget to register the user under whom archiving of the system state will be launched in group policy "Default Domain Controller Policy -> Computer Configuration -> Policies -> Windows Configuration-> Security Settings -> Local policies-> Assign user rights -> Log in as a batch job".

Recovery Active Directory must be executed in mode DSRM ("Directory Services Restore Mode" - "Directory Services Restore Mode"). To enable this mode click " F8 "before the start OS to see additional download options.

Another option to get to DSRM : execute command " shutdown -r -o -t 0" For loading OS into diagnostic mode and there you can tell the system to offer additional boot options.


AND last method: use " msconfig"to specify the boot parameters (in our case, select " Safe mode-> Active Directory Recovery"). It must be added that this is the only way to boot into DSRM without the server having the domain controller role.

Let's consider two recovery scenarios:
First when the hardware fails and needs to be completely replaced. In this case, you will need to first install it on new server clean OS the same version, with the same service pack that was on the controller. It is desirable that the browser versions match I.E.. You also need to add the component " Archiving system Windows data Server".
The sequence of actions is as follows:
1. While in mode DSRM
, open the console" Windows Server Backup System"and run the wizard" Restore...".
2. Specify that the archive is in a different location.

3. Next, select the remote shared folder.

4. Select the desired archive.

5. Specify that you want to restore the system state.

6. Select " Original placement"to restore and be sure to check the box" Perform trustworthy recovery of Active Directory files".

7. After the settings have been made, we start the recovery, agreeing with all system warnings.

8. When finished, the server will need to be rebooted. All changes in Active Directory, made after the backup will be automatically replicated from other domain controllers.
According to the second scenario it is necessary to restore accidentally deleted objects Active Directory: users, groups, etc. In this case, the shopping cart functionality is not used in the domain. In this case, we proceed completely according to the first scenario, with the exception of rebooting the server after recovery. Before you do this, launch the console" cmd " with elevated privileges and run the following commands:
ntdsutil -> Activate Instance NTDS -> authoritative restore -> Restore subtree "let_to_object"
For example, to restore all objects in a domain TEST.LOCAL indicate the path " DC=test,DC=local":

This command will disable replication by specified path from other controllers and thus allow objects to be restored Active Directory existing at the time of backup.
Continuing the topic of creating high availability systems, in this material we will look at setting up iSCSI storage in the modern version of server OS from Microsoft. We will not repeat ourselves and discuss again general issues, therefore, if you are just starting to work with iSCSI, we strongly recommend that you read the introductory part to our .
The widespread use of virtualization and the need to create fault-tolerant systems, even with small implementations, have forced Microsoft company reconsider your attitude towards Windows Server roles available out of the box and licensing policies. If previously iSCSI Target was offered only in the edition Windows Storage Server, then starting with Server 2008 R2 it became available as a separately installed component, and with the release of Windows Server 2012 it naturally became part of the OS.
To install a role iSCSI target servers run Add Roles and Features Wizard, then expand the items sequentially File Services and Storage Services - File and iSCSI Services and specify the role of the same name.
 There is no need to reboot the server, and after completing the wizard, you can immediately proceed to setting up the target server. To do this, in the left menu Server Manager select File and Storage Services and go to the section iSCSI.
 To create a new virtual disk, click the appropriate link or select the appropriate item from the menu Tasks, will open Creation Wizard virtual disks iSCSI, which will first ask you to specify the storage location.
 Remember that the performance of the storage disk subsystem must match the expected loads, and you must also ensure that the target server has sufficient throughput network interfaces. We recommend setting aside for storage area networks (SAN) a separate network not connected to the enterprise network.
Next step specify the name and size of the disk to be created. Windows Server 2012 supports new format virtual disks - VHDX, as well as dynamically expanding disks. If previously available fixed-size disks reserved disk space for storage immediately upon creation, dynamically expanding disks increase in size according to the data actually written to them. This allows you to significantly save storage disk space by cutting virtual disks with a reserve.
Not recommended this type disks for systems with high disk activity, since due to possible fragmentation and operations to increment the disk size, performance will be lower than with fixed-size disks. At the same time, dynamically expanding disks are well suited for file storages, backup, etc. tasks where data storage is primarily required, rather than speed of access to it.
Another supported type of disk is differential, when all changes are written not to the original one. virtual disk, but a newly created one is not recommended for use in production environments due to significantly lower performance, but it can be useful for debugging and various kinds of experiments, when you need to be able to quickly roll back to the original state.
 The created virtual disk can be assigned to an existing goal (target) or a new one can be created; in this case, simply specify the name of the target, the IQN will be generated automatically.
 You will then need to specify the initiators who will be allowed access to this target. The initiator's IQN can be viewed on the client; to do this, open Control Panel - Administration - iSCSI Initiator, to the question about automatic start services answer in the affirmative.
 The IQN of the current initiator can be viewed on the tab Configuration:
 But you can do it easier, go to the bookmark End objects and execute Quick connection It will not be possible to connect to the target Server for obvious reasons, but the IQN of the initializer will remain in the server cache.

Let's go back to the server and click the button Add select the initiator's IQN from the cache, for modern systems you can also get the initiator's IQN by connecting to it by IP address or hostname:
 For the remaining steps, leave the default values, after which the wizard will be completed, the virtual disk will be created and assigned to the appropriate target. Now you should connect the created disk to the target system. You can use the function quick connection, then all target drives will be connected with default settings, which is not always correct. So go to the bookmark Detection and press the button Detect Portal:
 Returning to the bookmark End objects and execute manual connection found disks, while pressing the button Additionally, you can independently configure the connection parameters, for example, select network adapter servicing the SAN network.

If you need to change the connection parameters of an already connected object, you should disconnect it and connect it again. After completing all these steps, the connected device will be detected by the system as another local disk and subsequent work with it is no different from working with a regular hard drive.

In Windows Server (2008, r2, 2012, r2) when setting up archiving via GUI There is one big drawback: you have the choice to archive every day or more than once a day. Therefore, you cannot configure data archiving to start on different days. With a large amount of data, copying every day is impossible (the system simply does not have time to complete the copy). Approximately starting from 3 TB.
The system has one 4TB partition with data and two 3TB disks for backup.
Section with data under the letter d:
Backup section f: and e:
Let's start creating a bat file that will start archiving data.
Open Notepad (press the keyboard shortcut windows+r recruiting a team notepad and press enter)
Paste the following command with parameters
wbadmin start backup -backupTarget:f: -include:d:\folder1,d:\folder2 -systemstate -vssFull -quiet
wbadmin- standard archiving application
-backupTarget:f:- the place where the archive will be located (in the first bat file we indicate drive f:)
-include:d:\folder1,d:\folder2- folders in section d: which we will archive
-systemstate - Creates a backup that includes the system state in addition to all other items specified with the -include parameter. (The entire section relating to the system and its state, including the section “reserved by the system”)
-vssFull- Performs full backup using Volume Shadow Copy Service (VSS). The fact of archiving of each file is reflected in the corresponding log. If this option is not used, the "WBADMIN START BACKUP"+B192 command performs a copy backup, but the history of the files being backed up is not updated. Attention! Do not use this option if you are using a product other than Windows Server Backup to back up applications on volumes included in your current backup. This may damage the incremental, differential, or other backup copy created by another product.
-quiet- suppresses all requests for the user
Save the file with the extension .bat
We create a task, say once a week on Saturday, in the scheduler and specify this file.
Now let’s create a second bat file, only now we’ll insert the command with different parameters
wbadmin start backup -backupTarget:e: -include:d:\folder4,d:\folder5 -exclude:d:\folder4\temp -systemstate -vssFull -quiet
This bat file will start archiving two other directories and onto another disk; we will also create a copy of the system (in case the first disk for archiving stops working).
This command uses the -exclude option: d:\folder4\temp(excludes the folder from copying).
Save the file with the extension .bat
We create another task for Sunday in the scheduler and specify this file.
In this article we looked at the archiving method from command line at a time that is convenient for us and used two disks for backup.
This cannot be done through the GUI.
Additional options that may be useful
-exclude- Specifies a list of items to be excluded from archiving, separated by commas. You can include multiple files, folders, or volumes. Volumes can be specified using a drive letter, volume mount point, or GUID-based volume name. If a GUID-based volume name is used, it must end with a backslash (\). When specifying a file path, you can use a wildcard character (*) in the file name. It should only be used in conjunction with the -backupTarget option.
-nonRecurseInclude- Specifies a non-recursive comma-separated list of items to be included in the archive. You can include multiple files, folders, or volumes. Volumes can be specified using a drive letter, volume mount points, or GUID-based volume names. The GUID-based volume name must end with a backslash (\). When specifying a file path, you can use a wildcard character (*) in the file name. It should only be used in conjunction with the -backupTarget option.
-nonRecurseExclude- Specifies a non-recursive list of items to be excluded from archiving, separated by commas. You can include multiple files, folders, or volumes. Volumes can be specified using a drive letter, volume mount point, or GUID-based volume name. The GUID-based volume name must end with a backslash (\). When specifying a file path, you can use a wildcard character (*) in the file name. It should only be used in conjunction with the -backupTarget option.
-hyperv- Specifies a list of components included in the archiving, separated by commas. The identifier can be the name or GUID of the component (with or without curly braces).
-allCritical- Creates a backup that includes all important volumes (important volumes contain files and components operating system) in addition to all other elements specified with the -include parameter. This option is useful when creating a backup for recovery initial state systems. It should only be used in conjunction with the -backupTarget option.
-noVerify- Prevents checking backups written to removable media (such as DVDs) for errors. If this option is not used, backups saved to removable media, are checked for errors.
-user- If the backup is saved to a remote shared folder, specifies a user name with write permission to that folder.
-password- Specifies the password for the username specified for the -user parameter.
-noInheritAcl- Applies permissions from the access control list (ACL) corresponding to the credentials specified by the -user and -password parameters to the folder \\<имя_сервера>\<имя_общей_папки>\WindowsImageBackup\<архивируемый_компьютер>\ (backup folder). To access the backup later, you must use these credentials or be a member of the Administrators or Backup Operators group on the computer with the shared folder. If -noInheritAcl is not used, ACL permissions from the remote shared folder applied to the folder<архивируемый_компьютер>by default, which ensures that every user who has access to the remote shared folder has access to the backup copy.
-vssCopy- Performs copy archiving using VSS. The log of archived files is not updated. This is the default value.
-allowDeleteOldBackups- Overwrites found backups before updating.
It is not necessary to create bat files, you just need to correctly add the command and parameters to the task scheduler.
The archiving system replaced NTBackup with the release of Windows Server 2008 and today is a completely mature and proven product, but many administrators still do not use this OS component, preferring alternative products. There may be both objective reasons for this, and a lack of understanding of the principles of operation of the Windows Server archiving system. Therefore, we decided to address possible knowledge gaps with this article.
We quite often asked our friends system administrators Question: What tools do they use to back up the state of their servers? And they were very surprised that many of them did not even mention the Windows Server archiving system. To the next question: why don't they use this tool, we often received the answer that they do not understand how this system works, how to manage backups, etc., etc. In part, the reason can be called valid; when there is no understanding of how this or that product works, it is better to refuse to use it.
Better yet, figure out how it works and start putting it into practice. IN new system archiving, many expect to see a successor to the familiar NTBackup, but Microsoft has completely redesigned the backup mechanism and we have a completely different tool. The main storage for backup copies is a disk, which is independently marked by the archiving system and hidden from the user. You can also use an already partitioned volume or network resource, however, these methods have their limitations and negate all the advantages of the new technology.
The new archiving system independently manages the backup process, creating primary and additional copies of data, as well as their retention period. This is one of the main difficulties that arises when using a new tool. Many administrators are accustomed to explicitly specifying the type created archive, their quantity and shelf life, therefore, not finding the necessary options here, they make hasty and incorrect conclusions.
With Windows Server Backup, you give the service an entire disk and it manages the storage process as it sees fit. Is it good or bad? In our opinion - good. Because quite often there are situations when the administrator incorrectly estimates the size of the disk space required to store copies or there is a sharp jump in the volume of archived data. In this case, there is a very high probability that the backup service will fail due to lack of free space at the most inopportune moment.
Windows Server takes a fundamentally different approach. The easiest way to draw an analogy is with video surveillance systems, when a stream is continuously written to disk and at any given time we have a certain recording duration determined by the disk capacity. Let's say we installed a 500 GB disk - we have a week of video, replaced it with 1 TB - two weeks, etc.
The backup service works in a similar way, writing copies to disk until free space is exhausted, then overwriting the oldest copies. This way, you will always have a constant backup depth, limited only by disk space; even a sharp increase in the copied data will not lead to negative consequences, only the number of available copies will be reduced.
 Another difficulty arises here. Many administrators associate the word disk only with a physical hard drive, after which a lot of questions immediately arise: where to get so many disks, how to connect them to servers, how to ensure that archives are stored separately from the system, etc. and so on. Yes, and allocating even a 500 GB disk for backup of a member server looks somewhat wasteful. Therefore, it’s time to remember about technology that allows you to immediately solve the entire layer of “problems”.
Really, this technology today they support all systems, including even NAS price category slightly higher than the initial one, which allows you to wisely manage the available disk space and organize the storage of archives separately from the systems. Microsoft recommends having 1.5 times more disk space to store two copies of data; in our opinion, this figure is somewhat overestimated, especially if you are copying data that rarely changes, for example, server state.
We'll jump ahead a little and show the result of archiving test server with a volume of archived data of 29 GB:
 As you can see, eight copies of the system state took up approximately 9 GB, which is quite good, and the total volume of the 60 GB iSCSI disk we allocated is enough for about three weeks of storing daily copies, which in our opinion is more than enough.
To create backup copies, the Volume Shadow Copy (VSS) mechanism is used, which allows you to work with open and system files without interrupting the operation of the system and users. Starting with Windows Server 2012, the archiving system also allows you to archive virtual Hyper-V machines and restore their condition separately. When using other software on the server that uses shadow copy capabilities, the archiving system has the ability to save the VSS log, which will ensure the correct operation of these services during recovery.
Separately, you should touch on database backups, if with products that support shadow copying, such as MS SQL Server or Exchange, there are no problems, then problems may arise with third-party products, for example, PostgreSQL. The shadow copy mechanism does not check the logical integrity of files, simply taking a snapshot of their state on certain moment time, systems that support VSS are able to handle this moment, bringing the database to a consistent state before the moment of creating a shadow copy. For unsupported systems, we will simply receive a slice of the database for a certain state of time; when restoring such a database, it will be brought to a consistent state using the DBMS, in other words, all pending transactions will be canceled and data loss may occur.
Based on the above, we can conclude that the Windows backup system is well suited for creating backup copies of the system and user data, as well as “native” services and applications. To archive complex third-party software, it is better to use the tools provided by the manufacturer of this software.
In order to start using the Windows Server archiving system, you first need to install the component of the same name, this is done through Add Roles and Features Wizard.
 The service management snap-in can then be launched either through Facilities V Server Manager, or through a shortcut in Control Panel - Administration.
 The equipment is absolutely typical for Windows Services Server and does not cause any difficulties when working with it.
 A quick glance at the screen immediately allows you to assess the current settings and status of the service; the available actions are concentrated on the right. There are a few of them: One-time archiving, scheduled archiving and recovery. We are primarily interested in the schedule, although one-time archiving is also a rather convenient tool that allows you to quickly make a copy of the server state before any potentially dangerous actions, so that you can roll back to their very beginning.
Pressing Archiving schedule we will launch the wizard of the same name, which offers us to archive the entire server, or specify objects for selective archiving.
 We will always have time to archive everything at once, so we will choose a custom archiving type. The next step will be asking us to select objects for archiving.

To add them just click Add elements.
 If you select Restoring the system to its original state, then they will be automatically added State of the system, system partition (drive C:) and service partition with bootloader. For educational purposes, we added to this data a folder with MS SQL databases, which should represent some user data.
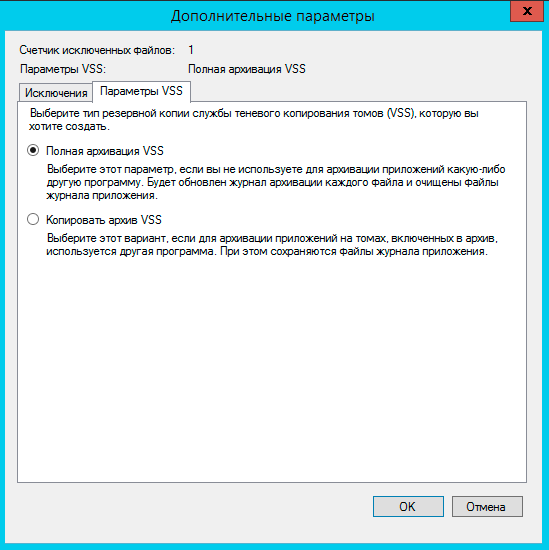
 And also set the parameters of the shadow copy service if you have applications that use this service, for example, MS SQL Server, then you should select the Copy VSS log setting, which will ensure their normal interaction with the shadow copy service, including during recovery.
Then you will need to create a schedule, the task is extremely simple, you can run archiving either once or several times a day, the minimum interval step is half an hour.
 We've sorted out the schedule, now it's time to decide on the storage location for the archives. There are three options to choose from, each of them is quite well commented, which makes it easier right choice:
 As we have already said, it is optimal to allocate an entire disk for archiving; we recommend using iSCSI disks for this purpose, which allows you to solve two main problems at once: optimally use disk space and store archives separately from the system.
It is worth mentioning the possibility of placing an archive in a network folder; despite strict restrictions, this method is convenient to use for one-time archiving, when you need to quickly create an archive and place it outside the server.
If you select a disk, it will be formatted and hidden, this provides additional protection from possible destructive influences, for example, encryption Trojans.

At the last step, you should once again make sure that the settings made are correct and confirm them by pressing the button Ready.
 Now all that remains is to wait for the specified time and make sure that the archiving process was completed without failures. When creating a schedule, you should take into account the load on the network and disk storage subsystem, which may lead to a decrease in their performance.
After the backup has been created, it would be a good idea to check the possibility of restoring from it. To do this, select the action of the same name in the snap-in, and this will launch Recovery Wizard, which will first ask you to indicate the location of the archive:
 Then we indicate the date and time the backup was created to which we want to roll back; the available dates are highlighted in bold.
 Then we indicate what exactly we want to restore:
 As you can see, these can be files and folders, virtual machines Hyper-V, volumes, applications and system state. Special mention should be made of applications. This feature is only available to applications registered with the archiving system, which must be able to work with the service's API and support VSS. Simply put, this list includes a limited number of programs, mainly from Microsoft itself, and for third-party software this function is useless.
At the same time, it is difficult to overestimate the possibility of system state recovery, which allows you to roll back the state of the OS without affecting user data. This is very helpful in situations where some time has passed between making changes to the system and identifying their negative effect.
Restoring the system state is carried out in two stages, each of which ends with a reboot.

Moreover, the second stage looks like a normal OS boot and does not display any messages, simply rebooting after a while. It may seem like there was an error or failure, but this is not the case.

Therefore, you just need to be patient and wait for the message about the successful completion of the operation. Depending on network speed, disk performance, and data volume, this operation may take a significant amount of time.
 An alternative to a system state restore is a volume-level restore, which will destroy all data and return the volume to the state it was in on the specified date. This can be useful in the event of a virus incident where you want to ensure that no malware remains on the system, or in cases where the original volume has been damaged.
Overall, this operation is no different from restoring a volume from an image using any other software, for example, Acronis.
 When restoring folders and files, you can flexibly manage the recovery parameters, for example, by saving both versions of the file: the current and the restored one, this is useful in cases where the file was accidentally overwritten, but the result of the current work is also needed. During recovery, you can also restore all access rights to files and folders, which is important if you have a complex rights assignment system.
 As you can see, the Windows Server backup system is a very functional and convenient tool that allows for successful data recovery at any level and at the same time relieving the administrator of a significant part of the worries of managing this process. So if you are not already using this system archiving, then after reading this material it’s time to take a closer look at it.
Tags:
The archiving system replaced NTBackup with the release of Windows Server 2008 and today is a completely mature and proven product, but many administrators still do not use this OS component, preferring alternative products. There may be both objective reasons for this, and a lack of understanding of the principles of operation of the Windows Server archiving system. Therefore, we decided to address possible knowledge gaps with this article.
We quite often asked the system administrators we know: what tools do they use to backup the state of their servers? And they were very surprised that many of them did not even mention the Windows Server archiving system. To the next question: why don't they use this tool, we often received the answer that they do not understand how this system works, how to manage backups, etc., etc. In part, the reason can be called valid; when there is no understanding of how this or that product works, it is better to refuse to use it.
Better yet, figure out how it works and start putting it into practice. In the new archiving system, many expect to see a successor to the familiar NTBackup, but Microsoft has completely redesigned the mechanism for creating backup copies and we have a completely different tool. The main storage for backup copies is a disk, which is independently marked by the archiving system and hidden from the user. You can also use an already mapped volume or network resource, however, these methods have their limitations and negate all the advantages of the new technology.
The new archiving system independently manages the backup process, creating primary and additional copies of data, as well as their retention period. This is one of the main difficulties that arises when using a new tool. Many administrators are accustomed to explicitly specifying the type of archive being created, their number and storage period, so if they do not find the necessary options here, they make hasty and incorrect conclusions.
With Windows Server Backup, you give the service an entire disk and it manages the storage process as it sees fit. Is it good or bad? In our opinion - good. Because quite often there are situations when the administrator incorrectly estimates the size of the disk space required to store copies or there is a sharp jump in the volume of archived data. In this case, there is a very high probability that the backup service will fail due to lack of free space at the most inopportune moment.
Windows Server takes a fundamentally different approach. The easiest way to draw an analogy is with video surveillance systems, when a stream is continuously written to disk and at any given time we have a certain recording duration determined by the disk capacity. Let's say we installed a 500 GB disk - we have a week of video, replaced it with 1 TB - two weeks, etc.
The backup service works in a similar way, writing copies to disk until free space is exhausted, then overwriting the oldest copies. This way, you will always have a constant backup depth, limited only by disk space; even a sharp increase in the copied data will not lead to negative consequences, only the number of available copies will be reduced.
Another difficulty arises here. Many administrators associate the word disk only with a physical hard drive, after which a lot of questions immediately arise: where to get so many disks, how to connect them to servers, how to ensure that archives are stored separately from the system, etc. and so on. Yes, and allocating even a 500 GB disk for backup of a member server looks somewhat wasteful. Therefore, it’s time to remember about iSCSI technology, which allows you to immediately solve the entire layer of “problems”.
Indeed, this technology is supported today by all systems, including even NAS in a price category slightly higher than the entry level, which allows you to wisely manage the available disk space and organize the storage of archives separately from the systems. Microsoft recommends having 1.5 times more disk space to store two copies of data; in our opinion, this figure is somewhat overestimated, especially if you are copying data that rarely changes, for example, server state.
We'll jump ahead a little and show the result of archiving a test server with a volume of archived data of 29 GB:
As you can see, eight copies of the system state took up approximately 9 GB, which is quite good, and the total volume of the 60 GB iSCSI disk we allocated is enough for about three weeks of storing daily copies, which in our opinion is more than enough.
To create backups, the volume shadow copy (VSS) mechanism is used, which allows you to work with open and system files without interrupting the work of the system and users. Starting with Windows Server 2012, the backup system also allows you to backup Hyper-V virtual machines running on the host and restore their state individually. When using other software on the server that uses shadow copy capabilities, the archiving system has the ability to save the VSS log, which will ensure the correct operation of these services during recovery.
Separately, we should touch upon database backups; if there are no problems with products that support shadow copying, such as MS SQL Server or Exchange, problems may arise with third-party products, for example, PostgreSQL. The shadow copy mechanism does not check the logical integrity of files, simply taking a snapshot of their state at a certain point in time; systems that support VSS are able to handle this moment, bringing the database to a consistent state before the moment the shadow copy is created. For unsupported systems, we will simply receive a slice of the database for a certain state of time; when restoring such a database, it will be brought to a consistent state using the DBMS, in other words, all pending transactions will be canceled and data loss may occur.
Based on the above, we can conclude that the Windows backup system is well suited for creating backup copies of the system and user data, as well as “native” services and applications. To archive complex third-party software, it is better to use the tools provided by the manufacturer of this software.
In order to start using the Windows Server archiving system, you first need to install the component of the same name, this is done through Add Roles and Features Wizard.
The service management snap-in can then be launched either through Facilities V Server Manager, or through a shortcut in Control Panel - Administration.
The equipment is absolutely typical for Windows Server services and does not cause any difficulties when working with it.
A quick glance at the screen immediately allows you to assess the current settings and status of the service; the available actions are concentrated on the right. There are a few of them: One-time archiving, scheduled archiving and recovery. We are primarily interested in the schedule, although one-time archiving is also a rather convenient tool that allows you to quickly make a copy of the server state before any potentially dangerous actions, so that you can roll back to their very beginning.
Pressing Archiving schedule we will launch the wizard of the same name, which offers us to archive the entire server, or specify objects for selective archiving.

We will always have time to archive everything at once, so we will choose a custom archiving type. The next step will be asking us to select objects for archiving.

To add them just click Add elements.

If you select Restoring the system to its original state, then they will be automatically addedState of the system, system partition (drive C:) and service partition with bootloader. For educational purposes, we added to this data a folder with MS SQL databases, which should represent some user data.

And also set the parameters of the shadow copy service; if you have applications that use this service, for example, MS SQL Server, then you should select the Copy VSS log setting, which will ensure their normal interaction with the shadow copy service, including during recovery.
Then you will need to create a schedule, the task is extremely simple, you can run archiving either once or several times a day, the minimum interval step is half an hour.
We've sorted out the schedule, now it's time to decide on the storage location for the archives. There are three options to choose from, each of them is quite well commented, which makes the right choice easier:

As we have already said, it is optimal to allocate an entire disk for archiving; we recommend using iSCSI disks for this purpose, which allows you to solve two main problems at once: optimally use disk space and store archives separately from the system.
It is worth mentioning the possibility of placing an archive in a network folder; despite strict restrictions, this method is convenient to use for one-time archiving, when you need to quickly create an archive and place it outside the server.
If you select a disk, it will be formatted and hidden, this provides additional protection from possible destructive influences, for example, encryption Trojans.

At the last step, you should once again make sure that the settings made are correct and confirm them by pressing the button Ready.
Now all that remains is to wait for the specified time and make sure that the archiving process was completed without failures. When creating a schedule, you should take into account the load on the network and disk storage subsystem, which may lead to a decrease in their performance.
After the backup has been created, it would be a good idea to check the possibility of restoring from it. To do this, select the action of the same name in the snap-in, and this will launch Recovery Wizard, which will first ask you to indicate the location of the archive:

Then we indicate the date and time the backup was created to which we want to roll back; the available dates are highlighted in bold.

Then we indicate what exactly we want to restore:

As you can see, these can be files and folders, Hyper-V virtual machines, volumes, applications and system state. Special mention should be made of applications. This feature is only available to applications registered with the archiving system, which must be able to work with the service's API and support VSS. Simply put, this list includes a limited number of programs, mainly from Microsoft itself, and for third-party software this function is useless.
At the same time, it is difficult to overestimate the possibility of system state recovery, which allows you to roll back the state of the OS without affecting user data. This is very helpful in situations where some time has passed between making changes to the system and identifying their negative effect.
Restoring the system state is carried out in two stages, each of which ends with a reboot.

Moreover, the second stage looks like a normal OS boot and does not display any messages, simply rebooting after a while. It may seem like there was an error or failure, but this is not the case.
Therefore, you just need to be patient and wait for the message about the successful completion of the operation. Depending on network speed, disk performance, and data volume, this operation may take a significant amount of time.

An alternative to a system state restore is a volume-level restore, which will destroy all data and return the volume to the state it was in on the specified date. This can be useful in the event of a virus incident where you want to ensure that no malware remains on the system, or in cases where the original volume has been damaged.
In general, this operation is no different from restoring a volume from an image using any other software, for example, Acronis.

When restoring folders and files, you can flexibly manage the recovery parameters, for example, by saving both versions of the file: the current and the restored one, this is useful in cases where the file was accidentally overwritten, but the result of the current work is also needed. During recovery, you can also restore all access rights to files and folders, which is important if you have a complex rights assignment system.
As you can see, the Windows Server backup system is a very functional and convenient tool that allows for successful data recovery at any level and at the same time relieving the administrator of a significant part of the worries of managing this process. Therefore, if you are not yet using this archiving system, then after reading this material it’s time to take a closer look at it.


