There is no need to explain that personal data or files stored on USB drives should sometimes be kept under lock and key. In this regard, many users have a logical question about how to password-protect a flash drive, and in such a way that even an experienced hacker cannot get to the information. To perform such operations, there are several basic methods, which will be discussed further.
How to password protect a flash drive: main directions of action
Regarding blocking access to information on a USB drive, modern technologies Several main priorities can be identified. For example, you can set an access password to the device itself (hardware or software) or encrypt files.
Of course, if the user initially purchases a device that is already equipped with a special hardware protection system, you can immediately set an access code that will need to be entered when trying to view or open information. But such devices are not cheap, so further they will be considered exclusively software methods and allowing you to protect information on regular Flash drives.
Protection of office and other documents
The question of how to password protect a flash drive without programs (meaning specialized utilities), which interests most modern users, in the simplest case can be partially resolved by installing protection on office documents when saving them or on other files.

In the first case, when using applications like World or Excel, in the file menu when saving, you can use the service section, where you select the options menu, and then go to the security tab. Here you can enter a password, and then save the file on removable media or copy it there later.

In the case of operations with other files, the security issue is resolved using a small program Anvide Lock Folder, which can set passwords for individual files and folders. It is small in size and has a user-friendly interface, making it an ideal tool for all novice users.
Setting passwords for archives
No less simple method on the question of how to password-protect a flash drive, which helps to get a partial solution to more common problem, is the storage of data in packaged archival form.

When creating them, any modern archiver allows you to set a security code or any other combination that will be required when trying to unpack the desired archive. Of course, the question of how to open a password-protected flash drive in this way can be solved quite simply (if you use password guessing utilities or view the contents of the archive in some editors). However, such actions are not considered for obvious reasons.
Using the BitLocker utility
Now let's move directly to the main problem of how to password-protect a flash drive (namely the device itself, and not the files on it). Owners of versions of Windows version seven, in particular the Enterprise and Ultimate modifications, or systems of a higher rank, are incredibly lucky. The operating system itself has a built-in tool called BitLocker.

To carry out the necessary actions, insert the flash drive into the appropriate port of the computer or laptop, then in Explorer, right-click on the device and select the BitLocker line. In the new window, check the box for using a password to unlock it and enter the combination you created. Next, the application will create a special key in case the user forgets his password, which can be saved on a hard drive or printed on a printer. After this, select the part that needs to be encrypted (it is better to use the full encryption method), and activate the start of the process. Upon completion in file manager An image of a lock will appear on the device.
A program to password protect a flash drive, Rohos Mini Drive
One of the most advanced utilities of this type is the Rohos program. Mini Drive. The principle of its operation is that it does not encrypt the entire device, but, as it were, creates a kind of secret section on it, in which the encrypted data will be located. Unfortunately, it also has some limitations due to the fact that a drive with a capacity of more than 2 GB cannot be encrypted, but it is possible to create a partition of such a volume.

Everything is simple here. We install and run the program, after which, with a flash drive inserted into the port, select the creation of an encrypted USB drive, then enter the password and indicate the size of the encrypted partition, after which we press the button to start the encryption process.
TrueCrypt, MyFolder and USB Safeguard applications
There are many more programs to protect USB drives programmatically. For example, the USB Safeguard application is installed directly on the storage medium, but the free version has a capacity limit of 2 GB. Therefore, to fully encrypt devices with large volumes, you need to use a paid modification.

In addition, the utility is installed exclusively in file system NTFS, therefore, if the flash drive has FAT32, it will have to be reformatted (the program itself will inform you about the need for such actions).
The other two applications also look quite interesting, but TrueCrypt has a rather complex interface that an untrained user may not understand the first time, but it is stable and reliable in terms of encryption. The second utility is very simple, but it encrypts only individual objects and uses the Blowfish block encryption algorithm with a variable key length, which is questionable in terms of reliability.
Using passwords for removable memory cards on mobile devices
Finally, a few words about how to password-protect a flash drive on Android. There are several ways here. For example, you can use the methods described above when connecting an SD card to a computer.

However, such actions can also be performed through the menu themselves. mobile devices(some Samsung models have this function, and you can find it through location and security in the personal data storage section, where the access combination is set). If, after encryption, the question arises of how to open a password-protected Micro-SD flash drive on another device, there will be nothing left but to enter the password, since the information on it simply will not be visible.
On the other hand, this feature is not available on all gadgets, so it is better to use third-party software. The crux of the matter here is that you won’t be able to open the device even if you have a valid password without installing a decryptor.
Password recovery
Finally, let’s look at another burning issue related to recovering passwords used to protect removable media. In the simplest case, in order to gain free access to the device, you can format it, but in this case all data will be lost. Naturally, if you use programs like R.Saver, you can restore information, but the process will take a long time.
To protect yourself from such situations, even if you lose your password, you can use recovery keys similar to those provided in the BitLocker program.
True, some repair shops mobile technology, offer such services, and use special devices called unlockers as tools. This is a device, not a program, and it costs about 10-20 US dollars. But, just like software interference, the use of unlockers is fraught with completely unpredictable consequences. By the way, using applications to select passwords and combinations is also not recommended.
A flash drive is a very strange object: here it is, but suddenly it’s gone... Like any small things, USB flash drives are easily lost. Along with them, information leaks out that may not be intended for prying eyes and ears. To prevent your files from being opened by strangers, protect them with a password, or even better, encrypt them.
You can put a password on the flash drive different ways- how to use specialized software, and using Windows tools without third party programs. Let's consider both.
On many computers running Windows control There is a WinRAR archiver, and it has a function for setting a password for the archive. If packing and unpacking files on a portable drive will not take too much time, more convenient way you won't find it.
To set a password for WinRAR archive, do the following:
- Connect the flash drive to the USB port of your PC and open the “Computer” folder.
- Right-click the context menu of the flash drive and select the “add to archive” option, marked with the WinRAR icon.

- On the General tab, click the Set password button.

- Enter the code word in the marked field and click OK. Optionally, check the “show password” and “encrypt file names” checkboxes.

After this, all your data will be moved to the archive, and each time you open it you will have to enter a password. You can access the contents of the drive on any machine where the archiver program is installed. By the way, not only WinRAR, but also any other with similar functions. For example, 7-zip.
The advantages of using WinRAR to protect removable media are not only its simplicity and widespread use, but also the fact that it can be used to set a password on a separate folder or file. The disadvantage is that the archiving method is convenient only if there is a small amount of information on a removable disk, otherwise the process of unpacking and packing will be too long.
BitLocker Windows
BitLocker encryption is designed to protect information stored on desktop and portable drives of Windows computers and is part of the operating system itself. The technology is very reliable and easy for the user, but is not implemented in all, but only in server, professional, corporate and maximum editions of the system. And this is perhaps its most significant drawback. On a PC where, for example, Windows Home is installed, there is no way to open an encrypted disk. And the funds for separate installation Microsoft does not offer Bitlocker for home OSes.
Using BitLocker to protect flash drives is justified only if you are going to work with them on machines with the above-mentioned versions of Windows, as well as Linux and Mac OS X. For the latter two systems, there is a utility developed by enthusiasts that allows you to open and view encrypted drives, but does not allow you to encrypt them.
How to protect a USB device with BitLocker:
- Connect the USB flash drive to your PC and open the list of drives in Windows Explorer(go to the “Computer” folder).
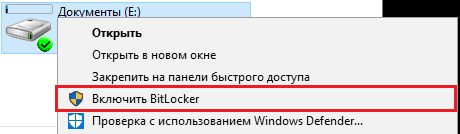
- Open the context menu of the flash drive and select the “Enable BitLocker” option.
- The first thing the system will offer you is to choose a method for unlocking the media. The only one for home users suitable option- password. Enter it in the field provided, repeat and click Next.

- Next, determine how it is more convenient for you to store the recovery key, which you will need to access data in case you lose your password.

- Next, specify which part of the drive should be encrypted.

- In the next window, select the encryption mode. Portable drives that will be used in different versions operating systems, compatibility mode will do.

- The last step is to confirm your intention - click “Start encryption”.

The encryption operation will last several minutes, after which the contents of the flash drive will be accessible only with a password. Every new object, which you save on it will also be automatically encrypted.
The strengths of BitLocker are its highly hack-resistant algorithm, no need to install third-party software, and ease of use. Disadvantages - inability to encrypt separate file or a folder of the user’s choosing (only a section or the entire drive) and a limited area of use.
CyberSafe Top Secret
The CyberSafe Top Secret application, according to experts, is one of the best means of encrypting data on desktop and portable storage devices. Available in several versions - from free to expensive corporate ones. For personal use, in particular, encrypting flash drives, the free version or one of the inexpensive paid ones with an expanded set of functions is sufficient.
CyberSafe Top Secret Free allows you to encrypt files, containers, disk partitions and removable media using the DES algorithm with a 64-bit key length (password length limit is 4 characters). Paid versions use more robust algorithms - AES-256 and BlowFish-448, and also support electronic digital signatures, allow you to hide files and folders, compress data to save space, etc. Full list of features different versions utilities can be found on the official website.
To protect information on a flash drive with CyberSafe Top Secret, just move your fingers a little:
- Open the flash drive in the application as a disk partition: in the left panel, select “Encrypt disk”, select the desired media and click “Create”.

- Next we set the encryption algorithm and password; determine whether to save the file system or not (if not, the drive will be formatted); we indicate which area should be encrypted - only the occupied space or all available space. After clicking “Accept”, the program will begin the encryption process.

You can only open an encrypted flash drive on a computer where CyberSafe Top Secret is installed. Other PCs will see it as media with an unknown file system.
To get rid of encryption, just format the flash drive in any program.
The advantages of CyberSafe Top Secret are power, functionality, free, the ability to encrypt individual folders and files, and no disk space limitations. The disadvantage is the inability to use a flash drive on a PC that does not have this program.
USB Safeguard
The free version of the USB Safeguard utility allows you to protect flash drives with a capacity of up to 4 GB. Unlike CyberSafe Top Secret, it does not need to be installed on your computer. You need to run it directly from the device that it will “protect.”
USB Safeguard does not have a Russian-language interface, but it is very easy to use:
- Copy the utility to removable media and launch by double clicking. Administrator rights are not needed - the program will work even on machines where you do not have administrative rights.
- After the first launch, USB Safeguard may prompt you to format the flash drive. If you refuse, protection will be impossible, since the utility only supports file NTFS system.
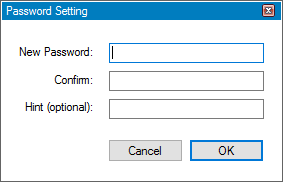
- After formatting and restarting USB Safeguard, a window will open asking you to set a password to access the drive files. In the “New password” field, enter the code word, in the “Confirm” field - repeat it, in the “Hint” - specify a reminder hint.
Now the utility will ask for a password every time you connect a flash drive to your PC.

The advantages of USB Safeguard are that there is no need for installation and the ability to open a protected flash drive on any computer. Disadvantages - the device capacity is limited to four gigabytes and only supports the NTFS file system.
Lockngo
The principle of operation of the Lockngo utility is reminiscent of USB Safeguard, however, it has no restrictions on disk space and has a Russian language. You can use it to protect any portable drives, and not only those with a USB interface.
The program is focused on Windows users and Mac - supports file systems of both OSes. Available in versions compatible with Windows only, Mac only, or both. It has the functions of hiding files on protected media, blocking access to it with one click, automatic blocking when the user is inactive, encrypting data in a private directory (uses the AES-256 algorithm), launching the selected program after unlocking.
Lockngo is a paid but very affordable utility. The price of one license, depending on the version, is 200-500 rubles.
How to use Lockngo:
- Transfer the downloaded Lockngo.exe file to the USB flash drive and run it. Enter the unlock password and its confirmation in the specified fields. After clicking OK, the program will lock the drive.

- To resume access to data, enter the same password in the form.

Lockngo's strengths are simplicity, functionality, fast and efficient operation. There is, perhaps, only one drawback - the lack of opportunity to test it before purchasing (the developer does not release trial versions). But overall, the program is very good, and you really don’t mind paying some 200 rubles for it.
USB flash drives are small, portable and universal devices storage Flash drives are very convenient for transferring data between computers. However, due to their portability and compact size, USB media can be easily lost. Therefore, you need to take care of reliable protection data on a flash drive.
Unfortunately, you can't simply set a password on the entire drive like you can with a smartphone or computer. For enhanced protection your files need to be encrypted. If you do not wish to purchase separately safe device flash memory with hardware encryption, you can use free software to get a similar level of security.
In this article we have presented several simple ways to protect files and folders on a USB flash drive.

If you need to protect only individual important documents, and you do not need to encrypt entire folders, then you can simply limit yourself to installing password protection for individual files.
Many programs, including Word and Excel, allow you to save files with a password.
For example, when the required document is opened in text editor Microsoft Word, you can go to the menu File > Details, select item Document protection and option Encrypt with password.
All that remains is to ask secure password and confirm its installation. Be sure to save the document and be sure to remember or write down the password.

Download portable version VeraCrypt and extract it to a USB drive. When you launch the application, a list of available drive letters will be displayed. Select a letter and press Create Volume
To create a virtual encrypted disk inside a file, select the option Create an encrypted file container and click "Next".
On next step you can select the volume type: regular or hidden. Using a hidden volume reduces the risk of someone forcing you to reveal your password. In our example, we will create a regular volume. Next, select the location of the encrypted volume – a removable USB drive.
Configure encryption and specify the volume size (must not exceed the size of a USB drive). Then select the encryption and hash algorithm, you can use the default settings. Then set your volume password. In the next step, your random mouse movements will determine the cryptographic strength of the encryption.
Once encryption is complete, each time you connect the USB drive to any computer, you can run the VeraCrypt hosted on it and mount the encrypted file container to gain access to the data.

VeraCrypt supports encryption of entire partitions and storage devices.
Download VeraCrypt and install the program on your PC. When you launch the application, a list of available drive letters will be displayed. Select a letter and press Create Volume. The VeraCrypt Volume Creation Wizard will launch.
To encrypt the entire USB drive, select the option Encrypt a non-system partition/drive and click "Next".
In the next step, you can select the volume type: regular or hidden. Using a hidden volume reduces the risk of someone forcing you to reveal your password.
On the next screen of the wizard you need to select the device, i.e. our removable USB disk, and then click "OK" and "Next".

In our example, we will create a regular volume. On the next screen of the wizard you need to select the device, i.e. our removable USB drive, and then click “OK” and “Next”.
To encrypt the entire USB drive, select Encrypt the partition in place and click "Next". VeraCrypt will warn you that you must have backup copy data – if something goes wrong during encryption, you can restore access to your files. Then select the encryption and hash algorithm, you can use the default settings. Then set your volume password. In the next step, your random mouse movements will determine the cryptographic strength of the encryption.

Then select the cleaning mode. The more rewrite cycles, the more reliable the cleaning. In the final step, select Encryption to start the encryption process.
After encryption is complete, each time you connect the USB drive to your computer, you will need to mount it with using VeraCrypt to gain access to the data.

Many modern archivers, including the free 7-Zip, support AES-256 encryption and password protection of files.
Install 7-Zip then click right click mouse over a file or folder on your USB drive and select 7-Zip > Add to archive. In the "Add to Archive" window, select the archive format and set a password. Click "OK" to begin the archiving and encryption process.
Found a typo? Highlight and press Ctrl + Enter
If your USB drive doesn't have encryption software pre-installed, the easiest way is to use the Windows BitLocker tool. To do this, right-click on the drive partition, select “Enable BitLocker” and set a password. If this item is not in context menu, activate the utility through “Control Panel” - “System and Security” - “BitLocker Drive Encryption”. Unfortunately, the program is not available for everyone Windows versions(Windows 7 Home Premium doesn't have it, for example), but you can use third-party software to encrypt USB drives.
CyberSafe Top Secret
The CyberSafe Top Secret program is used not only to protect USB flash drives, but also to encrypt files and folders, hard drives, emails and so on. To set a password on the drive, the free version of the application is enough. main feature method: you can open a flash drive protected in CyberSafe Top Secret only on the computer on which this program is installed. Other devices do not recognize the file system of the secure USB storage device.
1. Install the CyberSafe Top Secret application on your computer. In the side menu, select “Encrypt partition”, find your flash drive in the list and click “Create”.
2. A window will open in which you need to set a password for the USB drive and define the file system. Be careful: if you change the file system of the flash drive, it will be formatted. We recommend that you back up your disk data before encrypting it.
 3.
You can also specify how much memory will be accessible without a password. By default, protection is applied to all partitions of the drive at once. To change this, uncheck “Use all available size devices" and set the required restriction.
3.
You can also specify how much memory will be accessible without a password. By default, protection is applied to all partitions of the drive at once. To change this, uncheck “Use all available size devices" and set the required restriction.
USB Safeguard
The free version of the USB Safeguard program allows you to set a password on flash drives up to 4 GB. You must run the utility directly from the drive. If your flash drive has a FAT file system, the program will offer to format it to NTFS, so be sure to back up your data before encrypting the drive.
1. Install the program from the flash drive by clicking “Next” as usual. If you are prompted to format to NTFS, agree. In the window that appears, enter a password that will protect the flash drive and a hint.
 |
 |
 |
2. The program will prompt you to specify the letter of the virtual disk, which will become a mirror of the encrypted drive. Now, when you connect a flash drive, a protected partition will appear in the list of disks, access to which will only be possible with a password.
Rohos Mini Drive
Another free program for encrypting USB drives is Rohos Mini Drive. The application selects a section on the flash drive that will be accessible on any PC after entering the password.
1. Download and install Rohos Mini Drive. In the main program window, select “Encrypt USB drive”.
 2.
Set a password and configure the parameters of the protected disk: its size, file system, encryption algorithm and letter. You can encrypt all or part of the memory.
2.
Set a password and configure the parameters of the protected disk: its size, file system, encryption algorithm and letter. You can encrypt all or part of the memory.
The use of flash media for storing information is gaining increasing popularity, because they have a number of undeniable advantages over outdated CDs and DVD discs. The flash drive does not take up much space, is easy to use and has a fairly large amount of memory. That is why the question: how to put a password on a flash drive is relevant these days. After all, it can store personal data, important documents and, in general, any other information that you would not want to show to other people.
In this article I will tell you how to put a password on a flash drive using the built-in BitLocker program, or using the free one USB program Safeguard.
BitLocker
You can set a password on a flash drive using the built-in Windows tools. The BitLocker program is used for this. Go to the “My Computer” folder and right-click on the flash drive on which we will set a password. Now in the context menu select the item "Enable BitLocker".
If you didn’t find this item in the context menu, it doesn’t matter. Go to “Start” - "Control Panel".

In the upper right corner, select “View” - “Category”. Then follow the link "System and safety".

In the next list, select the item "BitLocker Drive Encryption".

Select the disk partition that corresponds to the flash drive, I have it (G:), and click on the button opposite it "Enable BitLocker".

In the window that opens, put a tick next to the item "Use a password to unlock the drive". Next, enter the created password, the length of which must be at least 8 characters, otherwise the program will not allow you to continue, and click “Next”.

In the next window, the program offers to save the disk recovery key, this is in case you forget the password. Select an item "Save the recovery key to a file" and select a location on the computer where it will be stored. It’s better if this is the folder where people go least often. Click "Next".


Do not remove the flash drive during encryption. My 1GB flash drive was half full and took 3 minutes to encrypt. Therefore, if your flash drive is larger, be prepared that the process will take a little time.

Now, the flash drive is password protected. Every time you plug it into your computer, a golden padlock will appear next to the disk. We open the flash drive and see that the BitLocker program asks for a password. Enter it and click "Unlock". When the flash drive is unlocked, a silver padlock will appear in the My Computer folder next to it.

If you want to delete or change the password on a flash drive, right-click on it and select from the context menu "BitLocker Management". The following window appears in which you can perform several necessary actions.

USB Safeguard
The USB Safeguard program allows you to set a password on a flash drive. Its clear functionality is suitable for both advanced and novice users. You can download USB Safeguard from the official website: http://www.usbsafeguard.com/download.html. You will be offered two versions to download. The first one is free, suitable for those who have a flash drive up to 2 GB. The second is a paid one, it allows you to set a password on a flash drive, the volume of which does not exceed 16 terabytes.
I will install the first - free - version. I click on the “Download now” button and save the installation file.

Now copy the downloaded installation file to the root of the flash drive and run it from the flash drive. The installation of the program is carried out as usual: constantly click “Next”, then “Finish”. Considering that most flash drives are in FAT format, during the installation process the program will offer to format it in NTFS - we agree. Please note that formatting will delete all files from the flash drive, so it is better to copy everything to your computer in advance.


In the next window you need to enter the password for the flash drive. We come up with it, enter it, confirm, in the last field you can enter a hint, you will see it if you forget the password. Click "OK".

Now remove the flash drive and insert it back into the computer. Open it and run the file “USBSafeguard”.


That is, the program creates another protected one on the flash drive. virtual disk Z:. The capacity of this disk is the same as the capacity of a flash drive. When writing a file to the Z: drive, the space on the flash drive will also decrease.
Files that you do not want to protect access to, simply copy directly to the flash drive: in my case it is the G: drive. If you want the file to be protected, copy it to the Z: drive.

Thus, when you connect the flash drive to your computer, you will have access to open files on her. But to open password-protected files, you will need to launch the USBSafeguard program and enter the password. Only after this you will have access to the protected Z: drive.
Now you can put a password on the flash drive. Just choose one of the described methods and I’m sure everything will work out and your personal files and documents will be protected.