You decided to install Windows: you recorded a digital copy on a flash drive, configured the BIOS, rebooted your computer or laptop, but for some reason the installation did not start. What the heck? Why doesn't the BIOS see it? bootable USB flash drive? It seems like everything was done correctly...
There are 2 most likely reasons here. The first is that the BIOS does not display the flash drive because it is not bootable. Second, you haven’t configured the BIOS quite correctly.
Although there is one more nuance - your BIOS is too old. It does not support USB drives, and therefore does not see them. In this case, you can install Windows from a disk.
As for the first two reasons, we will look at them in more detail.
Did you write the bootable USB flash drive correctly?
The fact is that it is not enough to simply copy files. In this case, it will not be considered bootable. This is why the BIOS does not see your flash drive. It must be recorded only using special programs. There are plenty of them, but personally I use UltraISO. Why? Because she:
- Free (with trial period for 30 days).
- Records both Windows 7 and Windows 8.
- Easily writes images to a 4 GB flash drive (some programs only support USB drives with a capacity of 8 GB and higher).
And most importantly: creating a bootable USB flash drive in UltraISO is as easy as pie. First, you need to install the program (link to the developer's website) and connect the USB flash drive to your laptop or computer. And after that there are only a few steps left to complete:

During recording, all information from the USB flash drive will be deleted. The program will also warn you about this. Therefore, if there is important data on it, copy it to another location.
Correct BIOS setup
If you did everything according to the instructions, then rest assured that the USB flash drive was written correctly. And now it really is bootable. Try it - it may work to install Windows.
Therefore, restart your laptop or computer and go into the BIOS. To do this, you need to press a certain button several times. Most often this is Del or F2, although it may be different (depending on the motherboard model and laptop brand).
Next, you need to go to the tab whose title contains the word “Boot”. This is where you configure the boot priority of devices when you turn on your PC or laptop. By default, First Boot Device boots HDD, next comes the disk drive. In this case, you need to put the flash drive (USB-HDD) in first place, and temporarily lower the hard drive (Hard Disk) to second.

When exiting the BIOS, be sure to save the new settings! To press the button that is responsible for the “Save and Exit” item.

That's all. Now, if the USB flash drive is connected to a computer or laptop, and the BIOS is configured correctly, Windows installation will begin.
P.S. If this is all too complicated for you, then you can go to Boot Menu. This is one of the BIOS options, which is designed specifically to quickly configure booting from a flash drive.
P.S. If the BIOS stubbornly refuses to recognize the USB flash drive, then it may be damaged. But before you throw it away, read it. Perhaps everything will work out and it will last a couple more years.
How is it happening? It's very simple friends! On laptops Samsung latest models, several new options have appeared in the BIOS ("Fast BIOS Mode" and "Secure Boot"), which are directly related to the ability to boot a laptop from a flash drive or disk. Samsung Corporation suddenly decided to protect the download of the new Windows 8 operating system from some kind of virus or from the laptop owners themselves, whichever you like. Naturally, many users immediately had questions.
One of my friends wanted to boot a Samsung laptop from a bootable flash drive containing a program Reserve copy Acronis to do Windows backup 8, but it didn’t work out for him. Another one decided and also got stuck at the very beginning, he just couldn’t find his flash drive anywhere, neither in the BIOS, nor in the boot menu of the laptop. After he tried five flash drives, he flew to me with bulging eyes and said that his new laptop could not be booted from either the disk or the flash drive. In short, I had to figure it all out, and if you also found yourself in the same situation, read our article.
Booting a Samsung laptop from a flash drive
If you suddenly want boot samsung laptop from flash drive, then you will try to enter the boot menu of the laptop using the F10 key when booting and select your connected flash drive there, but nothing will work for you, since first of all you need to enter minor changes in the laptop BIOS settings.We turn on the laptop and immediately press F2 when loading, enter the BIOS, go to the Advanced section and set the “Fast BIOS Mode” parameter to Disabled.

Then go to the Boot section, we are interested in the “Secure Boot” option,

We also set it to the “Disabled” position and press “Enter”

A warning appears about the possibility of booting the laptop with an error.

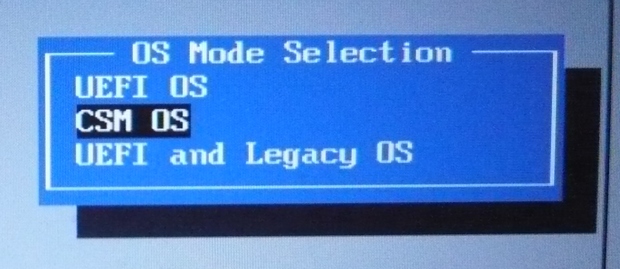
We agree, press “Enter". An additional parameter “OS Mode Selection” appears below,

We put it in the “CMS OS” or “UEFI and Legacy OS” position
And press “Enter”. Again a warning appears about the possibility of booting the laptop with an error, “Enter”.
We save the changes we made in the BIOS and press “F10” on the keyboard. To the question “Save the changes made and reboot?” press “Enter”. Yes.


The laptop reboots, press F10 and go to the boot menu, select the flash drive, boot occurs Samsung laptop from a flash drive.
If you cannot get into the laptop boot menu, then you need to change the boot device priority directly in the BIOS. We enter the BIOS, go to the Boot section, then the option Boot device Priority

Our flash drive should be here, set it as the first boot device, then press F10 (save the changed settings) and reboot. After rebooting, your laptop will boot from the flash drive.
Do you know what is the most common question among users who first decided to install Windows from a flash drive?
People constantly ask why Bios doesn’t see the bootable USB flash drive. To which I usually answer, is it bootable? 😛
In this short note, I would like to dwell on the main issues that you need to go through if you have a similar problem...
1. Is the bootable USB flash drive written correctly?
The most common thing is that the flash drive is written incorrectly.
Most often, users simply copy files from a disk to a flash drive... And, by the way, some say that it works for them. It’s possible, but you shouldn’t do this, especially since this option won’t work for most...
It's best to take advantage special program to burn a bootable USB flash drive. We have already gone through the most popular utilities in detail.
Personally, what I like best is to use the program: it can even burn Windows 7 or Windows 8 to a flash drive or external hard drive. In addition, for example, the recommended utility “Windows 7 USB/DVD Download Toll” allows you to write an image only to an 8 GB flash drive (at least for me), but UltraISO will easily write an image to 4 GB!
To burn a flash drive, take 4 steps:
3) The settings window should appear. There are several important points to note here:
In the Disk Drive column, select exactly the flash drive on which you want to write the image;
Select the USB HDD option in the recording method column (without any pluses, dots, etc.);
Hide Boot Partition - select the no tab.
After that, click on the recording function.
4) Important! When recording, all data on the flash drive will be deleted! Which, by the way, is what the program will warn you about.
After the message about successful recording of the bootable USB flash drive, you can begin setting up the BIOS.
2. Is the BIOS configured correctly, is there a function to support a bootable flash drive?
If the flash drive is written correctly (for example, as described just above in the previous step), most likely you simply configured the Bios incorrectly. Moreover, in some BIOS versions there are several boot options: USB-CD-Rom, USB FDD, USB HDD, etc.
1) First, restart your computer (laptop) and go into Bios: you can press the F2 or DEL button (look carefully at the welcome screen, you can always see a button to enter the settings there).
2) Go to the download section. IN different versions In BIOS it may have a slightly different name, but the word “BOOT” is always there. What interests us most is the loading priority: i.e. queue.
Just below the screenshot shows my download section on an Acer laptop.
The important thing here is that loading from hard drive, which means the queue simply won’t reach the second line of the USB HDD. You need to make sure that the second line of the USB HDD becomes the first: on the right side of the menu there are buttons that can be used to easily move the lines and build the download queue the way you need.

ACER laptop. Setting up the boot partition - BOOT.
After the settings, it should look like the screenshot below. By the way, if you insert a flash drive before turning on the computer, and after turning it on, go into Bios, then you will see opposite the USB HDD line - the name of the flash drive and you can easily figure out which line you need to move to the first place!
Even the most experienced user at some point may encounter an unpleasant moment when an attempt to start the system from a bootable flash drive (to reinstall Windows, for example) ends in nothing, since the BIOS simply does not see the flash drive. There is a logical explanation for this phenomenon. In this manual you will find a couple of tips that will help solve the problem.
What to do if the BIOS does not see the bootable USB flash drive
First, make sure your USB port is working. Try connecting to a port on the motherboard itself. If you try to solve this problem by rewriting the bootable media, but inserting it into a non-working port in the BIOS or in general, your efforts will be of little use, to put it mildly. If the port is working, move on to the next solution.
Most often, bootable flash drives are not displayed in the BIOS or Boot Menu due to the fact that the image recorded on it does not support booting in the mode installed on the motherboard (by the user or manufacturer). For example, an image for UEFI is recorded on a flash drive, and the motherboard operates in Legacy mode or vice versa. On many motherboards Hybrid mode is supported, which allows you to boot from both UEFI drives and Legacy. You need to go into the BIOS (UEFI) and find the desired item.
For example, on my motherboard from Gigabyte it is called BootModeSelection and allows you to select two modes at once. It is precisely because of the hybrid mode that when entering the Boot Menu, one drive is displayed twice - one Legacy and one UEFI (if an image is recorded for both systems at once), which allows you to select your preferred boot mode without overwriting the image or changing BIOS settings. On other motherboards, selecting the boot mode may be called differently. Eg, Legacy Support or Compatibility Support Mode(it may be abbreviated CSM). IN in some cases it is also called the name of the operating system, like Windows 10 / 8 for UEFI, and for Legacy Windows 7 or Other OS.
If your motherboard only supports one of the boot types, you will need to either switch the BIOS to Legacy / UEFI, or reset it. An error with the image most often occurs among users who have not figured out how to correctly write Windows to a flash drive. Many people simply copy the contents of the image to removable storage, and then try to boot from it. This method will work on a UEFI system, but will not work on Legacy. And yes, you need to copy content image, not the image itself separate file. Copying the image itself will not work even on UEFI. If the BIOS does not see the flash drive, we recommend overwriting the drive, because when you try to install Windows from a Legacy drive to UEFI system You may also need to disable Secure Boot.

It is also worth considering that on some motherboards the flash drive must be inserted into the USB port before the computer starts booting. In other words, it will not appear in the boot menu list if you insert the USB flash drive into the port after entering the same Boot Menu. Insert the drive into the port, restart the computer, go to the Boot Menu and boot from the flash drive.
If all else fails, try recording Windows on another flash drive and boot from it. Alternatively, connect the drive to a USB 2.0 port, not a USB 3.0 one.
On older BIOSes, USB flash drives are not displayed as a separate boot menu item at all (USB-HDD does not work). In this case, you need to go into the BIOS and find the priority settings hard drives. Your flash drive with the recorded system should be displayed in the list of connected drives. Install it in the first place, save, reboot, and then in the boot menu select start from HDD. The BIOS will select the flash drive first and start booting from it, which in turn will allow you to install the system.
If all attempts are in vain, you will have to burn Windows to another type of media. If the computer you are trying to install Windows on has a DVD drive, try burning the system to a DVD and booting from it. This advice will cause ridicule for many, but if all else fails (this primarily applies to older computers), booting from a DVD should help solve the situation. You can burn the image to disk in the same Media Creation Tool, just select the target drive not as USB, but as a DVD drive.
Every user is certainly faced with the need to reinstall the operating system on their computer or laptop. IN Lately It is more rational to carry out such an installation using a regular flash drive, making it bootable.
This installation is fast and reliable, and to create bootable media Now it's easier than ever. But sometimes the user may encounter one problem that prevents him from performing a normal installation of the system - BIOS does not recognize bootable USB flash drive.
When connected to a computer device, it turns out that the flash drive is simply not detected by it, as if it doesn’t exist. Even after entering the BIOS (UEFI), the user does not find the drive in the Boot Menu. Below we will explain why the PC does not see the boot drive in the BIOS, how to correct the situation and make it visible.
Why is the bootable USB flash drive not visible in the BIOS?
The main reason why a bootable flash drive is not visible in the BIOS is a discrepancy between the boot modes specified in the BIOS and those supported by the drive itself. Why is this happening? Because modern computers have 2 boot modes: Legacy and UEFI. On older devices there was no such choice. So, only one of these modes is enabled in the device.
If the UEFI mode is set, then the drive on which the system image for Legacy mode is written will not be displayed in the BIOS. Accordingly, you won’t be able to select it as a boot one. In this mode, images for Windows 7 systems are usually recorded. If Windows is installed, then, as a rule, there are no problems.
What to do to make the BIOS see the bootable USB flash drive
2 options for solving the problem.
In a situation where the BIOS does not see the bootable USB flash drive, you can do one of the following two actions:
- In the BIOS you need to disable support for the second mode, which will not be used. After entering the BIOS, go to the Boot tab and simply set the mode you need to the value "Enabled". Sometimes this item is not easy to find. For example, it might look like choosing an operating system. In this case, the proposed options may be:
- Booting Windows 8 or 10 systems for UEFI mode.
- Booting another system (Other OS) also for Legacy mode.

If you are using a bootable USB flash drive designed only to boot in Legacy mode, you must disable Secure Boot in the BIOS. To do this, go to the field "Secure Boot" indicate value "Disabled". On some laptops and PCs, you just need to select Windows 7 to disable secure boot.
To see if Secure Boot is enabled on Windows systems 10 or 8, just press on the keyboard Windows combination+ R, and then enter the expression in the line "msinfo32". After pressing "Enter", information about the system installed on your computer will be displayed, where you can find an item displaying the status of your secure boot. 
- Rewrite the data onto the flash drive again, choosing a different boot mode. This option is only possible for new images created recently. If you are recording an image that is a year old or older, it will only support Legacy mode.
If the recorded image is supported for both modes, it is not necessary to change the BIOS settings. It is enough to rewrite the system image. However, please note that for recording Windows images 7 and XP will require mandatory disabling of Secure Boot.
It is very easy to create a bootable USB flash drive in the Rufus program. Before you start recording data, you can choose which boot mode the drive will be written to. The default (for most cases) is MBR mode for UEFI and Legacy. But you can choose MBR with UEFI or GPT with UEFI mode.
Important note! Many users do not understand one thing important moment. For a flash drive to be visible in the BIOS, it must be bootable. That is, it is not enough to simply write an image of a system onto a USB drive and then install the system from it. You just need to create a bootable drive using one of the special programs.
You might be wondering how to use a USB flash drive to increase RAM computer().
Using these tips, you can easily install any operating system using a bootable USB flash drive.


