Hello friends,
today we will deal with the question of how to install network printer in Windows 7. I’ll say right away that the process of installing a network printer in Windows 7-8 is not so complicated in theory, but in practice it causes a lot of unexpected errors both from the printer and from windows sides. Well, oh well, you will come across this yourself in the process. Let's figure it out.
We combine computers into a home group
First of all, we need to combine all the computers on which we want to configure access to a shared printer into a homegroup. And already within the home group we will set up general access to the printer of one of the computers connected to the homegroup.
I already wrote about how to create and configure a home group in Windows 7-8 in one of my previous articles. You can read it if you suddenly forgot how to do it. In addition, it also discusses the process of setting up shared access to folders for computers in a home group.
Download drivers for the printer
In the future, we will need to install drivers for the printer on all computers from which we plan to use our future network printer. However, drivers themselves, of course, will not want to be installed on computers to which the printer is not physically connected.
Therefore, we will only download the drivers for now, but we will indicate the path to them a little later. During the process of installing a network printer on a separate computer, when the system suddenly asks us to indicate to it the drivers that should be used to work with the network printer.
Making the printer network
To do this, go to the computer to which the printer is physically connected. The printer is already installed on it and is working normally. Please note that the computer must be connected to a homegroup.
Then open the "Start" menu and go to the "Devices and Printers" tab:
We see something like this in front of us. Now click on the working printer icon right click mouse and go to "Printer Properties":

In the printer properties, go to the "Access" tab. Here, in the “Network name” field, we enter any name for the future network printer and check the boxes next to the items for sharing and drawing print jobs.

All this is needed so that our printer is detected in the homegroup as a shared one and the rest of the computers in the homegroup can see the printer’s print queue and somehow influence it.
Setting up access to a network printer for other computers in the homegroup
Now comes the fun part. We will configure the ability to use our network printer by other computers from the home group to which the printer is not physically connected. I hope you have already downloaded drivers for our printer on them.
So, let's first go to the "Devices and Printers" menu of the connected computer:

We see that the network printer was immediately found. But don't rush to rejoice. Unfortunately, he will not print anything. You can see this for yourself by sending a test page to it for printing.
Therefore, feel free to delete it and click on the top tab “Printer Installation”:

Here we choose the second option, because we have a network printer. As a result, we end up at the window automatic search printers:

The search usually takes a long time and Windows 7, when completed, most likely finds nothing. Don't be surprised; this is a common thing for Windows OS. Therefore, I prefer not to wait and hope for a miracle, but to poke the system’s face into a network printer in manual mode. To do this, I immediately click on the item " The printer you need is not in the list":

Then I move the checkbox to search by name and click on the “Browse” button:

Next, I am asked to select a computer from the homegroup to search for a shared printer on it. I select a computer to which the future network printer is physically connected. I enter credentials if necessary. And lo and behold! The network printer is immediately found!

I click on it and the system immediately tries to find and install drivers for the new printer.

And no matter how surprising it may sound, in my case the system found the drivers itself. I didn't even have to give it drivers from the manufacturer.

The installation of the network printer was also successful, which the system itself reported to me, at the same time offering me to print a test page.
The test page, to my surprise, printed quickly and without errors. This means that I have successfully configured access to a network printer for a computer from a homegroup. I hope that everything will work out just as quickly and easily for you. Good luck, yours PC.
Nowadays, you can often observe a situation where some of the computers in the office are still running Windows XP (because their hardware is not powerful enough to install newer operating systems), and some are more recent computers running Windows 7 or Windows 8 Just imagine: we have 2 computers - one on Windows XP and one on Windows 7. A printer is connected to each computer via USB. And we need it to be possible to print from every computer to any printer. If both computers were running an identical OS, then connecting the printer would be more than simple. But when the OSs are different, it's easy “connect” printer It won't always be possible.
In this article I will teach you how to properly connect a printer over a network when local computer and the remote computer with the desired printer work under different OS.
So, we have 2 computers: one with Windows XP (comp1), the second with Windows 7 (comp2).
One printer is connected to each computer via USB and drivers for local printing are installed. Those. so far every computer Maybe print to your printer, but can't print to someone else's printer over the network.
Step 1. Setting up computer No. 1. As always, the first step is to share the printer for the network, i.e. Sharing the printer.
For Windows XP: click Start -> Control Panel -> Printers and faxes-> right-click on the desired printer -> select Sharing -> ... and set a network name for our printer.
(For Windows 7(8), in this case you need to perform the following steps: click Start -> Control Panel -> Devices and Printers-> right-click on the desired printer -> select Printer properties-> Access tab -> set a network name for our printer.)

Also, for Windows 7 and 8, you need to check whether sharing is enabled on the computer.
Step 2. Let's go to computer No. 2. We go from it to computer No. 1 over the network and check whether the printer open to the network is visible. To do this, type \\comp1 in Explorer and press Enter.

We see that the desired printer on computer No. 1 is open to the network. But since our computers are running different OSes, we won't click Connect because we'll likely end up with the print service (spooler.exe) crashing:

We'll just leave this window open so we can see the printer's network name.
Step 3. Download the driver for computer OS No. 2 from the official website of the printer manufacturer. In our case, this is a Windows 7 driver for the HP LaserJet 1020 printer.
Right-click on the downloaded file and select Extract to folder hp-lj-1020-xp.

The trick is that instead of an exe file, we now have a folder with unpacked drivers, which we can point to to the installation wizard so that it can take drivers for the OS we need from there.

Step 4. Manually add a network printer to computer No. 2. To do this in the window Printers and faxes for (Windows XP) or Devices and Printers(for Windows 7 (8)) click:
Installing the Printer -> Local printer
(in XP, immediately uncheck Automatic detection PnP printer) -> set the selector to position Create new port
-> in the drop-down menu select Local Port -> in the window Enter port name manually enter the full address of the printer we need from computer No. 1:
\\comp1\HP1020 (letter by letter, including spaces, if any!)

and press OK
The system creates a new local port.
-> click OK -> select the driver we need from the list -> Next -> select a name for the network printer, under which it will be displayed on computer No. 2 (for example HP1020 ) -> Next -> select No printer sharing (for Windows 7.8). -> Next -> if necessary, check or uncheck...Default -> Done.
Printer added!
In the same way, you can add a printer from computer No. 2 to computer No. 1. In this case, we need to download the driver for the HP LaserJet 1005 MFP under Windows XP and add the printer to computer No. 1 via Local Port.
By sharing the printer under local network, you can connect all users to the same printer. Here we will look at how to connect a printer over a network, that is, a printer that is directly connected to another computer on the network. we considered, so in this article we will assume that the printer is already connected to the print server and configured properly.
Connecting to a printer over a network
I would like to note that here are various ways printer connections over a network, which are relevant when the printer is connected directly to a computer and the computers are on the same network. Even if it's . To connect a printer via a local network, you can use several methods:
- The first method is the most correct way to connect the printer via a local network. To do this we need to open a window Control Panel - Hardware and Sound - Devices and Printers and press the button Adding a Printer. The computer will then begin searching for connected and available printers. In most cases, it makes no sense to wait until the check is completed, so click the button The printer you need is not in the list. After this we need to fill in the field Select shared printer by name. The printer name must consist of the name or computer to which it is connected, as well as the network name of the printer, which must be separated by a left slash (\). The network name of the printer is set automatically in the tab Access V Properties printer. Example printer name: \\pcname\printname
Then you need to press the button Further. - The second method includes the same actions, only in a slightly different sequence. You need to open the window Network(Network Discovery) and find there the computer to which the printer is connected. If you double click this computer, then you will see a window with shared resources, among which the printer should be located. Having found the printer, you need to call up its context menu and select the command Join.
- The third way to connect a printer over a network is to change the port of an already created printer. For this it is necessary to Printer properties open tab Ports and press the button Add port. Next, you must specify the network name of the printer, as in the first case. It is not at all necessary to use this method as the main one. Personally, I used it only when I couldn’t connect and configure the printer via a local network. In this case, I created a very ordinary printer with default settings that were in no way related to this printer, and then I changed its skeleton: I changed the port, I changed the drivers, I changed other settings.
But you must understand that the methods described above for connecting a printer over a network do not bring the matter to its logical conclusion. After completing these steps, the computer begins to request drivers for this printer from the print server. Naturally, the print server has drivers for this printer. But they are suitable for your computer only if operating system and its bit depth is the same on both computers. If not, then wait for an error that the printer could not be connected. And then you will have to think for yourself where to get the drivers. Please note that the computer asks for the presence of not only a print server, but also own storage drivers. Therefore, you need to stock up on the necessary drivers, and it is advisable to install them on the system before you start connecting the printer. In this case, the driver will be picked up automatically.
Additional printer drivers
As I already said, when connecting a shared printer over a network, the computer asks the print server for the availability of drivers that are suitable for this system. If the answer is negative, technical support will have to look for the appropriate drivers and install them on remote computer. Moreover, such actions will have to be performed for almost every computer that will connect to this printer. And you will also have to redo the same process after reinstalling the operating system. Wouldn't it be easier if all the necessary drivers were stored in the print server's memory? Indeed, in this case, connecting a shared printer via a local network will happen in a couple of clicks and you will not need to waste time searching and. To do this, you need to add additional drivers for this printer.
When we connected the printer to the print server and configured it, we loaded the driver into the print server’s memory, which is supported by this operating system (the operating system of the print server). By additional drivers we mean drivers that are compatible with other versions of operating systems or with other architectures. These are the ones we need to put into the print server’s memory. The search itself necessary drivers- It’s your concern, I’ll show you how to add them later.
- Control Panel.
- Equipment and sound.
- Devices and Printers.
- Call context menu desired printer and pressing a button Printer properties.
- Open tab Access and press the button Additional drivers.
- Next, you will be asked to select the operating system architecture( x86 or x64). Typically, drivers for one of the architectures are already installed (print server architecture). You need to select a different architecture and specify a location suitable driver.
- Wait until the operating system adds these drivers to the system, and then save the results.
After these steps, the print server will store drivers for both of the most common architectures of client operating systems, and the process of connecting the printer over the network will take place in a couple of clicks.
Method 1. Connect via computer.
The classic method, which has been around for many years, but at the same time, it still remains the most budget-friendly and in demand, especially when it comes to home network. This is setting up shared access to the printer through a computer to which it is connected via USB or other interfaces.
This method is ideal if you have a simple printer that does not have any interfaces for connecting via USB or LPT.
Keep in mind that if you have an MFP, then in this way you can only share the printer of this MFP. The ability to scan remains only with the computer directly connected to your MFP.
Method 2. Connecting a printer or MFP using special units - print servers.

This connection method is also used to connect devices described in the first method that do not have the ability to communicate via Ethernet or Wi-Fi.
In this case, the print server performs the function of this very computer, to which in the first method we connect the printer. Connect to the print server network, depending on technical characteristics, maybe like a wired one Ethernet networks or via Wi-Fi.
Most often, this connection method is used in small offices, when there is a need to connect a not very new, but good printer as a network one.
On to the pros this method This could include not requiring someone's computer to be on all the time. We reduce equipment wear and save energy. In addition, if you use an MFP and want to use the scanner over a network, you can purchase a special print server that can also work with the scanner.
Method 3. Through the built-in network controller.

Most modern printers and MFPs already have LAN card, allowing you to connect the device to a local network either by wire (Ethernet) or via Wi-Fi. Typically, in this case, there should be no difficulty in setting up such a printer to work over a network. The installation wizard allows you to find a device on the network and install a set of drivers and various application programs with assistants.
Since this all happens automatically, we will not go into details. Write in the comments if anyone has any difficulties, we will sort it out.
The advantages are a problem-free connection and you can use the scanner and printer over the network.
The only one important point, to which I would pay close attention, it is advisable (not necessary, but very desirable) to assign to your network device static IP. This will eliminate those potential situations when the printer suddenly refuses to print or the scanner refuses to scan due to the fact that the device received a different IP address when turned on. Modern control programs easily solve this problem by connecting to the device by name, not by address, but from experience I can say that sometimes anything can happen.
There are different ways to connect to a printer mobile devices, such as smartphones and tablets. Technologies are used for thisGoogle printer andAirPrint. In this article we do not disclose these technologies, because... this is a topic for a separate article.
Method 1. Set up access to a printer connected to one of the computers on the network.
The method, as already written above, is old, which makes it perfectly debugged. If your network uses the same operating systems, then the one that requires the least action from you.
Let's start with the computer to which the printer is connected. Let's go to Devices and Printers via menu Start Start Devices and Printers Printers Printers and faxes.
Right-click on the printer that you want to share and select Printer properties.

In the window that opens, go to the tab Access.

Check the box here Share this printer, field Network name: you can leave it alone, except in certain cases when, for example, you need to connect to a shared printer in a non-standard way. We will definitely examine this point in a separate article, because... most often this is not required.
If all computers on your network are running the same Windows versions, you can skip the highlighted block below.
Chapter Drivers. I put this point out as a separate block to simply give you an understanding of why it is even needed.
This section is used in cases where other computers that will interact with the shared printer are running different versions ofWindows, as well as versionsWindows with a different bit size. Its use is not necessary if you are responsible for all computers in your company or at home. Otherwise, you can click Additional drivers... and add drivers for various operating systems.
If this is not done, then when connecting to the printer from another workstation, if the operating system does not have a suitable driver, you will be asked to specify the path to the driver, which must first be downloaded from the manufacturer’s website.
We press everywhere OK and go to another computer to which you need to connect a network printer.

Let's go to Computer and go to Net, select our computer and right-click on the icon of our printer, which we just opened access to.

Click To plug, we answer Windows’ question about installing drivers Yes and after that Ready. If in progress Windows installations will require a driver, go to the printer manufacturer’s website, download, unpack and specify the path.
IMPORTANT! If possible, any driver should be downloaded from the manufacturer’s website! If you just search for a driver on the Internet, then there is a high probability of downloading not a driver, but a virus! This is if you already have very old equipment and the manufacturer did not bother to write a driver for new version operating system, then it’s already breaking bad, and then very selectively.
Method 2. Connecting printers and MFPs via the Print Server device using the example of TP-Link TL-PS110U V2
Let's start by setting up the print server itself. The interface is in English by default, so the screenshots will also be in English. However, do everything as written and you will be happy.
We plug the print server's power supply into a power outlet, use the supplied cord to connect the print server to the router or switch, and connect the print server to the printer using a USB cable. And we begin the settings.
We go to any browser and in the address bar (namely in address, not in search bar Yandex or Google, namely in the one that is located at the very top of the browser window) we type the address of the print server, which by default is 192.168.0.10 and click Enter. If suddenly it doesn’t work, then you need to manually set the IP address from the zero subnet on your network adapter. (How to do this?) Most often, this is not required, unless you are a fan of TrendNet technology - they use the default network 192.168.10.0 or Zyxel, which likes 192.168.1.0.
A username and password request should appear on your screen. Enter login admin(all letters are small), field Password leave it blank. If everything went well, then we should see the following picture:

Go to the section Setup.
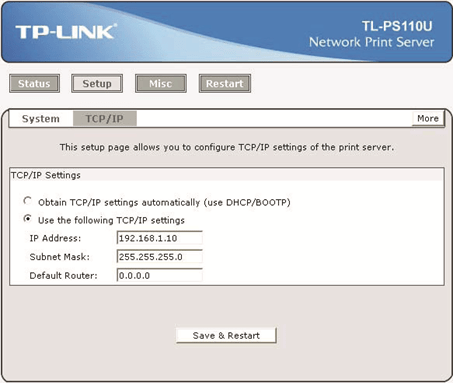
Here we change the settings to UserthefollowingTCP/IPsettings and for convenience we will drive into the field IPAddress not what the manufacturer offers, but 192.168.0.30 , Subnet mask ( SubnetMask) - without changes. Everything else, if you have one network, can be left untouched. Click Save & Restart.

Actually, this is where the setup of the print server ends, let’s begin the setup on the computer.
Let's go to Devices and Printers via menu Start(Windows 7), or right-click on the button Start and in the context menu that opens, select the item Devices and Printers. If you are using Windows Vista, then you have an icon Printers on the control panel. Windows XP is Printers and faxes.

Press the button Installing the Printer

In the window that opens, select Add a local printer.

In this window you need to select Create a new port: and choose Port type:StandardTCP/IPPort.

Set the device address. The port name will be added on its own. Checkbox Poll the printer and select the driver automatically We don’t put it down - this is important!

We meditate on this picture and wait for the next page to open.

Choose Special and press Options.

Select Protocol - LPR LPR parameters - lp1, check the box Byte counting allowedLPR. Click OK.


Admiring the window...

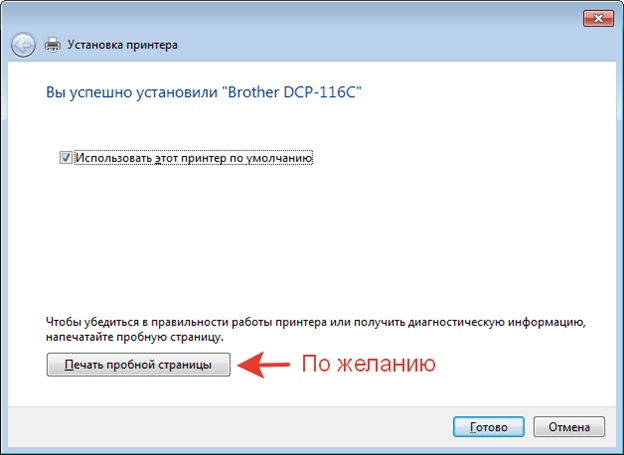
You can optionally print a test page to ensure that the printer is installed correctly.
And we admire our correctly installed printer.

That's all.
The companyTP-Link there is another interesting one print server TL- PS310 U - this print server can work correctly with MFPs not only as a printer, but also as a scanner. It is better to do the printer settings by analogy with the example above, and in order to work with the scanner, you need to install the included utility. But that's a completely different story. If anyone is interested, write in the comments, I will describe the installation process in one of the following articles.


