Today we will discuss with you the question of how to create a disk image and the intricacies of this process. We will consider this issue using the example of an .iso image file; this is the most popular format for obtaining a disk image. Now you need to figure out what an .iso disk image is.
An Iso disk image is simply an exact virtual copy of a disk; it contains all the disk data, the state of the file system, a set of directories, and also, very importantly, the boot information of the entire media.
If, for example, we simply copy information from a disk, then at least its boot data is lost, but when creating an iso image, the boot data is saved, which is necessary, for example, when receiving a boot disk or a bootable Windows flash drive.
Now let's move directly to the program which we will create an iso disk image
The program we will use is called Daemon Tools. We will use it for the following reasons:
- Very simple and easy to learn
- Free version available
- And as a result of the first two points, it is one of the most popular programs for obtaining disk images
You can download Daemon Tools from the official or trusted website by typing “download Daemon Tools” in a search engine, follow it and click “Download” at the bottom; the entire process of downloading and installing this program is covered in this article.
And we will directly create the image.iso file. And so we begin the process of obtaining the .iso image. Take the disk from which you want to make an image and insert it into the cd/dvd drive.
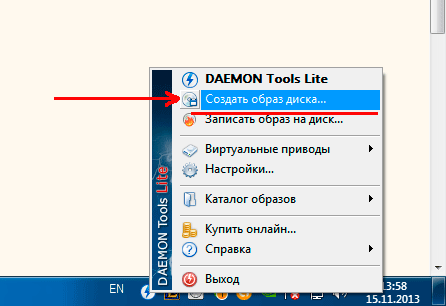
Now we move to the area at the bottom right of the screen, where the icon of our Daemon Tools program is located, although if you do not have it running, then launch it:

Now just click on this icon right click and select “Create a disk image...”
We find ourselves in the settings menu for creating a disk image:

All you can do here is make sure that in the “Drive” line there is a physical disk drive and not a virtual one.
And you can also specify the place where your virtual image disk, despite the fact that when you indicate where to save it, you can call created file image, as you wish, and on last line select the format of the image to be created, we have this .iso image file:

After you have entered necessary settings, click “Start”:

All you have to do is wait until the image creation process reaches 100% and everything can be sent to the location on the hard drive that you specified in initial settings and use the image for a long time and without any hassle with disks.
We have discussed with you the question of how to create a disk image and what is needed for this. The main thing is to do everything slowly and consistently and you will succeed. Thank you for your attention.
Every computer user sooner or later begins to wonder: “How to create a disk image?” This is quite simple to do, moreover, the process does not take much time. But for this it is recommended to read this article, since it is given here step-by-step instruction, which will help you understand the issue in more detail.
General provisions
There are several ways you can create a disk image yourself. In any case, we will have to work with special software, which significantly speeds up the process and makes it much easier. It is worth saying that the image, which may have the ISO extension, is a regular file stored on your hard drive. The only difference is that it is significantly smaller in size than the original one, and is also launched using special programs. You've probably noticed that most often the image is created for games and service files that take up a lot of space. The ISO is also opened by different programs, and in this article we will look at which ones. By the way, the extension does not have to be exactly like this, but it is used most often. We cannot help but draw your attention to the fact that the integrity of the files is of great importance; it is advisable to check them with an antivirus before starting work. After this, we proceed to the practical part.
What's good about the image?

First, let's look at a simple example. For example, you have a game disc, you need to use an optical drive to run it. If one is missing or faulty, then this already indicates that the image is for you - perfect solution. The same applies to damaged disks. Old computers and laptops often have a faulty laser, so writing or reading a disc is quite problematic. In addition, if there is good internet connection you can download images from the Internet, you don't even need to buy anything, you just need to find what you need. Another example is installing an operating system from a flash drive or disk, which is extremely convenient. The image will unpack quickly and without errors. As noted above, if the file weighs 11 gigabytes, and you have a 4.5 GB disk, then the only way to write the document to existing media is to make an image of it. This way you can achieve the volume you need.
Working with Daemon Tools
One of the most popular and simple programs to create images. It is completely free and constantly updated, supports most modern extensions, which is why it is in great demand. First we need installed program and a disk inserted into the drive, it is its image that we will learn to create. Most often, the Daemon Tools icon appears in the tray (lower right corner on the desktop). Right-click and see a pop-up menu, where you should select “Create a disk image.” A menu will open in front of you. Here we can find the disk drive, the place where the image will be saved. You will also need to select an extension. ISO or IMG is recommended, but if you are interested in a specific format, then choose that one. The name of the image is also indicated here. After that, select “Save”. Click "Start" and wait for the process to complete. Upon completion, close the window and go to the folder where we saved the file.

Creating a hard disk image: introduction
It’s one thing to simply learn how to write to a flash drive or disk, and quite another to be able to create backup copies. For this we will use free software, a program called Acronis. Although it is worth noting that this is far from the only option that allows you to work with hard drive. If you are using an operating room Windows system 7.8, then there are built-in tools that allow you to create an image hard drive. If this is a laptop, then there is also a standard utility called Recovery. It is worth saying a few words directly about Acronis, which was designed specifically to create backups hard drives, download them or restore them. It should be noted that the utility works when other programs are powerless, for example, even in cases when the operating system does not load. Well, now let's move on to the practical part of the question.

How to create a hard disk image using Acronis Images?
First of all, go to the program menu. Here you will see the line “ Backup and restoration”, which is what we need. Click and go to another section, where you need to select the “Backup disks and partitions” item. Pay special attention to disk management. You will be able to watch as many as 4 sections. Each of them is responsible for something. One of them, usually the biggest one, is where you have your operating system installed. The section called System contains recovery information. Recovery is the place where the factory settings of a computer or laptop are stored, and the untitled section is of a system nature. So, select disk 1, also known as My Passport, our backup copy will be located here. The program will prompt you to make a copy of all partitions of your computer or laptop. It’s worth noting right away that you don’t need to change anything, we create a full backup of all partitions. It is advisable to perform the setup first; to do this, go to disk mode, check the box next to the hard drive and select the location where to save the image.

We continue to work with Acronis
After we have done all of the above, we move on to the next stage, where we need to get down to business, and since creating a disk image is not very difficult, it will take no more than 10 minutes. It is best to use a flash drive or portable hard drive. This is where you should create and save a backup copy. Although this may be a partition of the hard drive, it is not the partition where the operating system is installed. Then you can click “Archive”, although before doing this it is better to configure the backup settings. Go to “Advanced” and check the box next to “Archive in sector-by-sector mode.” We also select “Check the backup after it is created.” Exit this menu and start archiving. When finished, go to the folder and see if our file is saved.
What to pay attention to
It should be noted that you must create bootable media. Since you already know how to create a disk image, let's move straight to the next point. This is necessary in case any emergency arises. For example, the computer does not turn on due to errors. For this we use the same Acronis. In the main menu, select “Create bootable media.” Next, follow the instructions, and then insert a flash drive or disk into the port. The connected device will appear in the window. In the menu, check the boxes next to all the lines that you see. Click “Next” and select the device, after which we begin creation. A window with the process will appear, upon completion you will see a dialog box confirming the successful creation bootable media. If you need to restore the system, you can do this either directly from a running system or through the BIOS. In the main menu, select “Restore” and follow the prompts.

Conclusion
I would like to say that creating a regular image and a hard disk image are somewhat similar. In principle, there is nothing complicated here, but there is one “but”, you need to use only those programs that you understand or have at hand detailed instructions. If you do something wrong, there is a possibility that you will have to HDD to a service center, where they will charge a considerable amount to restore its operation. After reading this, you should have a complete understanding of how to create a disk image: both hard and regular. The main thing is to follow the instructions and not be nervous if you fail to do something on the first try.
Welcome to my blog!
After reading this article, you will learn how to create ISO image file or CD using different programs. In total, I decided to give an example of working with eight free programs that can create an ISO archive, both a regular file or directory, and a CD, so that you can choose the most optimal ones for yourself and work with them.
An ISO image is an image of a file or program that supports a system ISO standard 9660 and has a *.iso extension. This is a kind of archive, the contents of which can be viewed by any archiver or file manager that supports this feature, such as Total Commander.
How can I use an ISO disk image? There are several applications for using such images.
For example, you can create an ISO archive of your favorite game and mount it on virtual disk, and then use it instead of the real one CD-ROM drive.
Such an archive can be posted online for downloading, and the person who downloads it can burn it onto a CD.
The ISO archive can also be used to install operating systems on virtual machine, for example VirtualBox, which is very convenient when working with it.
It is also convenient to store such archives on CDs if you burn several distributions onto one disk and, if necessary, take only the one you need.
There are many uses for ISO files and every computer user will find a use for them.
Check out the programs below and choose the ones you like. The list of programs is large; for ease of navigation, use the menu. All programs work perfectly in Windows 7 64bit, but if there are any problems with the installation, then run them in compatibility mode with Windows XP.
Cyberlink Power2Go program.
The program of Taiwanese developers Cyberlink Power2Go is designed for recording and copying discs various formats. This program is distributed free of charge, which makes it very popular among computer users.
You can download the Cyberlink Power2Go program from the link:
http://www.cyberlink.com/downloads/trials/power2go-platinum/download_en_US.html?affid=2581_1163_729_37307_0_ENU
Using Cyberlink Power2Go, you can quickly create an ISO disk image.
By default, when the program starts, a window appears asking you to select various actions when working with the program, which is very convenient, since you can immediately launch desired mode in a programme. If desired, this window can be disabled and operated using the application menu.
To save a disk image in this program, select “ “ Utilities for working with disks”, and in the right window “Save disk image”.
If you have disabled this window, you can create a disk archive using the commands in the main program window.

To do this, open the menu in the top line “Burn to disk” and select “Save disk image”.

In the next window, you will need to select the CD-ROM drive, if you have several of them, change the reading speed if you need it, and by clicking on the “Browse” button, select the path where you want to save the disk image.

When choosing a location to save the image, in the “File name” line, you will need to indicate its file, any one, you can come up with your own and in the “File type” section, indicate the extension in which you want to save the archive. The extension “*.p2i” is the format of the program itself, we need to select the extension “*.iso”.
Then click the “Save” button to begin saving the disk image.

A window will appear showing the progress of this operation, after the successful completion of which you will see another window where it will be reported that the operation was completed successfully.
Ashampoo Burning Studio 16 program.
The German developer program Ashampoo Burning Studio 16 allows you to create an ISO image not only from a disk, but also from a file or directory, which is often necessary.
The program is distributed both on a paid basis and on a free basis; you can create an image archive in both versions of the programs, I mean that in paid version, during the test period you can also create it without purchasing the program.
I recommend using first free version this program, perhaps its functions will be enough for your purposes.
You can download the Ashampoo Burning Studio program from the link:
https://www.ashampoo.com/ru/rub/fdl
How to create an ISO image from a disk

To create a disk archive image, launch Ashampoo Burning Studio 16 and select from the menu on the left side:
Disk image – Create image

In the next window, make sure that your drive is ready for use and follow the prompts, click on the “Next” button.

Now in the line: “Disk image path” you can specify its storage location or to select this location, click on the “Browse” button on the right. And in the “Image file format” line, you need to specify the ISO format, then click the “Next” button to save your image to your hard drive.
How to create an ISO image from a file

To create an archive image from a file or directory, open the same menu and follow the path:
Disk image – Create an image from files

Then select one of the options for creating an image, “Data disk” or “Data disk with advanced settings”, the only difference here is that the settings window opens immediately, but you can open it later if you wish.

Now you will need to add the files that need to be added to the archive to the program window, for which click on the “Add” button or simply drag the files you need into this window, “hooking” them with the mouse. Then click “Next”.

In the next window you will need to specify the storage location of the image file, its name and extension, as in the case of saving an image from disk. Click the “Save Image” button to save it to your hard drive in ISO format.
CD Burner XP program.
The CD Burner XP program from Canneverbe Limited is distributed free of charge and its main task is to burn any data onto CD/DVD format discs. As for working with ISO files, using this program you can burn an ISO file, create an image of this format, convert bin and nrg files into ISO format.
An archive image can be recorded as a disk, a directory or any file.
https://cdburnerxp.se/
For the program to work properly, the .NET Framework 2.0 package must be installed on your computer, which can be downloaded from the links on the program website.
https://cdburnerxp.se/help/Appendices/install-without-dotnet

To create a disk image, open the program and select “Copy disk”, then open it by clicking “OK” or double click mouse over it.

In the next window you need to specify the recording source if you have several drives, and in the “Receiver” section you need to select “Hard Disk”, specify the file name and its type. Then click the “Copy disc” button.

After this, a window will appear where the progress of the task will be displayed with a countdown.

After the disk has been copied successfully, you will see a message about this.

To create an image archive in CD Burner XP from a file or directory, double-click the “Data Disc” item.

In a new window you will see a hint on what to do. Select in the upper part of the program window those files whose image you need and, “hooking” them with the mouse, drag them to the lower part of the program window.
Or click the “Add” button and specify the files you need in the window that appears.


Then indicate the location where your image and its name will be recorded and by clicking the “Save” button, save the image of your files.
BurnAware Free program.
The BurnAware Free program is distributed freely and is designed for burning discs of various formats, including creating ISO images of files, and you can create both a disk image and an image of a directory or file.
You can download the BurnAware Free program from the link:
http://www.burnaware.com/download.html
How to create an ISO image from a disk.

To create an ISO disk archive using this program, launch it and in the “Project” tab, click on the “Copy to image” icon.

In the next window, select the drive, if you have several of them, you can change the disk reading speed if desired, and in the “Destination” section, indicate the storage location of the archive, its name and file extensions. Then click the “Copy” button.
How to create an ISO image from a file.
Creating an ISO archive from a file in BurnAware Free is as easy as creating a disk archive.

Launch the program and in the “Project” tab, click on the “Create ISO” icon.

In the next window select file system ISO-9660 and click “OK”.

Now click on the “Add files” button and indicate to the program those files whose archive you need to create or simply drag them into this window by “hooking” with the mouse.

Then click on the “Create” button and after a while an ISO archive of your files will be created.
ISODisk program.
The main task of the ISODisk program is to create a disk image and connect virtual drives to the system. In this article we will look at creating an ISO file using this program.
http://www.isodisk.com/
Creating a disk image using this program is too simple, since the program has practically no settings.

To create a disk image, run the ISODisk program and go to the tab:
Create ISO Image from CD-ROM
Specify the drive you need and click on the floppy disk icon.

In the next window you will need to specify the storage location of the image, its name and file type, then click on the “Save” button.

The process of creating a disk image will begin, filling the bars with blue. True, there is no countdown of the time it takes to create it, everything happens blindly, you just have to wait.
Once the image is created, you will see a message about it.
ImgBurn program.
The ImgBurn program is distributed free of charge, so you can use it completely without any restrictions. With its help, you can create an archive of an image, both a disk and a file or folder.
http://www.imgburn.com/
How to create an ISO image from a CD.

To create a disk image archive, run the program and click on the icon:
Create images file from disc

In the next window, in the “Destination” section, click on the folder icon to change the location where the image is saved, its name and file type. If desired, you can change the disk reading speed.
To save an archive image, click on the disk icon at the bottom of the window.

In the next window you will see information about the progress of creating the archive and upon completion, you will see a message about this.
How to create an ISO image from a file.

To create an archive image from a file or folder, run the program and click on the icon:
Create images file from files/folders

In the next window, in the “Sourse” section, you need to click on the folder icon and select the source for creating an image archive. You can also add files by simply dragging them with the mouse into the program window. Please note that you can add multiple files or directories.
In the “Destination” section, by clicking on the folder icon, you need to indicate the location where the archive will be saved, its name and extension.
Then click on the disk folder icon at the bottom of the window to start the image saving procedure.

After which several more windows will appear with additional questions, which depend, for example, on how many files you have selected. How to answer them, decide for yourself, it all depends on your desires.
After saving the image, you will also see a message about this, as in the case of creating an image from a disk.
Why does a PC user need to know how to create a hard drive image? Of course, in order to, if necessary, produce a complete including lost data, and not just operating system. To create a hard disk image you will need one of the specially designed for this purpose computer programs. For example, this can be done using Acronis True Image Home.
First, you will have to download and install the above program, latest version which is located, for example, at this link http://openprog.ru/acronis-true-image-home and install it on your computer. It's free. Once you have asked yourself the question, you should also take into account the fact that you will need some free space. For example, you can save it on one of your drives personal computer. Or create this image on
So, Acronis True Image Home is installed and running, how to create a disk image, what are the next steps for the PC user?
Step one: You need to enter the main menu of the installed and running program and select the “Backup” button in it, after which a menu will appear that includes other submenus. You should select - "Backup disks and partitions".
Step two: In the "Partitions to be archived" window that opens, you need to select a hard drive or partition. How to create an image of a disk or partition on which the OS is installed? In this case, it is recommended that you check the option for archiving in sector-by-sector mode, taking into account that you will need more free space. You will see the estimated size of the archive below in the same window. That's it, click "Next".
Step three: A new window has opened and now you should check “Create a new archive backup copies", if you need to create a new archive and copy a disk image into it. How to add it to an archive that was created earlier? In this case, you should check - "Add to an existing backup archive."
Using the "Browse" button here, you should select the folder in which the disk image archives created by the program in question will be stored.
Now, using the appropriate button, we create a name for the archive, select its format, and in order to save these and others suggested by the settings program, click the “OK” button.
Step five: After all the previously performed manipulations, you will see a newly opened window - “Summary data”. Here you need to check the name created archive disk image and its location. If the need arises or you desire, you can use the “Options” button to configure additional copying parameters or change previously set ones. The creation of the archive will begin after the PC user presses the “Proceed” button.
In fact, after reading the above information, any personal computer user and even a child who can read, type on a keyboard and “click” with a mouse will understand how to create a disk image and will be able to perform all the necessary operations practically.
After clicking the "Proceed" button, the disk image archive is actually created in automatic mode. At the end of the process, you will see a window informing you that the operation was successful, and in another window, after clicking “OK” you will see the corresponding information about the newly created image of a tough disk or one of its partitions.
Over time, fewer and fewer users use disks, and more and more laptop manufacturers deprive their devices of having a physical drive. But it is not at all necessary to part with your valuable collection of disks, because all you need to do is transfer it to your computer. Today we will take a closer look at how a disk image is created.
This article will discuss how you can create a disk image using the DAEMON Tools program. This tool has several versions, differing in cost and quantity. available opportunities, but specifically for our purpose, the most budget version will be sufficient software– DAEMON Tools Lite.
Steps to create a disk image
1. If you do not have the DAEMON Tools program, install it on your computer.
2. Insert the disk from which the image will be extracted into your computer's drive, and then launch the DAEMON Tools program.
3. In the left area of the program window, open the second tab « New look» . In the window that appears, click on the item "Create an image from disk" .

4. A new window will appear in which you will need to fill in the following parameters:
- In the column "Drive unit" select a drive that has this moment disk;
- In the column "Save as" you will need to specify the folder in which the image will be saved;
- In the column "Format" select one of the three available image formats (MDX, MDS, ISO). If you don't know which format to choose, check ISO, because... this is the most popular image format supported by most programs;
- If you want to protect your image with a password, then check the box next to the item "Protect" , and in the two lines below enter the new password twice.

5. When all the settings are set, you can begin the image creation process. To do this, you just have to click on the button "Start" .


