Is very popular. It is used for recording discs, creating bootable flash drives and other tasks related to optical discs. But, the main function of UltraISO is to create disk images. In this article we will talk about how to create a disk image in UltraISO and save it in various formats.
There are two ways to create a disk image in UltraISO:
- Method No. 1. from a real CD, in this case the source for the disk image is real existing disk, which needs to be inserted into the drive optical disks;
- Method No. 2. Create a disk image with separate files, in this case, a disk image is created from absolutely any files that are on your computer.
Method No. 1. Create a disk image in UltraISO from a real CD.
First, insert the CD into your optical drive and run UltraISO program. After that, open the “Tools” menu and select “Create CD image” or simply press the F8 key.
After this, a window will open in front of you to create disk images. In this window you need to select in which the CD is installed.

Specify the location to save the disk image and its name.

And also select the disk image format.

In the UltraISO program big choice available disk image formats. In addition to the classic, the user can choose formats such as compressed ISO, BIN/CUE, NRG, MDF/MDS, IMG/CCD/SUB.
If the disc has scratches or does not want to be read normally, you can check the box next to the “Ignore reading errors” function. But, in this case, the disk image may have damaged files.

\After all the settings have been set, you can click on the “Make” button. After clicking on the “Make” button, the process of creating a disk image in the UltraISO program will begin.

At the end of this process, the disk image will be in the folder you selected.
Method No. 1. Create a disk image in UltraISO from separate files.
In addition, the UltraISO program allows you to create a disk image almost from scratch, using separate files for this. Creating such a disk image is even easier than creating a disk image from a real CD. All you need to do is open the UltraISO program and add the necessary files to it.

Once the files are added you can rename the disk image. To do this you need to click right click mouse over the disk on the left side of the UltraISO program window.

Hello readers of the blog of the ComService company (Naberezhnye Chelny)!
In this article we will figure out how to create an ISO image from files and folders and how to make a bootable image. For example an operating system. You can read how to make an ISO image from a disk. Usually, I use Ashampoo Burning Studio FREE to create images, and UltraISO to write to a flash drive. In this article we will create bootable ISO images from files and folders from which you can install Windows using CDBurnerXP.
This article could have been called “How to edit ISO images.” Image editing programs cost money. In this article I will show you how you can keep this money for yourself.
Article structure
1. Download CDBurnerXP
Go to the site
https://cdburnerxp.se/ru/download
Click on the link " More download options»
In order not to install an additional program, download CDBurnerXP for .


Choose Data disk and click OK

At the top left, open the folder from the contents of which you want to create an ISO image. At the top right, select everything and drag it down with the mouse.
 You can also add files to the project by selecting them and clicking

Set the name of the ISO image, location and click Save

We are waiting for the image to be created

The ISO image has been created.
3. How to create a bootable ISO image
This is the part for which this article was written. For example, we need to edit the ISO image of Windows 7 or Windows 8. We downloaded the original image of Windows 7 Ultimate. Therefore, you can install Windows 7 Ultimate from it. To be able to choose others when installing Windows versions 7 (for example, Basic, Home Basic, Home Advanced, Professional and Ultimate) you need to delete the file in the image ei.cfg. You can do this as follows
Unpacking the image

We go into the unpacked archive into the folder sources and delete the file ei.cfg

Now from the unpacked folder we will create a bootable ISO image of Windows 7
We add files to the project in the same way as described in the second paragraph.
Expanding the menu Disk and choose Boot options...

Check the box Make the disk bootable and click to set the path to the boot image

In the folder with the unpacked image, go to the directory boot. From the drop-down menu at the bottom right, select All files. Choose etfsboot.com and click Open

In chapter Emulation type choose No emulation
In chapter Sectors put 8 (Value depends on size etfsboot.com. If the size is 4 KB, set it to 8, since the size of one sector is 512 Bytes or 0.5 KB (4/0.5=8). If the file size etfsboot.com 2 KB - set 4) (Thanks for this valuable information oszone.net). In Windows 7 and Windows 8.1 images, the etfsboot.com file has a size of 4 KB - set it to 8.
In chapter Platform chose x86-32 since I have a 32-bit Windows 7 image
Click OK
 .
.
Conclusion
In this article, we figured out how to create an ISO image from files, folders and make it bootable if necessary. In general, we now know how to edit Windows ISO images. You can delete everything you don’t like (for example, a file ei.cfg) and add what you need (program distributions, portable programs, drivers, etc.). In the video below I will show whether it works with Windows images 8.1.
Welcome to my blog!
After reading this article, you will learn how to create an image of an ISO file or CD using different programs. In total, I decided to give an example of working with eight free programs, which can create an ISO archive, both a regular file or directory, and a CD, so that you can choose the most optimal ones for yourself and work with them.
An ISO image is an image of a file or program that supports a system ISO standard 9660 and has a *.iso extension. This is a kind of archive, the contents of which can be viewed by any archiver or file manager that supports this feature, such as Total Commander.
How can I use an ISO disk image? There are several applications for using such images.
For example, you can create an ISO archive of your favorite game and mount it on a virtual disk, and then use it instead of the real one CD-ROM drive.
Such an archive can be posted online for downloading, and the person who downloads it can burn it onto a CD.
The ISO archive can also be used to install operating systems on virtual machine, for example VirtualBox, which is very convenient when working with it.
It is also convenient to store such archives on CDs if you burn several distributions onto one disk and, if necessary, take only the one you need.
There are many uses for ISO files and every computer user will find a use for them.
Check out the programs below and choose the ones you like. The list of programs is large; for ease of navigation, use the menu. All programs work perfectly in Windows 7 64bit, but if there are any problems with the installation, then run them in compatibility mode with Windows XP.
Cyberlink Power2Go program.
The program of Taiwanese developers Cyberlink Power2Go is designed for recording and copying discs various formats. This program is distributed free of charge, which makes it very popular among computer users.
You can download the Cyberlink Power2Go program from the link:
http://www.cyberlink.com/downloads/trials/power2go-platinum/download_en_US.html?affid=2581_1163_729_37307_0_ENU
Using Cyberlink Power2Go, you can quickly create an ISO disk image.
By default, when the program starts, a window appears asking you to select various actions when working with the program, which is very convenient, since you can immediately launch desired mode in a programme. If desired, this window can be disabled and operated using the application menu.
To save a disk image in this program, select “ “ Utilities for working with disks”, and in the right window “Save disk image”.
If you have disabled this window, you can create a disk archive using the commands in the main program window.

To do this, open the menu in the top line “Burn to disk” and select “Save disk image”.

In the next window, you will need to select the CD-ROM drive, if you have several of them, change the reading speed if you need it, and by clicking on the “Browse” button, select the path where you want to save the disk image.

When choosing a location to save the image, in the “File name” line, you will need to indicate its file, any one, you can come up with your own and in the “File type” section, indicate the extension in which you want to save the archive. The extension “*.p2i” is the format of the program itself, we need to select the extension “*.iso”.
Then click the “Save” button to begin saving the disk image.

A window will appear showing the progress of this operation, after the successful completion of which you will see another window where it will be reported that the operation was completed successfully.
Ashampoo Burning Studio 16 program.
The German developer program Ashampoo Burning Studio 16 allows you to create an ISO image not only from a disk, but also from a file or directory, which is often necessary.
The program is distributed both on a paid basis and on a free basis; you can create an image archive in both versions of the programs, I mean that in paid version, during the test period you can also create it without purchasing the program.
I recommend using first free version this program, perhaps its functions will be enough for your purposes.
You can download the Ashampoo Burning Studio program from the link:
https://www.ashampoo.com/ru/rub/fdl
How to create an ISO image from a disk

To create a disk archive image, launch Ashampoo Burning Studio 16 and select from the menu on the left side:
Disk image – Create image

In the next window, make sure that your drive is ready for use and follow the prompts, click on the “Next” button.

Now in the line: “Disk image path” you can specify its storage location or to select this location, click on the “Browse” button on the right. And in the “Image file format” line, you need to specify the ISO format, then click the “Next” button to save your image to your hard drive.
How to create an ISO image from a file

To create an archive image from a file or directory, open the same menu and follow the path:
Disk image – Create an image from files

Then select one of the options for creating an image, “Data disk” or “Data disk with advanced settings”, the only difference here is that the settings window opens immediately, but you can open it later if you wish.

Now you will need to add the files that need to be added to the archive to the program window, for which click on the “Add” button or simply drag the files you need into this window, “hooking” them with the mouse. Then click “Next”.

In the next window you will need to specify the storage location of the image file, its name and extension, as in the case of saving an image from disk. Click the “Save Image” button to save it to your hard drive in ISO format.
CD Burner XP program.
The CD Burner XP program from Canneverbe Limited is distributed free of charge and its main task is to burn any data onto CD/DVD format discs. As for working with ISO files, using this program you can burn an ISO file, create an image of this format, convert bin and nrg files into ISO format.
An archive image can be recorded as a disk, a directory or any file.
https://cdburnerxp.se/
For the program to work properly, the .NET Framework 2.0 package must be installed on your computer, which can be downloaded from the links on the program website.
https://cdburnerxp.se/help/Appendices/install-without-dotnet

To create a disk image, open the program and select “Copy disk”, then open it by clicking “OK” or double click mouse over it.

In the next window you need to specify the recording source if you have several drives, and in the “Receiver” section you need to select “Hard Disk”, specify the file name and its type. Then click the “Copy disc” button.

After this, a window will appear where the progress of the task will be displayed with a countdown.

After the disk has been copied successfully, you will see a message about this.

To create an image archive in CD Burner XP from a file or directory, double-click the “Data Disc” item.

In a new window you will see a hint on what to do. Select in the upper part of the program window those files whose image you need and, “hooking” them with the mouse, drag them to the lower part of the program window.
Or click the “Add” button and specify the files you need in the window that appears.


Then indicate the location where your image and its name will be recorded and by clicking the “Save” button, save the image of your files.
BurnAware Free program.
The BurnAware Free program is distributed freely and is designed for burning discs of various formats, including creating ISO images of files, and you can create both a disk image and an image of a directory or file.
You can download the BurnAware Free program from the link:
http://www.burnaware.com/download.html
How to create an ISO image from a disk.

To create an ISO disk archive using this program, launch it and in the “Project” tab, click on the “Copy to image” icon.

In the next window, select the drive, if you have several of them, you can change the disk reading speed if desired, and in the “Destination” section, indicate the storage location of the archive, its name and file extensions. Then click the “Copy” button.
How to create an ISO image from a file.
Creating an ISO archive from a file in BurnAware Free is as easy as creating a disk archive.

Launch the program and in the “Project” tab, click on the “Create ISO” icon.

In the next window, select the ISO-9660 file system and click “OK”.

Now click on the “Add files” button and indicate to the program those files whose archive you need to create or simply drag them into this window by “hooking” with the mouse.

Then click on the “Create” button and after a while an ISO archive of your files will be created.
ISODisk program.
The main task of the ISODisk program is to create a disk image and connect virtual drives to the system. In this article we will look at creating an ISO file using this program.
http://www.isodisk.com/
Creating a disk image using this program is too simple, since the program has practically no settings.

To create a disk image, run the ISODisk program and go to the tab:
Create ISO Image from CD-ROM
Specify the drive you need and click on the floppy disk icon.

In the next window you will need to specify the storage location of the image, its name and file type, then click on the “Save” button.

The process of creating a disk image will begin, filling the bars with blue. True, there is no countdown of the time it takes to create it, everything happens blindly, you just have to wait.
Once the image is created, you will see a message about it.
ImgBurn program.
The ImgBurn program is distributed free of charge, so you can use it completely without any restrictions. With its help, you can create an archive of an image, both a disk and a file or folder.
http://www.imgburn.com/
How to create an ISO image from a CD.

To create a disk image archive, run the program and click on the icon:
Create images file from disc

In the next window, in the “Destination” section, click on the folder icon to change the location where the image is saved, its name and file type. If desired, you can change the disk reading speed.
To save an archive image, click on the disk icon at the bottom of the window.

In the next window you will see information about the progress of creating the archive and upon completion, you will see a message about this.
How to create an ISO image from a file.

To create an archive image from a file or folder, run the program and click on the icon:
Create images file from files/folders

In the next window, in the “Sourse” section, you need to click on the folder icon and select the source for creating an image archive. You can also add files by simply dragging them with the mouse into the program window. Please note that you can add multiple files or directories.
In the “Destination” section, by clicking on the folder icon, you need to indicate the location where the archive will be saved, its name and extension.
Then click on the disk folder icon at the bottom of the window to start the image saving procedure.

After which several more windows will appear with additional questions, which depend, for example, on how many files you have selected. How to answer them, decide for yourself, it all depends on your desires.
After saving the image, you will also see a message about this, as in the case of creating an image from a disk.
A disk image is an ISO file that stores all the contents of the original media. There are other formats, but this is the most popular.
The computer recognizes the virtual image in the same way as a physical disk. Even if related files were stored on the original media, they will work correctly as an image. Therefore, most often they create disk images with installation files games, programs and operating systems.
Modern operating systems read ISO files without additional programs. On older operating systems, you can use utilities like Daemon Tools for this. You can also open the image and view its contents using a regular archiver.
Why create disk images?
Let's say you bought a DVD/Blu-ray with a game or movie. Over time, scratches appear on it, which is why you can lose the recorded information. And the disk itself is easy to lose. In addition, it makes noise as it rotates in the drive, and the speed of reading data from it is lower than from computer memory. All these problems can be solved by creating a virtual disk image.
If the disk is copy protected, most likely it will not be possible to create an image of it.
Another example: you have a Windows distribution disk. It can be used for or OS, but a flash drive is much better suited for these purposes. Moreover, many modern computers They don't have disk drives at all. But you can create a disk image and make a .
How to create a disk image in Windows
Ashampoo Burning Studio FREE is one of the most convenient utilities for creating disk images. Its interface has been translated into Russian, it takes up little space and is also free. During installation, the program asks license key, but you can receive it by email after quickly registering an account.
Immediately after launching the utility, select “Disk Image” → “Create Image”. Then insert a physical disk into the drive and wait until the program recognizes it, then click “Next”. Then specify the folder in which the image will be created and select the ISO format. Click “Next” again and wait for the copying to complete.


The disk image will appear in the location you specified in your computer's memory.
If for some reason you are not satisfied with this utility, you can use similar free programs like BurnAware Free or CDBurnerXP.
On a Mac, this can be done in the standard Disk Utility, available in Finder → Programs → Utilities. Once you have launched it, insert required disk into the drive and press in top menu"File" → " New look→ “Image from [name of your drive].”

In the next window, enter the short name of the future image in Latin. Specify the desktop as the destination and select the “DVD/CD Master” format. After that, click “Save” and wait until the copying is completed.
The created image will appear on the desktop and will have a CDR extension. If you plan to use it only on , then you can leave this format. But for Windows computers to read it, you need to convert the CDR file to ISO.
To change the image format, run the Terminal utility. Type cd desktop and press Enter. Then enter the second command hdiutil makehybrid -iso -joliet -o [name 1].iso [name 2].cdr , after replacing [name 1] and [name 2] with the names of the future ISO file and the already created CDR file, respectively. Then press Enter again - after a while the ISO image will appear on the desktop.
Let's say we first created a CDR file called olddisk. Then we choose for the future ISO image, for example, the name newdisk. As a result, the commands for our case will look like this:

Creating a system imageWindows 7. You can’t imagine how many times this image has helped me out during serious system crashes and various troubles, and how much time it has saved me. Hope you can apply successfully this information on practice.
Note: Friends, this article was written two years ago, read our more complete article on this topic - by using standard means archiving on DVDs, or on a portable USB hard drive and how to recover from these images, you will also learn how to connect a disk drive to your laptop or netbook SATA interface, IDE or old HDD and store your backups on it.We also have an article - or another hard drive using the tools built into the operating system.
Creating a system image
Sometimes, due to our own erroneous actions on the computer or a virus attack, it is not possible to download Windows 7 by any means. Or it will be possible to load the operating system, but working in it can be simply unbearable, due to serious problems and malfunctions, and if you imagine that there is not one computer, but ten. There are also many friends who, unfortunately, also have computers and in the evenings you have to solve their problems, such a life would truly seem like a nightmare if such a tool as Creating a system image.
This image may be useful if none of the remedies did not help you, and therefore all our previous articles did not either. First I will describe how create a system image Windows 7 using the Computer Data Backup tool, then we will restore our Windows 7 from the image. Below are examples of how to restore individual files of your data from an image.
- It is important to know that when Windows recovery 7 from the system image, all information from the partition hard drive, to which you deploy the image, will be deleted and replaced with the contents of the image. By the way this operation can be done using the program.
Creating a system image
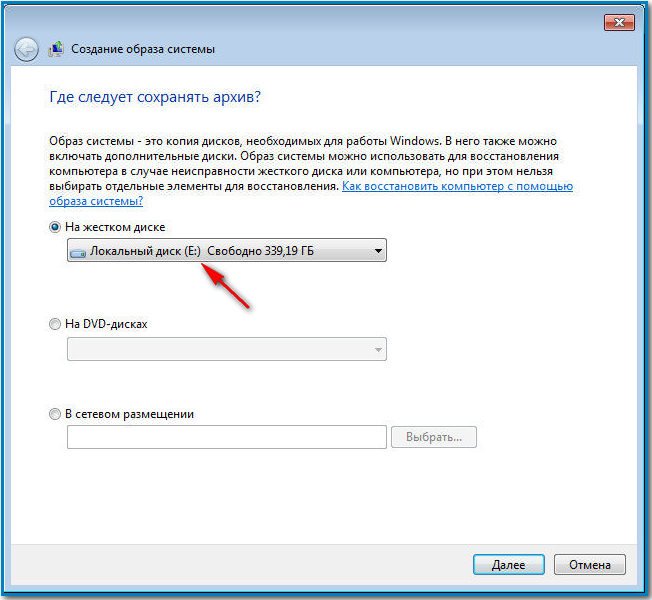
Start->Control Panel->Backup computer data->Create a system image.
In the dialog box that appears in front of us - Where should the archive be saved? The operating system will give us a hint, for example, in my case, Windows 7 chose Local disk(E:), with a capacity of 339.19 GB, located on the second hard drive (I have two hard drives), one contains the system itself, and the second contains Windows 7 system images made using our Computer Data Backup tool. If you have one hard drive, then the system image needs to be created on a free partition.
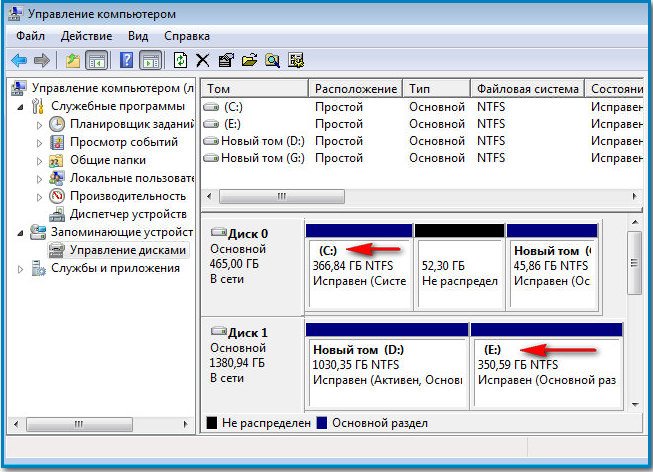
Just in case, I am attaching a screenshot of the Disk Management window on my computer.
Important Note: The ideal option for storing system images is a portable USB hard drive or a specially purchased SATA hard drive. If you choose DVD discs, you will need a lot of them; this option, in my opinion, is the most inconvenient; you can also store images online, but this method deserves a separate article. You also need to know that, unlike the archives of our data, the system image can only be saved on a disk with file system NTFS.
Which partitions of your hard drive should be included in the backup? By default, the Local disk with the operating system will always be selected. Windows system 7, in our case (C:). You can additionally choose to include in the system image any disk with your personal data or all disks, this means that the System Image you create will contain all the information stored on your computer, as long as there is enough space on the media where you are creating the image. Click next.

We confirm the archiving parameters, we see a warning that to create a system image in my case you will need 9.42 GB, your requested space may be more. Click Archive, the process of creating a System Image will begin, which may immediately result in an error if we do not have enough space to store the image.


At the end of the process, you are prompted to create


